3D projects

PETAL PARADE GIFT BAG!

I wanted to show you a little gift bag I have been making at my workshops this month. They are so easy to make and gotta love the Sweet Sorbet DSP!!!

P1110388

You can make these too.  Just head to Ronda’s blog here and and she will show you how.

To create the label on the front I have stamped Whisper White cardstock firstly with the greeting from ‘Simply Sketched’ and then stamped randomly in Pool Party, Crisp Canteloupe and Summer Starfruit using Petal Parade. You make the enclosure with the Scallop Tag Topper Punch and I have tied it off with Crisp Canteloupe Ruffled Ribbon.

I hope all is well where you are???  Have a good day 🙂

Jenny

Uncategorized

HIP, HIP, HOORAY BANNER BLAST!

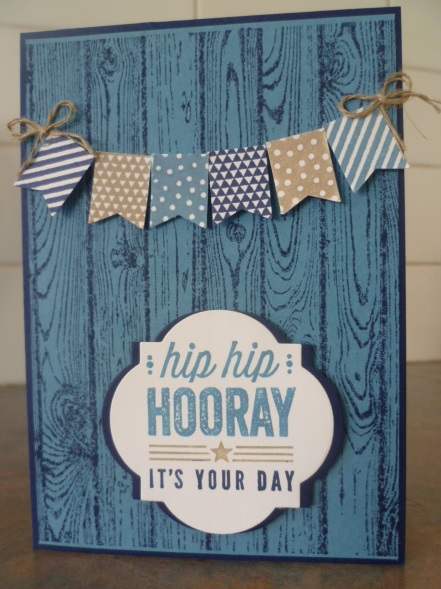
I love the stamp set you get with the ‘Hip, Hip, Hooray’ card kit.  This is awesome value at $34.95 which includes the cards, envelopes, stamps, inkspot and embellishments enough to make 20 cards.  You can see all the details in this post here.  Here is a card I made with the stamp set and using the set ‘Banner Blast’ that you can get for Free as one of your Sale-A-Bration choices.  This also uses the ‘Hardwood’ stamp from the Occasions Catalogue.  The card was inspired by a card I saw on Pinterest.

P1110485

This is one of the cards we will be making at my card classes on Friday.  I still have some places left if you want to join me and you are in the area. I would love to see you at 10am or 7.30pm.  Cost is $15 but you need to let me know ASAP so you don’t miss out.

Have a happy day 🙂

Jenny

Stamp Spectacular

STAMP SPECTACULAR IS COMING!!

My Project 41-001

I am excited to announce my first Online Stamp class.  It will be lots of fun.  Each day of the week we will have a new project, stamping technique or product information and you can make them in the comfort of your own home  AND since it is my first one – it is FREE!!!  Come and join me.

To sign up click on the link HERE or click on the box in the right hand column that says ‘SIGN UP NOW’.  You can nominate just to receive the emails for the Stamp Spectacular or to get my regular newsletters and Stamp Spectacular projects. I can’t wait to share these projects with you.

See you then,

Jenny 

cards

SCALLOP TAG TOPPER TRI-FOLD CARD!

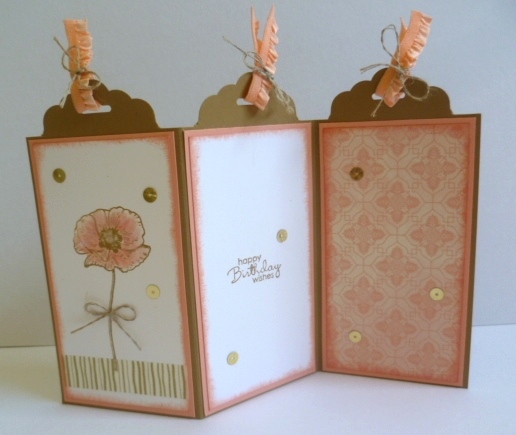
When I first got my Tag Topper Punch I thought it would look cool to make a fold out card with it.  I had seen a couple around my blog travels but wasn’t sure how to go about it.  Well I made one AND I have put together a tutorial just for you so you can make one yourself.

P1110458

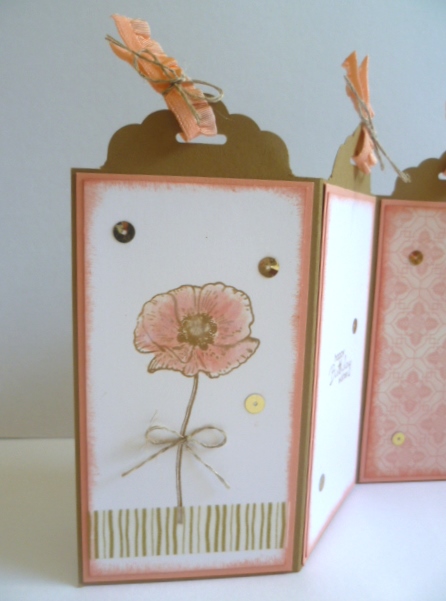
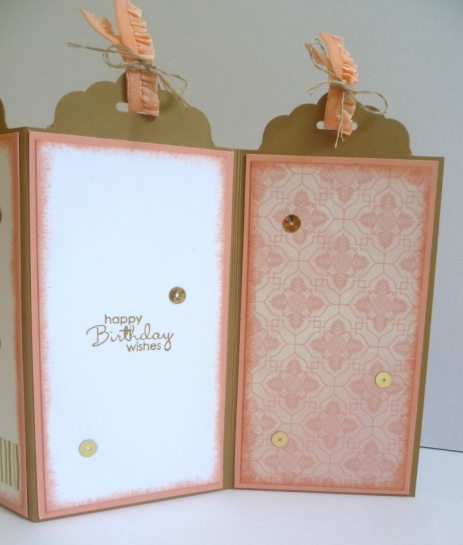
Here is some close-ups.

P1110459

P1110460

Now on to the Tutorial.

SCALLOP TAG TOPPER PUNCH TRI-FOLD CARD!

1. Cut your base card to 14.8cm x 21cm. (I used Baked Brown Sugar). On the 21cm side score the card at 7cm and 14cm.

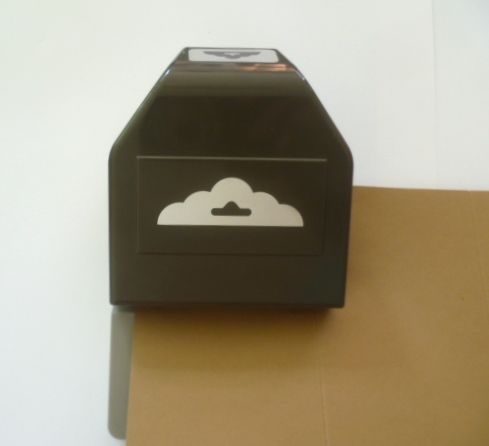
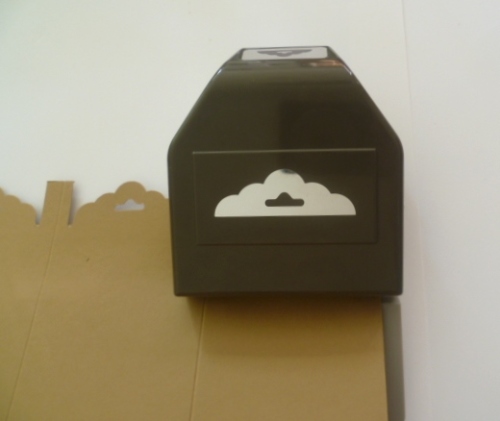
2. Slide the edge of your card (long side) in to your Tag Topper Punch. It takes a little wiggling but you can get the card in and line it up in the first scored section in to the punch.  You can roughly line the card up between the rectangle shape on the top of the punch where the image of the punch is on.  See the photo.

P1110477

Punch the card.  Then move it along to the next scored section.  Line it up and then punch again. Repeat for the last section again.

P1110479

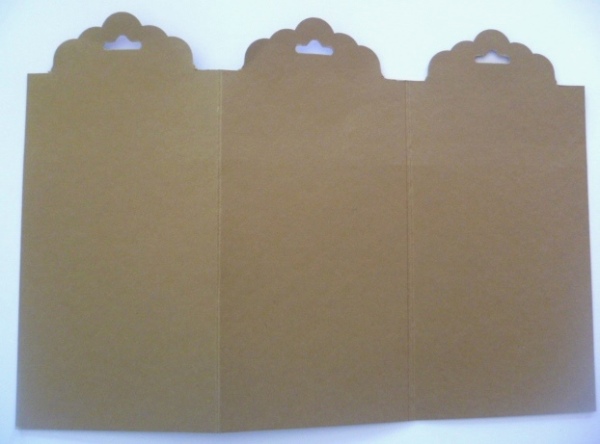
Trim off the excess tabs to level them off.

P1110442

NOTE: The card does get a little bent when you punch it out but just press over it and when you add the card to the front you don’t notice it.

3. Cut your card mat pieces and whisper white and DSP (designer series paper).

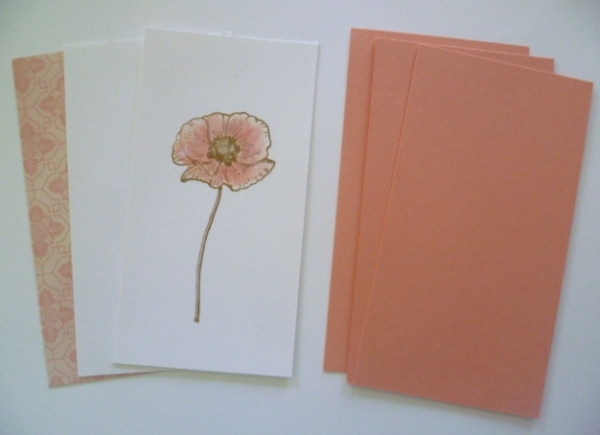
Card mats (I used Crisp Canteloupe)  measures 6.6cm x 12.2cm  (3 in total).

Whisper White (x2) and DSP piece(x1) 6.2cm x 11.8cm.  The DSP is from Venetian Romance.

P1110441

I stamped one of the Whisper White pieces with the flower from ‘Happy Watercolor’ in Baked Brown Sugar and coloured it with the Aquapainter and inkpad.

To finish the card off I sponged the white card pieces and the DSP with Crisp Canteloupe ink and adhered them to the card. I added some Gold Washi Tape and also  some gold sequins over the card (still not sure about these???). Then I tied some Crisp Canteloupe Ruffled ribbon through the holes and tied them off with Linen Thread.

Here it is again – the finished off card.

P1110458

Do you like it????? Why not go and make one for yourself.

Thanks for taking the time to visit me in your day.  I do appreciate it as I know your time is precious.  I hope you are inspired.

See you next time.

Jenny x

cards

BLAST OFF – CARD IN A BOX!

Have you seen the ‘Card in a Box’ floating around the internet??? I had to make one.  I did share this on my Facebook page last week because I was so excited to show someone but I thought now I would show you.  If you don’t want to miss seeing some of my creations make sure you have ‘LIKED’ me on Facebook.  My link is on the right hand side.

Anyway, back to the card.  The other reason I was so excited about it was that it was the first time I had used the set ‘Blast Off’.  I love this cute set.  I can’t wait to use it again soon.

P1110372

Wouldn’t any young boy love this for the Birthday??? I used the ‘Watercolor Wonder’ DSP for this. Who would have thought it would be so cool for it. If you want to make one of these then check Tanya’s blog out here.  She has the video there.  Tanya has the measurements to make these to the Australian standard size envelopes which is great.  This box is just the easiest.  You have to make one yourself.  I have to say decorating the box takes longer than making the actual box.  They are so fun though.

The “box” will fold flat so you can put it in an envelope and it is still fine to post.  Check it out here.  Isn’t it just the cleverest!  I can’t wait to make another one soon.

P1110373

I have to show you this photo too.  We are getting our bathroom redone at the moment.  My craft room is opposite the bathroom so I thought I would evacuate for a while.  Just as well I did.  The whole top floor of our house is covered in dust from the jack-hammering of the cement.  I had closed the door to my craft room but somehow those tiny specks of dust makes their way through the smallest little cavities.  I moved out to my studio which is out the back of our house.  I just hold my classes here but now I have set up here I think I will stay for a bit.  It’s getting a bit messy already. I am starting to create for an exciting event coming up soon.  That’s a shame you can’t see anything yet!! 🙂

P1110415

Hope your week is going along OK??? Hope you are getting some time for yourself to create.

Happy Stamping,

Jenny x

Uncategorized

HIP, HIP, HOORAY – IT’S A CARD KIT!!

Stampin’ Up! have released a new card kit which I think you will love.  I can’t wait to get my kit.  This is the ‘Hip, Hip, Hooray’ kit.  This comes with your card, envelopes and embellishments to make 20 cards PLUS a Basic Gray Stampin’ Spot (mini ink pad) Plus a great stamp set (available in clear mount only).  It also includes instructions to make up the 20 cards but you can create them how you like.  Then when you are done you have the cute stamp set and Stampin’ Spot to make lots more cards.  All this for only $34.95.

Here they are in detail.

This is what you will get in your ‘Hip, Hip, Hooray’ Kit.

HipHipInt

Check out the cool stamps in the kit.

hip hip hooray stamps

And look at all you can make.

Hip Hip cards _1

Hip Hip Cards _2

So message me to order your kit or you can shop online at my store right now here.  Don’t forget when your order reaches $90 then pick your free Sale-A-Bration gift.

cards, Masculine

GORGEOUS GRUNGE THANK YOU!

I made a special Thank You card on the weekend.  My husband had a really bad Mountain Bike accident 2 weeks ago.  Fortunately there were no broken bones but a few other injuries and stitches.  This Thank You card is for his mate who he was riding with.  I am so thankful for all he did on the day and continually does for us.  I added a Gift Card with the card but this “Thank You” doesn’t seem enough.

P1110367

The card had to be manly and I was careful with the colour choices.  No red was to be seen!!  I used Gorgeous Grunge and Chalk Talk.  It was finished off with a ‘Hung Up Cute Clip’ (p 170 of the Annual Catalogue).

The last couple of weeks have been crazy.  I have just now managed to get to my stamp room again to create. It is such a good feeling to escape and stamp!!!

See you again soon,

Jenny

cards

GOLD IS IN!!

Gold is the new HOT colour at the moment.  It is very in vogue.  Did you know that???  We have lots of lovely gold products in the Occasions Catalogue.  I played around with the new Gold Fancy Foil Vellum a couple of weeks ago.  It is available in silver too.  There are 9 sheets per pack (12″x12″ size sheets).  There are 3 each of 3 different designs.  They are just beautiful to use on their own or as a little addition to a card or project.  One of the projects I made was this cute little bag.

P1110208

It is always hard to tell the size by a photo.  So check it out against an Embossing Powder pot.  Isn’t it just the cutest???

P1110209

They are the easiest little bags and can be made up in no time. I have tied the bag off with some of the gold cord that comes with the ‘Good as Gold’ card kit from Sale-A-Bration.

These would make nice little wedding or party favours.  If you would like to make this bag you can get the instructions from Sam’s blog here.

Thanks for stopping by. Now go and get your gold on!!

Jenny


cards

ANOTHER GREAT YEAR!

I made a card a few weeks ago to get ready for my Card Buffet.  I wasn’t happy with the finished card but with the encouragement of my lovely blog friend Patti, I touched it up a bit.  Here is the stepped-up version for you Patti. 🙂

P1110328

I stamped the swirly Happy Birthday from ‘Another Great Year’ onto Whisper White card and adhered it to a Whisper White card base.  I also stamped this onto Tempting Turquoise card and cut the banners off and adhered them over the banners on the white card.  It was a simple white on white card. I have seen a few stampers create white on white cards and they always look so classy and crisp.  I love the look but can never get it to work right.  It looked a bit plain.  What to do??? If I ripped it apart and mount it on a coloured card base  it was only going to get all scrunched up.  So I stamped the little Macarons from the stamp set.  I coloured the centres of them with the Markers and then used the aquapainter to spread the ink out.  This was a really risky move.  If I stuff up the stamping or colouring, then whole card is ruined.  But, what did I really have to lose!!!  I added a few Adhesive Rhinestones for dazzle.  I was pleased with the end result.  What do you think???

I love this set ‘Another Great Year’.  It is such a bargain at $41.95 Woodmount or $33.95 Clear mount. I think you need this set in your collection. You can buy this directly at my Online store here or contact me to purchase it.

Thanks for stopping by,

Jenny

3D projects, Blog Hops, cards

ESAD OCCASIONS BLOG HOP

ESAD blog hop Occasions

Have you checked out the Occasions Catalogue yet??? There are some fantastic products in there! Today you can join in on a Blog Hop and check out the fantastic projects that some Demonstrators have been creating. This Blog Hop you are joining in with today is the ESAD Demonstrator group. Hopefully the projects will inspire you!!!

Firstly though, What is ESAD?

ESAD –

stands for “Extra Special Australasian Demonstrators” and it is an on-line group just for Australian and New Zealand Stampin’ Up! Demonstrators.

We love what we do & love to share with our customers, friends, and wonderful blog visitors. We also share what we love in our ESAD Demonstrator community, through swaps, challenges, sharing knowledge, ideas & friendship, and we’re always there to help and support each other.

So, if you are a Stampin’ Up! demonstrator located in Australia or New Zealand then please feel free to leave me a comment with your email address then I’ll contact you with information on how to join our group.

Now onto the Blog Hop.  You may have come from Angela’s blog or starting here.  Either way, Grab your coffee and settle in for the ride.

Today I have chosen to use the ‘Petite Petals’ Bundle.  This is a cute little stamp set AND matching punch. You can see these on page 33 of the Occasions Catalogue. Not only is it a cute set but it co-ordinates so well with many other stamps and accessories you probably have already. I have shown you some projects here and here already with this set but I have created some other projects just for you today.

Firstly – a card.

P1110342

I have layered some of the gorgeous Watercolor Wonder DSP behind the lattice Diecut. One of the flowers from Petite Petals were stamped 5 times in Tangerine Tango and punched out with the matching petal punch. No cutting out these little flowers!! I added some Gumball Green leaves punched with the 2 way Bird punch and a little Dazzling Diamonds to the centre of the flowers for some dazzle.  The greeting is from Label Love and punched with the Label Punch.  A second label was punched in Island Indigo and cut and layered behind the label.  I tied some Linen Thread around the card too. Now this card turned out differently to what I had planned. I think it is kind of tropical though, don’t you???

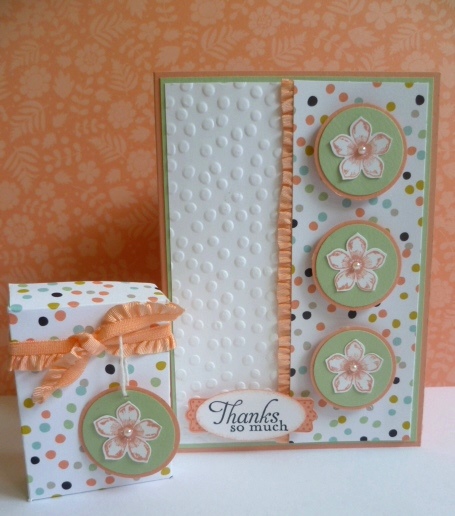
I have another project for you too.  This is a cute little gift box and matching card.
P1110348

For these projects I have used the paper from the free Sale-A-Bration ‘Sweet Sorbet’ DSP.  The instructions for this cute little box can be found on Sam’s blog here.  Now if you scroll down in that post you will see the measurements.  I followed the metric measurements.  I didn’t bother trimming off the 4 or 5 mm that Sam suggested.  It is not really necessary.  It is just the cutest box and way easy, so go and make yourself some!  The circles layered with the flowers are punched out with the 1 1/4″ circle and 1 3/8″ circle.  The greeting is from ‘Simply Sketched’ and I just finished the card and box off with some Crisp Canteloupe ruffled ribbon and some pearls.

Now you can head to your next stop.  Go and see the wonderful creations that Libby has in store for you here.