cards

TANGERINE HAPPY WATERCOLOR

I made this card a few weeks ago and forgot to show you.  This is using the stamp set ‘Happy Watercolor’.  The card was CASED from Pinterest from Allison’s blog here.

P1110378


I stamped the “splodges” from the set in Coastal Cabana onto Whisper White and then stamped the flower and the dots in Soft Suede.  The greeting is from ‘Simply Sketched’.  I stamped the flower again on scrap white card. I coloured the flower using Tangerine Tango and Daffodil Delight ink using an aquapainter and inkpads.  Just squeeze the ink pad a couple of times when it is closed then you can pick up the ink from the pool of ink on the lid. I cut the flower out and adhered this over the flower on the White stamped card after I had adhered this to the Tangerine Tango base card. To finish this off I adhered a few gold sequins randomly over the card.

Thanks for stopping by today.  Have a happy day 🙂

Jenny

cards

OMBRE ZIG ZAGS!

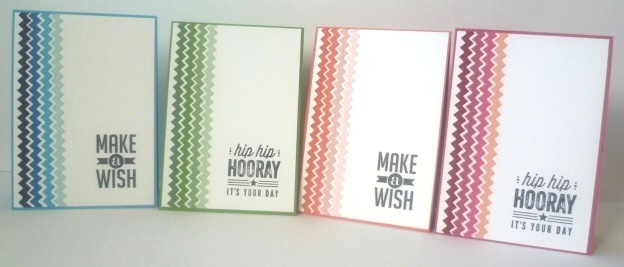
I saw a card on Pinterest that I really liked the look of so I thought I would recreate it.  I thought that I would go with the Ombre look (ie a graduation in colour tone).  I have used the Tasteful Trim Bigz XL Die to create the zig zags.  I did one – AND why not create 4 different ones. (Apologies for the bad lighting.  It has been overcast lately).

P1110857

The sentiments are from ‘Perfect Pennants’ and ‘Hip, Hip, Hooray’ stamp sets.

I will show you them individually.

P1110859

Colours are Night of Navy, Pacific Point, Tempting Turquoise and Sky Blue.  Base card is Tempting Turquoise.

P1110862

Colours are Garden Green, Gumball Green, Wild Wasabi and Pistachio Pudding.  Card Base is Gumball Green.

P1110864

Colours are Tangerine Tango, Pumpkin Pie, Blushing Bride and Pink Pirouette.  Card Base is Pumpkin Pie.

P1110866

Colours are Cherry Cobbler, Rose Red, Melon Mambo and Crisp Canteloupe.  Card Base is Rose Red.

The Ombre effect is quite “in” at the moment.  Why not go and make an ‘Ombre’ card yourself.

Thanks for visiting.  Stop by again very soon,

Jenny

cards

FAREWELL SALE-A-BRATION 2014!

Last day of Sale-A-Bration! I can’t believe how fast these last 2 months have flown by.  I am a bit sad that Sale-A-Bration is over for another year.  I have really loved playing with these products.  Here is a quick card today to say Farewell to Sale-A-Bration – and to ‘Petal Parade’.  When I first saw this set the brochure I really wasn’t sure of it BUT I REALLY LOVE IT!!!  I am a bit sad to finish with this set.  I hope you have your set of ‘Petal Parade’ already or any of the other Sale-A-Bration products.

This card I shared in my ‘Stamp Spectacular’ Event the other week but I thought I would show you today as we say Farewell to Sale-A-Bration.

P1110545


I love how you can multi-stamp the images and create your own Background paper or you can use the images on their own.  For this I have used Crisp Canteloupe, Summer Starfruit, Pistachio Pudding and Coastal Cabana.  The sentiment is from ‘Remembering Your Birthday’.  I have used the Scallop Tag Topper Punch and layered the sentiment.  The Whisper White card was 3.5cm wide (I think) and the Summer Starfruit was 4cm. (Something like that).  Place the card in the punch and look through the window underneath to line it up evenly.

So, today is the last day.  Email or phone me with your order.  You can choose one Sale-A-Bration gift with every $90 order  OR head to my store here and place your order.

OK, I have to run.  Have a Happy Day 🙂

Jenny

cards, Classes

WISTERIA PETAL PARADE!

ONE WEEK LEFT OF SALE-A-BRATION!!!!!  

These last couple of months have just flown by.  I feel Sale-A-Bration has only just begun.  If you feel like me and think you have got plenty of time to get your Sale-A-Bration freebies then THINK AGAIN!!! These products won’t be available again (which is very sad BTW!)  If you haven’t checked out the Sale-A-Bration brochure yet then click on the link in the right hand column.  If you’re local why not come to my ‘Celebrate Sale-A-Bration’ Event.  Here are the details.

‘CELEBRATE SALE-A-BRATION’

Come and join us to celebrate.  We will make 2 cards, have fun have a cuppa and there will be giveaways.
This is one of your final chances to get your Sale-A-Bration order in.
WHEN: Saturday 29th March, 2pm.
COST: $10 or free with minimum $35 order.
BYO: Adhesives and scissors.
RSVP: Thursday 27th.
So if you are in the Wollongong area.  Why not join us.  I Look forward to seeing lots of you there.
Here is one of the cards we might be making.  I thought it would be good to pull out the Wisteria Wonder for a change.
P1110722
Thanks for stopping by.  Hope you are having a good day 🙂
cards, Challenges

FRESHLY MADE ‘PETAL PARADE’

It has been such a long time since I have done a challenge.  That is one thing I want to do more of this year.  So this week I have made a card for the ‘Freshly Made’ Sketch Challenge.  Here is the sketch and you can check all the details on their site here.

FMS Final 128-001

This is the card I have created for it.

P1110658

I wanted to use the arrows from the set ‘Petal Parade’ as there is only just over one week left of Sale-A-Bration for me to use this set.  I was inspired by a card I saw on Pinterest.

The arrows were stamped in Tangerine Tango, Tempting Turquoise, Daffodil Delight and Rich Razzleberry.  One bonus of using clear stamps is you can see where you are stamping them to line them up.  It doesn’t matter if you go a bit of course!!  I mounted this piece on a piece of Tangerine Tango and wrapped around some Whisper White Bakers Twine.  Then this was layered on to a Smoky Slate card base.

I wanted to play around with the ‘Just Sayin’ set too.  I stamped and cut the “Hey There” with the Word Bubble Framelits.  I wanted a “Happy Birthday” saying though.  So, I used a Black Marker to colour one of the other Framelits and then used the Marker to colour part of the greeting from a stamp in ‘Remembering Your Birthday’ set.  I could carefully stamp inside the bubble.  I then cut it out using the Framelit.  I was quite pleased with the end result.  These were raised up off the card with Dimensionals.

I think this is quite a versatile sketch to work with so why not have a play yourself.

See you next time,

Jenny

cards

SCALLOP TAG TOPPER TRI-FOLD CARD!

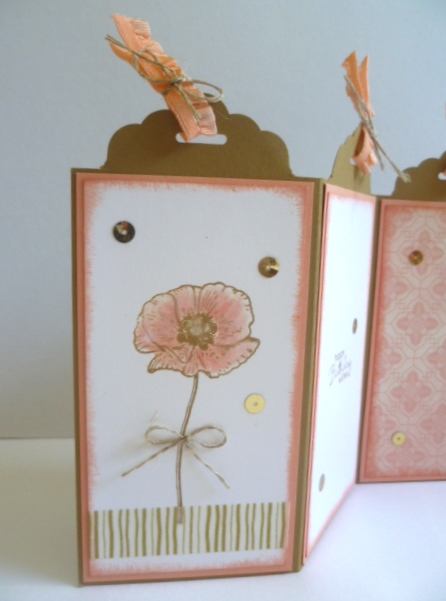
When I first got my Tag Topper Punch I thought it would look cool to make a fold out card with it.  I had seen a couple around my blog travels but wasn’t sure how to go about it.  Well I made one AND I have put together a tutorial just for you so you can make one yourself.
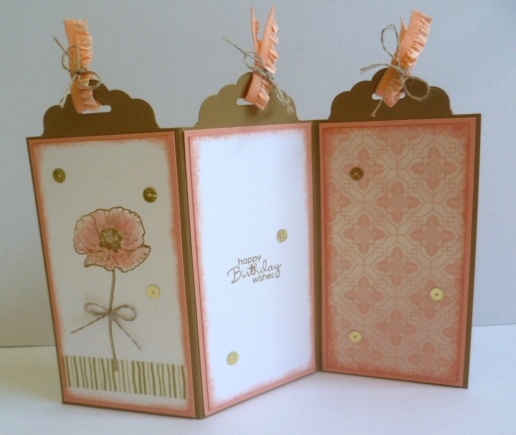
P1110458

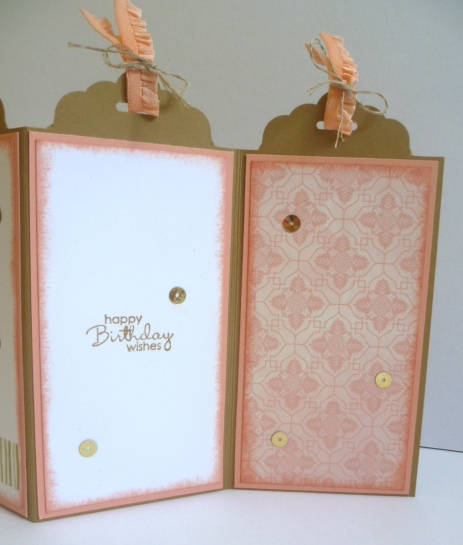
Here is some close-ups.

P1110459

P1110460

Now on to the Tutorial.

SCALLOP TAG TOPPER PUNCH TRI-FOLD CARD!

1. Cut your base card to 14.8cm x 21cm. (I used Baked Brown Sugar). On the 21cm side score the card at 7cm and 14cm.

2. Slide the edge of your card (long side) in to your Tag Topper Punch. It takes a little wiggling but you can get the card in and line it up in the first scored section in to the punch.  You can roughly line the card up between the rectangle shape on the top of the punch where the image of the punch is on.  See the photo.
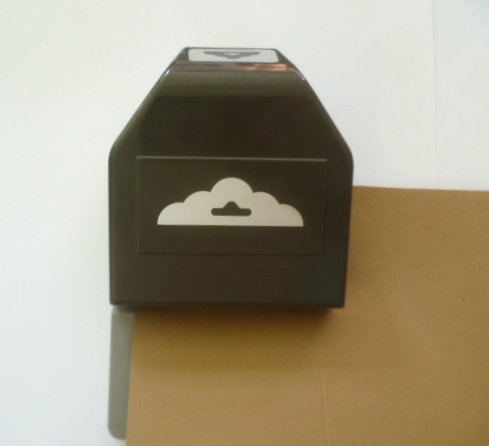
P1110477

Punch the card.  Then move it along to the next scored section.  Line it up and then punch again. Repeat for the last section again.
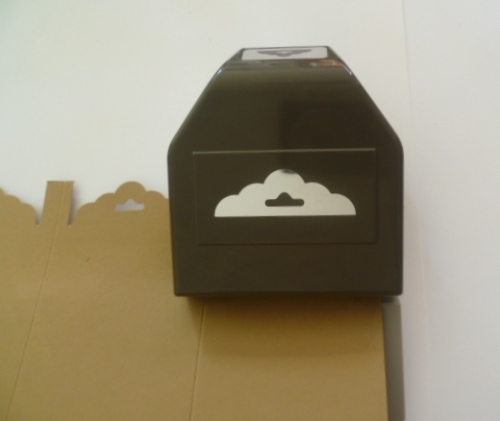
P1110479

Trim off the excess tabs to level them off.
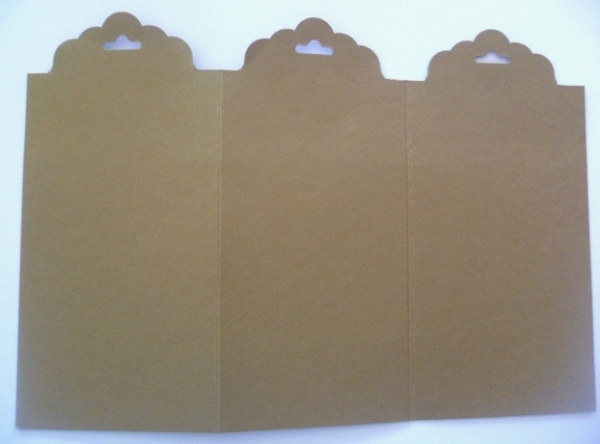
P1110442

NOTE: The card does get a little bent when you punch it out but just press over it and when you add the card to the front you don’t notice it.

3. Cut your card mat pieces and whisper white and DSP (designer series paper).

Card mats (I used Crisp Canteloupe)  measures 6.6cm x 12.2cm  (3 in total).

Whisper White (x2) and DSP piece(x1) 6.2cm x 11.8cm.  The DSP is from Venetian Romance.
P1110441

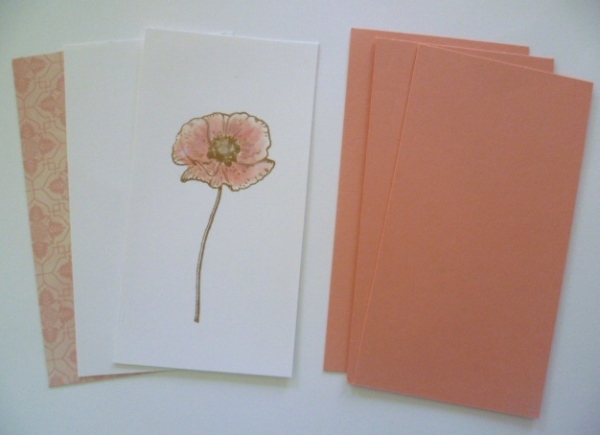
I stamped one of the Whisper White pieces with the flower from ‘Happy Watercolor’ in Baked Brown Sugar and coloured it with the Aquapainter and inkpad.

To finish the card off I sponged the white card pieces and the DSP with Crisp Canteloupe ink and adhered them to the card. I added some Gold Washi Tape and also  some gold sequins over the card (still not sure about these???). Then I tied some Crisp Canteloupe Ruffled ribbon through the holes and tied them off with Linen Thread.

Here it is again – the finished off card.

P1110458

Do you like it????? Why not go and make one for yourself.

Thanks for taking the time to visit me in your day.  I do appreciate it as I know your time is precious.  I hope you are inspired.

See you next time.

Jenny x

cards

BLAST OFF – CARD IN A BOX!

Have you seen the ‘Card in a Box’ floating around the internet??? I had to make one.  I did share this on my Facebook page last week because I was so excited to show someone but I thought now I would show you.  If you don’t want to miss seeing some of my creations make sure you have ‘LIKED’ me on Facebook.  My link is on the right hand side.

Anyway, back to the card.  The other reason I was so excited about it was that it was the first time I had used the set ‘Blast Off’.  I love this cute set.  I can’t wait to use it again soon.

P1110372

Wouldn’t any young boy love this for the Birthday??? I used the ‘Watercolor Wonder’ DSP for this. Who would have thought it would be so cool for it. If you want to make one of these then check Tanya’s blog out here.  She has the video there.  Tanya has the measurements to make these to the Australian standard size envelopes which is great.  This box is just the easiest.  You have to make one yourself.  I have to say decorating the box takes longer than making the actual box.  They are so fun though.

The “box” will fold flat so you can put it in an envelope and it is still fine to post.  Check it out here.  Isn’t it just the cleverest!  I can’t wait to make another one soon.

P1110373

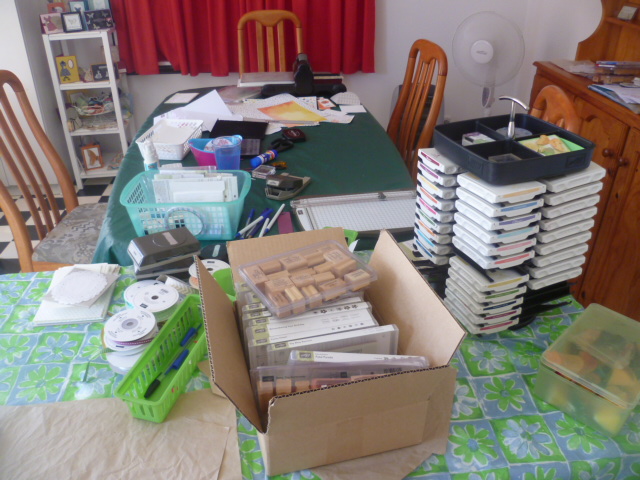
I have to show you this photo too.  We are getting our bathroom redone at the moment.  My craft room is opposite the bathroom so I thought I would evacuate for a while.  Just as well I did.  The whole top floor of our house is covered in dust from the jack-hammering of the cement.  I had closed the door to my craft room but somehow those tiny specks of dust makes their way through the smallest little cavities.  I moved out to my studio which is out the back of our house.  I just hold my classes here but now I have set up here I think I will stay for a bit.  It’s getting a bit messy already. I am starting to create for an exciting event coming up soon.  That’s a shame you can’t see anything yet!! 🙂

P1110415

Hope your week is going along OK??? Hope you are getting some time for yourself to create.

Happy Stamping,

Jenny x

cards, Masculine

GORGEOUS GRUNGE THANK YOU!

I made a special Thank You card on the weekend.  My husband had a really bad Mountain Bike accident 2 weeks ago.  Fortunately there were no broken bones but a few other injuries and stitches.  This Thank You card is for his mate who he was riding with.  I am so thankful for all he did on the day and continually does for us.  I added a Gift Card with the card but this “Thank You” doesn’t seem enough.

P1110367

The card had to be manly and I was careful with the colour choices.  No red was to be seen!!  I used Gorgeous Grunge and Chalk Talk.  It was finished off with a ‘Hung Up Cute Clip’ (p 170 of the Annual Catalogue).

The last couple of weeks have been crazy.  I have just now managed to get to my stamp room again to create. It is such a good feeling to escape and stamp!!!

See you again soon,

Jenny

cards

GOLD IS IN!!

Gold is the new HOT colour at the moment.  It is very in vogue.  Did you know that???  We have lots of lovely gold products in the Occasions Catalogue.  I played around with the new Gold Fancy Foil Vellum a couple of weeks ago.  It is available in silver too.  There are 9 sheets per pack (12″x12″ size sheets).  There are 3 each of 3 different designs.  They are just beautiful to use on their own or as a little addition to a card or project.  One of the projects I made was this cute little bag.

P1110208

It is always hard to tell the size by a photo.  So check it out against an Embossing Powder pot.  Isn’t it just the cutest???

P1110209

They are the easiest little bags and can be made up in no time. I have tied the bag off with some of the gold cord that comes with the ‘Good as Gold’ card kit from Sale-A-Bration.

These would make nice little wedding or party favours.  If you would like to make this bag you can get the instructions from Sam’s blog here.

Thanks for stopping by. Now go and get your gold on!!

Jenny


cards

ANOTHER GREAT YEAR!

I made a card a few weeks ago to get ready for my Card Buffet.  I wasn’t happy with the finished card but with the encouragement of my lovely blog friend Patti, I touched it up a bit.  Here is the stepped-up version for you Patti. 🙂

P1110328

I stamped the swirly Happy Birthday from ‘Another Great Year’ onto Whisper White card and adhered it to a Whisper White card base.  I also stamped this onto Tempting Turquoise card and cut the banners off and adhered them over the banners on the white card.  It was a simple white on white card. I have seen a few stampers create white on white cards and they always look so classy and crisp.  I love the look but can never get it to work right.  It looked a bit plain.  What to do??? If I ripped it apart and mount it on a coloured card base  it was only going to get all scrunched up.  So I stamped the little Macarons from the stamp set.  I coloured the centres of them with the Markers and then used the aquapainter to spread the ink out.  This was a really risky move.  If I stuff up the stamping or colouring, then whole card is ruined.  But, what did I really have to lose!!!  I added a few Adhesive Rhinestones for dazzle.  I was pleased with the end result.  What do you think???

I love this set ‘Another Great Year’.  It is such a bargain at $41.95 Woodmount or $33.95 Clear mount. I think you need this set in your collection. You can buy this directly at my Online store here or contact me to purchase it.

Thanks for stopping by,

Jenny