cards

MARINA MIST SECRET GARDEN!

While I am on a roll with ‘Secret Garden’ cards I thought I would show you another one.  This card was inspired by this card here.

Here is my version.

P1070673

The flowers are stamped in Midnight Muse onto Marina Mist card and cut with the matching Framelits.  The large flower was stamped a second time and the middle section was cut out and layered onto the large flower.  Yes, cut with scissors! The greeting is from “Petite Pairs” and stamped in Midnight Muse on to Whisper White. Then this was layered onto Midnight Muse card.  For the base I ran a piece of Marina Mist card through the Big Shot with the Honeycomb Embossing Folder and layered it on to the Marina Mist Card base.

I have been playing with some other stamps from the new Seasonal Catalogue AND Sale-A-Bration.  So much to play with at the moment!  I love to have you vist.  I hope you can visit again soon.

Jenny

cards

SECRET GARDEN 60TH!!

I have another card to show you using the ‘Secret Garden’ Stamp Set.  This is similar to the card I showed in the last post but I did actually make this one first.  This is for my lovely friend Leonie N for her birthday.  I won’t tell you how old she turned!!! 😉

P1070669

CARD: Whisper White, Marina Mist, Perfect Plum, Certainly Celery.

STAMP: Secret Garden.

INK: Black StazOn.

OTHER: Honeycomb Embossing Folder, Ovals Framelits, Timeless Type Junior Alphabet (retired), Marina Mist Satin Ribbon (retired), Adhesive Pearls.

I was really pleased with how this turned out.  I love this Embossing Folder.  You really don’t need much more to a card.  It just adds such lovely texture.

Thanks for stopping by today.  I look forward to you visiting again soon.  🙂

Jenny

cards

“SECRET GARDEN HONEYCOMB”

Firstly, let me say a HUGE Thank You for your wonderful comments on my projects that I shared in the last post for the Sale-A-Bration Blog Hop.  Thank You.  They were so encouraging.  I really appreciate your comments.  It’s nice to know I am reaching out somewhere in Blogosphere and inspiring you.  I try to 🙂  If you missed the Blog Hop then head back to my last post and take the little hop around.  There are 25 blogs from Demonstrators in Australia and New Zealand who are showcasing some projects using the Sale-A-Bration products.  You can choose any one of these for FREE for every $100 you order.   Have you checked the Sale-A-Bration Catalogue out yet?  There is a link in the Right Hand Column for you to see it Online.

Meanwhile we now have the new Seasonal Catalogue.  It has some very exciting products in there.  So much goodness to create with!!!!!!!!!!!  You can check it out through the link in the Right Hand Column too.  If you would like your own copy to drool over and mark with Post-It notes and take to bed to read with you  (Isn’t that what everybody does???), then drop me a comment or email and I will get back to you to get your address to send one to you.  Nothing like the real thing!!!

Today I wanted to show you a card using some new goodies from that catalogue.  Of course, I still have some Sale-A-Bration creations to share but today it is the Seasonal Catalogue’s turn!

P1070667

So, what’s new here??? I have used the new set Secret Garden stamp set.  Isn’t it nice we have matching Framelits that can cut the flowers out!! No more fussy cutting here!  I have stamped them in Black StazOn on coloured card using some of the new Incolors: Summer Starfruit, Raspberry Ripple and Primrose Petals.  I stamped the “Beautiful Birthday” greeting and cut it out with the new Oval Framelites. This was all layered onto a piece of Whisper White embossed with the new and very versatile ‘Honeycomb’ Embossing Folder.  This is all finished off with some Raspberry Ripple Satin Stitched ribbon and some Adhesive Pearls.  Simple!!!

Thanks for stopping by today.  Please feel free to leave a comment.  It is nice to know I am not talking to myself here.  🙂

Till next time,  Happy Stamping.

Jenny x

cards

“PEEKING OWL!”

It’s been a bit quiet here lately.  School holidays are still happening and so not a great lot of time to create.  In the time I have had I have been busy making some samples using the great Sale-A-Bration sets and also playing with some new toys from the new Seasonal Catalogue coming out very soon.  I will show you those soon but I wanted to show you this card I made last week.  I have been wanting to create this one for a little while so just HAD to do it before I got too busy.

P1070578

Doesn’t he look cute peeking through the hole.  The card is made using the Early Espresso Core’dinations cardstock.  I cut it lengthwise and then ran the top section through the Big Shot with the Woodgrain Embossing Folder.  I sanded the card a little to accentuate the woodgrain.  It makes it look just like the owl is sitting in a tree.  The Scallop Circle and the Modern Label punch are in Daffodil Delight.  The ribbon is the Primrose Petals Satin Stitched Ribbon.

Here is the inside view.  A friend has joined him.

P1070579

I haven’t added a greeting inside as yet.  I can add that later when I know what the occasion will be.  This card was CASED from a card on Late Night Stampers group I think.  I’m sorry I don’t know the original creator though.  I hope you like my version??

Thanks for stopping by today to see my cheeky owls.  Come and visit again soon.

Jenny

cards, Masculine

A MASCULINE 50TH!

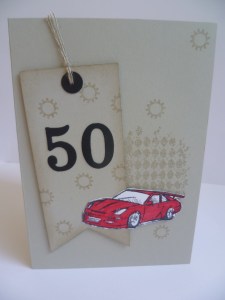
Last week I needed to create a 50th Birthday card for my Brother-in-law.  What to do???  Masculine cards are always a dilemma.  I went through my “saved card ideas”.  We all have one (or more) of those files don’t we??  The layout was inspired by this card by Debra Currier.  Of course I couldn’t use Extreme Elements now but ‘Clockworks’ was a good substitute.  A racy red sportscar is a good addition for a 50th.  Unfortunately it wasn’t a real one though! 🙂  The ’50’ was done on the Bigshot with ‘Timeless Type Alphabet’ now retired.  I punched a circle with the large circle on the Owl punch and punched a centre hole with a small hole punch.  I threaded some Linen Thread through it to create a tag.  The edge of the tag was sponged with ink.

P1070583

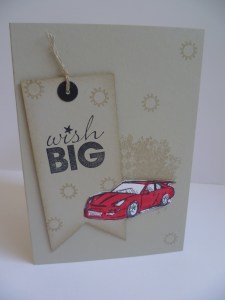
While I was on a roll I created a similar card to use for another Male Birthday.  They can always come in handy.  This time I used the “Wish Big” from ‘Word Play’.

P1070584

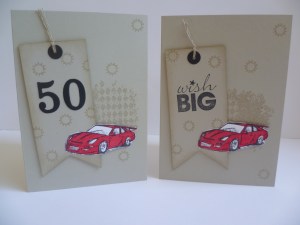
Here are the 2 together.  I did use Sahara Sand on both these cards but they do look a little different.  Possibly the lighting – or my bad photography!

P1070582

Thanks for stopping by today.  Have a good day.  I hope my Aussie friends are surviving the heat.  It has been hot and looks like it will continue all week.  Stay cool 🙂

Come and visit again soon,

Jenny x

cards, Uncategorized

“SCENTSATIONAL” BABY!

Don’t put some of those Christmas stamps away just yet! It’s great to know that you can use them for more occasions than the season they were intended.

Here is a great idea I found on Stampin’ Connection, a Demonstrator Forum I am on.  This was CASED from Mercedes Weber.  You can visit her blog here.  She is just the cleverest 🙂

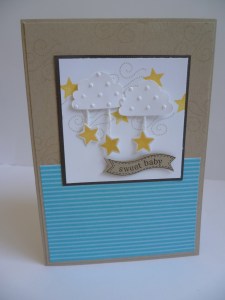
P1070587

How cute is this using the set “Scentsational Season”.  I would never have thought to use this for a baby card, but what a great idea! The clouds are punched from the Cupcake Punch and ran through the Big Shot with the Perfect Polka Dots Embossing Folder.  The DSP is Tempting Turquoise and is from the Brights Paper Stack.  The greeting is from “Itty Bitty Banners” and cut with the Bitty Banner Framelits.  There you go, a baby card using a Christmas set.  Who’d have thought Hey!!!!

Well, 2013 has dawned.  I hope this year brings you all you hope for.  Keep looking forward to achieve your goals.  Don’t dwell on the bad stuff, they just weigh you down.

Happy 2013 to you,

Jenny x

cards

LAST MINUTE CHRISTMAS CARDS!

I was tidying up my craft desk the other day and found all these little bits left-over from recent Christmas Card making.  I couldn’t let these little bits go to waste so I made some quick cards with them.

For this first card, I had a strip of the Candlelight acetate.  It is so gorgeous I couldn’t throw it out.  It did take me a little fiddling to work out where to put it though!!  So much for a quick card!

P1070493

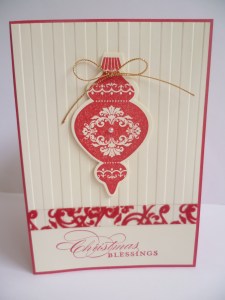
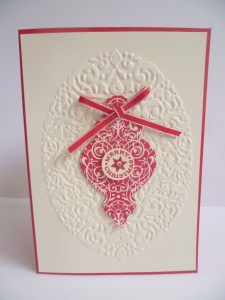
On this second card I had a piece of Very Vanilla card that I had embossed with the Holiday Frame Embossing Frame at Heartfelt in Sydney in November.  This has been sitting on my desk since then waiting for some inspiration.  I had a left-over ornament already cut from the Candlelight DSP.  This didn’t take long to put together.

P1070494

Christmas Cards are done and dusted for this year so at least I have made a start for next year!!!!

Thanks for taking time to stop by.  It is such a crazy time of year but I do appreciate you visiting my little corner of the blogosphere today and anyday.  🙂

Jenny x

cards

TUNNEL CHRISTMAS CARD

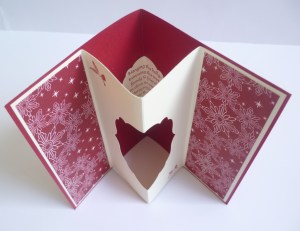
Here is the Tunnel Card we created at my Sparkly Christmas Class last week.  You might have seen these around your Blog Travels.  I am going to share the instructions below so you can create your own version, so read on!

Here is the inside of the card.

I have used the Framelits Labels to cut the centre out.  I stamped the cute greeting from ‘More Merry Messages’ and cut it out with a smaller Labels Framelits.  The DSP strips either side are from “Be of Good Cheer” DSP.  The little pinecone and leaves from ‘Lovely as a Tree’ are stamped in the corners.

You can see a top view how it opens out. Isn’t it cool!!
Here is the front of the card.  I kept it plain as we were focusing on the inside.
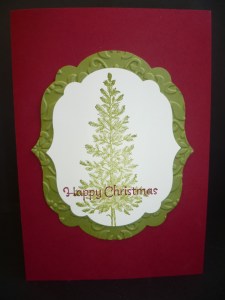
I cut a larger Labels Framelit in Old Olive and ran it through the Big Shot with the Vintage Wallpaper Embossing Folder.  I really think the tree could have some Dazzling Diamonds on it to give it some bling.  I think I will add that later.  The greeting is from ‘More Merry Messages’.

So, here are the instructions for you to make your own.

TUNNEL CARD (This is in metric).

Cut a standard card size base:  ie 14.8cm x 21cm, score this at 10.5cm.

For the inside: Card size is 14.4cmx20.6cm.  Score this at 5.2cm, 10.3cm and 15.5cm.

If you wish to add Patterned Paper strips, these measure 4.7cmx14cm.

You can create any shape window in the centre of the inside card, either cutting a square or using the Big Shot with the Framelits (the Big Shot is much easier!!).

On the inside card piece, adhere only the 2 outside sections onto the card base.  Don’t add any adhesive in the middle section or it won’t pop out!

*This card can be decorated any way you desire.  The inside piece could be entirely of Patterned paper.  It’s all up to you!!

So off you go and make your own now.

Why not show me your version.  I would love to see it.

I am heading off in the morning to the Stampin’ Up! Heartfelt Event in Sydney.  I can’t wait to meet up with some stamping friends and be totally blown away with all the inspiration there.  That’s always what happens anyway!  I will  tell you all about it next week.  I will show you my projects I have created for the Inspiration Boards too.

Have a good weekend,

Jenny

cards

“SPARKLY CHRISTMAS”

Firstly I would like to say that if anyone out there is responsible for speeding up the clock, please revert it back. Thank You. Or even make it a little slower would be nice!!! I don’t know where the time is getting to but it is certainly flying past at an almighty pace.  Are you finding this???  We have reached the crazy time of year, end-of-year Dance Performances and extra practices that go with that, End-of-Year school presentations (and Final Year 6 events too), throw in a few extra stamping classes as well.  As for Christmas shoppping HA! Let’s not go there right now!  Anyway, I’m sure you are feeling the same too.  So you don’t want to hear about my happenings.  You have enough to deal with.  So, onto what you really came for – A CARD (or 2!).

The week before last I held my ‘Sparkly Christmas’ Class.  That was a lot of fun.  We all got glittery but learnt some fun techniques in the process.  Here are 2 of the cards we made.

This one was inspired by my lovely friend Andrea.  This is using the Dazzling Dust technique, I think!!! It is Really very sparkly.  It’s a shame it doesn’t capture it too much in the photo.  It is much better IRL!

This next one was inspired by Colleen here.  This is my version.

I have used the ‘Delicate Designs’ Embossing Folder along the bottom.  The Snowflake was cut from the Silver Glimmer Paper using the Snow Flurry Die.  It is SO sparkly.  I wish I could show that to you!!!!  Photos just don’t do them justice sometimes! This is such a simple card but I think so elegant.

We did a third card – a Tunnel card.  I will show that to you next time.

As for me, I must now dash – school pickup, swimming training for Carlie, Football training for Josh!!

Catch you sometime soon,

Jenny

cards

“ANOTHER SCENTSATIONAL WINDOW!”

I wanted to show you this card we made a few weeks ago at a workshop.  Thanks Deb :).  I have been having fun with this stamp set ‘Scentsational Season’.  How easy is it when you have the co-ordinating Framelits??? – No scissors involved!!!

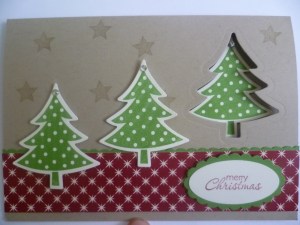
Here is the card.  I CASED this from Fiona Whitten on our Stampin’ Connection forum for Demonstrators.  I just changed a couple of little things.

I love the little window created with the tree.

I will give you the details:

CARD: Crumb Cake, Gumball Green, Very Vanilla, Be of Good Cheer DSP.

INK: Gumball Green, Crumb Cake, Cherry Cobbler.

STAMPS: Scentsational Season, Petite Pairs.

OTHER: HOLIDAY Framelits, scallop oval punch, oval punch, Dotted Ribbon Punch, Rhinestones.

Just a couple of tips:

– Once you stamp and cut the trees, line them up on your card front so you roughly know where to cut the tree.

– It is easier to push the tree through the window at the front to position it rather than trying to line it up from inside.

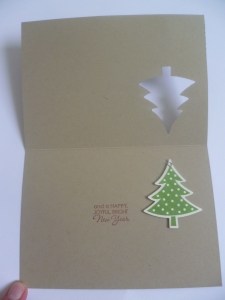
Here is the inside of the card if you want to see.

The inside greeting is from Petite Pairs.

Thanks for looking.  My bed is calling me …….

Come and visit again soon,

Jenny x