cards

OMBRE ZIG ZAGS!

I saw a card on Pinterest that I really liked the look of so I thought I would recreate it.  I thought that I would go with the Ombre look (ie a graduation in colour tone).  I have used the Tasteful Trim Bigz XL Die to create the zig zags.  I did one – AND why not create 4 different ones. (Apologies for the bad lighting.  It has been overcast lately).

P1110857

The sentiments are from ‘Perfect Pennants’ and ‘Hip, Hip, Hooray’ stamp sets.

I will show you them individually.

P1110859

Colours are Night of Navy, Pacific Point, Tempting Turquoise and Sky Blue.  Base card is Tempting Turquoise.

P1110862

Colours are Garden Green, Gumball Green, Wild Wasabi and Pistachio Pudding.  Card Base is Gumball Green.

P1110864

Colours are Tangerine Tango, Pumpkin Pie, Blushing Bride and Pink Pirouette.  Card Base is Pumpkin Pie.

P1110866

Colours are Cherry Cobbler, Rose Red, Melon Mambo and Crisp Canteloupe.  Card Base is Rose Red.

The Ombre effect is quite “in” at the moment.  Why not go and make an ‘Ombre’ card yourself.

Thanks for visiting.  Stop by again very soon,

Jenny

Stamp Spectacular

STAMP SPECTACULAR IS COMING!!

My Project 41-001

I am excited to announce my first Online Stamp class.  It will be lots of fun.  Each day of the week we will have a new project, stamping technique or product information and you can make them in the comfort of your own home  AND since it is my first one – it is FREE!!!  Come and join me.

To sign up click on the link HERE or click on the box in the right hand column that says ‘SIGN UP NOW’.  You can nominate just to receive the emails for the Stamp Spectacular or to get my regular newsletters and Stamp Spectacular projects. I can’t wait to share these projects with you.

See you then,

Jenny 

Uncategorized

HIP, HIP, HOORAY – IT’S A CARD KIT!!

Stampin’ Up! have released a new card kit which I think you will love.  I can’t wait to get my kit.  This is the ‘Hip, Hip, Hooray’ kit.  This comes with your card, envelopes and embellishments to make 20 cards PLUS a Basic Gray Stampin’ Spot (mini ink pad) Plus a great stamp set (available in clear mount only).  It also includes instructions to make up the 20 cards but you can create them how you like.  Then when you are done you have the cute stamp set and Stampin’ Spot to make lots more cards.  All this for only $34.95.

Here they are in detail.

This is what you will get in your ‘Hip, Hip, Hooray’ Kit.

HipHipInt

Check out the cool stamps in the kit.

hip hip hooray stamps

And look at all you can make.

Hip Hip cards _1

Hip Hip Cards _2

So message me to order your kit or you can shop online at my store right now here.  Don’t forget when your order reaches $90 then pick your free Sale-A-Bration gift.

cards

ANOTHER GREAT YEAR!

I made a card a few weeks ago to get ready for my Card Buffet.  I wasn’t happy with the finished card but with the encouragement of my lovely blog friend Patti, I touched it up a bit.  Here is the stepped-up version for you Patti. 🙂

P1110328

I stamped the swirly Happy Birthday from ‘Another Great Year’ onto Whisper White card and adhered it to a Whisper White card base.  I also stamped this onto Tempting Turquoise card and cut the banners off and adhered them over the banners on the white card.  It was a simple white on white card. I have seen a few stampers create white on white cards and they always look so classy and crisp.  I love the look but can never get it to work right.  It looked a bit plain.  What to do??? If I ripped it apart and mount it on a coloured card base  it was only going to get all scrunched up.  So I stamped the little Macarons from the stamp set.  I coloured the centres of them with the Markers and then used the aquapainter to spread the ink out.  This was a really risky move.  If I stuff up the stamping or colouring, then whole card is ruined.  But, what did I really have to lose!!!  I added a few Adhesive Rhinestones for dazzle.  I was pleased with the end result.  What do you think???

I love this set ‘Another Great Year’.  It is such a bargain at $41.95 Woodmount or $33.95 Clear mount. I think you need this set in your collection. You can buy this directly at my Online store here or contact me to purchase it.

Thanks for stopping by,

Jenny

Uncategorized

MORE THAN FOR TAGS CLASS!!

The new tag punches in the Occasions Catalogue are a great new product but don’t think of them just for tags.  See how versatile they can be.  I will show you some fun ideas and you will get to create this card and treat box.

P1110336

If you are in the Wollongong area I would love to see you join us.  We are a friendly group of ladies.  Classes are really relaxed and a lot of fun.

WHEN: Saturday February 15th at 2pm.  RSVP: Wednesday February 12th.

WHERE: My studio, East Corrimal.

COST:  Class only – $15.

Class and Punch – $52.  Saving of $5.

BYO: Adhesives and scissors.

Message/Email me to let me know you are coming.  If you can’t make this one but would love to join us at another class then let me know and I can send you out my newsletter to keep updated.

Jenny

cards, Personal Ramblings

THIS DAY FORWARD WEDDING!

The last couple of weeks/months have been really busy.  My Mum was married on Saturday so there has been a lot to do in preparing for the wedding and starting to pack up her house to move.  It was a great day on Saturday though and I am very happy for them both.  Now I know there is a lot of excitement with the new products from the Occasions Catalogue and Sale-A-Bration but I thought now was a good time to show you the invites and cards I made for them before it gets too much later.

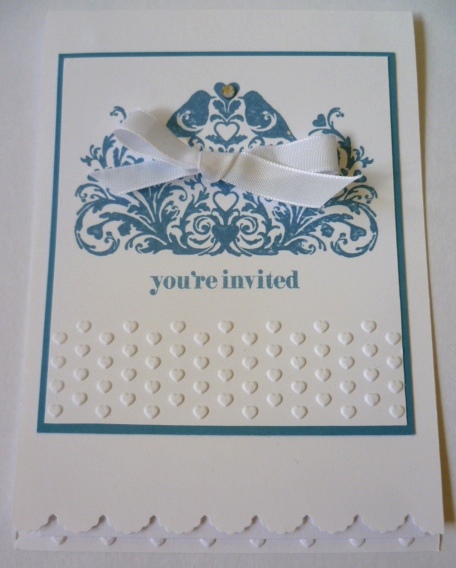
Firstly, the engagement card.  I bought the set ‘This Day Forward’ especially for my Mum.  She loves birds and I knew that she would like it for the invitations as well.  Of course, I was assuming I was making them though! I will just tell you in advance in case you don’t work it out, my Mum likes blue!!! 😉

I started using the set for the Engagement card.

P1100504

Is is hard to tell but I stamped the image in versamark and Marina Mist ink and then clear embossed it.  I matted it on Silver Glimmer Paper.

See the border??? This has been created with the Chevron Border Punch.  I cut 2 strips and punched along them.  Then I flipped one over and wove one through the other.  I saw this idea on my blog travels somewhere.  I added some Rhinestones in the centre and around the image (although they seem to look a bit black in the photo). Then I tied around some striped organza ribbon which is now retired.

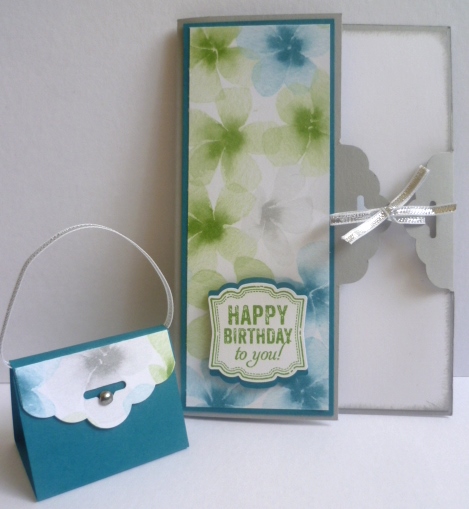
Here is the Wedding Invitation.  I needed to keep it simple as there was not a lot of time.  These needed to get out before Christmas so it was crazy for a week or two.

P1100685

I was going to heat emboss the image again but that was going to take too long.  After I stamped the image I embossed the bottom edge with the hearts from the Adorning Accents Embossing Folder. The “You’re Invited” is from the set ‘A Dozen Thoughts’. This piece was then matted on Marina Mist card.  I added a white Taffeta ribbon bow and a Rhinestone.  For the card base I cut an A4 piece of card vertically and then scored it half way.  I embossed the inside edge with the hearts once again.  I cut the front bottom edge with the ‘Adorning Accents’ Edgelits.   I forgot to take a photo of the inside but I had the wedding details on a separate piece of paper and attached with 2 silver brads at the top.

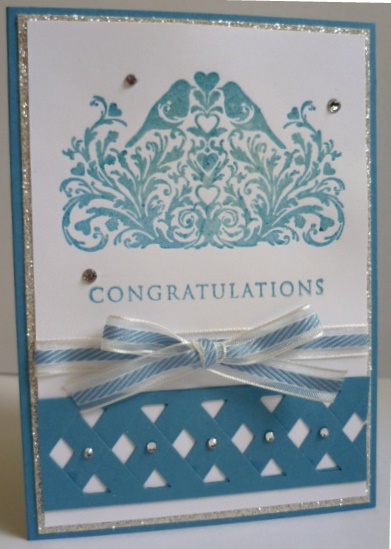
Now for the wedding card.  It was 3 days out from the wedding and I thought maybe I should get the card made.  So of course I used ‘This Day Forward’ again.  I didn’t have a lot of time to make one but I was pleased with the end result.

P1110234

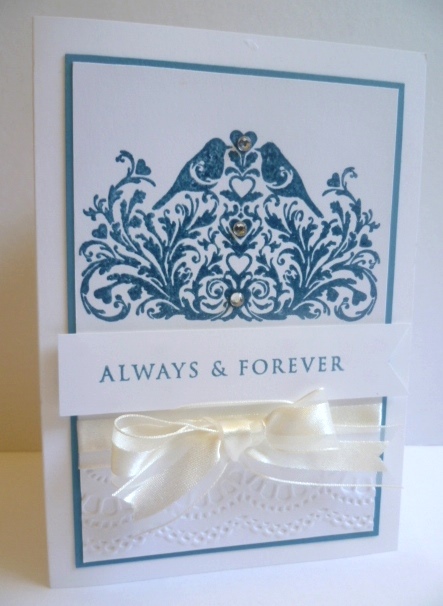
I stamped the image with versamark and Marina Mist and added clear embossing powder and heat embossed this.  Along the bottom edge of the card I dry embossed this with the ‘Delicate Designs’ Embossing Folder.  I added some white organza ribbon.  The sentiment from the set was heat embossed as well and then I cut a banner shape from one end.  This was raised using Dimensionals.  I added 3 Rhinestones to the hearts.

The inside was just kept simple.

P1110237

OK, so just a couple of family pics.  If you are friends with me on Facebook you would have seen these so I don’t want to bore  you too much with these again.

Here is my Mum and her new husband.

P1110275

I have to add my gorgeous girl.  Carlie was Bridesmaid and she looked beautiful!

P1110248

Thanks for looking.  Hope I didn’t bore you too much.  All this was a whirlwind done in about 3 months. So I might just come up for air now – maybe!!!!  This year is turning out crazy.  Never fear though creating is what keeps me sane – or saner!  I will endeavour to share my projects with you as best I can.  I have been having fun playing with all the new products so I will show you some of them soon.

Jenny

3D projects, My DIgital Studio

CRAFT FAIRS PART 2 – GIFT IDEAS!

In today’s post  on Craft Fairs I thought I would show you some Gift Ideas that I made to sell.

Firstly, some little notebooks.  I found these at a local discount shop.  I was going to cover them but time was running out.  I think this was one week out to the Craft Fair! The notebooks had a plastic type plain cover so I decided just to stamp directly on them.  They are not as exciting as I could have done BUT ……

P1100429

I used Black Staz On and stamped images from ‘Timeless Talk’.  They were simple but cute!

Next I made some Whiteboard Frames.  Another idea from my Internet travels.

P1100431

P1100433

For these, I just grabbed some photo frames and you can use whiteboard markers to write directly on the glass.  For the insert inside I used different pieces of DSP that I had.  I created the heading using MDS and printed this on Whisper White card.  I added a trim from card punched with the Scallop Border punch.  I cut some butterflies using the Butterfly Bigz die and and Beautiful Wings Embosslits and adhered them to the front.  They make really nice gifts in no time.

Some more projects tomorrow so come back and visit.

Jenny

PS. One more Week to Sale-A-Bration and the new Occasions Catalogue starts.  I am mailing out the catalogues now. Drop me a message if you want them mailed out to you.

cards

PETITE PETALS MEETS FLOWER SHOP!!

One of the great features with the Stampin’ Up! products that I think many people love is how great they co-ordinate together.  Card, ink, ribbons co-ordinate.  Stamp sets co-ordinate with punches and dies.  What about stamp sets co-ordinating with other stamp sets??? Well, this new little stamp set available in the upcoming Occasions Catalogue looks great when used on it’s own but how great is it when you combine it with one of the other stamp sets!

P1110174

The small flowers are from the new stamp set ‘Petite Petals’.  There are 6 little flower stamps in the set plus there is a matching punch.  They are very cute on their own BUT why not layer them! Here I have added them with a flower from the ‘Flower Shop’ set.  For this card I have used some of the new DSP ‘Watercolor Wonder’. Absolutely gorgeous paper. You must grab some of this.  The colours and images are just beautiful.  The problem is though that each side is so beautiful it seems a shame to cover up one side to use on a card!  On the card I have also used the new Embossing Folder – Decorative Dots.  You can grab one of these for Free during Sale-A-Bration with a $90 order.  You will need that Embossing Folder too.  The greeting on this card is from ‘Remembering Your Birthday’. This card was inspired by a card I saw on Pinterest.

Hope you like what you see!!!

Would you like your own copy of the upcoming Occasions Catalogue and the Sale-A-Bration Brochure?? Let me know and I can send one directly to you. I am mailing them out now. (Australian Residents only).  You will be able to check out these products I have used on this card PLUS so many more great products. Don’t forget the freebies you can get during Sale-A-Bration with your $90 order!

Thanks for stopping by,

Jenny

cards, Masculine

TAG-IT CONGRATULATIONS!!

I know that we are in the Christmas season but I had to show you this card.   Yesterday Josh received his HSC marks.   For my overseas readers this is the mark achieved from the final exams at High School.  The mark determines the University courses they can apply for.  Josh achieved an awesome result and we are very proud of him.  He worked really hard.  So I wanted to let him know.  This is the card I made for him yesterday.

P1100874

I have used the stamp set ‘Tag-it”.  Did you know that Stampin’ Up! will donate $3 from the sale of this stamp set to Ronald McDonald House Charities.  Isn’t that great!  I stamped it first in Island Indigo and then with Versamark and embossed it in silver.  Then cut the trophy out and adhered it on to the stamped image.  I added a small Rhinestone in the middle.  I think it is still OK to have bling on a boys card, don’t you think??

Once this was done it was all  layered on a Silver Glimmer circle punched with the 2 1/2″ circle punch.  I embossed a strip of Pool Party card with the ‘Alphabet Press’ Embossing Folder and layered a strip of silver glimmer paper underneath. I stamped the base card with ‘Gorgeous Grunge’ before assembling it all together.

Here is a close-up.

P1100876

OK, back to Christmas preparations.  We have only just got the tree up, there is still shopping to be done and presents to wrap.  Better get back to it!

Jenny

Uncategorized

INDIGO NATIVITY!

Is life busy for you at the moment?  I think we are all starting to feel a little time-pressured with Christmas preparations and shopping and the end of year activities.  Well, if you are feeling that way then you will understand my absence of late.  I am starting to tick off some really huge projects on my ‘To Do’ list so I think things are getting a little clearer – although I haven’t done a lot of Christmas shopping yet so I won’t speak too soon!

Anyway, enough of my rambling.  You are here to see what fantastic, exciting creations I have been doing.  I can’t guarantee all that but here is a card I created a couple of weeks and I hadn’t shown you yet.

P1100695

The layout is from a card I had filed away for a few years but thought it would work here.  The little nativity scene is from the ‘Best of Christmas’ set. (This is a great little set for $25.95 with some great images in the set).  It is stamped on Whisper White and then I cut a circle on the Island Indigo card with the Circles Framelits.  I embossed the card with the Snow Flurry Embossing Folder and added a few Rhinestones.  The greeting is from Teeny Tiny Sentiments.

Thanks for stopping by.  I do appreciate your visits to my little corner of blogland.  I really don’t need to talk to myself here!

Stop by again soon,

Jenny