Catalogues, Stampin' Up!

THE HOLIDAY CATALOGUE IS NOW LIVE!!!

Woo Hoo! I am excited! You can view the Holiday Catalogue Online NOW – if you haven’t already seen it.  Here is the link below and I will add it to the side bar as well.  AND, if you want a little preview of some of the exciting new products, check the video out below.

holiday16_en-sp

You can head HERE to download the catalogue.

If you want your own copy of the catalogue sent to you, then ask me. 🙂

For your viewing pleasure, check this video out HERE.

Later today I am going to share some projects for our International Blog Hop so make sure you come back and visit.


cards, Catalogues, Stampin' Up!

CHRISTMAS THOUGHTFUL BRANCHES!

Today I am going to show you a couple of Christmas cards with the Thoughtful Branches set. You can see just how versatile this set is.  A set for so many different occasions.

Here is the first one. I CASED this from Pinterest but changed the colours.

peace tree

I have used Emerald Envy for the card mat and for the tree branches. I will say it was a little tricky lining up the branches with the trunk.  Thank goodness for clear stamps!! But it took a couple of goes.

Just a tip: Stamp the tree trunk first.  (this one is in Early Espresso).  Then ink up your branches and hold it over the trunk.  Just move the stamp around until you have lined up a few of the tree branches with the branches on the trunk. I started at the bottom of the branches and worked up the tree. Have a practice on scrap card if you like.  I did fill in a couple of leaves with the marker because I missed, but hey! you wouldn’t have known if I didn’t tell you. 😉

I did try to stamp the branches first and then stamp in the trunk but I think it is much easier to stamp the trunk first. Have a play and see what works for you.

The sentiment is cut from Gold Foil Sheets with the Christmas Greetings Thinlits.

The next card is one I CASED from my friend Leonie when we had a stamp day.  I think this was CASED off Pinterest.

Christmas

The tree is cut from Dazzling Diamonds Glimmer Paper.  I hope you can see the sparkle. The ground and the 3 trees are stamped in Versamark and then Heat embossed in White Embossing Powder on to a piece of Whisper White just a little smaller than your card base.

The sentiment is from the Merriest Wishes set (coming out TOMORROW in the Holiday Catalogue!) I stamped it on scrap white and heat embossed it, then just flagged the ends with scissors. I have to say this was the first time I had used the Copper Embossing Powder. WOW! I think it is more like Rose Gold.  I may have ordered it now!! 😉

So are you convinced you NEED this set yet?  I am sure you have seen lots of samples around.  Today is the last day to order it but we have been told by Stampin’ Up! there are still some supplies left so they will be available until sold out. SO, go and get your set now!!

If you are in Australia you can order directly from my store HERE. Please use the HOST Code: AEA9A3PT

Tomorrow the Holiday Catalogue goes live.  I am excited to share more projects from this catalogue. Join me later tomorrow as I am taking part in a Global Blog Hop showcasing projects from this catalogue.  Can’t wait!

Have a happy day,

Jenny

cards, Stampin' Up!

HAVE YOU GOT THE THOUGHTFUL BRANCHES BUNDLE YET??

Thoughtful Branches Header

Time is running out to get this gorgeous set.  Tomorrow is the last day.  Don’t miss out because I am telling you, you will be sorry.  Don’t come to me on Thursday asking to order it.  You know what I am going to say!! 🙂

So, grab it now.  You can get just the stamps or just the dies but why not get the bundle and save 10%.  ($92.50 AUS)

You can order it by emailing me or ordering Online at my store HERE.  If you order online please use the Host Code: AEA9A3PT

Also, if you order from me you will receive a PDF of some gorgeous projects PLUS get 2 Loyalty VIS points.

Here are a few cards that I have made recently.  You might have seen a glimpse of these on earlier posts.

This first one was CASED off Pinterest. I added some stamping down the side with the tree top stamp and added some twine on the side.  I think this would be a good masculine card.

3 trees

This next one was inspired by one on Pinterest.  I embossed the background with the Fluttering Embossing Folder and added some Melon Mambo Twine.  The doily is the retired ones.

Melon Mambo flowers

For this next one, I have sponged the card and stamped the trees.

Sponged Trees

To create this, you can cut a square from scrap paper to form a window. Then lay this window piece over your white card to create a mask.  Then sponge your colours over it.  I have used Soft Sky for the top section and Pear Pizzazz on the bottom section. Before removing your mask stamp the trees in Early Espresso.

I heat embossed the greeting in gold Embossing Powder.

You might have seen this version around your blog travels.  I wanted to make it myself.  I stamped the flower head/tree top stamp onto Marina Mist card with the Dapper Denim.  (I think it was those colours!).

hydrangea

Tomorrow I have some Christmas cards for you.  Come back and visit and check them out.

Have a great day/night,

Jenny x


Catalogues, Christmas, Classes, Stampin' Up!

PEOPLE FROM THE ‘GONG, IT’S TIME TO START YOUR CHRISTMAS CREATING!

The Stampin’ Up! Holiday Catalogue starts THIS WEEK! (THURSDAY) Exciting! This is an absolutely fantastic catalogue.  You are going to love it.  If you have already seen it you know what I am talking about.

If you are in the Wollongong area  then you can see – and play with some of the fun new products at my Holiday Catalogue Review this coming weekend.

Here are the deets.

WHEN:  Friday 2nd September 7.30pm
or
Saturday 3rd September at 2pm

WHERE: My studio, East Corrimal

COST: $10

Includes Afternoon Tea, a card or 2 to make, Giveaways and of course the Holiday Catalogue.

PLEASE RSVP: by Thursday 1st.  

Seats are filling up fast, so be quick to reply. 🙂

Holiday catalogue promo photo

Can’t make it but you would love a catalogue??

Ask me to send you one.  I can send them anywhere in Australia.

Jenny

Catalogues, Christmas, Stampin' Up!

THE WONDER OF CHRISTMAS – CHOIR OF ANGELS!

I was playing with some new products from the 2016 Holiday Catalogue  yesterday.  I even got my colouring happening!! I wanted to try this new set the ‘Wonder of Christmas’.  There is not a lot around with this set yet but I am sure there will be soon. It is really sweet and I love the words in it too. I will show you the set below.  Here is the card first.

angels singing

I had in mind to do a choir of Angels.  This is a standard size card so I could only fit 3 but I am sure there were lots more Angels around right!! 🙂 I stamped an Angel on Thick Whisper White card with StazOn and coloured it with the Aquapainter and Inkpads. I then cut it out and layed it onto a Whisper White card mat so I could see where to place the other Angels. I stamped 2 other Angels in Smoky Slate on to the Whisper White card.

The little stars in the set were stamped in Soft Sky on to the White card also.  This was adhered to a Cherry Cobbler card base.  The sentiment was stamped in Memento Black. The Angel was raised up off the card with Dimensionals.  The card was finished off with some Rhinestones and I added a little Wink of Stella on the wings but you can’t notice that too much.

What do you think?

It’s a great set.  Here is a little sneak for you.

142136S

It’s not long now until you can order from this Holiday Catalogue.  I think you are going to love it.  Don’t forget, if you still haven’t got hold of one yet and you are in Australia, let me know and I can get one sent off in the post for you.

holiday catalogue photo

Thanks for visiting.

Jenny

Stampin' Up!

PRICES NOW DISCOUNTED FOR MY RETIRED ITEMS!

sale bright

I forgot to tell you in my last post.  I have now reduced the prices of my retired items.  I want them cleared out.  I am taking an additional 10% off the listed prices.

Head to the RETIRED PRODUCTS FOR SALE PAGE at the top of this blog and you will find the links.  Let me know if you would like any of the items.

Jenny

Personal Ramblings, Stampin' Up!

HAPPY BIRTHDAY TO ME!!

8 birthday

It’s my Stampin’ Up! Birthday today.  8 years ago I joined Stampin’ Up! Back then I was joining to get a great discount of these awesome products, hopefully earn a little income along the way and it gave me an excuse to craft away my day!! Hehe!!  Now while I love the discount and the free products I get, the best part is all the friends I have made. Along with my local customers and friends, I have friends now from all over the world that I wouldn’t have known if I hadn’t become part of this great big family.

So I am celebrating all my new found friends.  Thanks for coming a part of my life. You are very special to me and I mean that.  xx

To many more fun years of creating – and hopefully inspiring you.  Thanks for visiting me. I know there are hundreds of Stampin’ Up! blogs around.  So I appreciate you taking the time to visit me.  I hope that when you visit you might feel inspired and maybe encouraged.  I hope to brighten your day.

Do comment and say Hello.  Tell me where you are from.  I love to hear from you.

Thanks again,

Jenny x 


Stampin' Up!

RETIRED PRODUCTS FOR SALE!


sale bright

Thanks to those people who came along to my recent BOGO sale.  It was great to see some of my loved products go to new homes.  BUT I STILL HAVE SO MUCH LEFT!!!!

I have now reduced some of the prices so these are not eligible for BOGO (Buy one Get One Free), but I am sure there are some great bargains for you.  🙂

These are only for Australian residents.  Sorry.

Click on my Page for “Retired Products For Sale” at the top and it will have the links there.

Catalogues, Stampin' Up!

HOLIDAY CATALOGUES ARE BEING MAILED OUT. ARE YOU ON THE LIST??

Holiday catalogue promo photo

It’s getting close for the Holiday Catalogue to go live.  September 1st!  You will be able to view it online BUT who doesn’t love to flick through the catalogue and see the samples and the products close up.  I think you are one of those people am I right??

So, if you are a resident of Australia AND you don’t have a current Demonstrator then drop me a comment/email and I will drop one in the post for you.  I am starting to mail them out so make sure you are on the list.

Have a wonderful day,

Jenny

3D projects, cards, Catalogues, Christmas, Tutorials

COOKIE CUTTER Z-FOLD CARD!

I have a little sneak peek for you today.  Very soon the Stampin’ Up! Holiday Catalogue will be Live. September 1st to be exact.  You are going to L.O.V.E. it!  I tell you there are so many exciting new products it is going to be hard to choose.  I am having a hard time to choose myself!

Have to say though when I first saw our sneak peek I just loved the cute little gingerbread in the Cookie Cutter Christmas set.  It was the first on my list – and the first thing to play with the other day when my preorder arrived.  It has the stamp set AND the matching punch.  It makes it so easy to cut those gingerbread and the other characters out.

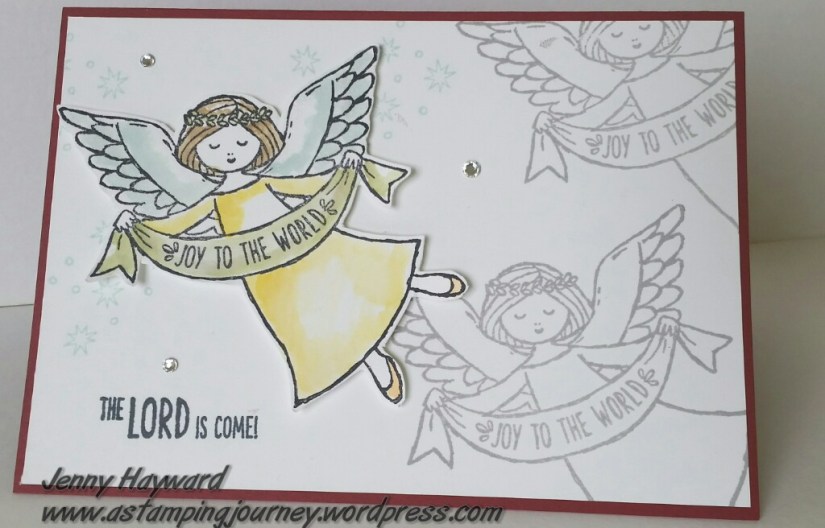
So here is the card I made, because I couldn’t wait until later in the month. 🙂

This is a Z-Fold card which you might have seen a bit around recently.  I have been waiting to try one of these folds and I thought the Gingerbread were just the thing to use.

Z-fold

Z-fold with Cookie Cutter

I thought the corner looked a little plain so I created a little Holly leaves and berries using the NEW Holly Berry Builder Punch.

This is the card when it is folded flat.

Z-fold card folded flat

Have you tried a Z-Fold card before?? There are a number of tutorials around the internet and some vary in size.  I based mine on Amanda’s version (craftyspa) HERE. You will find that Amanda’s tutorial makes 2 card bases from one sheet of cardstock. That’s OK if you want to do multiple cards or you are using the same colour card base for different cards. 

I adjusted the measurements a little and have them in Metric and Imperial for you if you wish to create just one card.

Square Z-Fold Card Tutorial (Based on Amanda Bates – Craftyspa)

* This makes one card.

1. Cut card t0 21cm x 13cm for your card base. (8 1/4″ x 5 1/8″)

2. On the long side score your card at 5.2cm and 10cm (2 1/16″ and 4 1/8″).

3. On the short side, cut your card at 10.5cm.  The thin strip you cut off will be your band.

*Doing it this way by cutting your card after you have scored saves you scoring the little strip. 🙂

4. Cut your Designer Series Paper  – I have used the new ‘Candy Cane Lane DSP.  You will need 2 pieces: 4.8cm x 10.1cm (1 7/8″ x 4″) and 10.1cm x 10.1cm ( 4″ x 4″)

Plus a piece of Whisper White piece: 5.1cm x 10.1cm (2″ x 4″).

5. Adhere your Designer Series Paper pieces to each end sections.  Stamp your Whisper White piece with a sentiment as you like and then adhere that to the centre section.

6. To attach your band please take note of where to place adhesive.  You don’t want to run adhesive along the whole length. Place your card base down open and flat on the tabletop. Lay down the strip on to the card halfway down the card.  Work out where you want to place your adhesive. I find it helps to mark in pencil where to place it. You will want to place adhesive on the back of your strip just where it rests on the front section not where it lays on the white section. Then on the back of the strip on the last section.  I hope that makes sense??

Hope these instructions are helpful to make your own Z-Fold card.

Why not share your version with me.

Jenny