Uncategorized

TUTORIAL PAGE AVAILABLE!!

I have just put together a page for you with all my tutorials I have posted on my blog over the time.  You can find tutorials for Gift Bags, Techniques and some different fold cards.  Click on the Page above for ‘Free Tutorials’ to take you there.   Have fun browsing and I hope you can try some out.  I look forward to seeing your creations too.  So stop by and send me a photo or a link to your blog.

Happy Stamping,

Jenny x

cards

“EVERY MOMENT” WATERCOLOURING!!

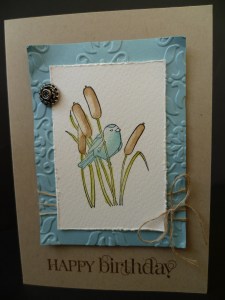
After my frustrating attempts at watercolouring a few weeks ago I was determined to give it another go.  I was not going to be beaten!  I pulled out my stampset “Every Moment” which is a good one to colour.  I received this set from Sydney Regionals 18 months ago and it hadn’t seen ink since! (is that bad????).  It’s not that I don’t like it, it’s just that I have so many other stamps to use (and I get a bit lazy when it comes to colouring!)  Now I used several different mediums in my attempts and different types of cardstock to see what I came up with.  I tried the pastels, markers and inkpads using the blender pen and aquapainter and I tried it on whisper White cardstock, confetti White and Watercolour paper.  So this is my final attempt.  Let me say Number 6 attempt!  Sorry you are not going to see the other attempts.  They looked like a kindergarten child had coloured them.  They were not good believe me.  They are now neatly filed in our paper recycling bin to be off to a new home!  LOL

So here is the final card.

With this one I used the inkpads and aquapainter.  Using watercolour paper is a must I think. I built the colour up in layers.  I remembered this was a trick they showed us at Regionals when we used this set.  Picking up the colour with your aquapainter you brush a light wash over the area you want coloured.  So for the bird I gave it a light wash in Baja Breeze.  Let that layer of colour dry.  It only takes a little minute.  You can move onto another area to work on while you let that dry.  Then come back to the first area and give another wash in certain areas.  This will give a darker colour.  Then later apply another touch up in certain areas you want highlighted.  Does all that make sense???  I think I added some highlights in part with the fine tip of the marker like on the reeds and the bird’s head.  Once this was done I assembled the card.  The card is CASED on a sample card from Regionals.  The Baja Breeze mat was embossed with the Vintage Wallpaper Embossing Folder.  I added linen thread and a Vintage Brad to finish it off.  The sentiment is from ‘Curly Cute’.  So I think I was happy with this attempt.

Thanks for looking.  As far as my swap count goes.  Well,  I haven’t fully completed any cards this week.  I have had so much else going on.  But I have 20 more cards cut and stamped ready to go if that is anything.  Hopefully I will have some time to put them together this weekend.  I am not sure when that is going to happen exactly though!! So the count still stands at 35.

Have a good weekend.  I hope all the Mum’s have a lovely Mother’s Day on Sunday and get spoilt.  Stop by and visit again soon.  I love to see you have visited.  Don’t forget to say ‘Hi’

Jenny x

3D projects, Classes

“MOTHER’S DAY BAG AND CARD”

I still have a couple of places left for my Mother’s Day class this coming Friday 11th May 10am or 7.30pm.  I would love to see you there if you are in the Wollongong area.  Cost is $15 to create this very stylish gift bag for Mum and a matching card.  You can change the sentiment to suit for a birthday if you like.  Drop me a message to RSVP – ASAP.  If you haven’t joined us for classes before they are a lot of fun – really!!!  I look forward to seeing you.

Jenny

cards

A CUPCAKE AND FLOWER!!

Over the Easter weekend a few weeks back I had some time and decided to pull out some stamps I haven’t used in a while.  It was such fun to ink these stamps up again.  These are the end result.  Nothing exciting really but just some simple stamping.
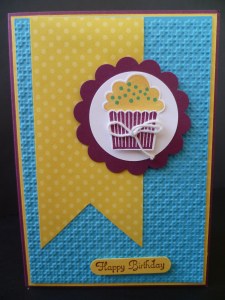
The layout is based on a few cards I have seen recently.  The pennants are “in” at the moment apparently.  I won’t bore you with all the details.  I think it is straight-forward how I have created this card.  Here is the recipe list though.

Stamps: Create A Cupcake   Ink: Rich Razzleberry, Daffodil Delight, Tempting Turquoise.   Card: Rich Razzleberry, Tempting Turquoise, Whisper White.  Daffodil Delight (Brights Paper Stack).       Other: Square Lattice Embossing Folder,  2 3/8″ Scallop Circle punch, 1 3/4″ Circle Punch, Word Window Punch, Cupcake Builder Punch, White Twine.

Here is the second card.

This one uses “Flower Fest”.  This was the first set on my wish list when the catalogue came out last year.  It took me a while to get it still and I have only used it maybe twice.  How disgusting is that!!  I love that it co-ordinates with so many punches.  It makes life so much easier than cutting each one out.

Stamps: Flower Fest, Create A Cupcake (greeting).    Ink: Marina Mist           Card: Marina Mist, Perfect Plum, Certainly Celery, Very Vanilla.  Other: Framed Tulips Embossing Folder, Swirls Scribbles sizzlit Die, Marina Mist Striped Grosgrain Ribbon, Adhesive Pearls.

Thanks for stopping by today.  I can report too my swap convention card count is 35.  I have been cutting and stamping up a storm this week.  I ran out of card of one colour so couldn’t complete the full 20.  I don’t expect that I will get that many done in the next week.  I have lots of other things to do.

Stop by again soon.  I love your visits. 🙂

Jenny x

Stampin' Up!

IT’S A PAPER PARTY PLUS CHECK OUT THE NEW STARTER KIT!!!

Why not join the Paper Party with Stampin’ Up! in May.

How exciting is this!!!!  During May purchase any 3 packs of Designer Series Paper (excluding the Specialty range) and get a fourth one absolutely Free!  

OR

Join Stampin’ Up! during May and receive 1 pack of Designer Series Paper for FREE each month until December 31st.  How awesome is this.  I can’t believe it.  You can find out all the details by heading to the website here.

Just contact me to place an order if you haven’t got your own local Stampin’ Up! Demonstrator.  I can ship to anywhere in Australia.  You can’t miss out on Free paper now can you????  🙂

A NEW STARTER KIT IS HERE!!!!

You have always thought Stampin’ Up! products were great! Well now you can get your COMPLETELY CUSTOMISABLE Starter Kit for $169. You can choose ANY products up to the value of $235.  What great value is that!!!!  You might want all stamps, or maybe grab the Big Shot.  Whatever your little heart desires.  Plus, you receive over $80 of business supplies to get you started.  This is awesome value!!

Perhaps, you just want to receive a discount on all your next purchases, or you might want to build a great business and run workshops and classes.  You choose the kit!  You choose how you use it!  Come and join the Stampin’ Up! family.   If you are still not sure you can head over here for more details.  Or you can head over to my Business Website here and click on ‘Join Now’.  It is just too exciting too miss out!!!

cards, Convention

VINTAGE FLOWER!!

Thought I would just stop by and show you a card I made a couple of weeks ago.  This was my first play with the new Edgelits.  I do love the edging you can create with these little beauties.   Just a tip:  I found it helps to add some Dotto or other non-permanent adhesive to hold the edgelit in place when you cut them otherwise they can go slipping all over the place.

I cut the edge from the Whisper White card and a piece of the Flirtatious Specialty paper.  The flower was created by punching a few flowers from the new Blossom Punch in Pretty in Pink and folding and distressing and folding until the layers of the card came apart.  I sponged the edges and added a Vintage brad to the centre.   I added some folded Pretty in Pink Satin Ribbon.  The sentiment is from “Fabulous Phrases” and punched out with the Modern Label Punch and added some pearls for some elegance.  The Pink swirls are from “Kindness Matters”.

Hope you like it???

The Stampin’ Up! National Convention is on in Canberra in 38 days!!! I can’t wait!  It is a great time to get together with demonstrators from all over Australia and New Zealand.  Part of the fun of convention is swapping cards with other demonstrators.  You come back with so many great ideas and samples.  I have just started on my swaps.  I have decided to do the one card but have different colour variations.  I have tested a few out and I am ready to go.  I figured that I would make 20 of 5 different colours which will give me a good number to swap.  Each week for the next 5 weeks I am going to create 20 cards.  So I thought I would give you a running tally here so you can help cheer me on.   Then I can have lots of great cards to show you when I come back.  I will share my swap card later on.   So let’s see how we go!!!

Thanks for stopping by today,

Jenny x

cards

STAMPING DAY CREATIONS!!!

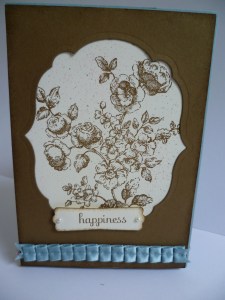
A couple of weeks ago now we had our stamping get together with my great stamping buddies, Andrea, Leonie and Tracey.  It is always a fun time.  I have to say though this day I found very frustrating.  I really don’t colour well and just couldn’t get things happening.  We CASED a card from Anne Westerneg (this card was on our Stampin’ Up! Demonstrator forum – Stampin’ Connection).

This stamp set is the gorgeous new “Bordering on Romance” in the Autumn Mini Catalogue.  I stamped the flowers with Stazon and then coloured them with a Blender pen and inkpads.  (Don’t look too closely – colouring is not my strength!).  I finished it off outlining the flowers with the Markers.  The flowery edge is so pretty with the scallop border cut with the new Edgelits.  (Ooh, can I say that?)  I added some Baja Breeze pleated satin ribbon from the Autumn Mini.  I added a greeting from “Teeny Tiny Sentiments”. I punched that out with the word window punch.  Ok it was to hide a little ink smudge, but we won’t tell anyone that will we!!  I added some pearls to finish it off.

The next card was inspired by another card by Anne.  I changed this around a little.

On this card I cut the curved edge with the edgelits.  I embossed a Pretty in Pink card strip with the hearts from the Adorning Accents Embossing Folder and layered this on Pretty in Pink DSP from the Subtles paper stack.  Another strip of the DSP was added to the bottom on the inside of the card that you can see peeking through.  I stamped the flower from “Mixed Bunch” in Pretty in Pink and then sponged the edges in Rose Red ink.  I added a Vintage brad and raised it off the card with dimensionals.  The sentiment is from “Teeny Tiny Sentiments” and punched out with the Modern Label Punch.  This was adhered to another piece punched out in Pretty in Pink.  Some more Pearls finished the card off.

Thanks for stopping by today.  I hope you can visit again soon.

Jenny x

cards

FRAMING ELEMENTS OF STYLE!!

It has taken a little while to get back here.  It was great having a relaxing weekend over Easter.  Since then we have had one drama after another with our computer.  Don’t you just love this modern technology???  It’s great when it is working right.   We now have a new computer and all is good again!  I wanted to show you this card.  This was one of the first cards I created with all my new goodies from the Autumn Mini Catalogue.  I was playing around with the new Framelits.

I wanted to use the Framelits to create a frame and use my favourite set that I haven’t used in a while – Elements of Style.  I had to play around a little to get the embossed edge around the frame.   I have since found a tutorial on how to do this here.  (Check out the exploding purse while you are there – Must try that sometime!).  It is a bit hard to tell in the photo but I sprayed the Soft Suede frame with Champagne Shimmer Spray.  It gives it a nice sparkle  which is a shame you can’t see that here! I stamped the flowers in Soft Suede on to Very Vanilla and spritzed the card with the Soft Suede Marker.  The sentiment is from ‘Fabulous Phrases’ and was punched out with the Modern Label Punch.   I added some new Baja Breeze Pleated Satin ribbon.  Gotta love that.  So much easier than pleating it yourself!!

I hope to get back and show you some more creations using the new goodies.  Over Easter weekend I had fun dragging out some neglected stamps that I haven’t used in ages so I will show you those soon too.  It was so nice to play with some of these sets again.

See you again soon,

Jenny x

cards

“SPARKLY MIXED BUNCH”

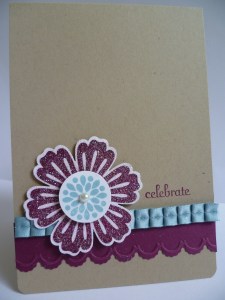
Last Friday’s class we celebrated the awesome Sale-A-Bration Catalogue  and Summer Mini Catalogue that has just ended, and we welcomed in the Autumn Mini Catalogue that began today.  Below is the card we created with lots of goodies from the new Mini.  Notice the stamp set, the pleated satin ribbon (just gorgeous and so much easier than pleating your own!!!)  and the edgelits for the Big Shot.

I cased this card from Allison here.  I changed the colours slightly.  Here is a close-up of the flower.

See the sparkle???  On the card that Allison created she used the Adhesive sheets with the Big Shot to adhere her Dazzling Diamonds.  On the card above I used a mixture of Heat and Stick and Dazzling Diamonds.  I have a tutorial for this technique here.  I first stamped the flower and then punched it out and then applied the Dazzling Diamonds as in the tutorial.  After this was done I adhered it to the base card with dimensionals  and then stamped the centre of the flower in Baja Breeze and this was punched out with the 1″ circle punch.  I added an Adhesive pearl for some elegance.

If you would like to see some more projects from the Autumn Mini Catalogue why not join in on the ESAD Blog Hop.  You can start here at Tanya’s blog.  There are 25 blogs showcasing some awesome projects.  I was very impressed!

Stay tuned for some more projects with products from this Mini Catalogue.  I have been busy creating!

You can view the Mini by clicking on the link in the right hand column.  If you would like me to send one out to you in the mail then drop me an email.  They always make good bed-time reading don’t they??

Thanks for stopping by,

Jenny x