cards

SILHOUETTE OWLS!

On Monday we had our regular stamping get together with Leonie and Andrea.  It’s so much more fun stamping with friends!  Andrea brought along some project ideas and we loved this sample by Laurie.  We loved the Silhouette owls.  This was the card I created.  It was a little similar to Laurie’s.
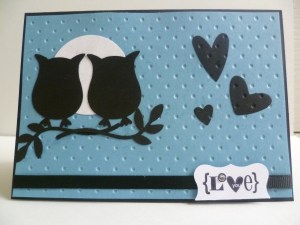
The hearts were punched out with the Heart to Heart punch and then inlaid embossed with the Perfect Polka Dots Embossing Folder. That is, I adhered the hearts onto the Marina Mist card before I ran it through the Big Shot, so the hearts were embossed with the dots as well.  I reversed the dots to give it a different effect. (OK, well I ran it through the wrong way by mistake!!!  That doesn’t matter though, does it???).  I adhered a strip of the narrow grosgrain ribbon across the bottom.  The greeting is from “Love Defined”.  I punched it out with the Curly Label Punch and cut off the bottom half.  I raised it up with dimensionals.  I added a little Rhinestone in the centre of the ‘O’.  It’s a bit hard to see.  I also used Champagne shimmer Paint on the moon but you can’t see the sparkle unfortunately.  Andrea had that idea and we copied!! hehe!  That’s the good thing about getting together!!  You can see her sparkly moon – and her beautiful brayered version at her link!!

I am heading off now and going to TRY and get to bed at a more reasonable time tonight!! LOL

Thanks for stopping by.  Stop by again soon.

Jenny x
 

cards

“CREATE A CUPCAKE” HEART CARD!!

Today has just flown by.  I think I’m still in holiday mode.  By the time I got some washing done, went to footy and did the shopping it was dinner time.  Not a lot of stamping time in there.  I wanted to show you something though.  I still have a few projects in my vault (that’s always handy!!!)

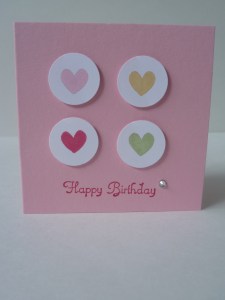
This card I made a few weeks ago now for my Mini launch.  This is using the Create A Cupcake stamp set.  I CASED it from Shari and had come across it on Splitcoast Stampers.  I liked how it uses the Cupcake stamp set in a different way than just making cupcakes.

This is a 3″x3″  Love Note size card.  I inked up the hearts and stamped them out then punched them with the 3/4″ circle punch.  These were raised up with dimensionals.  I stamped the sentiment in Rose Red and added an Adhesive Pearl.  A very simple card!

Thanks for stopping by,

Jenny x

Personal Ramblings, Uncategorized

JUST CHECKING IN!!!

Hi my Friends.  We just arrived back from Cairns this evening.  We didn’t have a lot of internet access where we were staying so I couldn’t stop by and update you with what I have been doing.  We had a really lovely family time.  It was so nice to step away from the usual crazy routine and have time together.  We snorkelled on the Great Barrier Reef, visited the Daintree National Park and travelled up to Kuranda on the Skyrail.   Once I get the photos sorted I might show you.  If it is not too boring for you???

I’m so looking forward to getting inky again though and hope to get stamping on the weekend.  Once I get the washing done and footy starts back and …. It starts already!!

Stop by again soon,

Jenny xx

Personal Ramblings

HAPPY EASTER!!

Just wanted to stop by and wish you all a Happy and Blessed Easter.  I hope that it is surrounded by those you love.  I love Easter, not for the chocolate or Hot Cross Buns but remembering the wonderful act that Christ did for us over 2000 years ago.  I hope that you take some time to reflect on this over Easter.

Isaiah 53:5  “He was pierced for our transgressions, he was crushed for our iniquities (sins); the punishment that brought us peace was upon him, and by his wounds we are healed”


                                                                            glitter-graphics.com

HAPPY EASTER TO YOU ALL!!

I’m heading away on holidays now for the week.  I don’t know if I will have access to a computer during that time.  I hope you don’t miss me too much.  🙂  I will be back soon with lots more creating.  I can’t wait to get back and stamp.  I am suffering withdrawals already!!

Jenny xx

cards

EASTER BUNNY CARD!

I thought I would stop by quickly to show you a card we did at my Kids Punch Art Class last week.  The kids had a lot of fun making these.  I had 2 groups during the day, which was pretty full on!! 

This punch bunny was shown to me by my stamping buddy – Leonie N.  I made one for the Easter Hat shown a couple of posts back.  It is so cute and so easy to make.

PUNCHES YOU NEED:

Body and Head:  1 3/4″ circle          Cheeks: Circles on 2 step owl punch           

Ears/Legs: Whisper White Large ovals and Regal Rose small oval.

Eyes:  punched in Basic Black with the Crop-A-Dile.

The edges are sponged in Regal Rose and then draw in his whiskers and markings on his paws with a Basic Black Marker.

I should have taken photos of the kids creations.  They were very creative.  Most of them also put a little flower on his/her head punched out with the Boho Blossoms Punch.  They looked very cute.  They even stamped inside the card AND the back.  They did a fantastic job.  They also made the chick card I showed here and a puppy dog bookmark.  They were very busy punchers!!

We are heading to Cairns on Sunday for the week.  I have only just caught up on all the jobs I needed to do before I go.  Now I should start thinking of packing – tomorrow though!!

Hope to get back here before I go.  Until then, I hope you get time to stamp because I won’t!

Jenny x

cards

A CUTE EASTER CARD FOR YOU!!

I can finally get around to showing you this cute card.  A few weeks ago at our stamping get together Andrea showed us how to make this!  I love it.  This is so clever!

This card is created using a number of different punches.  Can you guess which ones???

You can tell the egg flowers are the oval punch.  The leaves are created using the oval punch too.  But check out the base of the flowers.  This is created using the owl punch.  How clever!!  Valita is the one who originally created this card.  You can check out the full instructions on her blog here.  There is no need for me to repeat them here 😉

I love being able to use the punches in different ways than punching around a text or something similar.  So much fun!!

Hope to be back again soon.

Happy Stamping,

Jenny xx

cards

VELLUM BUTTERFLY!!

It has been a lazy weekend here for us.  It has been wet and cold all weekend.  Winter is fast approaching I think.  It was just the weather for creating!!  I have to say, I have spent most of the weekend trying to finish a double page scrap page and it was just not happening!  It was getting very frustrating.  Sometimes you have to walk away and hope that inspiration hits.  It has to happen quickly though, I just don’t have a lot of time this week and it has to get done. 

Let me ask all you scrappers out there: What do you start with – the photos or the layout?????  Just leave a comment, I would be interested to know.  Maybe I should work with the photos and pick a layout that suits these and not try to fit the photos to a layout I have???

Anyway, I do have a card to show you.  This one I made at our stamping get together the other week.  Yes, and I am just getting around to showing you now!!  This was a sketch challenge based on a ‘Clean and Simple’ Sketch from some time ago – and we only had 1/2 hour to do it. 

I got to use my Beautiful Butterfly BIGZ Die.  I cut one from Perfect Plum and another from Vellum.  I sponged the plum butterfly and adhered the vellum butterfly to it and added 3 adhesive pearls.  I have embossed the Whisper White strip with the Vintage Wallpaper folder.  I’m thinking that should have been a bit narrower, but never mind now.  The swirl from ‘Elements of Style’ is stamped in Marina Mist onto the Marina Mist card.  The sentiment is from ‘Teeny Tiny Sentiments’.  I punched it out with the Modern Label Punch and sponged the edges.  I punched another 2 from Perfect Plum and  cut one end off from each and then off-set them under the White one.  I added some pearls to this too.   It just adds a touch of elegance!

With Easter upon us next week I hope to show you some Easter projects this week.  If I have time!  We are going away next weekend for a week and there is still so much to do! 

I hope you have time to create this week!

Jenny xx 

cards

ANOTHER FUN-FOLD!!!

I showed you the Cupcake Fun Fold the other day.  I love doing these cards and I wanted to do another one.  This time I used the “Just Believe” stamp set. 

I used Crumb Cake and Marina Mist.  The DSP is from the Subtles Paper Pack and I added Marina Mist Satin ribbon to finish it off.  For the text I stamped ‘friends’ in Marina Mist.  Then inked up the flowers from around the text box in the set in Crumb Cake and stamped off on scrap paper.  This lightens the ink slightly. I then stamped this around the ‘friends’.  It was punched out with the small oval and sponged around with Crumb Cake ink.  This was mounted on 2 Crumb Cake ovals layered together, and then a larger oval in Marina Mist.  I added 2 adhesive pearls for a touch of elegance!!

Hope you like??? 🙂

That’s it for me today.  I have had 2 Kids Punch Art classes today and I am beat.  I am so behind in my projects to show you, but they will keep for another day.  Thanks for stopping by.  See you again soon.

Jenny x

cards

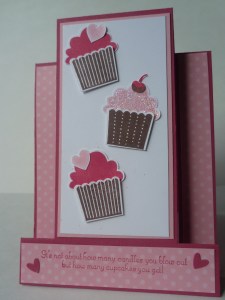
CUPCAKES FUN-FOLD!

Recently on my blurfing I came across this great card by Kelly. I love the different fold to it. Kelly has the template for it there. This template is in imperial.  I adjusted the template to suit our A4 card size. I will give you the instructions for it below. But first I should show you my card.

I have used the fun new set ‘Create A Cupcake’ in the Autumn/Winter Mini.   You can’t see it very well but I added some Dazzling Diamonds to the pink iced cupcake – and note, the choc-dipped cherry!!!  It’s all very yummy!  The paper is from the Subtles DSP paper pack.  These packs are such great value.

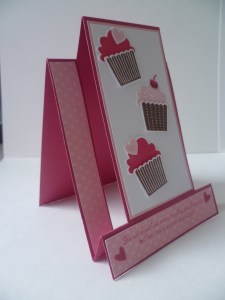
To get a better idea of the fold I can show you a side-view.

This is quite easy once you get a hang of the cutting and folding.  I have a template to show you and I will explain it below.

Create your own Side Stepper Card.

If you are wanting imperial measurements head to the top of the post and head to the link for Kelly’s card.

Cut card 29.5cmx10.5cm.  It is easy cutting and scoring  this straight on your paper cutter if you have one, or else use a ruler and pencil to mark in your lines.  On the 10.5cm side line up your card at the 2cm mark on your cutter and then go down to 12.2cm on the ruler of your cutter – not cutting this!!!!  You will cut from that 12.2cm mark down to 27cm.  Move your card across to line up with the 8cm on your paper cutter.  Then cut your line on this side from 12.2cm down to 27cm.  The cut lines are shown on the template as the solid line.

Turn your card and on the 29.5cm, score at 2.5cm and 5cm only on the outside sections.  At the 14.7cm point score in the middle section only. At 17.2cm score on the outside sections only. Look at the template for a guide to help you.  The score lines are marked with the dotted lines.  A ‘v’ on the score line means a valley fold, an upside down ‘v’ is a mountain fold.

 I hope this makes sense for you. 🙂  Any problems just ask!!

I have just finished another card using this fold that I will show you later.  It is so easy once you get the hang of it – really!!!

That’s it for me today.

Have a good weekend all,

Jenny x

3D projects, Punch Art

BUNNY IN A HURRY!!

Carlie came home from school yesterday and told me they were having an Easter Hat parade TODAY!!!  Although Easter is not for another 2 weeks, school holidays start here from today.  Nothing like leaving it until the last minute!  I didn’t have any time to go to the shops, Carlie used most of the cotton wool balls on her last creation, so I didn’t know what I was going to do.  I was beginning to think of bunny ears on a headband!! At 8.30 last night I really wasn’t feeling very creative.  Then, inspiration hit and I whipped up this very quickly. 

My buddy Leonie showed me these great punch bunnies recently.  Thanks Leonie your a life saver 🙂  I made one up and stuck it on the front of a party hat.  Then I punched out some ovals from some scrap designer paper I had lying around.  I sponged the edges and put them around the hat to create eggs.  I fringed a strip of green paper (non-Stampin’ Up!) and stuck this around the hat for grass. Carlie was happy with it when she saw it this morning and at least she had something to wear!

I have some more cupcake creations to show you so I will get back to that now.  I just had to show you this.

Jenny x