cards

“CHOCOLATE AND CUPCAKES”

Last Saturday I held my Autumn Mini Catalogue Launch.  Sorry it has taken so long to get back here to show you the projects we created.  It has been a busy week.  There are only 2 days of school left for the term and I can now breathe a sigh of relief that all the school projects are done!!! There have been some marathon efforts put in here – and a few tears!  So I can get back to some other creating!

With the new Autumn Mini Catalogue out now there are lots of great new toys to play with.  Firstly I will show you the Make and Takes we did last Saturday.  We used the ‘Eat Chocolate’  and the Scallop Square Duo Die to create a mini scallop bag.
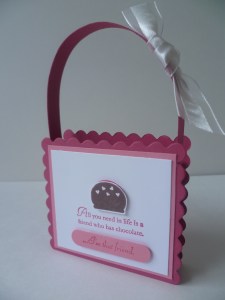
We cut 2 of the larger scallops from the Scallop Square Duo from Rose Red.  We cut the bottom row of scallops off and adhered the pieces to a small box we created.  (Check below for the instructions).  To decorate the box we stamped the image in Rose Red onto Whisper White and it was stamped again in Chocolate Chip.  Just the chocolate was cut out and raised up with dimensionals.  The image was stamped again in Rose Red and stamped on Regal Rose.  This was punched out with the Word Window punch and raised up with dimensionals too.  The white was then matted onto Regal Rose before adhering it to the box. The handle is a strip of Rose Red card and adhered to the box using Sticky Strip or Snail.  The strip measures 1.5cmx21cm.  Some Organza ribbon is tied around the handle to finish it off.

You can see in this photo below that the box is not very wide.  (it’s a bit in shadow though sorry).  It is just big enough for a note card and small chocolate.

To create the box, cut card 9.5cm x 12.5cm.  On the 9.5cm side, score at 1.5cm and 8cm.  Turn the card, Score card and 5.5cm and 7cm.  On this side, cut the 2  centre score lines up to the scored line that runs across.  Add sticky strip or snail adhesive to the small tabs and 2 of the side tabs.  Assemble the box.  Hope that makes sense???

We also made a card with the Create a Cupcake stampset and punch.
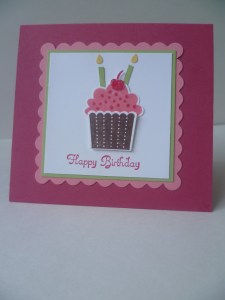
This is a small square card.  The card base measures 21cmx10.5cm and scored at 10.5cm.  I have cut a scallop square again, this time from Regal Rose.  I created the cupcake using various elements in the stampset and with the co-ordinating punch.  These are so fun to put together.  You can create the cupcake however you like.  It is so good there is a punch to go with this set.  This makes the creating so much easier!!  I really like the font  on the sayings too.

There are lots more projects to show you but that is enough for now.  I really need to get to bed!  Stop by again soon and I will show you some more.

Jenny xx

cards

THE AUTUMN MINI IS HERE!!!!

April 1st, already 1/4 of the way through the year but today also marks the start of the Stampin’ Up! Year.  Happy New Year!  How exciting!  Lots of new goals to achieve and stamping to be done.  Today is also the start of the Autumn/Winter Mini Catalogue.  There are lots of new fun products in store. 

One stamp set I have been having fun with is the ‘Eat Chocolate’ set.  I think chocolate is close to many of our hearts – isn’t it?????  I saw this colour combination recently on my blog travels and really liked it.  I think it works well with this set.  I have used Perfect Plum (a colour I haven’t used before!), Marina Mist and Certainly Celery.

I stamped the chocolates in Chocolate Chip (what else!) and then used the markers on the chocolate cases and cut them out and raised them up with dimensionals.  The DSP is from the Subtles Paper pack and I have used the eyelet border punch along the bottom.  Some Certainly Celery Grosgrain ribbon was tied around to finish. 

I have my ‘Cupcakes and Chocolate’ Autumn Mini Catalogue launch tomorrow so I have been stamping up a storm all week.  I will show you some of those creations next week so make sure you stop by.  If you would like to receive a Mini Catalogue and check out all the fun products for yourself  then email me and I will drop one in the mail for you.

I hope you have a lovely weekend. 

Happy Stamping -and  chocolate!! 😉

Jenny xx

cards

BLISS TIME!!

Can you believe that there is only 3 days left of Sale-A-Bration and the Summer Mini Catalogue.  Wow,  these past few months have flown by!  I have really loved using the SAB set ‘Bliss’.  It is such a beautiful set and so versatile.  I just wish it was in the main Stampin’ Up! Catalogue and I can keep using it for a long time still.  I don’t think it will be one I will part with in a hurry. 

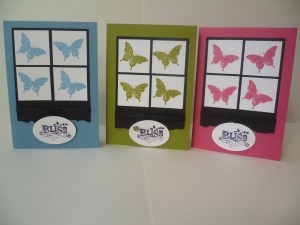
With these cards I want to show you today, I actually made the Marina Mist card before Sale-A-Bration started.  I thought It would be nice to have a set of these in different colours, but I only got around to making the other 2 last week.  The original design was inspired by a card by Ronda, a US demonstrator.

Here they are individually. 

Marina Mist and Black.

Melon Mambo and Black:

Old Olive and Black:

I love the Old Olive and Black.  It is not as clear in the photo but in real life the Olive against the black is intensified – If I can say that!   The Olive is so much more deeper.   It is such a contrast.

They are just very simple cards.  I added some narrow black Grosgrain ribbon tied around the bottom of the torn black card mat, and a matching Rhinestone brad.  I think they make a nice set.  If I had more time I could make a folder for them but I think I have to leave that for now. Time is running out. 

So, you still have a little bit of time to put those last minute Sale-A-Bration orders in and get your free stamp set.  You can’t miss out on this ‘Bliss’ set, or any of the others for that matter.  So contact your demonstrator today.  If you haven’t got one, drop me an email with your order.  I can send it anywhere in Australia.  For now, I’m off to bed.  Tomorrow is another day of stamping – I hope!!  🙂

Jenny xx

cards, Challenges

“GLAM IT UP!!!”

Just stopping by quickly to add this card for the Just Add Ink Colour Challenge for this week before it closes in a couple of hours.  When I stopped by JAI the other day I just had to have a go. I love Rich Razzleberry and Old Olive together AND I wanted to try this idea that I had seen it blogland recently and thought these colours would work well with it.

So, the colours for Just Add Ink Colour Challenge #60 are:

RICH RAZZLEBERRY        OLD OLIVE        CRUMB CAKE      WHISPER WHITE

Here is my card.  (Sorry the lighting isn’t very good as it was late in the day!)

Can you tell what I have used??? Look closely and you get a peak at the upcoming Autumn/Winter Mini Catalogue that will be out on April 1st.  The idea for this card was inspired by LeeAnn at Flowerbugs Inkspot here.   I even did the inside.

Ink: Rich Razzleberry, Old Olive (Ink Pads and Markers)

Card: Rich Razzleberry, Old Olive, Crumb Cake, Whisper White.

Stamps: Create A Cupcake.

Other: 2 step Cupcake Punch, Perfect Polka Dots Embossing Folder, 1/8″ Old Olive Taffeta Ribbon, Adhesive Pearls, 1.9cm circle punch and small oval and large oval punch.

I better quickly pop on over to JAI to enter it before it gets too late.

Thanks for stopping by,

Jenny xx

3D projects, Classes, Punch Art

“EASTER TREATS”

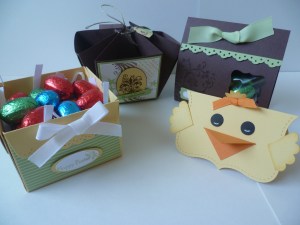
Do you want to create some fun Easter Gift Bags for Easter this year??  If you live locally then come along to my Easter Treats Gift Class.  This is what you will make.

I have something for everyone! 

WHEN IS IT???                     Friday 25th March 10am or 7.30pm at my studio in East Corrimal.

COST:                                         $20 in which you will make a great Treat Box, a Treat Bag and Scalloped Envelope Box.  PLUS  as a bonus this cute little Chick tag.  I will show him below. (Bring your own adhesives, Easter eggs not included) PLUS grab a cuppa and yummy morning tea/supper.

RSVP:                                        You need to reserve your seat by Tuesday 22nd  March.  

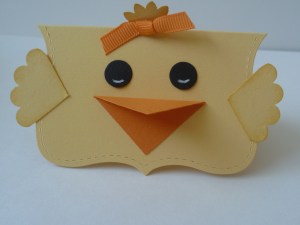
What about this cute Chick tag???

I found this on the internet somewhere and now not sure where now  (sorry!).  You could use him as a little gift card or as a bag topper.  He is a happy little chappy, isn’t he??

Don’t forget to email me if you would like to come along to the Easter Class.  We always have a good time.

Happy Stamping!

Jenny xx

cards, Challenges

SILHOUETTE UPSY DAISY

Just stopping by quickly to show you this card I have completed for Jac-inks Challenge #3.  This week it is an Inspiration Challenge.  This is the inspiration photo.

Doesn’t it look idyllic???  Wouldn’t it be nice to spend a few days lazing around here! 

This is the card I have created for this challenge.  I have tossed around ideas for this one for a few days.  I thought a brayered background would look nice for this, although  I hadn’t done a lot of brayering!

Considering all the Pinks that stood out so much in the photo I didn’t add any on this card.  By the time I finished I thought adding the pinks would be too much.  I have brayered with Marina Mist and Night of Navy for the sky. I masked off a circle before brayering to create the sun and sponged that with So saffron afterwards.  The grass was brayered with Certainly Celery and Old Olive.  The flowers from ‘Upsy Daisy’ was stamped in Basic Black.  This piece was matted onto Basic Black card and then Old Olive before adhering it to a Marina Mist card base. 

I created a flag strip for the greeting which is from ‘Teeny Tiny Sentiments’.  The butterfly is from the set ‘Every Moment’ and stamped in Black on Old Olive.  I added some Dazzling Diamonds with the 2 Way glue for Bling    Some Black narrow Grosgrain ribbon was added with a ribbon slide from the Hodge Podge Hardware.

So, I better quickly pop on over to Jac-inks to submit it before it gets too late.  If you’re quick you might have time to get a card done yourself so head on over and have a look.

Hope your enjoying your weekend???  Thanks for stopping by.

Jenny xx


3D projects, Tutorials

PUNCH BUNCH GIFT BOX AND CARDS!!

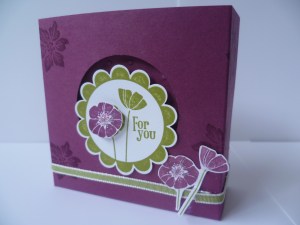
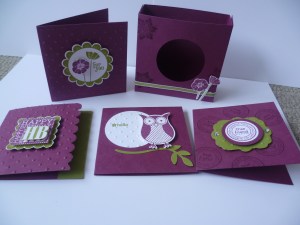
I recently had my Punch Bunch Gift box class.  I can now finally get around to showing you.  I used the Sale-A-Bration set ‘Punch Bunch’  and created this little box big enough to fit 4 3″x3″ cards.  These were a lot of fun to put together.  I used Rich Razzleberry, Old Olive and Whisper White to create them.

This is the box with the cards in them.

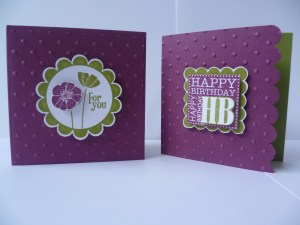
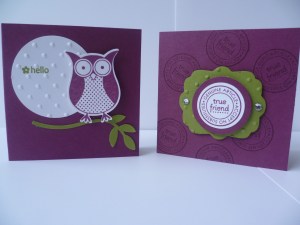
I will give you instructions for the box at the end.  This box was inspired by a box on our Stampin’ Up! Demonstrator website.  I adjusted it to fit these little cards in.  On the box I created a little window by punching out the front with the 1 3/4″ circle punch.  (Do this before you assemble the box!!).  I thought it was nice to have the window.  No matter what card you have at the front it shows through.  I had stamped over the box with the flower from ‘Bliss’ Sale-A-Bration set.  For the flowers on the front I used markers to colour the flower on the ‘For You’ stamp.  After stamping I cut them out.  They were adhered to the front after wrapping around some narrow taffeta Old Olive ribbon.  You can’t really tell but I added some bling to the flower with the 2-way glue pen and Dazzling Diamonds.

Here is the box with all the cards showing.  I will show you the cards close-up below.

For the cards I used the Big Shot and various punches. 

Here are the instructions for this cute Window Box.

Cut card 19cmx14cm.  On the 19cm side, score at 8cm and 11cm.  On the 14cm side, score at 3cm and 11cm.  Fold on all the score lines.  Cut the small score lines on the long side up to the score line running across.   (Remember to stamp your box and punch the circle before assembling).  Add Sticky Strip on the side tabs and small tab and assemble.

I hope these are clear enough.  Email me if you have any problems. 🙂

Have you got your Free Punch Bunch set yet, or any of the other Sale-A-Bration sets??? You only have 2 weeks left, so get to it.  You can select any of the Sale-A-Bration sets with a $100 order, or have a workshop and when your sales are over $600 you can select another SAB set for FREE.  See your demonstrator, or if you don’t have one you can contact me and I can have it shipped anywhere in Australia.

Have fun creating your own box and cards.  Until next time, Happy Stamping!!

Jenny xx

Uncategorized

ANOTHER “EXTREME” CARD!

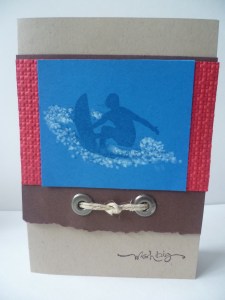
I debated on whether to show you this card.  I have really struggled putting this together.  Sometimes what is in your head doesn’t quite come out!


I stamped the surfer in Pacific Point onto Pacific Point card and I wanted to created a white wash for the waves.  I had tried sponging but that went in the bin!!  For this one I picked up some White Craft ink with the blender pen and dotted around the water lines. I did like the result.  Then I really struggled  putting the card together.  The layout is from a Clean and Simple sketch from a short time ago.

I wanted to create a manly card and added the eyelets and twine.   The Real Red card was run through the Big Shot with the Square Lattice Folder.   Not sure if it all works well though???? Maybe it is the colours??? Something is missing. What do you think???  All suggestions gratefully received.  🙂

Thanks for stopping by.

Enjoy your day,

Jenny xx

cards, Workshops

EXTREME SURFER MAKE & TAKE!!

I can’t believe how quickly these weekends fly by!  The start of another week.  I have been wanting to get back here to show you another of my ‘Extreme Elements’ cards I have been playing around with lately.  This card was a Make and Take we did at a workshop a couple of weeks ago now. 

I think this is one of the first times I have used Pacific Point.  I think it teams really well with Baja Breeze.  I stamped the images from Extreme Elements over the front of the Baja Breeze base.  The splodge was stamped in Baja Breeze onto Whisper White and then overstamped with the ‘Extreme Surfboard’ in Pacific Point and then layered onto Pacific Point cardstock.  The greeting is from Short and Sweet.  It was  punched out with the Word Window Punch and then a piece was punched out from Pacific Point with the Modern Label Punch.  This was then layered with dimensionals onto the card.  The original design for the card came from Splitcoast Stampers.  I modified it a bit to make it simpler for a Make and Take card.

I really love the ‘Extreme Elements’ stampset.  They are a great addition for those “Hard-to-do” Male cards!  I have had fun playing around with them.  I have another card I have made which I will show you next time.  I’m not so sure about that one though!

I hope you have a great week ahead – and fill it with lots of stamping!!!

Jenny xx

cards

“OWL BE SEEING YOU!!!”

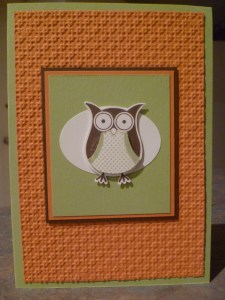
I am just going to interrupt my posting of my Extreme Elements Cards at the moment to show you this card.  My husband wanted a Farewell card for someone at work and he wanted to make it himself.  I wasn’t going to stand in his way!!!  We went through some pictures of cards I have saved for future reference.  He decided he wanted an owl and chose a card from SplitcoastStampers.  We changed it a little but went with the colours.  I cut the card and got the “tools” out.  He was impressed with the Big Shot AND the punches! 

So, here is the card.

The colours are Certainly Celery, Pumpkin Pie and Chocolate Chip.  He has used the Square Lattice Embossing Folder for the Pumpkin Pie.  He inked up the owl from Punch Bunch, first in Chocolate Chip and then in Certainly Celery and punched them out.  He didn’t add a greeting on the outside.  Inside he wrote “Owl be seeing you!!!”  

What do you think???  Pretty Good Hey!  I think he did a great job.

Back to regular programming tomorrow!

Jenny xx  (and from Glenn) Hehe!