3D projects, cards, Christmas, Classes, Stampin' Up!

TEAM CHRISTMAS PARTY!

Wednesday night was the last Team meeting of the year with a Christmas Party.  This is the larger Inky Fingers Team I am in with Vanessa Webb.  We are a funny bunch! 😉

Each month we get to share swaps although not everyone gets around to it.  (I know I don’t!) I think being the last meeting and our Christmas party most people made a special effort.

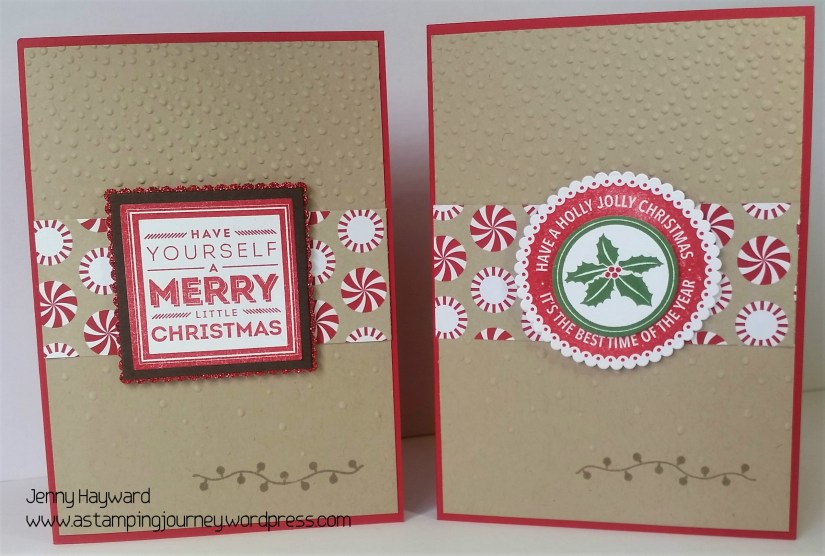
These are the tags I made for a swap.  I was pressed for time for anything too complicated. They are based on some tags I made recently and shared here.  These use the ‘Holly Jolly Greetings’ set and some scraps of the Candy Cane Lane DSP.  So quick to make. 🙂

holly-jolly-christmas-tags

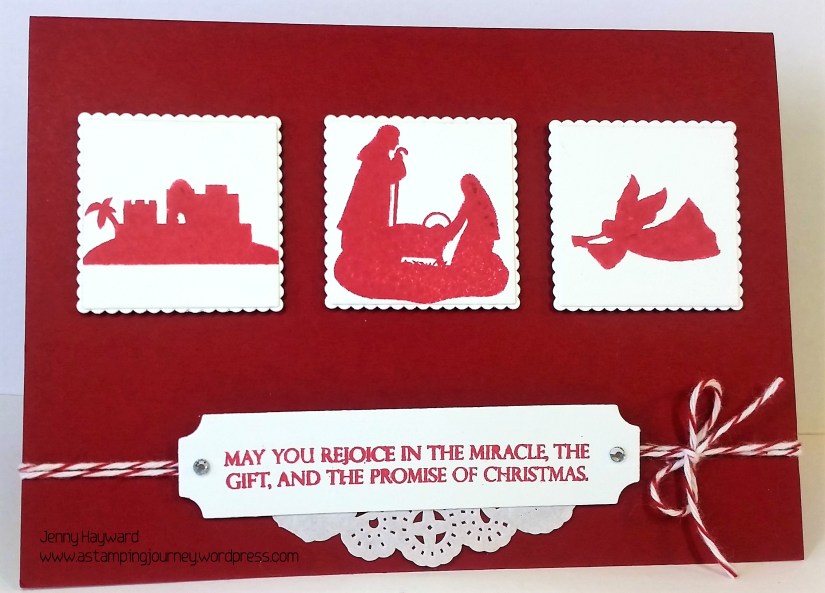
These are most of the swaps I received in return.

team-swaps

What a fantastic selection of cards and little treat holders. (Oops! I forgot your gift bag Katie!). Look at that gorgeous Dragonfly card given to me by Vanessa.  That’s a beautiful stamps and dies set coming out soon. 😉

Here are some of the crazy Inky Fingers Team.  It is a very creative bunch of people.

inky-fingers-team-2016

I have to show you the little make and take we made.  I have been wanting to make one of these for ages but haven’t had a chance to.  Barbara surprised us all in getting us to make it.  So cute! Just the size for a little Ferrero Chocolate or a Lindt ball.  Something nice to add to a table setting or as a simple gift.

ferrero-coffee-cup

Thanks for visiting.  How are your Christmas celebrations going?  It has been a little crazy this end.  I think we are now at the end of the end of year activities and presentations, classes have finished and cards have been sent out.  Still to put up the tree and finish shopping.  I feel it is never going to end!  Never mind.  We still have a week.  🙂

Have a wonderful day and stay sane,

jenny-_-signature

cards, Christmas, Stampin' Up!

HOLLY JOLLY LAYERS CHRISTMAS!

Some quick cards using the Holly Jolly Layers stamp set (which is a Hostess set from the Holiday Catalogue).  I made them a few weeks ago and used one of the versions for a Stamp-A-Stack.

holly-jolly-layers

I kept the layout the same on both and used different stamps in the set. On both of the cards the base is Real Red. Then a Crumb Cake mat on which I stamped the string of lights down the bottom in Crumb Cake. The piece was then run through the Big Shot with the Softly Falling Embossing Folder.  Once adhered to the card base I added a strip of the Candy Cane Lane Designer Series Paper.

TO STAMP THE IMAGES.

For the card on the Left: I stamped the greeting in Real Red and cut the piece with the Layering Squares Framelits.  A larger square in Chocolate Chip was cut with the next size up square in the Framelits and then a Scallop Square from the Layering Squares was cut from Real Red Glimmer Paper. They were all adhered together and then raised off the base card with Dimensionals.

For the card on the Right: I stamped the circle greeting in Real Red and cut this out with  a Scallop Framelit from the Layering Circles Framelits.  After cleaning the stamp then ink it up with Garden Green BUT BEFORE stamping use your Blender Pen to wipe off the “berries”in the centre of the holly.  This is done by wiping off the ink on the stamp and then wiping the tip of the Blender pen on to scrap paper to take off excess ink. It might take a couple of goes. Once it is clean you can use your Real Red Marker to colour in the berries.   THEN, you can stamp the image on to Whisper White card and cut it out with (I think) the 1 1/4″ Circle Punch. (Just check the size.  It could have been the 1 3/8” Circle punch.  It was some time ago that I made it).

These pieces were then adhered together with Dimensionals in between and then using Dimensionals to raise it up off the card.

Hope all your plans are coming together for Christmas.

See you again soon,

Jenny

cards, Christmas, Stampin' Up!

JOYFUL NATIVITY IN CHERRY COBBLER!

I made this card a couple of months ago and can’t believe I haven’t shown you.  With all the excitement of the Holiday Catalogue it is easy to forget the great Christmas sets we have in the Annual Catalogue.  This card uses the set ‘Joyful Nativity’ which is just lovely.

cherry-christmas-nativity-2

The card base is Cherry Cobbler.  I used retired white Paper Doilies on this one as I was waiting on the new ones to arrive at the time.  The sentiment is cut with the Project Life Framelits.

I thought the small images were just the size for smaller squares.  I considered layering them on to some Gold Foil scallop mats but I went for White card in the end.  I am sure Gold would look very classy!  These squares were cut with the Layering Squares Framelits but wouldn’t they look nice with the Stitched Shapes Framelits?

Here is the set if you have missed it.  It is on p 35 of the Annual Catalogue and is $30AUS (Photopolymer).

joyful-nativity

Christmas is getting way too close don’t you think?? But hey! I still have 2 weeks to shop and wrap and get Christmas cards written and mailed out and put up the tree… All good! 🙂  In all the frantic busyness let’s not lose sight of the true meaning of Christmas celebrating the birth of this baby that would change the world.

Thanks for stopping by,

Jenny

cards, Christmas, Classes, Stampin' Up!

IT’S A SHINY CHRISTMAS!

Our next class is all shiny – Silver, Gold and Copper!

It will be our last class for the year.

Let’s celebrate the year by making some special ‘Christmas cards’ with lots of fun and Christmas cheer.  Let’s make it “shine”.

WHEN: Saturday 3rd December at 2pm.
We will make one of each of these “shiny” cards.

COST: $25 – $5 discount with own adhesives.

Please RSVP by Thursday 1st December

cards, Christmas

CANDY CANE CHRISTMAS MOUSE!

This Merry Mice set is so cute don’t you think??  I had fun colouring this little mouse.  I Cased this card from my friend Leonie whom I think had Cased it off Pinterest.

merry-christmouse

I stamped the cute mouse on Thick Whisper White cardstock and have coloured some of it with the Aquapainter and inkpads.  The smaller areas like the bauble and the leaves and also the ears and stars I used the markers.  This piece was matted on Real Red then layered on to strips of the Candy Cane Lane Designer Series Paper. This is a great way of using up some of the scraps of patterned paper.

I meant to tie around the twine around the paper and the white card mat but forgot before I stuck it down.  There was no point even trying to lift it without destroying it so I just went with a bow with the both twines.  That’s all good though right.  🙂

Thanks for visiting.

jenny-_-signature

3D projects, cards, Christmas

HOLLY, JOLLY GREETINGS TAGS!

Just a quick one for me today. I thought I would show you these really quick Christmas tags using the Holly, Jolly Greetings set.

candy-cane-tags

These were inspired by tags I saw on Pinterest.  I think the Whisper White card is cut to 5cm x 12cm (2″ x 4 3/4″) and the top punched with the Scallop Tag Topper Punch. The snowflake is stamped in Crumb Cake with the sentiment stamped in Real Red. There are a number of combinations you could make with these stamps for your sentiments. You can see the set below.

I added some small strips of the Candy Cane DSP with some Red Glimmer Paper. This is a great way to use up some of those small scraps you have lying around. I tied around some Real Red Twine and finished them with Rhinestones.  It wouldn’t take long to whip up a number of these classy tags to dress up your gifts for Christmas.

Here is the set for you to see if you haven’t noticed it.  This is in the Annual Catalogue p 34. ($49.00 W   $35.00 C).

holly-jolly-greetings

Thanks for visiting today.  I hope your day/ night is great.

jenny-_-signature

JUST A REMINDER: 

  • Stitched Shapes Framelits still available to order until the end of November PLUS 25% off select stamps.  See the details HERE. Please use the HOST CODE: YTKD9JKB  
  • Extravaganza is on.  Up to 40% off select products with Flash Sale on Monday 28th with additional items reduced.  Go in the draw to win the set Cozy Christmas with a minimum $20 order.  See the details HERE. 
  • All orders over $55 in November receive the Exclusive limited edition Pop Up Scrap Bin as a Thank You gift from me for your orders.  See these cute bins HERE.
cards, Christmas

STAR OF LIGHT CHRISTMAS!

I realised I hadn’t posted these cards yet.  They have been sitting in my drafts folder for weeks!  Oops! Now you can get to see them.  🙂

I didn’t get this set, Star of Light at first when the Holiday catalogue came out.  I wasn’t sure about it and after all I still had the star framelits from the Annual Catalogue.  I got to play with this set at our stamping weekend, and well … I kinda liked it.  I may have this set now.  😉

This is the first card I made.

cherry-cobbler-star

The “swirly” star pattern is heat embossed in Copper.  The sentiments and small stars are stamped in Cherry Cobbler.  I cut one of the larger stars in Dazzling Diamonds Glimmer Paper and the smaller one is cut from Copper Foil sheet with the matching Starlight Thinlits.  A pearl is added for some glam.

This is quite a simple card really but makes and impact I think.

For the next card the layout is based on the Freshly Made Sketches #217.

gold-star

The base card is Real Red and the paper is from the Candy Cane Lane DSP pack.  I heat embossed the “dots’ in gold on white card.  There are so many star shapes in this Thinlits pack to give you so many options. (You can see them down below).  I cut a large one in Real Red and the more detailed on in Gold Foil.  Before I added it to the card front I looped around some Gold thread.

The sentiment is heat embossed in Gold onto vellum.  Just be gentle when heat embossing the vellum. 🙂

Here is the set and the Thinlits if you haven’t noticed them yet.  What combinations can you make??  Can you see the sentiments in the set too? They are really lovely. With these gorgeous sentiments and the varying shaped Thinlits, it doesn’t take much to make quick fancy cards with them.

star-of-light

They are available for $84.50 as a bundle in my store HERE.   So why not go and grab them.

Don’t forget with a minimum order of $55 you will receive the limited edition Pop Up Scrap Bin for Free from me as a Thank you!

See you soon,

jenny-_-signature

cards, Christmas

HOLLY JOLLY IN MINT!

Here is another card using Holly Jolly Greetings.  I have CASED this off Pinterest but I quite liked the idea.  I am not sure who the original creator is.

mint-macaron-joy

The base is Mint Macaron.  The snowflakes are stamped in Mint Macaron.  The “JOY” is heat embossed in silver which gives a nice shiny finish. The “spots” are stamped in Smoky Slate.  I liked how the ribbon is tucked behind the sentiment.

To do this cut a larger circle from your stamped Whisper White card.  Wrap the Mint Macaron Sheer Linen Ribbon around the white card before adhering it to your card base.  After you have heat embossed the “JOY” sentiment then cut with a smaller circle from the Layering Circles and raise it off your card with Dimensionals.  Add some Rhinestones for the bling factor.

Thanks for visiting.  Stop by again soon,

jenny-_-signature

Christmas, Classes, Stampin' Up!

CHRISTMAS STAMP A STACK!

I know it’s September but we do need to start thinking Christmas cards.  I have a Christmas Stamp A Stack on this Friday for you to get some of those cards done for you. We will create 6 cards – 3 each of 2 different designs. I have a little sneak peek for you.  I think you will love them.

sas-on-fri

Here are the details but if you can’t make the time let’s make another time just for you.  I would love to show you how to create them.

WHEN: Friday 23rd September at 10am or 7.3opm at my place in East Corrimal.

COST: $15 or $20 if you use my adhesives.

PLEASE RSVP: Wednesday 21st September

Why not bring a friend and receive a special gift.

Hope to see you there.

Jenny

3D projects, Catalogues, Christmas, Stampin' Up!

HOME SWEET HOME!

A couple of weeks ago with my order I got the new ‘Sweet Home’ stamp set and the matching Thinlits.  I finally had a play recently and made a cute little house.  I thought I would show you.

merry-house

These ‘Home Sweet Home’ Thinlits have so many special little “bits”, OK well dies to be more technical – 22 in fact.  You can create so many variations.  I will say this did take some time but I think now I have made one I can whip them up pretty quickly.  I think the most time consuming part was the roof. Also, I found it a little tricky lining up the stripes on the walls of the house. This house was CASED from Pinterest but I added the circle wreath on the door using one of the dies and then punched some small red circles from the 2-step Owl punch for the “berries”.

In the photo above it doesn’t really give you much idea of the size.  I thought I would take another photo for comparison.  Check out the size against an ink refill.

merry-house-size

Isn’t it the cutest??  I can’t wait to have some more play with these.

Have a wonderful day/night wherever you are in the world.

Jenny