cards, Convention, Masculine, swaps

SOUTH PACIFIC STAMPIN’ UP! CONVENTION 2015!

As you read this I will be on my way to the Gold Coast, Queensland for the South Pacific Stampin’ Up! Convention.  So exciting!!

The best part of this is meeting up with online demonstrator friends and swapping cards with them. Oh yes! There are great demonstrations of projects and sneak peeks too 🙂

So I thought I would show you my swaps I have done.  This year I made less than I usually do. Time was a little against me.

Here are my cards.

P1160442

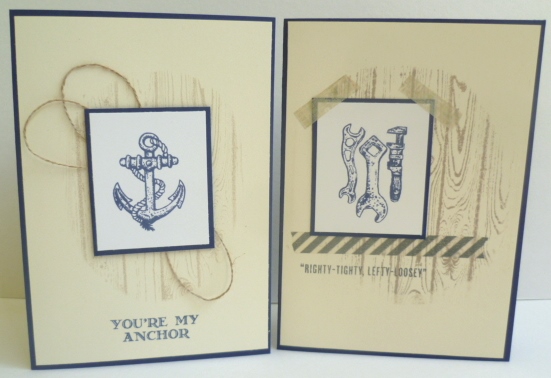
I have used the set ‘Guy Greetings’.  The card on the right I have CASED from Lisa Young (addinkandstamp.blogspot.com) HERE.  This card then inspired my card on the left.

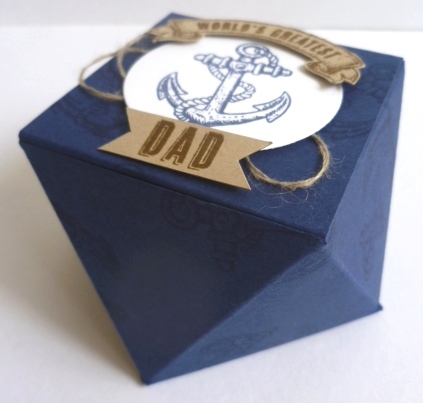
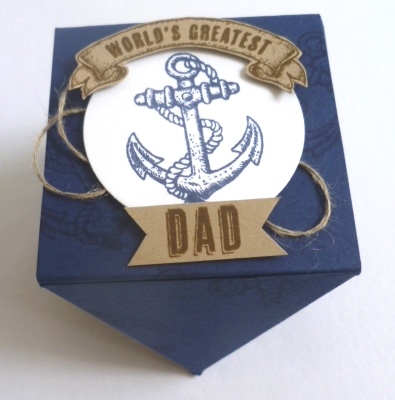
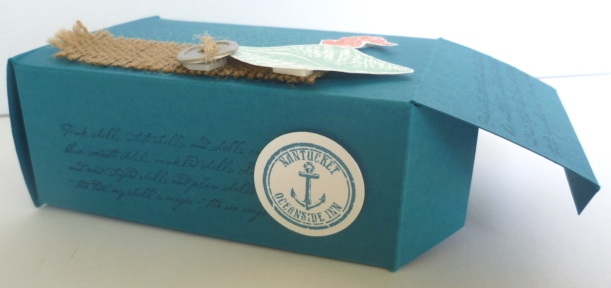
The base card for both is Night of Navy.  I used Very Vanilla mat.  I cut an oval shape on scrap card to form a mask and placed this over the Hardwood background stamp.  I inked up the Hardwood stamp by patting the Crumb Cake ink over the mask and stamp. I removed the mask and stamped the Hardwood stamp onto the Vanilla cardstock. The anchor and tool images are both stamped in Night of Navy ink on Whisper White card.

For the card on the right I added ‘Epic Day’ Washi Tape and this greeting was stamped in Basic Gray.

P1160446

For the card on the left, the greeting is stamped in Night of Navy.  I added some loops of linen thread on the back of the card.  To create these loops,  I loosely wrapped the linen thread twice around 2 fingers and cut the linen thread at this point. I added Glue dots to attach the loops under the top left of the image which had been matted onto Night of Navy card.  Then I made one loop and attached it under the bottom right.  Glue dots are the best  way to attach the loops.

P1160447

I hope you like them.  I can’t wait to receive the swap cards in return.  I will share them with you when I get back.

I will try and post again later in the week but most of the updates will be on my Facebook business page.  You can ‘Like’ me if you haven’t already.  Just click on the link in the right column.

Thanks for stopping by today 🙂

3D projects, Masculine, Stampin' Up!

FACETED BOX FOR THE MENFOLK!!

A few weeks ago I saw a cute Faceted box on a Facebook group I am on.  Of course, one must have a go at one of these!  I thought I would show you my version.  Then I will show you where to go to make your own.

I thought for this it would be good to make a male version.

P1160084            P1160082

I have used Night of Navy and Crumb Cake cardstock and used a new stamp set from the Occasions Catalogue ‘Guy Greetings’. This is a good one to tuck some chocolates in for the males in your family.  They are always the ones that are hard to make for aren’t they!

What do you think??  I thought at first it would be really hard to make with all those angled sides, but it was really easy once you got the scoring and cutting right.

Do you want to make your own?? My lovely friend Sam created this box {waving HI SAM] 🙂 Here is the You tube link for you to make it.  Really it is not hard so don’t be scared off by all those angled sides.

Now the funny thing after Sam posted this tutorial things went a little crazy and little Faceted boxes were streaming onto our group page.  So fun to see all the versions.  You can check them out on Sam’s page.  She posted them to show how crazy things were. HERE THEY ARE!

So now go and check the Youtube video out and make your own version.  Why not send me a photo of your version and I can share it with Sam.  🙂

Happy Stamping,

Jenny

cards, Masculine, Stampin' Up!

ADVENTURE BOUND + HELLO YOU. GREAT FOR THE MALE CARDS!!

I just have to share these cards I made yesterday.  I am not great at making male cards.  Aren’t they hard to make???  The new Adventure Bound Designer Series Paper Stacks in the Occasions Catalogue makes creating them so much easier.  Actually there are a lot of great “male” sets in this catalogue.

P1150801


The prints in the stack are beautiful.  You really don’t need too much more with them on your cards.  I have used the new ‘Hello You’ Thinlets and the ‘Crazy About You’ stamp set with them and kept the embellishments very simple.  I was thinking of putting Candy Dots on them but didn’t get around to it.  I don’t think it needs them really.  I like the clean look.

Here they are individually.

P1150803

P1150805

P1150808

P1150806

The Adventure Bound Stacks are great value at $11.95.  (p 40 of the Occasions Catalogue).  You get 48 sheets – 4 each of 12 double-sided designs.  Sized right for the front of your cards.

Adventure bound

You can get the Thinlets and Crazy About You set as a Bundle. (p 31).  For Bundle price W $112.95  C $94.25  Photopolymer $72.95.  They are available individually too.

Hello You          Crazy About You

So if you have a hard time with cards for the boys then grab one of these stacks.

Thanks for stopping by today,

Jenny 

3D projects, Masculine

RECTANGULAR GIFT BOX!

I was playing around the other day and created this Rectangular style box. I was inspired by some packaging we received on something we bought.  I liked the design so I tweaked it to fit our Australian size cardstock.  Here are the boxes I made. Keep reading too for the tutorial to make your own.

P1140380


A Cherry Cobbler box ready for Christmas.  I used the ‘Bright and Beautiful’ Stamp set and embossed one of the gorgeous stars with Gold Embossing Powder.  I cut this out and one in Gold card with the Star Framelits.  I coloured a Rhinestone with the Cherry Cobbler Blendabilities.  BEFORE assembling make sure you stamp the cardstock.  So much easier!  The greeting on this box is from the ‘Good Greetings’ stamp set.  This is the Free set you can get this month when your party sales reach a minimum or $300.  This set is very useful with greetings for all occasions.

The Island Indigo box might suit the men in your life.  On this one I stamped the seaweed from ‘By The Tide’ with White Craft Ink.  The shell was stamped in Pool Party and the Seahorse in Calypso Coral.  I stamped the verse on each side of the box with Island Indigo ink.  For the Burlap trim I cut a length and cut off the sewn edges.  I then frayed the edges by pulling out some of the thread.  I used one of the threads to tie off on the Silver button.

Here they both are individually.

P1140381 - Copy     P1140387

Here you can see how the end flaps fold in.

P1140412

So do you want to know how to make one yourself.  Here you go.

RECTANGULAR GIFT BOX TUTORIAL

(Finished size is 10cm x 4cm x 7cm)

1. Cut cardstock METRIC:  24cm x 20cm.  On the 24cm side score and 4cm, 11cm, 15cm and 22cm.  On the 20cm side score at 1cm, 5cm, 15cm and 19cm.

                            IMPERIAL: 9 1/2″ x 8″.  On the long side score at  1  1/2″, 4  5/16″, 5 7/8″ and 8 5/8″.  On the 8″ side score at 3/8″, 2″, 6″ and 7 1/2″ (NOTE: I haven’t tested these measurements yet so I do hope they are correct! Let me know if I am wrong.  There are some odd measurements!)

Here is the template.  (This has now been updated).

P1140404

2. Cut off all the shaded areas.  Cut up on the tab lines (filled in line).  Where I have marked “Trim Down” I cut these tabs down shorter.  These are the tabs you fold in on the ends and then I angled the tabs to fold in more neatly.  I hope that makes sense??

3. Fold on all the scored lines.  Stamp the cardstock as you like before assembling.

4. Add Sticky Strip along the narrow tab on the right hand end (the underside).

5. Assemble by lining up the edge of the tab with the Sticky Strip to the other end.  Then fold in the flaps on each of the ends.

Hope this all makes sense.  Please ask if you are unsure.  Enjoy making them.

Jenny

cards, Masculine, My DIgital Studio

“ON THE GO” FOR A 5 YEAR OLD!

Another Great Nephew’s Birthday….yesterday. Again I left it until the last minute, and again I realised I don’t have any suitable stamps for a young little boy since the new Catalogue came out! So I turned to MDS (My Digital Studio). I love how MDS extends your card and paper supply.  Here is the card I made.

P1140184

I printed off some Designer Series Paper to card size.  I used the ‘On The Go’ paper.  Then I created a ‘5’ using the “Schoolbook Serif” Digital brush set, resized it and recoloured it to Island Indigo.  I chose a little car from the ‘On The Go’ Brush set and recoloured it Real Red. Once these were all done I printed them off.  I did have to go back and resize the car to fit the 1 1/4″ circle punch (a couple of times).  A circle was punched out with the 1 3/8″ circle punch from Crushed Curry to layer underneath it.  I cut the ‘5’ out leaving a white border around it.  After adhering the Designer Series Paper to the Island Indigo card base I then raised up the 5 and the car with dimensionals.

MDS to the rescue again – and you can still have dimension and layers by creating a Hybrid card.

Thanks for stopping by.

Jenny

3D projects, cards, Masculine

MONEY HOLDER FOR THE BOYS!

Hope life is going well in your corner of the world??  Here it is cold and windy – but I guess you have to expect that for this time of year.  Yesterday was my gorgeous boy’s 18th Birthday.  I can’t believe how the time has flown.  I thought I would show you the card and gift I made for him.

You might recognise the card???

P1130120

I used this card for my Convention swap a few month’s ago.  Josh loves vinyl records so thought this idea would be really cool for him.  I used the Circle Thinlets Die to cut the Smoky Slate card base.  I used the Music Notes wheel (now retired) to run over the card in Black Stazon.  The black circle was punched with the 2 1/2″ circle Punch and the white inner circle was punched out with the 1 1/4″ circle.  The small black circle was punched with the 2 step Owl Punch.  The ‘YAY’ is cut from Real Red card using the little extras in the Circle Thinlets set.  I could have used the Chevrons in the set too but these ones were punched with the Chevron Border punch.  The ’18’ is cut using the ‘Timeless Type’ Die (now retired).   I stamped the streaks in Smoky Slate from ‘Gorgeous Grunge’ too.

Here is a close-up.  Josh thought it was pretty cool and even at 18 had fun flipping it! 😉

P1130123


Here is the inside with just a simple “Happy Birthday” from ‘Fabulous Phrases’.

P1130127

I forgot to take a photo of the Money Holder on it’s own but you can see it in the photo at the top. For this I followed the theme of the Vinyl Record.  I stamped over the front of the card using the streaks and splodges from ‘Gorgeous Grunge’.  The stars were punched from the new ‘Itty Bitty Accents’ pack and the greeting is from ‘Label Love’.  Here is the inside of the Money Holder.  I added some more streaks and stars.

P1130125

I will give you directions so you can make your own Money Holder.  They can just add a little extra to the gift rather than just adding it inside the card.  I didn’t take step-by-step photos but I think it is fairly straight forward  – I hope 🙂

MONEY HOLDER   (The finished pocket is 16cm long)

METRIC

Cut you card 21cm x 16cm.  Score on the short side at 8cm.

On the long side score at 5cm. Cut off the Top Left Hand section. (This will be the smaller tab section)

Add adhesive along the top and bottom of the lower Left Hand section and fold over to create a pocket.

IMPERIAL (These are approximate.  Check your card size – and your money size).

Cut your card to 8 1/2″ (ie the width of the card) x 6 1/2″. Score on the short side at 3 1/4″.

On the long side score at 2″. Cut off the Top Left Hand section. (This will be the smaller tab section)

Add adhesive along the top and bottom of the lower Left Hand section and fold over to create a pocket.


Have a happy day.  I hope to go and create today.

cards, Masculine

HEXAGON HIVE SOCCER INSPIRED CARD!

Just a quick post as I race out the door to get this in the mail.  I made this card up for one of my Great Nephew’s 9th Birthday.  I have to get it in the post TODAY!

I realised I didn’t have a lot of stamps for the young boys, but Hey! with the World Cup Soccer that has been around this would work the trick.

P1140001

I cut Black card with the Hexagon Hive Die and layered it on some Whisper White card.  This was adhered to the Pacific Point Card Base.  The greeting is from the ‘Hip, Hip, Hooray’ card kit and stamped in Pacific Point and cut with the 2 1/2″ Circle Punch.  I cut a Real Red Starburst with the Starburst Framelits.  The little yellow flags are punched with the Petite Pennants Punch.

I am sure the inside money would be more appreciated than the outside card so no need to go to too much trouble!! Hope you like it though??

Gotta run, Have a great day 🙂

cards, Masculine

GORGEOUS GRUNGE THANK YOU!

I made a special Thank You card on the weekend.  My husband had a really bad Mountain Bike accident 2 weeks ago.  Fortunately there were no broken bones but a few other injuries and stitches.  This Thank You card is for his mate who he was riding with.  I am so thankful for all he did on the day and continually does for us.  I added a Gift Card with the card but this “Thank You” doesn’t seem enough.

P1110367

The card had to be manly and I was careful with the colour choices.  No red was to be seen!!  I used Gorgeous Grunge and Chalk Talk.  It was finished off with a ‘Hung Up Cute Clip’ (p 170 of the Annual Catalogue).

The last couple of weeks have been crazy.  I have just now managed to get to my stamp room again to create. It is such a good feeling to escape and stamp!!!

See you again soon,

Jenny

cards, Masculine

TAG-IT CONGRATULATIONS!!

I know that we are in the Christmas season but I had to show you this card.   Yesterday Josh received his HSC marks.   For my overseas readers this is the mark achieved from the final exams at High School.  The mark determines the University courses they can apply for.  Josh achieved an awesome result and we are very proud of him.  He worked really hard.  So I wanted to let him know.  This is the card I made for him yesterday.

P1100874

I have used the stamp set ‘Tag-it”.  Did you know that Stampin’ Up! will donate $3 from the sale of this stamp set to Ronald McDonald House Charities.  Isn’t that great!  I stamped it first in Island Indigo and then with Versamark and embossed it in silver.  Then cut the trophy out and adhered it on to the stamped image.  I added a small Rhinestone in the middle.  I think it is still OK to have bling on a boys card, don’t you think??

Once this was done it was all  layered on a Silver Glimmer circle punched with the 2 1/2″ circle punch.  I embossed a strip of Pool Party card with the ‘Alphabet Press’ Embossing Folder and layered a strip of silver glimmer paper underneath. I stamped the base card with ‘Gorgeous Grunge’ before assembling it all together.

Here is a close-up.

P1100876

OK, back to Christmas preparations.  We have only just got the tree up, there is still shopping to be done and presents to wrap.  Better get back to it!

Jenny

cards, Masculine

“BLUE RIBBON CONGRATS”

One of my Nephew’s recently graduated from University so I wanted to make a card congratulating him.  I didn’t think I had a ‘Grad’ stamp but then I remembered the Blue Ribbon stamp set.

P1090561

It is a hard to tell by the photo but I clear embossed the ‘Congrats Grad’ after I stamped it in Black. So it has a nice shine to it.  This was punched out with the 1 3/8″ circle.  The Scallop was stamped in Pacific Point and punched out with the 2 3/8″ Scallop Circle. The tail outlines were stamped in Pacific Point and then I stamped the words over it with Black.  The Whisper White card was embossed with the Chevron Embossing Folder. This was layered on a Basic Black mat and then a Pacific Point card base.   I have added some Black Taffeta ribbon.  It doesn’t hurt to add a little bling on a boy’s card either does it???

Thanks for stopping by today.  I hope you can visit me again soon.

Jenny