Uncategorized

12 WEEKS OF CHRISTMAS – WEEK 10!!

Latte 12 weeks Header

Week 10 of our 12 Weeks of Christmas.  That can only mean that Christmas is getting very close – which is a scary thought!  Today I bring you another project in our 12 Weeks of Christmas series.  I hope you like this project.

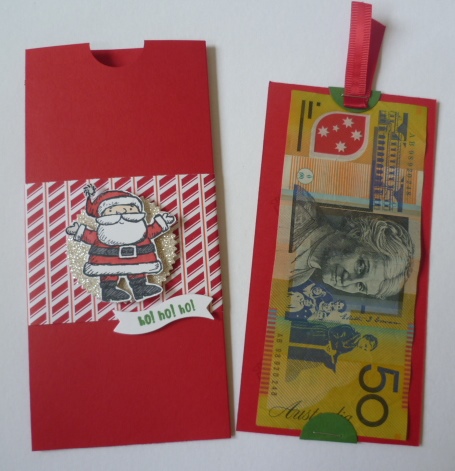
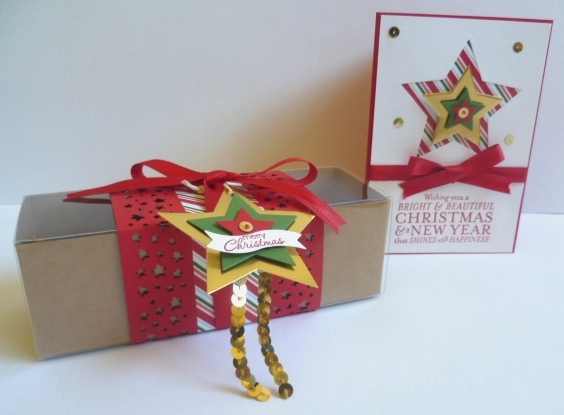
Today I bring you a Tag A Bag Gift Box and matching card.  

P1150415

When you are looking for gift packaging ideas Stampin’ Up! offer an assortment of bags and boxes that with some simple decorating they can make your gift very special.  To hold some yummy treats you can’t go past the Tag A Bag Gift Boxes.  These assemble very quickly without any adhesive at all.  These boxes can be found on p 201 of the Stampin Up! Catalogue and come in a pack of 8 for $11.95.  Great value!!

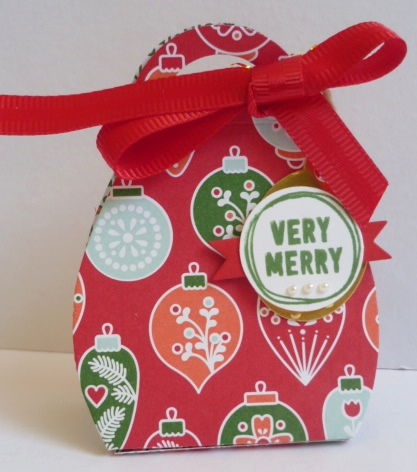
Here is the box for you.

P1150420

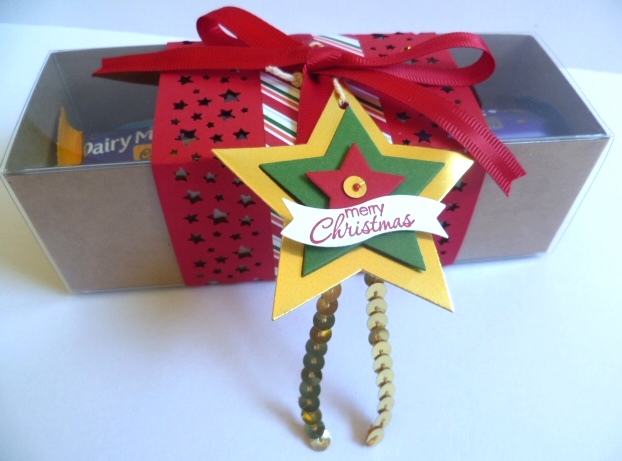
For this I have punched a strip of Real Red Cardstock with the Confetti Stars Border Punch, wrapped around a strip of the Nordic Noel DSP and tied around some Real Red Satin Ribbon.  I have the tutorial below. The cute tag is simply a number of stars cut with the Stars Framelits from Gold Foil, Garden Green and Real Red.  In the centre of the smallest star I added a single Gold sequin and added a small pearl coloured with the “red” colour in the Cherry Cobbler Blendabilities pack.  I added a length of the Gold Sequin Trim behind the star. The greeting is from Petite Pairs and cut using the Bitty Banners Framelits.

I made a matching card to go with the box.

P1150417

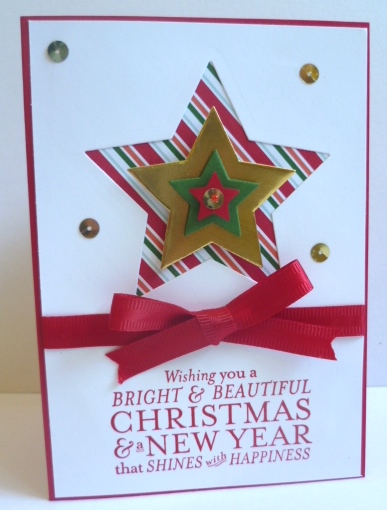
I cut a large star from the Whisper White card and adhered some of the same Nordic Noel DSP behind it.  Then layered stars in Gold Foil, Garden Green and Real Red to match the box although these were slightly smaller.  The smaller red star is punched from the Itty Bitty Accents punch set.  I added a single Gold sequin and coloured Adhesive Pearl to this too. The greeting is from the Bright and Beautiful set stamped in Real Red.  I wrapped around some Real Red Satin Ribbon and added a bow separately.  So much easier to add the bow separately.  It sits so much better.  I always have a tussle with the card and the ribbon. 😉  I finished it off with some single Gold sequins around the card.

TAG A BAG BOX TUTORIAL

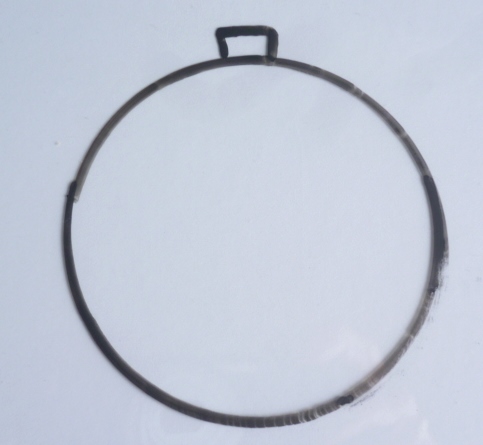
Cut cardstock to measure 9.5cm x 28cm (3 ¾” x 11”). Punch along both edges with the Confetti Stars Border Punch. 

P1150400

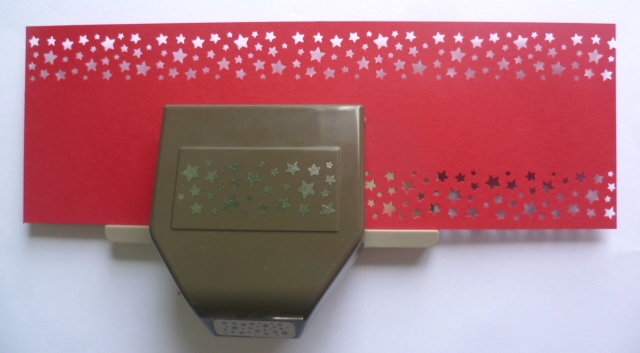
Cut DSP 3.5cm x 28cm (1 3/8” x 11”). Adhere slong the centre of the punched strip.

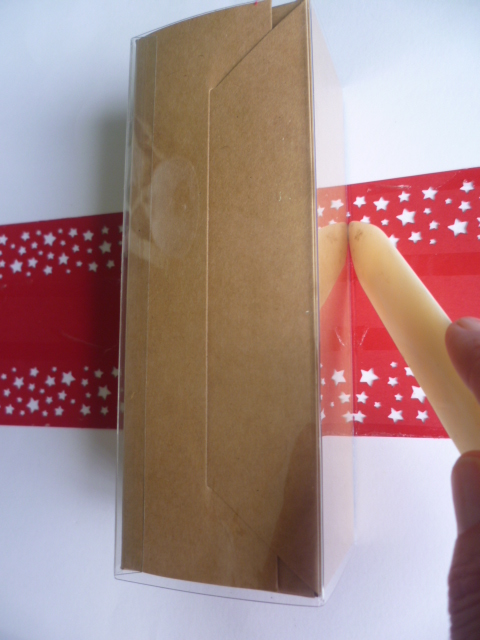
Run adhesive along the back of your card strip with adhesive of your choice.  I used Fast Fuse. 

Place the middle of your card strip at the centre of the top surface on the Acetate sleeve for the box and adhere down.  Wrap the cardstock around the sleeve adhering each side as you go.  TIP: When you wrap the cardstock around each side run the Bone Folder along the edge to give a crisper fold. Check it out  in the photo how I have done it.

P1150402

Adhere the ends together at the base of the box.

Wrap your Red Satin Ribbon around the box and tie in a bow.  Create a tag of your choice to finish.

I am sure you could think of a few friends/workmates that you could whip up a few of these for?? Fill them with some chocolates, cookies even a small gift.  Decorate them as you like.

Of course, as with our past 12 Weeks of Christmas projects we have a special bundle for you and receive 10% off.

Tag A Bag Boxes   (130927)                                   $11.95

Gold Sequin Trim     (132983)                                 $8.95

Confetti Stars Border Punch (135861)                    $37.95

TOTAL    $58.85.  Your price with 10% off is $53. Only available by ordering through me directly not through my Online store. 

tag a bag box                   gold sequin trim                 confetti punch

Thanks for stopping by today.

Jenny


3D projects, Christmas

12 WEEKS OF CHRISTMAS – WEEK 9!!!

Latte 12 weeks Header

These weeks are just flying by! Week 9 of our 12 Weeks of Christmas projects.  Today’s project is brought to you by Virginia. These are great little boxes using the Curvy Keepsakes Thinlet.

setof5finished1a

This versatile little Thinlets set creates the sweetest gift box in a shape that can be hung on a Christmas tree, used as holders for party favours or bonbonniere boxes for weddings/engagements/christenings etc.  They can even be used with Vellum for a table decoration by putting a little battery operated tea light inside to make it glow.

The first sample is a gift box that shows you how you can use both sides of patterned papers to create a unique customised Keepsake boxes.  You do not have to have larger sheets of pattterned paper or cardstock either.

You can see how much they will hold by these photos below as well. Two standard tea light candles, or one Votive candle.

TrimTheTreeTagPetitePunch1a

 TrimTheTreeTagPetitePunchOpen1a       TrimTheTreeTagPetitePunchOpen1b

The tutorial  that you can request will show you exactly where to place your sheets of paper/card on your Big Shot machine’ magnetic platform so that you can make the most of smaller pieces, or, as in these samples, use two different patterned sheets from the Trim The Tree Double Sided Patterned paper stack (page 7 of the Holiday catalogue).

all4piecesgluedAndCurvedWithBoneFolder1a

For the next samples, Wirg has used translucent Vellum sheets (page 193 of the annual catalogue). You can cut out both pieces from an A4 sheet as well as stamp the little baubles from the Cheerful Christmas Stamp set (page 15 of the Holiday Catalogue) – or any stamp set of your choice.

 vellumCherryCobblerTagChristmasCheerTealightOpen1a     vellumCherryCobblerTagChristmasCheerTealight1a

For the Christmas one, Wirg has used Cherry Cobbler and stamped the pieces before gluing them together.  When assembling you can put them together so that the stamping is on the inside of the closed box. Doing this gives a more subtle look. If you put a little battery operated tealight inside, it’s gives a beautiful effect as you can see.

StippledBlossomBlackberryBlissKeepsakeBox1a

The 2nd Vellum sample uses stamps from the Stippled Blossom stamp set, Whisper White and Blackberry Bliss ink pad.  Isn’t it pretty!

Here is another sample. The Four Feathers stamps and matching Framelits are brilliant for this.

curveykeepsakebox2a     curveykeepsakebox2b

FYI the battery operated tea lights can be picked up at most Discount stores and are quite inexpensive.  Check your local discount stores. At this time of year, they are quite popular.

Tip 1: Remember, you can cut your A4 sheets of vellum in half and cut the two pieces you need at the same time as the Vellum is quite fine and you can do two sheets at once.  Don’t do this with cardstock and thicker papers as Framelits are quite thin so you may not get a clean cut right through.

Tip 2:  As ink can take a little longer to dry on Vellum, give it a blast with your heat tool to dry it. And please be aware, when using a Blackberry Bliss inkpad, it’s a very strong ink. The slightest bit still on your fingers or craft work area can transfer onto your vellum without you realising.

This week’s bundle deal, (which you will not find in my online store), is as follows;

  • White Vellum, A4 cardstock $10.95
  • Trim the Tree Paper Stack $11.95
  • Linen Thread $7.95
  • Gold Sequin Trim $8.95

That’s a total of $39.80 + SHIPPING. However, if you order the bundle from me then you only pay $35.00 (+Shipping) + also receive a free bottle of Tombow Multipurpose glue!

REMEMBER: if you want the pdf tutorial sheet with how to place your dies and using two different patterned papers to make these OR if you want to place an order then drop me a comment or email me. 🙂

Thanks for stopping by.  I hope you stop by again soon,

Jenny

Stampin' Up!

25% OFF TO JOIN THIS WEEK!!

Save more

THIS IS AN AWESOME OFFER.  YOU JUST CAN’T MISS OUT!!!!

JOIN STAMPIN’ UP! BETWEEN NOVEMBER 25TH AND DECEMBER 2ND AND PAY 25% LESS FOR YOUR KIT. PAY $126.75 AND RECEIVE $235 IN PRODUCTS OF YOUR CHOICE. PLUS – PLUS YOU PAY NO SHIPPING!!

That is $107 of FREE PRODUCTS!! Crazy right!!!

Joining now you won’t need to submit your first full quarter until the end of March 2015.  BUT with this offer any orders you place during December you receive a 5% rebate.  That is an added bonus on top of the discounted Starter Kit. 

Have you considered joining the Stampin’ Up! family?  Are you still really not sure about it all and have questions??  Let me help you out. 

When you join the Stampin’ Up! family you get a regular 20% discount on all your purchases.  You get a few freebies thrown in along the way too.  You can choose to build a business and collect orders from people around you or enjoy the discount just to indulge in your own hobby.  It is entirely up to you! Plus, you get a sneak peek of the new products and catalogues coming out and get to preorder products before the general public.  This is great since we will be getting a new Occasions Catalogue on January 4th and you will get to see it in early December.

I have been with Stampin’ Up! for over 6 years now.  I have had so much fun sharing stamping with others.  I love to see people discover stamping for the first time and love to share new stamping techniques with others to help them extend their own stamping.  Making new friends is an added bonus whether they are through my classes or online from places all over the world.

When you join my team, Jen’s INK. I will assist you in whatever way you need. Whether it is how to get the best discount for your own purchases or how to take that step and hold stamping events with your friends and family. You can join us at our team meetings and cheer one another on with their creative projects and achievements – big or small.  Whether you are here for the short term or plan on staying around for a while, we all help each other out.  Even if you are a distance away you won’t miss out on my help and support so if you are from anywhere in Australia, then come and join in the fun.

If you would like more information, then ask me for a special information pack. You can email me or phone me and we can talk about it further.  I look forward to talking with you more. 

If you are ready to join right now, Head to my Website HERE and get ready to join the Fun!! Have your $235 shopping List ready to go. 🙂

Jenny

Join


3D projects, Christmas

12 WEEKS OF CHRISTMAS – WEEK 8!

Latte 12 weeks Header

We are now up to Week 8!!! Today’s project is brought to you by Libby.  This is very cute!  Libby has made a bag with a shaker frame on the front, a Star Gift Box and two cards to pop inside the bag.This would make a lovely gift to give someone before Christmas. 

12WeeksChristmas_Week8

Here is a closer look at the bag.  What a great idea having the Shaker Star on the front!

Wk8_12Weeks2014_22.jpg _ bag

The shaker frame is made using the Stars Framelit Dies, ‘Many Merry Stars’ Photopolymer Stamp Set, Confetti Stars Punch with Red Glimmer Paper and Frosted Sequins.

Wk8_12Weeks2014_18.jpg _ Shaker frame

The bag itself is made using the ‘Under the Tree’ Speciality Designer Series Paper from the Holiday Catalogue.

The Star Gift Box has a small Kit Kat Chocolate inside it and would be great as a stocking filler or a teacher gift, teamed with a bottle of wine or a coffee voucher etc.

12WeeksChristmas_Week8_8.jpg _ star

The two cards also use the ‘Many Merry Stars’ Photopolymer Stamp Set and the Stars Framelit Dies with the Big Shot.

This card uses layering of stars and Dimensionals to give depth and dimension. Both cards are stamped inside and the envelopes are also stamped.

12WeeksChristmas_Week8_9.jpg _ card

The last card uses the nesting of the Stars Framelit Dies again to make a frame of Gold Glimmer Paper which adds some sparkle to this card along with the Frosted Sequins.

12WeeksChristmas_Week8_10.jpg _ Card 2


If you would like the full instructions for this set of projects then drop me an email or a comment. 


THIS WEEK’S SPECIAL BUNDLE

Now you can order this bundle through me personally at this special price

$65 + Shipping.

Many Merry Stars Photopolymer Stamp Set

Confetti Star Punch

++
Thanks for stopping by.  I hope you’re getting your Christmas crafting on this weekend 🙂
Jenny
3D projects, Christmas

NOTEBOOKS AND MORE FOR CRAFT FAIRS!

Today I thought I would show you the notebooks I made for my recent Fairs I have been to.  These were all fun to make too and a great way to use up the scrap paper bits you have lying around.

Firstly, some notepad covers.  Very useful to have around the home or by the computer for quick notes.

P1140669

P1140671


To make these: Check the size of your notepads but I will give you the measurements for these ones.

Cut your card to 28cm x 21cm.  Score on the long side at 9cm, 10cm and 19cm.  Turn your card 90′ and score on the short side at 1cm and 3cm.  Cut off the small section on the top (only on this section and then the larger section below.  Does that make sense?? I didn’t make a template to show you.  You just want to end up with a small strip towards the top that the Notepad hangs off from the backing card on the notepad.  Decorate the front as you like.


Some post-it note holders.  These are fun to make.

P1140672


I don’t have an exact measure for these but they are simply a small piece of card that folds over to fit.  Make sure to allow extra to score 2 lines in the centre to create a spine in the middle. Decorate the front as you like.

P1140673


Notepads: just cover notepads as you like.  I didn’t want to fiddle with the spiral top so I just chose some coloured paper that co-ordinates closely to it.  I think it is OK!  Decorate with butterflies and bling!

P1140674


These notebooks I picked up from the discount store too and just decorated them as I liked.

P1140675


Hope you liked these ideas?  If you missed the previous posts on Craft Fair projects then you can check HERE. Don’t forget to check the previous post too.

Thanks for stopping by,

Jenny

PS. Week 8 of 12 Weeks of Christmas is due out today.  As I am away from the computer I am not able to post it today so when I get back tomorrow I will post it as soon as I can. 🙂

3D projects, Christmas

MORE CRAFT FAIR PROJECTS!

I am away this week but thought I would schedule a few posts for you – so you don’t miss me too much 🙂  The last couple of months I have done a few Fairs and School Fetes so I thought I would show you the projects I have made for these.  Previous posts for these on my blog have been really popular (and I will add the links at the end if you have missed those).  I know when I have done these I have searched around the internet looking for ideas so I am sure you might do too.

Here are some of the projects I have recently made.

Firstly, I made up some Gift Card Holders.  These are very useful at Christmas time I think as many people give Gift Cards as gifts.  I used the Envelope Punch Board and made it to the Gift Card size holder on the measurements.  These were decorated with all kinds of stars.  Some of the stars had been sitting around my desk so it was a good way to use them.

P1140680

Many people give money as Gifts too so I thought it would be nice to dress up the cash instead of just sticking it in an envelope.  I found this idea on a blog somewhere and I am sorry I am not sure where now though.  I did adjust the measurements to make a better fit for our size notes. I have the instructions just below.  Just check your own currency note size to fit.

P1140677

P1140678

MONEY HOLDER  (in metric).

Cut card to 18cmx18cm.  Score on one side at 8.5cm and 17cm.

Fold on the score lines. Punch a half circle on the front flap with the 1″ circle punch.  Add Sticky Strip or other strong adhesive along the narrow tab and fold up on the score lines and adhere together. Decorate as you like.

Insert

Cut card 8cmx16cm. Punch out 2 1″ circles from co-ordinating cardstock fold in half.  Staple one on each end towards the edge of the card to allow the note to slip in on either end.  Remember just to check the measurements for your own currency.  You can’t see but I stamped the insert front too.

Now how can you forget your furry friend.  These were very popular at my fairs.  I just cut the topper from the Top Note die and folded it in half.  The stamps are from the the set ‘D is for Dog’.

P1140679

You can check previous posts on Craft Fair Projects HERE.

Stop by again in the next few days I have some more projects to share with you.

Jenny

3D projects, Christmas

CURVY KEEPSAKES HANDBAG!!

I am sure you have seen all the amazing creations around using the Curvy Keepsakes Framelits. They are so clever.  I have been making some projects myself with them and I will show you these another time.  When I first saw the Framelits I thought it would make a cute little handbag. Recently I have seen some floating around the internet.  I thought I would show you my Christmas version – and it uses the set ‘December Wonder’ that I have been focusing on this past week.

P1140939

I am sorry I didn’t take a side-on view.  It would give you a better idea how it looks.  I will try and update this later. To create the bag I have used some of the Nordic Noel DSP.  I just cut the paper to size to fit half of the Framelit, the section with the curvy handle.  I cut 2 of these out.  Where the base is I trimmed off about 2cm (3/4″).  I added Sticky Strip to one of the bases and assembled the two together.  You can add some little chocolate treats and tie around some ribbon and add a tag.  For this tag I stamped the “Very Merry” in Garden Green and punched it out with the 1″ circle punch.  I cut one of the Oval tags that come with the Curvy Keepsakes framelits from the Gold Foil Sheets and layered them together with a little Real Red banner cut from the Bitty Banners Framelits.  I added 3 small pearls on the tag to finish and hung that from the ribbon with Whisper White Baker’s Twine. A cute treat bag in no time!!

I hope you enjoyed the projects this past week with the ‘December Wonder’ stamp set.  It is a fun set.  This is available in the Holiday Supplement Catalogue but these products are only available stocks are limited.  So get in soon for any of these items.  You can order directly from me or from my store HERE.

I hope you can join me again this week.  I will be away on a Family Holiday but I have some posts scheduled so don’t forget to stop by,

Jenny 

Uncategorized

12 WEEKS OF CHRISTMAS – WEEK 7!

Latte 12 weeks Header

It is my week this week to bring you the 12 Weeks of Christmas project.  I am excited to share this project with you.  Today I have made some Christmas Ornaments that you can make to hang on your Christmas Tree this year, or to give as a gift to someone special.

P1140933                P1140754

These were really hard to take photos of and I apologise for the reflection.  I would have spent an hour and a half taking photos inside and out trying to get the best ones.  These turned out the best and I liked them being outside hanging off our bushes as I hadn’t got our Christmas tree up yet – and didn’t want to do that just yet!!! 🙂

I have been looking out for these clear Ornaments for  the past few years but never able to find them but I came across these a few weeks ago. (Thanks Lynda for the tip!)  For locals these were from RIOT Arts and Crafts.  For other people you might be able to get them from your local craft store.

I discovered how to create these from a little blog surfing getting ideas from a few different blogs so today I thought I would show you.

CREATING YOUR CLEAR CHRISTMAS ORNAMENTS

1. On a piece of Acetate draw a circle in NON-PERMANENT MARKER. (This is really important so you can wipe this off afterwards).  Add a little square tab piece at the top.  The size of your circle will depend on the size of your ornamment.  These ornaments were about 7cm (just a little less than 3 inches).  The circle I drew was about 6cm (just over 2 inches).  To draw your circle you can trace around a circular object or a circle die.  I used the base of a container.

P1140730

2. Once you have drawn your circle you can cut it out and then wipe off the marked circle with a tissue.

3. Stamp your image in Staz On on the acetate circle.  This image is from ‘Get your Santa On’.   Now you can’t colour this on this surface with the Blendabilities as it reacts with the Staz On.  Turn over your circle and colour your image from the back with your Blendabilities.  You might be able to see too on my image I added some dots of Cherry Cobbler Dazzling Details on the wreath circle and hanging wreath on the chimney to add some sparkle.  This was added on the front of the circle.

P1140696

For the snowflake Ornament I stamped the image in White Staz On.  This snowflake is from the stamp set ‘December Wonder’ from the Holiday Supplement.  (It is marked as a Project Life set but don’t just dismiss these if you don’t do Project Life.  There can still be some great images in these sets).

4. To insert the acetate piece in to your Ornament you need to roll up the piece in to a tight roll and squeeze it in through the top.  Be sure to have the tab piece at the top and hold that as it gets further in to the ornament.  This piece will sit in the top of the ornament to keep the piece in place.  As the circle unrolls you many need to give it a little spin around or you may have to get a pen or the Paper piercer down to jiggle it around in place.

P1140735

You can add some little embellishments in the Ornament as well.  For the Santa one I punched some stars with the Confetti Stars punch from Real Red and Gold cardstock.  For the Snowflake one I added some sequins (snowflakes and silver sequins) from the Frosted Sequins Embellishment pack in the Holiday Catalogue (p 22).  I also added some Dazzling Diamonds Glitter and shook that around in the ornament.  This stuck to the sides of the Ornaments giving it a “snowy” effect I guess.  Then you can replace the cap and tie some ribbon around the top and a ribbon loop for them to hang off your tree.

Now if you are giving this as a gift to someone it would be nice to dress it up a little, so I have a Gift Box for you.  This is using the Kraft Gift Boxes in the Annual Catalogue (p 200).  These Ornaments fit just nicely in them.  You would need to check the size of the Ornaments you are using though.

P1140809

I decorated the sides and top with Designer Series Paper. This is from the Nordic Noel DSP pack from the Holiday Catalogue.

P1140815

Finish this off with some Red Satin Ribbon and a tag.  This makes a nice gift to give someone.

P1140823

Here is a close-up of the tag.  I used ‘December Wonder’ stamp set again.  The JOY is punched with the oval punch on Real Red.  I cut a label in Garden Green cardstock from the Chalk Talk Dies and then ran that through the Big Shot with the Perfect Polka Dots Embossing Folder. Then I layered these together. I finished it off with a Frosted Sequin snowflake and a Rhinestone.

P1140821

I hope you like these and can get hold of some ornaments to create your own.  Now as with our other projects I have put together a Bundle for you. (Not available to order as a Bundle through my Online Store).

This weeks Bundle includes: 

December Wonder Stamp set (Photopolymer)        136562      $27.95

Kraft Gift Boxes                 124106       $5.95

Confetti Stars Punch        135861        $37.95

Frosted Sequins                135835        $8.95

Total  $80.80.  Receive just over 10%  off = $70.00 + SHIPPING.

 —
If you would like to order this Bundle or any other Stampin’ Up! Products then please message me or drop me a comment.
Let me know what you think of this week’s project too.
Thanks for visiting,
Jenny
cards, Christmas

HEXAGON DECEMBER WONDER!

Here is another card using the set ‘December Wonder’.  I thought the Hexagon ’25’ would work well with the Hexagon Punch.  I did find a card similar on Pinterest that inspired this card.

P1140934

I punched out some Hexagons with the Hexagon Punch from the ‘Nordic Noel’ DSP and lined them up on the Lost Lagoon piece.  To get the ’25’ in the right position I punched a Hexagon from scrap paper, added some 2 way glue to the back and let it dry a little so it was repositional.  Then I placed it in position in the centre, removed the DSP hexagons and then punched out the shape over the scrap paper one.  The stamped ’25’ was placed behind the Lost Lagoon card using Dimensionals to raise it up a little.  I adhered the rest of the Hexagons in place and stamped the Snowflakes over the card.  This piece was adhered to Whisper White card with Dimensionals and then adhered to the Lost Lagoon card base.  I finished it off with some Rhinestones and Silver Ribbon bow.

Thanks for stopping by to visit today.  Do say ‘Hi’ and let me know where you come from.  I love to hear from you.

Jenny 🙂

Christmas, Classes, Stampin' Up!

DECEMBER WONDER CHRISTMAS!

I was playing around with a new stamp set last week ‘December Wonder’ from the Holiday Supplement Catalogue.  At first I dismissed the set because it was marked as Project Life – and well I don’t do a lot of Project Life and certainly not Christmas. (Did you think that about the set too???).  Then I had another look at it and thought it is still such a great set for your cardmaking. There are some really great images.  I will show you a few projects over the next few days with the set and you can see what you think.

Here are the cards I first made.

P1140726

These cards were inspired by a card on Pinterest that used ‘Endless Wishes’ but I don’t have that set.  (Yes really!).  I stamped the small and large snowflake on the bottom of Whisper White card. Stamped the greeting from the set and then pierced holes around the card with the Paper Piercer and mat.  I tied around some ribbon, added a snowflake embellishment from the Frosted Sequins Embellishments in the Holiday Catalogue and added a Rhinestone to the centre.  Quick cards that you could reproduce in a hurry.

The colours I used were Cherry Cobbler and Crumb Cake with the Cherry Cobbler Sheer Linen Ribbon and then for the second one Lost Lagoon and Crumb Cake with Lost Lagoon Satin Ribbon.

Here is the stamp set for you to check out if you haven’t already noticed it in the catalogue. 🙂

Stay tuned for some more exciting projects with this set this week.

Jenny