Stampin' Up!

WEEKLY DEALS _ WEEK 2!

More great deals have been released this week for the WEEKLY DEALS especially for the Big Shot this week.  Check them all out.

demoheader_weeklydeals_demo_4_2_2014-4_9_2014_SP_UK

The Deals (9-15 April)

 weekly deals Wk 2

I can’t remember if I had shown you this card but thought I would again if I had.  This card uses the cool Dress-up Framelits PLUS check out the edge of the dress.  This uses the Needlepoint Border Textured Embossing Folder.  Just 2 of the great bargains this week.

P1070993

Email or phone me your order.  Don’t miss out on these ones.  You can Order Online too by heading to my store here.  Why not check out the Clearance Rack items while you are there. There are some great bargains to be had!

Have yourself a stamping day 🙂

Jenny


3D projects

EASTER PROJECT CLASS!

Come and make some fun Easter projects just in time for Easter.

P1110817

Friday 11th. 10am or 7.30pm. Create this cute Bunny Box and Scallop Topper Bag.  Fill them with your own yummy chocolates they will make someone smile this Easter. Choose your colours from a select range.

COST: $15    BYO: Paper Trimmer or Simply Scored, Scissors and Adhesives.

WHERE: My studio in East Corrimal. If you are local in the Wollongong area, don’t miss out on this fun class.

RSVP: Wednesday 9th.  Message me or email me to join in the fun.
3D projects

SCALLOP TAG TOPPER BOX!

I have had this idea in my head for a while now so I had to just do it!!  I wanted to create a little box using the Scallop Tag Topper Punch.

P1110831

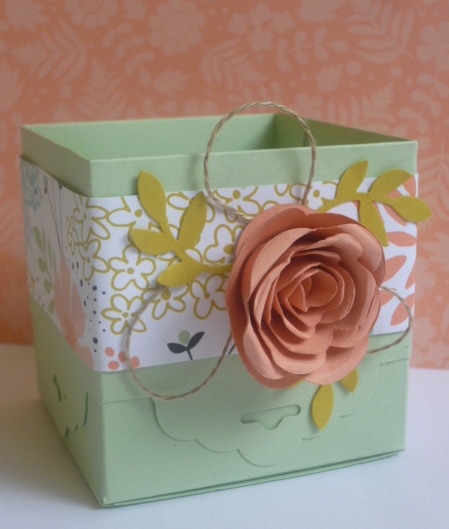
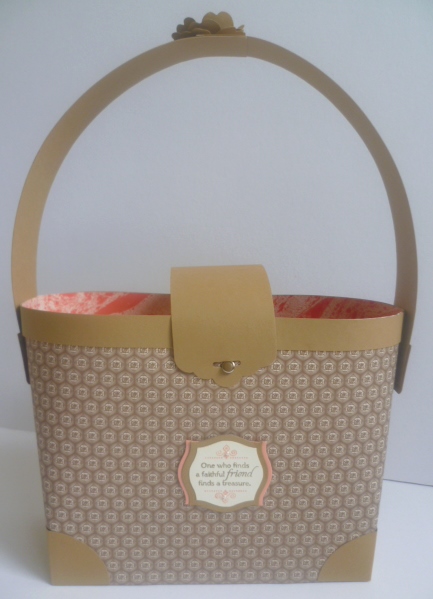
I have used the Sale-A-Bration ‘Sweet Sorbet’ DSP.  I know Sale-A-Bration is done with BUT I HAD TO USE IT!!!  I used the new Spiral Flower Die that has just come in to my possession.  I am having fun with that little die 🙂  I have seen the twine loops around the blogosphere and wanted to have a go with making them.  It was a bit tricky at first as I didn’t know what I was doing but I think I worked it out in the end.  The leaves are from the 2-step Bird Punch.

I wanted to share the Tutorial with you to make your own little box (AND it is in Metric AND Imperial)

SCALLOP TAG TOPPER BOX

Metric

Card – 29.5cm x 21cm.

Along the long side score at 7cm, 14cm, 21cm and 28cm.

Along  the short side, score at 7cm and 14cm.

DSP for wrapper – 3.5cm x 29.5cm.


Imperial     (Finished size for this one will be slightly taller than the Metric box. There is a photo below showing the difference in size).

Card  – 8 ½” x 11”.

Along the long side score at 2 ½”, 5”, 7 ½” and 10”.  (Trim ½” off on the small tab section so there is not so much excess to adhere down).

Along the short side, score at 2 ½” x 6”.

DSP for wrapper – 1 ¼” x 11”.


DIRECTIONS TO ASSEMBLE THE BOX FOR BOTH METRIC AND IMPERIAL.

1. After you have cut your card to size and scored it. Cut off the small tabs, one at the top and one at the bottom leaving the middle section.

P1110821

2. Punch out each tab on the long side using the Scallop Tag Topper Punch.  To do this slide the first scored section into the Punch.  You will need to wiggle it gently in under the punch.  Centre it in the punchI line up the card section between the rectangle on the top of the punch and then punch.

P1110826


3. Gently slide the card along to the next scored section.  Line it up in the same way and punch out again.  Repeat this for the next 2 sections. Trim off the excess card between each punched section.

4. Cut up each score line at the bottom until it meets the horizontal score line.

5. Fold on each of the score lines. Fold over the top Scalloped section and adhere down with Sticky Strip.

P1110828


6. Add Sticky Strip to the small tab at the side on the right side of the card.

7. Assemble by folding the scored lines in to form a box shape and adhere together onto the side tab.

8. Add Sticky Strip to the bottom tabs and adhere down.

9. Adhere the Wrapper around the box and decorate as you would like.

I made another version using DSP (Sweet Sorbet again!).  This one was using the Imperial measurements.

P1110839

This is slightly larger than the Metric version.  You can see them in the photo together below.

P1110838

Enjoy making your own.  🙂

Jenny


cards

FAREWELL SALE-A-BRATION 2014!

Last day of Sale-A-Bration! I can’t believe how fast these last 2 months have flown by.  I am a bit sad that Sale-A-Bration is over for another year.  I have really loved playing with these products.  Here is a quick card today to say Farewell to Sale-A-Bration – and to ‘Petal Parade’.  When I first saw this set the brochure I really wasn’t sure of it BUT I REALLY LOVE IT!!!  I am a bit sad to finish with this set.  I hope you have your set of ‘Petal Parade’ already or any of the other Sale-A-Bration products.

This card I shared in my ‘Stamp Spectacular’ Event the other week but I thought I would show you today as we say Farewell to Sale-A-Bration.

P1110545


I love how you can multi-stamp the images and create your own Background paper or you can use the images on their own.  For this I have used Crisp Canteloupe, Summer Starfruit, Pistachio Pudding and Coastal Cabana.  The sentiment is from ‘Remembering Your Birthday’.  I have used the Scallop Tag Topper Punch and layered the sentiment.  The Whisper White card was 3.5cm wide (I think) and the Summer Starfruit was 4cm. (Something like that).  Place the card in the punch and look through the window underneath to line it up evenly.

So, today is the last day.  Email or phone me with your order.  You can choose one Sale-A-Bration gift with every $90 order  OR head to my store here and place your order.

OK, I have to run.  Have a Happy Day 🙂

Jenny

3D projects, Tutorials

A NEW DESIGNER TOTE BAG!!

I have been wanting to create another Tote Bag for a long time but I haven’t had a chance – until now!  The ‘Large Tote Bag’ has been my most popular post over the last 2 years but I wanted to freshen it up.  Here is my new Tote.  Below I will share all the details for you.

P1110771

Here are a few other views. 

I have used the lovely Venetian Romance DSP and Baked Brown Sugar Cardstock.  I added the Soft Suede Candy Dots to the tabs.  They match in so well I think.  I added a flower to the top to hide the join.  I will tell you about that below.  The greeting is from ‘World Treasures’.  I coloured the words with markers (Baked Brown Sugar and Crisp Canteloupe) and cut around the inside of the border.  I cut a piece from Baked Brown Sugar with the Apothecary Framelits and layered this under the greeting and then cut another in Crisp Canteloupe and cut this one in half to layer underneath.

Let’s move on with ‘HOW TO MAKE THE TOTE BAG’ 

The original post for the Tote Bag with step-by-step instructions is HERE.  These are in metric.

** Edited to add: I have since updated that post to have Imperial measurements as well.

If you would like the tutorial emailed to you then drop me a comment.  

Let me tell you the modifications.

1. Omit the card strip for along the bottom edge.  Punch 2 circles in Baked Brown Sugar with the 2 1/2″ circle punch. Cut them in half.  You then have 4 pieces.  Fold each one in half and then adhere these to the corners of your bag.

2. For your handle, Omit the 2 card strips and the steps to prepare your handle.

Cut 2 pieces 3.5cm x 25cm (1 3/8″x10″). Join the 2 strips.  Adhere the handle to each end of the bag.  I used Sticky Strip for strength.  Cut small tabs to add to your handles.  Cut 2 pieces 4cm x 3cm (1 5/8″ x 1 3/8″).  Round the corners on the bottom edge.  Adhere these to the ends of your bag.  Add the Candy Dots or Brads for decoration. (If you are using Brads then place them on your tabs before you add the tabs to your bag).

3.  For your Bag Closure: Cut your card 5cm x 16cm ( 2″x 6 1/4″).  Punch one end out with the Scallop Tag Topper Punch.  Adhere the other end to the back of your Tote Bag.  Gently bend the closure over and mark the point on the front.  Place a Brad on the front to that will hold your closure.  I used a Candy Dot on a Brad.

4.  To cover the join in the handle I added a punch flower.  I punched out 3 flowers using the Pansy Punch and curled them a little.  Join these together by overlapping a little and adding Sticky Strip.  Add a small flower punched from the Boho Blossoms punch.  Adhere a large Adhesive Pearl to the middle.

I hope you like this version.  I hope you can go and make a Tote Bag yourself.  I hope the instructions are clear.  If you have any problems then please don’t hesitate to contact me.

Have a great day. 🙂

Jenny

cards, Classes

WISTERIA PETAL PARADE!

ONE WEEK LEFT OF SALE-A-BRATION!!!!!  

These last couple of months have just flown by.  I feel Sale-A-Bration has only just begun.  If you feel like me and think you have got plenty of time to get your Sale-A-Bration freebies then THINK AGAIN!!! These products won’t be available again (which is very sad BTW!)  If you haven’t checked out the Sale-A-Bration brochure yet then click on the link in the right hand column.  If you’re local why not come to my ‘Celebrate Sale-A-Bration’ Event.  Here are the details.

‘CELEBRATE SALE-A-BRATION’

Come and join us to celebrate.  We will make 2 cards, have fun have a cuppa and there will be giveaways.
This is one of your final chances to get your Sale-A-Bration order in.
WHEN: Saturday 29th March, 2pm.
COST: $10 or free with minimum $35 order.
BYO: Adhesives and scissors.
RSVP: Thursday 27th.
So if you are in the Wollongong area.  Why not join us.  I Look forward to seeing lots of you there.
Here is one of the cards we might be making.  I thought it would be good to pull out the Wisteria Wonder for a change.
P1110722
Thanks for stopping by.  Hope you are having a good day 🙂
cards, Challenges

FRESHLY MADE ‘PETAL PARADE’

It has been such a long time since I have done a challenge.  That is one thing I want to do more of this year.  So this week I have made a card for the ‘Freshly Made’ Sketch Challenge.  Here is the sketch and you can check all the details on their site here.

FMS Final 128-001

This is the card I have created for it.

P1110658

I wanted to use the arrows from the set ‘Petal Parade’ as there is only just over one week left of Sale-A-Bration for me to use this set.  I was inspired by a card I saw on Pinterest.

The arrows were stamped in Tangerine Tango, Tempting Turquoise, Daffodil Delight and Rich Razzleberry.  One bonus of using clear stamps is you can see where you are stamping them to line them up.  It doesn’t matter if you go a bit of course!!  I mounted this piece on a piece of Tangerine Tango and wrapped around some Whisper White Bakers Twine.  Then this was layered on to a Smoky Slate card base.

I wanted to play around with the ‘Just Sayin’ set too.  I stamped and cut the “Hey There” with the Word Bubble Framelits.  I wanted a “Happy Birthday” saying though.  So, I used a Black Marker to colour one of the other Framelits and then used the Marker to colour part of the greeting from a stamp in ‘Remembering Your Birthday’ set.  I could carefully stamp inside the bubble.  I then cut it out using the Framelit.  I was quite pleased with the end result.  These were raised up off the card with Dimensionals.

I think this is quite a versatile sketch to work with so why not have a play yourself.

See you next time,

Jenny

3D projects

PETAL PARADE GIFT BAG!

I wanted to show you a little gift bag I have been making at my workshops this month. They are so easy to make and gotta love the Sweet Sorbet DSP!!!

P1110388

You can make these too.  Just head to Ronda’s blog here and and she will show you how.

To create the label on the front I have stamped Whisper White cardstock firstly with the greeting from ‘Simply Sketched’ and then stamped randomly in Pool Party, Crisp Canteloupe and Summer Starfruit using Petal Parade. You make the enclosure with the Scallop Tag Topper Punch and I have tied it off with Crisp Canteloupe Ruffled Ribbon.

I hope all is well where you are???  Have a good day 🙂

Jenny

Uncategorized

HIP, HIP, HOORAY BANNER BLAST!

I love the stamp set you get with the ‘Hip, Hip, Hooray’ card kit.  This is awesome value at $34.95 which includes the cards, envelopes, stamps, inkspot and embellishments enough to make 20 cards.  You can see all the details in this post here.  Here is a card I made with the stamp set and using the set ‘Banner Blast’ that you can get for Free as one of your Sale-A-Bration choices.  This also uses the ‘Hardwood’ stamp from the Occasions Catalogue.  The card was inspired by a card I saw on Pinterest.

P1110485

This is one of the cards we will be making at my card classes on Friday.  I still have some places left if you want to join me and you are in the area. I would love to see you at 10am or 7.30pm.  Cost is $15 but you need to let me know ASAP so you don’t miss out.

Have a happy day 🙂

Jenny

Stamp Spectacular

STAMP SPECTACULAR IS COMING!!

My Project 41-001

I am excited to announce my first Online Stamp class.  It will be lots of fun.  Each day of the week we will have a new project, stamping technique or product information and you can make them in the comfort of your own home  AND since it is my first one – it is FREE!!!  Come and join me.

To sign up click on the link HERE or click on the box in the right hand column that says ‘SIGN UP NOW’.  You can nominate just to receive the emails for the Stamp Spectacular or to get my regular newsletters and Stamp Spectacular projects. I can’t wait to share these projects with you.

See you then,

Jenny