cards

BLOOMING WITH KINDNESS ON WHITE!

Aloha!! Have you missed me???  I have been cruising around the Hawaiian Islands this past week.  It is such a beautiful place and the people are so friendly.  I have taken SO many photos and I will share some with you when I get home.  I just thought I would pop by and send you a post so you don’t forget me too quickly 😉

Here is a card I created a couple of months ago now with ‘Blooming with Kindness’.  (Not the best photo   It seems a bit washed out.  Sorry I can’t take another photo now!!) I really love the detail in the flower.  So many ways you can use this flower.  I used this stamp at Leonie N’s.  when we were having a stamping day.  I have CASED this from somewhere and now I really can’t remember.

I have cut 3 rectangles in Cherry Cobbler, Basic Gray and Old Olive.  I used some non-permanent adhesive to adhere the 3 pieces together on scrap card and then stamped the flower randomly over them.  I then adhered them to the bottom of a Whisper White card piece.  The flower was then stamped again above these.  Each time I used Black Staz On.  The greeting is from ‘Fabulous Phrases’.  I add this all to a whisper White Card base after tying around some Cherry Cobbler Seam Binding ribbon.  A pearl was added for a touch of elegance.

Thanks for stopping by.  For now, I’m off to the beach  Sorry!  🙂  I will stop by and post again soon.

Jenny x

cards

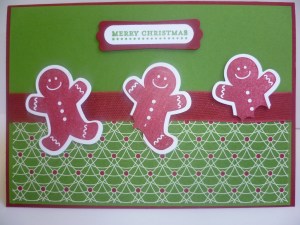
“MUNCHED GINGERBREAD”

Just a quick post today.  School holidays start today and we are heading off to …………..HAWAII!!! I can’t believe today is here.  We have been planning this trip for a year.  We have a few final things to pack and last minute rush around getting hair cuts.  Leaving things to the last minute here!!! 🙂  Anyway, I wanted to show you a quick card before we leave.

I had a lot of fun making this card.  I CASED this off our Demonstrator Facebook group.  Now I can’t remember who the original creator is – Sorry.  Let me know if you recognise it.

Isn’t it cute??  I have used the set ‘Scensational Season’.  This was made in Gumball Green and Cherry Cobbler and the ‘Be of Good Cheer’ DSP.  I have “munched” the gingerbread with the scallop circle punch.

Why not make your own “munched Gingerbread” card??

I hope to stop by occasionally and give you a few travel reports.  I don’t want to bore you too much though. 🙂  I have some cards that I have planned to show you too so don’t forget to visit.

Until then, Mahalo (Thank You and Good Bye)  – see I am learning the lingo already!!

Jenny

cards

BETSY’S “THINKING OF YOU”

‘Betsy’s Blossoms’ was one stamp set I had to get when the new catalogue came out.  I had seen quite a few cards posted in the blogosphere and loved the ideas.  This is the first card I made with this set a few weeks ago.

I CASED this card from Splitcoaststampers and just changed the colours. I used some of the new In-Colors: Midnight Muse, Summer Starfruit and Raspberry Ripple.  For the bird I stamped it twice on scrap Whisper White card first in Midnight Muse and then in Summer Starfruit.  I cut just the wings from the Summer Starfruit one and adhered them over the Midnight Muse one.  I was being lazy with the small flowers.  After I stamped them I punched them out with the 1″ circle punch (I think it was 1″???).  No cutting out around all the flowers for me!  I stamped the leaf stem on scrap Whisper White card and I did cut that out myself.  🙂 The greeting is from ‘Curly Cute’ and stamped in Midnight Muse.   I liked how this one turned out.  I wasn’t sure about these In-Colors but they work well together.

Thanks for looking.  Stop by again soon and I can show you some more creations I have been working on with stamp sets from this new Catalogue.

Jenny x

cards

“RASPBERRY RIPPLE MEMORABLE MOMENTS”

Last weekend I had my Catalogue Launch and big sale day.  It was a huge day.  We had a few challenges along the way but we got there.  As usual I was so busy and forgot to take photos of the fun But I think I can say we all had fun!!! 🙂

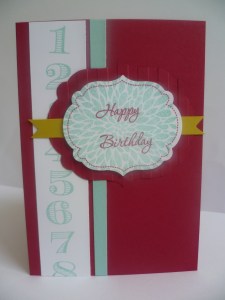
We had a play with some of the new products and everyone got to make a card to go home with.  Here is the card that everyone made.  I CASED this card from one I saw on Pinterest.  The original creator was Jill from Jill’s Ink.

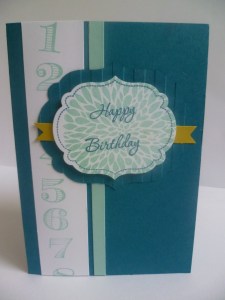
This is using some of the new In Colors: Raspberry Ripple and Summer Starfruit.  I have also used Pool Party for the card strip down the card and the stamping.  We used the new set Memorable Moments – a very versatile set.  One advantage of being in clear mount is the numbers could be mounted together down a clear block and stamped in one go.  Just a tip though, stamp it on scrap paper first to check that they are fairly straight and facing the correct way.  Don’t ask how I know??  I cut a larger Framelit Label and embossed it with the Stripes Embossing Folder.  The stamped blossom on the Framelit Label is from Betsy’s Blossom. We did a couple of other colour variations using the other In Colors.  We kept the Pool Party and the Summer Starfruit to co-ordinate with it.   Here is the version in Island Indigo which was popular on the day.  Don’t look too closely.  I was a bit out with the blossom in the middle of this Framelit.  It is a good idea to stamp the blossom first then line up the Framelit around it.

I made up some Thank You bags that had a few little goodies in too.  I kept it very simple as it was the day before when I did these.

Here is a close-up of the tag so you can see.  I have used the DSP from ‘Story Time’ and punched a flower out with the Blossom Punch.  The ‘Thank U’ is from Pennant Parade stamped in Rose Red and layered on a Rose Red Circle.  It was very quick and easy.

Stay tuned for some more projects I have been making with some new Catalogue goodies.

Thanks for stopping by.  Until next time,

Jenny

cards, Masculine

“MEMORABLE MOMENTS 50TH”

Have you checked out the new Catalogues yet???  There is some great things in there, isn’t there?? Oh, what to choose first!  I have put the links to the Catalogues in my sidebar so you can click on there and check it all out Online if you haven’t already had a chance to.  Why not get your very own copy?? Isn’t it nice to lie in bed and drool over that Catalogue?? Although that does effect the sleep as you lie awake dreaming up ideas!  Am I the only one that does that??  If you would like me to send one out to you then drop me a comment and I can get back to you to arrange your very own one to be sent to you.  The Catalogue would cost $12 which includes shipping to anywhere in Australia.

Anyway, you have come here to check out cards not read about my ramblings.  Here is a card I created a couple of weeks ago.

I wanted to play around with the Core’dinations Cardstock.  This is really cool stuff.  I have embossed it with the Woodgrain Embossing Folder and then sanded it lightly with the ‘new’ sanding system.  The paper strips are from the DSP pack ‘Patio Party’.  I have stamped on the leaf image from ‘Just Believe’ in Crumb Cake onto the Card base.  I stamped the Framelit border from ‘Memorable Moments’ and cut it with the Framelits die.  Happy Birthday is stamped in Crumb Cake and the ’50th’ is stamped in the new In-Color Midnight Muse.  I added a Vintage Brad to finish it off.

I think this set ‘Memorable Moments’ will be very useful.  How many times do you need a numbered birthday and this set has the ‘nd’, ‘th’, ‘st’ and ‘rd’ that you quite often need!

I did enjoy making this card and playing around with my new toys.  I have lots to show you.  I have been creating up a storm over the last couple of weeks.  I have my BIG Catalogue Launch and Stamp sale on tomorrow so I will show you these next week.  It is going to be a big day tomorrow with 18 ladies coming along, but it is always fun stamping with friends.

Thanks for stopping by,

Jenny x

cards

“GOOD-BYE EXTREME ELEMENTS!”

This is another stamp set I am very sad to say Good-Bye too.  I think this is a fantastic set for those ‘hard-to-do’ male cards.  I have used it SO much.  Here is a card we did probably late last year now but I don’t think I have shown it to you.

Card: More Mustard, Cherry Cobbler, Whisper White.

Ink: More Mustard, Cherry Cobbler, Basic Black.

Stamps: Extreme Elements, Happiest Birthday Wishes.

Other: Curly Label Punch, Twine, Cutting Kit (for distressing).

This is a quick card to whip up for those boys in your life.

Thanks for stopping by.  Come back and visit again soon.  (Don’t forget to leave a comment and say ‘Hi’.  It’s always nice to know you have been).

Jenny x

cards

“BYE, BYE BUTTERFLY”

We say Good-bye to the ‘Butterfly Prints’ Stamp set this month too.  This is such a cute little set – and always good when you have a matching punch!!  I just wanted to show you a quick card with this set.  This was a card we made at last month’s Stamp-A-Stack.  I CASED this from Brandyscards but sorry I don’t have the exact link. I love the colours in this.  It is so bright and happy.  It reminds me of Spring – which is just around the corner.

Here is the card:

Stamps: Butterfly Prints, Upsy Daisy (which is also retiring).

Ink: Melon Mambo, Rich Razzleberry, Tempting Turquoise.

Card: Whisper White, Rich Razzleberry.

Other: Butterfly Punch, Scallop Border Punch, 2 step Owl punch (circles), Adhesive Pearls.

I have been having fun today playing with some new toys from the upcoming new catalogue.  Oh, so much goodness!!!!  I can’t wait to show you some of the results of today so stay tuned.

Thanks for stopping by.  Come and visit again soon,

Jenny x

cards

“SWEET PEA”

I have been wanting to show you this card for some time now.  Since we are now saying Good-Bye to ‘Baroque Motifs’ I think it is about time.  I am sad to say Farewell to this set.  We have had a long association together. This set has been with me since the beginning of  my stamping journey.  I have used it for weddings, birthday, Christmas, Anniversary, I think just about any occasion.  If you want to check out some of the cards I have created with this set then just click on the ‘Baroque Motifs’ tag and it will take you there – I hope!  This time I have used it for a Baby card – and I think it is a very appropriate use.  🙂

You might have seen versions of this card around your blog travels.  I wanted to make this card for a special friend who just became a Grandma.  (Doesn’t that make you feel old when your friends start becoming Grandparents???).  Anyway,  when my friend was pregnant with her own daughter many years ago she used to call her baby ‘Sweet Pea’, and she had that nickname for quite a few years.  Now when her daughter was pregnant this little baby was called ‘Sweet Pea’.  So you see, I just had to make this card.  Here it is.

Stamps: Baroque Motifs, Short and Sweet.

Card: Olive Olive, Bashful Blue, Whisper White, Certainly Celery

Ink: Old Olive, Bashful Blue

Punches: Wide Oval, 3/4 ” circle, 2 step Bird Punch, 2 step Owl Punch, Boho Blossoms.

Other: Beautiful Butterflies Sizzlit, White Gel Pen, Whisper White Grosgrain Ribbon (check out the little tuft of hair!)

I hope you have got ‘Baroque Motifs’ in your collection because it is such a versatile stamp set.  Have you had a chance to check out the other retiring stamps and accessories??  Some items have sold out already so you have to be quick.  You can check it all out here.  Look down the page for the retiring stamps and accessories in the little picture boxes (if that makes sense).

Good Bye ‘Baroque Motifs.

Thanks for stopping by,

Jenny

Tutorials, Uncategorized

IT’S A POP-UP!!!!!

Finally I have got back to you with instructions of how I made the Cupcake Pop-Up card.  I showed this card one or two posts back but here is a photo of the card to refresh your memory.
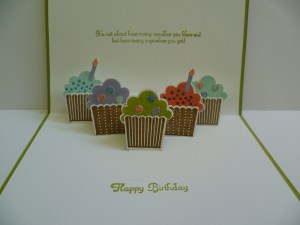
Leonie N  showed me how to make this card at a stamping day a few weeks ago.   It is so cool and gives such a ‘WOW’ when you open it.  I have put together a few steps and some photos to help you.

CUPCAKE POP-UP CARD

NB. All the measurements are in metric.  I have used the Cutter to cut the slits for the Pop-up.  I found that so much easier.

1.  Cut Card 20cmx13.8cm.  Score card along the 20cm side at 10cm.

Here is the template to go with the photos.

——-   Score lines                         ______  Cut lines
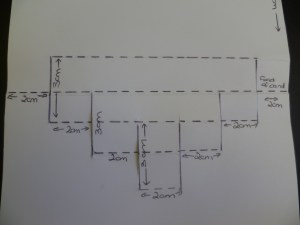
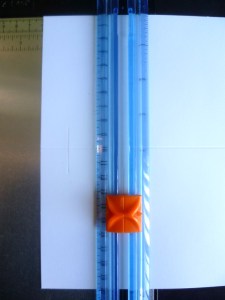
2. Line the card up on the cutter with the 13.8cm edge at the top. Starting at the scored centre line, move across 2cm.  Cut 1.5cm below the score line and 1.5cm above the score line (ie making a 3cm cut).  It is a bit hard to tell but in the photo I have the edge of the card lined up at the 2cm mark.  I have the cutter at the 11.5cm mark and will cut up to 8.5cm.

3. At the 4cm mark on the cutter, cut from the score line down 3cm. (Sorry I didn’t have a photo of this one but you can get the idea from the other photos and the template- I hope!)

4. At the 6cm mark, measure down 1.5cm below the score line (this is the 11.5cm mark on the cutter). Cut 3cm down (ie to the 14.5cm mark). (The photo shows the cutting ending at the 14.5cm mark).
5. At the 8cm mark, cut a line following the same measures as Step 4 above.  (ie measure down 1.5cm below the score line down to 14.5cm.

6. At the 10cm mark, cut from the score line down 3cm. (Missed that photo too!)

7. At the 12cm mark, cut 1.5 cm below the score line and 1.5cm above the score line. (Like you did in Step 2).  You can see the other cut marks from the earlier steps.

Here you can see all the lines cut.  If it’s not too clear refer to the template photo above.
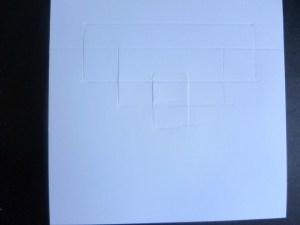
8. Now the cuts are made, score the lines between each cut line (see the template above to show the score lines).  Don’t score out towards the edge of the card.
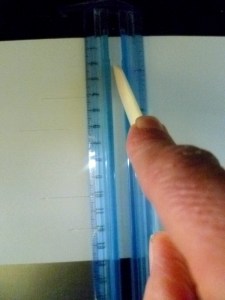
9.  Now the folding begins.  Here are a few tips to help with the folding. Firstly, fold the card in half on the regular score line.  Lift up the top half of the card and fold on the first score line.  Then turn the card over and fold the card back on each of the score lines.  Then open the card and push from behind on each of the folds and cuts to push it in shape.  Press along the score lines to make the scored lines crisper.
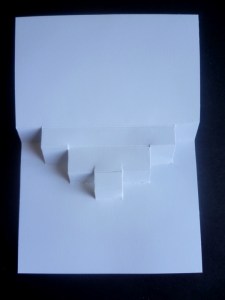
10. Now the folding is done, you can adhere this in to your card.  Place adhesive on one half of the back of the template.  Place inside the base card while folded.  Then you can add adhesive to the other half of the template and adhere in the base card.

Phew! I hope you are still with me!!!  I hope this all makes sense???  If any questions, please don’t hesitate to ask.

Enjoy!

Jenny x

Stampin' Up!

THE RETIREMENT LIST IS OUT!!!

It’s that time of year when we say Good-Bye to some much-loved stamps and accessories.  The list of what will be leaving us is out.  You can check the list out here.  These are only available while supplies last, so don’t delay!

If you don’t have a local demonstrator, then drop me a comment and I will email you back to get your order.  I can have it delivered anywhere in Australia.

Have a happy day!  🙂