cards, Catalogues, Classes

BEAUTIFUL BOKEH BUTTERFLIES CARDS

I have been playing a lot with the Beautiful Butterflies Bundle along with the Beautiful Bokeh Paper. They are a pretty combination together.

For some simple cards I embossed the paper with the Beautiful Butterflies Hybrid Embossing Folder. I love the depth of texture you get with this folder. The paper gives you the Bokeh effect without creating the mess doing the technique.

These are 2 of the colours. A Balmy Blue look and Calypso Coral.

Then there is this one a little more blue and Fresh Freesia showing on the pattern.

I diecut 3 butterflies in white card to add to the card with a simple HELLO Sentiment. This was cut with the Perennial Postage Dies. Simple but sweet cards. We made this as one of our cards in class last week.

What colour do you like?

This is the Beautiful Butterflies Bundle which includes the Stamp Set, the Dies and the Hybrid Embossing Folder.

You can see more with the Beautiful Butterflies -> HERE.

If you are in Australia and need your supplies I would love you to stop on by and shop with me. Thanks so much.

You can head to that link just above and select your items. Don’t forget your Sale-A-Bration choice when you order.

Happy Crafting,

Jenny

cards, Techniques, Tutorials

BUBBLES AND BALLOONS FOR A BIRTHDAY BOY!

I was asked by a friend to make a special birthday card for her 1 year old grandson.  The birthday theme was Red, White, and Blue and bubbles and balloons and if I could incorporate those.  Or at least either the balloons or the bubbles with the colours.  My mind started ticking over.  What to do???

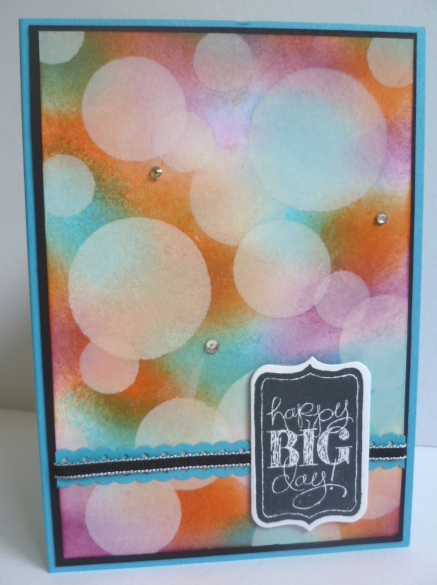
So here is the card that I made.

What do you think??  

The colours were Real Red, Pacific Point and Whisper White.

The Balloons were stamped with the Balloon Celebration set and punched with the co-ordinating Balloon Punch. The number 1 is cut with the small letters alphabet dies which is now retired but they are a useful size when you need small numbers.  I added some Snail Adhesive behind  the balloons, then added a length of White Baker’s Twine.  The three strands were then adhered down near the bottom of the card and then the sentiment was added over it.

The sentiment was from the Lift Me Up set.  I went over the “Happy Birthday” with the black marker and then stamped it on to white card.  It was then cut with the Bunch of Banners Framelits.

For the bubbles effect I used the Bokeh Technique.  Have you tried that technique before?  It has been a while since I have done it.   You can find other samples HERE. with this technique. I thought I added a tutorial back then but hadn’t.  So I will add a quick one below.  There are a number of different tutorials on the internet but to be honest I find them messy.  I am so not a messy stamper.  Maybe occasionally a little inky techniques but usually I need quick and clean – and done!!

So here is a non-messy Bokeh Technique Tutorial for you.  Hopefully soon I will create a video to share with you.

Firstly, You need a piece of acetate the size of your card front and cut 3 circles of different sizes over the card.  This creates a mask for the sponging.

On a piece of Whisper White card the size of your card mat, (This piece was 10.1 cm x 14.4 cm) sponge your chosen ink colours randomly over the card.  For this I used Real Red and Pacific Point. Sometimes it can look pretty ordinary at this point but persevere.

Once your card is covered with ink then place your acetate template over the card.  Sponge Whisper White craft ink over the circles.  You will want to dab or pounce the white ink on DO NOT RUB THE INK. Move your acetate template, if you are using a smaller piece over the card to different places to sponge more circles on. If you like, overlap some circles and have some going off the edge of the card for a good effect.   Let the card dry before you finish off the card.

Thanks for visiting me.  I love that you stop by.  I see lots of people stop by from all over the world so don’t be shy.  Do say HI. 🙂

Jenny


cards, Classes

BOKEH TAGS!

Last week at my Bokeh Technique class we made these tags.  I thought I would show you.

P1160030

We started off with a piece of Whisper White cardstock 10.1 cm x 14.4cm) to create the sponged Bokeh effect.  This was cut in half.  One half they could keep as a sample of the technique with the instructions and the other half we made the tag from.  That was by simply punching the top with the Scalloped Tag Topper Punch and threading some ribbon and twine through.  The flower was stamped using the Flower Shop stamp set and then punched out and then another flower punched with the flower punch. I added a little flower with the Petite Petals stamps set. I added some Linen Thread loops.  These flowers and loopy Linen thread was inspired by my lovely friend Sam (Thanks Sam).  If you haven’t checked Sam’s blog out yet, then make sure you do.  She has some amazing creations. 🙂

I made a number of these for our team swaps last week too.  I think everyone is loving the Bokeh technique at the moment and if you haven’t tried it yet then you have to give it a go. There are a number of tutorials on line with a few different ways of doing them. On mine I didn’t go the spraying with reinkers, I sponged the colours and the white circles.

I realised I hadn’t shown you the card we made too.  Here is the card.

P1150930

Thanks for looking in today.  Have a wonderful day wherever you may be.

Jenny