cards, Catalogues, Stampin' Up!

FRIDAY FAVOURITES – BUTTERFLY AND HEART DIES!

Each Friday for the last few weeks I have been sharing my favourite retiring products.  We have looked at my favourite stamps, flowers, butterflies and dragonflies.  Today for Friday Favourites is my favourite Big Shot Dies particularly the Butterfly Thinlits and the Bloomin’ Heart Thinlits.

FIRSTLY THE BUTTERFLY THINLITS

I have used the Butterfly Thinlits and the Bold Butterfly Thinlits so much over the years.  Just some of the cards are below.

Create a funky watercoloured background and diecut the large Butterfly Thinlits.  See the details in this post -> HERE.

This one below was a special card I made for my daughter. You can see the full post -> HERE.

It was a simple card and I really loved  how it turned out. Sometimes you don’t need too much. 🙂

This card below was a CASE of a card in the catalogue.  I made it a couple of years ago now.  I can’t seem to find the original post. If I did post it at all??? 🙂

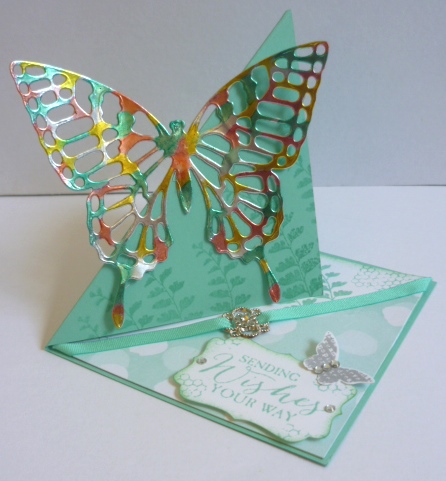
This card below I created for a Bloghop 3 years ago.  I coloured the Silver Foil with the Blendabilities at the time.  You could use the Stampin’ Blends now.  This card has been repinned from Pinterest and viewed so many times over the years since I shared it.  You can see the original post -> HERE.

BLOOMIN’ HEART THINLITS

The Bloomin’ Heart Thinlits are so detailed and delicate.  You don’t need to add too much to a card when you use this Thinlit.

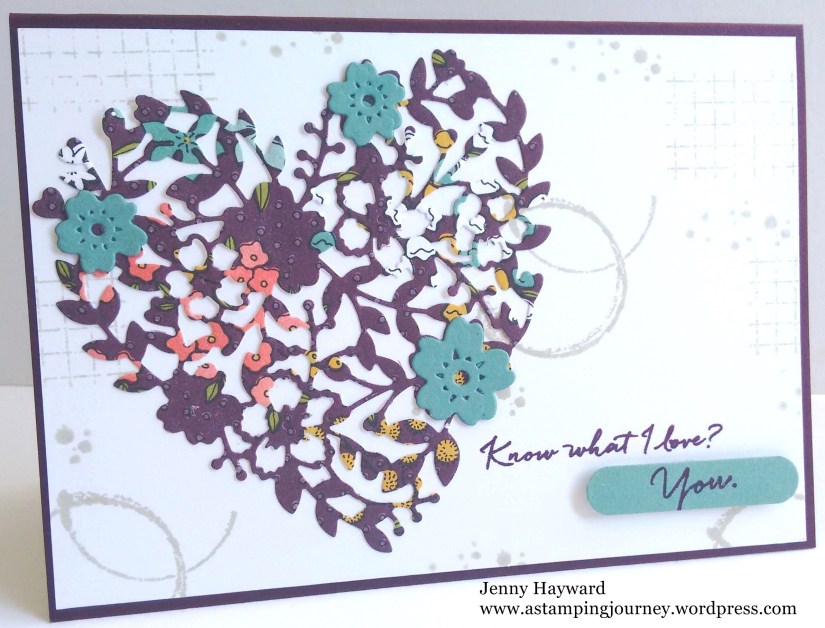
I cut this heart from Designer Series Paper. You can diecut flowers with this Thinlits set too. The background is stamped with the Timeless Textures.  See the card -> HERE. 

Another one cutting the Thinlits again with Designer Series Paper. I used the Timeless Textures set.  See this card -> HERE. 

Do you have these Thinlits yet?  They are delicate and detailed.  They are lovely to add to a card making any card extra “gorgeous”.  Really! You will want them in your stash.

They won’t be available in a couple of weeks though.

The Butterfly Thinlits and the Bloomin’ Heart Thinlits are available in my store -> HERE now.


Thanks for visiting me again.  Why not share what you have made with these Thinlits.  I would love to see them.

See you again soon,

Jenny


cards, Catalogues, Tutorials

WEDNESDAY’S WOW! #20 – USING A SKETCH!

Do you get stuck making a card thinking how will I put this card together?  Well today I thought I might give you a few tips for Wednesday’s WOW! #20.  

When I get stuck creating a card firstly I have a look through my stamps to find one I might want to stamp with.  With a new catalogue and new products that’s often easy.  Once I choose the stamp set I then turn to card sketches to help me.  I think it’s hard when you just look at blank card and have no idea what to do with it.  Today I thought I would go through a few previous cards I have made and go through the card sketches.  Full details can be found on the blog post which I will add the link.

BUT WHICH CARD SKETCH?

I get a few emails from different Sketch blogs.  My favourite is Freshly Made Sketches but I also follow Clean and Simple Stamping.

I also have a board on Pinterest which I pin Card Sketches too that I come across and the design I like.  You can check out that board HERE.  Follow along if you like to.

I will talk you through a few sketches and how the card resulted.

BRIGHTLY LIT

This was a new set at the time and as I was not sure what to do with it so I looked up a few sketches.

When choosing a sketch I look at the stamps in the set and then look at some sketches to see if some of the images in the set would work with the elements in the sketch.

The layer underneath could be paper or card.  I chose paper for mine.

The rectangle shape is where you can stamp your images in the space.

The Star shape can be any shape.  The thing with sketches is that it doesn’t have to be the exact shape or even the same position.  I slid it across and used it for the sentiment.

You can see the post for this card -> HERE.


SITTING HERE

I loosely based this card on the above sketch.  The sentiment banner I slid to the top and stamped the sentiment directly on the card.  I added a few elements to this card that wasn’t on the sketch like the Glimmer paper strip and the bow.

You can see the full post for this card -> HERE.

A COLOURED BUTTERFLY

I like simple style sketches.  This was an easy sketch to follow and I think is a little different by having your stamped piece off-set on  your card.  For this I used some Designer Series Paper.  Once again the star shape can be any shape.  I had been playing with colouring this butterfly so this worked here.  I added an additional card mat being the Gold Foil to lift the paper.  The sentiment could be stamped directly on the piece but I stamped it separately and raised it off the card.

You can see the full post -> HERE.

SUNBURST

This card I particularly wanted to show you that elements on the sketch can take any shape.  Don’t be scared to change the shape or even move elements.  The sketches are spring-boards to ideas to start your card.

For this card the larger square was a piece of Designer Series Paper. It could be card though.  For the tag shape I created a trimmed down starburst using the Starburst Thinlits.  I slid down the extra elements a little lower to make them fit better.

You can see the full card post -> HERE.

CAROUSEL BIRTHDAY

A different sketch blog site other than Freshly Made Sketches is this one, http://www.ilovecardsketches.com.  This site is not available any more but I had the sketch on my Pinterest board to use. The sketch has several layers which I used with Designer Series Paper with the larger rectangle.  The vertical strip worked for the stamped image in this case.  The sentiment banner was placed up in the top right.  If you were to use this sketch then you might want to slide a few of these elements around and that works too.  It’s about playing around with them.

You can see the full post -> HERE.

———–

Is this helpful to you??  I hope so.  Why not drop a comment to let me know or you can click “like post” which is at the end of the post.  

If you want to see more sketches and cards then click on the tag at the bottom for card sketches or sketch challenges and it will take you to other posts.

Thanks for getting through all this. I know there was a lot of information but hope it was helpful.  To come back to this post you can PIN the image at the top.

Have a great day,

Jenny