cards, Classes, Sale-A-Bration

IRRESISTIBLY YOURS BUTTERFLY!

I have just discovered the ‘Irresistibly Yours’ DSP in the Sale-A-Bration Catalogue.  I had fun creating with it the other day.  I found this card on Splitcoaststampers.  I loved the bright colours and just had to copy it.

P1150837

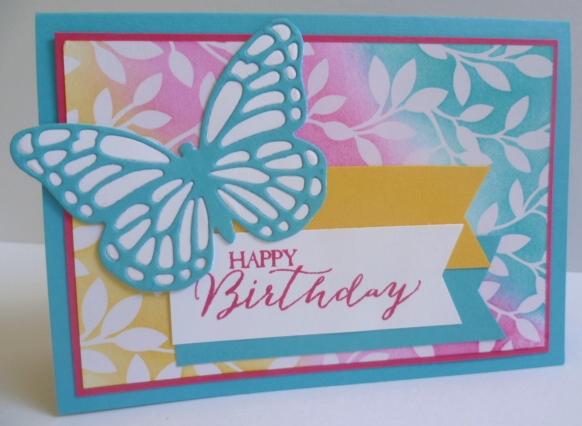
I used Tempting Turquoise, Melon Mambo and Daffodil Delight.  To colour the paper I sponged the ink picking it up from the inkpad with the sponge.  Rather than dabbing with the sponge though I rubbed in a circular motion.  I think that gives a smoother coverage of ink rather than it looking blotchy. Once you ink it then rub over the paper with a tissue and it will wipe off the ink over the embossed areas and give it a shine. For this card the paper is teamed with the gorgeous butterfly die available now in the Occasions Catalogue and I backed this with some Whisper White card to make it stand out.  The greeting is from the Buttefly Basics stamp set.

The ‘Irresistibly Yours’ DSP contains 12 sheets (2 each of 6 designs) that are single sided. They each have a glossy white pattern. You can apply ink to the paper by sponge, brayer or directly with the inkpad.  You could colour with Blendabilities too if you like. The embossed like pattern resists the ink leaving a gorgeous pattern. If you haven’t seen it yet or really paid attention to it, check it out on page 15 of the Sale-A-Bration catalogue. Here are the patterns you will find in the pack.  It’s great to create some beautiful patterned paper to the colour you would like and to make it look embossed and you haven’t had to drag out the embossing powder and Heat Tool!

paper

Thanks for visiting today,

Jenny

3D projects, Stampin' Up!

NEW YEAR CREATING WITH BUTTERFLY BASICS!

Happy New Year to you all.  I hope you have had a lovely Christmas and New Year celebrations. We had a really nice family time.  I love these special moments.  I have been in my craft room the past week though.  I can’t keep away.  I have a number of projects to share with you over the next week. It has been so nice to ink up some new stamps.  Today I thought I would show you a little gift box I have just made.  This is using the new Bundle ‘Butterfly Basics’.

P1150789       P1150788


I have used Coastal Cabana.  I cut a butterfly from the butterfly Dies from Whisper White and one from the silver foil sheets.  (Read below for some tips for cutting out these little intricate dies). I sponged around the edge of the white butterfly in Coastal Cabana.  The strip under the butterfly is vellum which I have embossed with the Perfect Polka Dots Embossing Folder and then flagged the ends.  The little postage stamp is heat embossed with silver embossing powder.  I added a strip of Rhinestones to the centre of the butterflies for some bling.

For the box I recreated the little box I showed in a post some time back.  You can find all the details HERE.

BUTTERFLY DIES CUTTING TIPS

These butterfly dies are very intricate and like similar ones you might have a few problems cutting them out.  I thought I would share my tips in cutting them to have a nice clean cut.

1. Use baking paper between your die and cardstock. You may have to also add a scrap piece of copy paper to aid the cutting further. So lay your card down on the bottom Big Shot cutting plate, place a piece of baking paper over the card, top with your die face down then add the scrap piece of copy paper. Place the top cutting plate over it.

2.  When running through your Big Shot you might want to run back and forth a few times.  I found I needed to run it through about 6 times.

I had several attempts playing around with this die to cut well.  After some frustrations (and maybe some mumblings under my breath!), I found this to be the best result.  The butterfly lifted almost cleanly off the die.  I just used the Paper Piercer to start popping it in the holes and lift it slightly and then it would lift off quite easily.  See how you go trying this but do persevere as it is such a beautiful die and combines so lovely with the Butterfly Basics stamp set.

I look forward to sharing more projects with you so stop by again soon,

Jenny