cards, Punch Art

FIRST BIRTHDAY TEDDY BEAR!

I can’t believe I forgot to show you this card.  I made this a few weeks ago for one of my Great Niece’s 1st Birthday.  I was a little stumped at first what to do as I had nothing really suitable.  I did consider the ‘Something for Baby’ set but then I thought PUNCH ART!! It has been ages since I did something like that.  This little bear took a little while to work out.  I did have a Punch Art Bear similar I had made a while ago but I had to reconfigure him.  Once he was done the card came together fairly quickly. Do you think he is cute???

P1140321


I used a number of oval and circle punches to create his body and sponged all the pieces. The greeting is from ‘Chalk Talk’ and finished with some Melon Mambo Candy Dots. I embossed some Melon Mambo card with the ‘Alphabet Press’ Embossing Folder and layered this piece on to a piece of Whisper White (after tying around some Whisper White Baker’s Twine). Then this was all adhered on to a Melon Mambo Card base.

I hope you like my cute little friend.

I hope you have wonderful weekend wherever you may be. Sending some Bear Hugs your way.

Jenny x

Classes

CELEBRATE WORLD CARDMAKING DAY!

Take time out for yourself, have fun together, make some cards using your very own ‘Everyday Occasions’ Kit. That’s how we can celebrate World Cardmaking Day 2014.
Come and join us.

The ‘Everyday Occasions’ kit contains all the cardstock, envelopes and embellishments to make 20 cards. What you don’t complete on the day you can take home.
The Kit also includes a 7 piece Stamp set a clear block, 2 Stamping Spot Inkpads and a full colour Brochure of the cards you can make.

Here is the stamp set you will receive. Isn’t it a great one! Stamps for many different occasions in this set.

Kit set

There will be spot prizes, unlimited tea/coffee and fun games throughout the day.

WHEN: Saturday October 4th at 2pm.
PLEASE BOOK AND PAY BY FRIDAY 26TH SEPTEMBER. **THIS FRIDAY**
COST: $60 which includes a $10 rebate voucher to use on the day.
WHAT TO BRING: Adhesives, Plus bring a plate of food to share for Afternoon Tea.


 Message me to book  your place but be quick.  This Friday is the closing date so I can  have your kit in time.

DON’T MISS OUT!!!

3D projects

TAG BOX TUTORIAL!

Yesterday I showed you the projects I made for the Stamp-A-Latte Blog Hop using the Snowflake Thinlets.  If you missed it just head back to the post before.  I didn’t have time in that post to show you how I made the Tag Box so I thought I would show you that today.

Here is the cute box to show you again.

P1140518

Here is inside the box showing the tags I made too.  The green strip of DSP from the Nordic Noel DSP is not a Belly Band.  I just added it to the top of the acetate and adhered the ends inside the lid.

P1140519

You can decorate this however you want to.  The finished size is 9cm x 9cm x 2cm (3 1/2″ x 3 1/2″ x 3/4″). But how did I make it?? Here is the Tutorial for you.

TAG BOX

For the Base

NB: If you intend to stamp your box then do so before you assemble the box!!

Cut your card to 13cm x 13cm ( 5 1/8″ x 5 1/8″).  Score on each side at 2cm (3/4″).  

Fold on all score lines and cut up the 2 tabs on one side and again on the opposite side.

P1140461

Place adhesive on the small tabs and assemble the box.

For the Lid

Cut your Acetate to 13.4cm x 13.4cm (5 1/4″ x 5 1/4″) and score at 2.2cm (7/8″). 

Fold on all the score lines.  You may want to use the Bone Folder to burnish (press down) the score lines more.

Cut up on the 2 tabs on one side and then again on the opposite side.  Place adhesive on the tabs and adhere together.  I used Fast Fuse or you could use Sticky Strip.

This lid is a little snug.  You just need to jiggle it in but it works fine.

Decorate your box as you like.  I lined the base of this box.  The paper size I used was 8.5cm x 8.5cm (3 3/8″ x 3 3/8″).

These fit the tags in just nicely.  The tags are punched with the 1 3/4″ circle punch.

Don’t just think of them for tags though.  Why not add some chocolates???

P1140522

Enjoy making them. 🙂

Jenny 

3D projects, Masculine

RECTANGULAR GIFT BOX!

I was playing around the other day and created this Rectangular style box. I was inspired by some packaging we received on something we bought.  I liked the design so I tweaked it to fit our Australian size cardstock.  Here are the boxes I made. Keep reading too for the tutorial to make your own.

P1140380


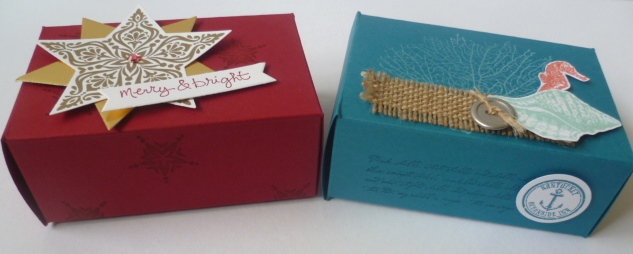
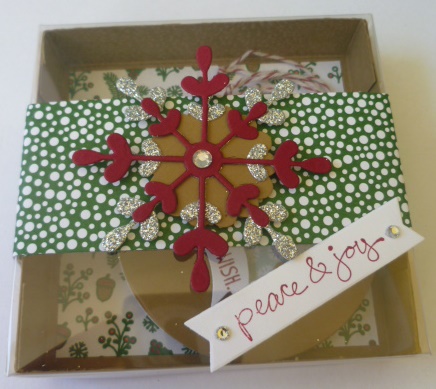
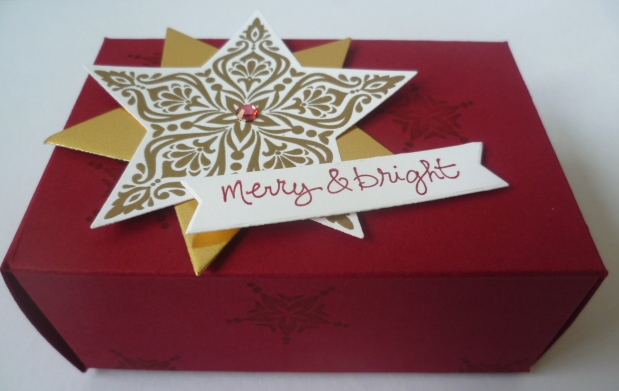
A Cherry Cobbler box ready for Christmas.  I used the ‘Bright and Beautiful’ Stamp set and embossed one of the gorgeous stars with Gold Embossing Powder.  I cut this out and one in Gold card with the Star Framelits.  I coloured a Rhinestone with the Cherry Cobbler Blendabilities.  BEFORE assembling make sure you stamp the cardstock.  So much easier!  The greeting on this box is from the ‘Good Greetings’ stamp set.  This is the Free set you can get this month when your party sales reach a minimum or $300.  This set is very useful with greetings for all occasions.

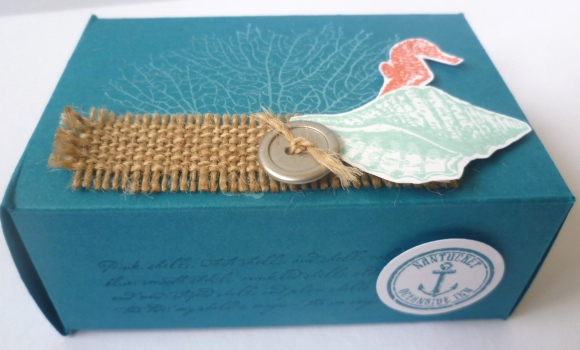
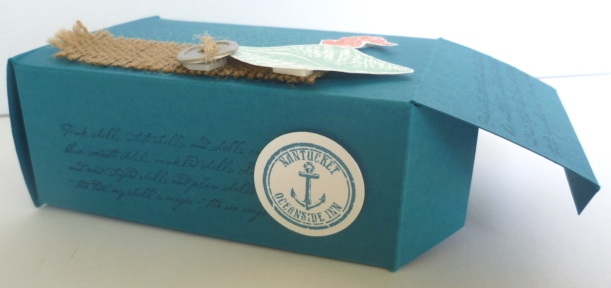
The Island Indigo box might suit the men in your life.  On this one I stamped the seaweed from ‘By The Tide’ with White Craft Ink.  The shell was stamped in Pool Party and the Seahorse in Calypso Coral.  I stamped the verse on each side of the box with Island Indigo ink.  For the Burlap trim I cut a length and cut off the sewn edges.  I then frayed the edges by pulling out some of the thread.  I used one of the threads to tie off on the Silver button.

Here they both are individually.

P1140381 - Copy     P1140387

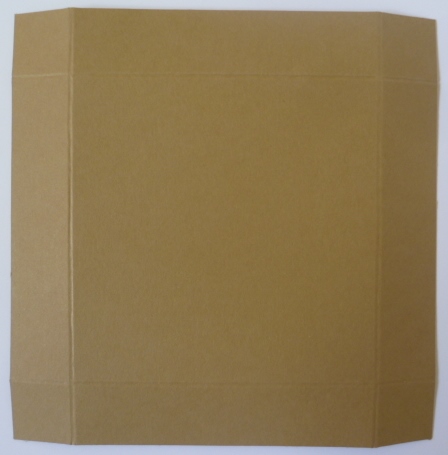
Here you can see how the end flaps fold in.

P1140412

So do you want to know how to make one yourself.  Here you go.

RECTANGULAR GIFT BOX TUTORIAL

(Finished size is 10cm x 4cm x 7cm)

1. Cut cardstock METRIC:  24cm x 20cm.  On the 24cm side score and 4cm, 11cm, 15cm and 22cm.  On the 20cm side score at 1cm, 5cm, 15cm and 19cm.

                            IMPERIAL: 9 1/2″ x 8″.  On the long side score at  1  1/2″, 4  5/16″, 5 7/8″ and 8 5/8″.  On the 8″ side score at 3/8″, 2″, 6″ and 7 1/2″ (NOTE: I haven’t tested these measurements yet so I do hope they are correct! Let me know if I am wrong.  There are some odd measurements!)

Here is the template.  (This has now been updated).

P1140404

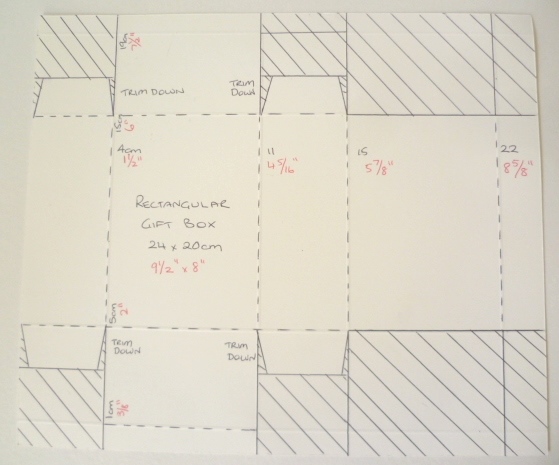
2. Cut off all the shaded areas.  Cut up on the tab lines (filled in line).  Where I have marked “Trim Down” I cut these tabs down shorter.  These are the tabs you fold in on the ends and then I angled the tabs to fold in more neatly.  I hope that makes sense??

3. Fold on all the scored lines.  Stamp the cardstock as you like before assembling.

4. Add Sticky Strip along the narrow tab on the right hand end (the underside).

5. Assemble by lining up the edge of the tab with the Sticky Strip to the other end.  Then fold in the flaps on each of the ends.

Hope this all makes sense.  Please ask if you are unsure.  Enjoy making them.

Jenny

cards

BORDERING BLOOMS!

A couple of weeks ago I had a chance to play with the ‘Bordering Blooms’ set.  This was my first time playing with Photopolymer stamps too.  I have to say I loved them.  Love how they stick to the block and stay!!! They are very easy to use too being able to see clearly through the block.  So here are the cards I made then.

This first one was CASED from Pinterest by Shelly Godby.  Her version was a lot more gorgeous and she stamped the inside too but I was happy with this.  I used Crisp Canteloupe and Baked Brown Sugar.  The scallop edge under the border was using the Dotted Scallop Ribbon Punch.  The greeting is from ‘Wetlands’.

P1140198

Another quick card.  This one was CASED from Sharon Burkert on Pinterest.  Her card had a White Card base.  I decided to make mine on a coloured card base so I used Hello Honey.  I think this will look good on any colour base.  I will try that sometime soon.  The little flowers were punched from the ‘Itty Bitty Accents Pack’.  The greeting was from ‘Blooming with Kindness’.  I coloured Adhesive Pearls with the Calypso Coral Blendabilities set.

P1140193

I liked this simple layout so I thought I would make it into a Christmas Card.  My first for the season. It’s a bit hard to get your head around Christmas yet but since the Holiday Catalogue is out very soon I have to make a start.

P1140191

I used Cherry Cobbler and stamped the “vine” type image in Mossy Meadow.  The pearls were coloured with the Cherry Cobbler Blendabilities.

One more – sorry.  This next one I made for a workshop last week.  After stamping the blooms I coloured them with the Blendabilities.  The greeting is from the hostess set ‘Hello There’.  I added a little of the Gold sequins, Gold Twine and some paper piercing.  I haven’t used this colour combination for some time using Rich Razzleberry and Wisteria Wonder.

P1140195

Hope you liked them.  I think these will be a great addition to your stamp collection suitable for many occasions.  Check it out below.  You can buy this or any other Stampin’ Up! products in my Online store.  Check the link in the right hand side bar.

Thanks for stopping by today. The rain is still pouring down here but it is good to have it.  The grass was looking a little brown. Hope all is well in your part of the world.  🙂


cards

COLOURFUL ‘LOVELY LACE’!

I have been playing around with the ‘Lovely Lace’ Embossing Folder this week.  As soon as I saw this in the Catalogue I knew I had to get it.  I love all the detail in it.

Here is the first one.  Since I had been playing around with the Blendabilities as well I thought I would do some colouring in.

P1140188

For this card I embossed on Whisper White cardstock.  I then just simply coloured to highlight the impression. The Blendabilities work better colouring on the card than the Stampin’ Write Markers as you don’t need to press hard to colour so you don’t effect the impression, and the colour blends nicely.   I found using the fine tip on the Blendabilities worked better for the finer lines. So easy – and so therapeutic just sitting and colouring. 🙂

I just finished it off by wrapping around some Pistachio Pudding Thick Baker’s Twine.  This was adhered to a mat in Pistachio Pudding and a card base in Lost Lagoon.  I added a greeting from ‘Label Love’.  The banners were cut from the ‘Bitty Banners’ Framelits.  One from Daffodil Delight and one from the Silver Glimmer paper. They were then cut in half and adhered behind the label. Some Rhinestone bling was added for more sparkle.

Another card I made was very simple.

P1140196

Simply emboss on white cardstock.  Tie around some Island Indigo Cotton ribbon ( I love how soft and easy to tie this ribbon is!).  This was adhered to an Island Indigo mat and then Whisper White card base.  I punched out a scallop circle in Silver Glimmer Paper.  The “For You” is from the ‘Hello There’ Hostess set.  I will be making a few of these cards to send out to some special people this week.

Thanks for stopping by.  Hope you have a wonderful weekend. 🙂

Stampin' Up!

BIG SHOT BUNDLE BONUS!!!

You have probably heard by now about the fantastic Big Shot promotion this month.  It is awesome whether you have a Big Shot already or not.  What’s the deal???

Buy a Big Shot and get a Bundle for FREE!!!!!  How good is that? That is a huge bonus with your new Big Shot machine.

OR

Buy a select Bundle and get 15% off.

Big Shot promotion-1

The prices are a bit hard to read aren’t they?? I have added a table below with the clearer prices. Check them out here.

Big Shot


Below you can see the stamp sets in these bundles just to help you out. So you don’t have to go fumbling through the Catalogue.  NB. I have just added the wood-mount images but they are available as wood and clear mount.  The prices are just for the stamp set only but use the bundle prices as in the table above.

                                             ————————————————————————-
Do you recognise the Bright and Beautiful stamps??? These are a little sneak peak from the upcoming Holiday Catalogue.  This would have to be my most favourite set from the catalogue AND you get the Star Framelits in the bundle.  Gotta love that!
Here is a close-up.  Isn’t it gorgeous???  How nice would it be heat embossed??? I can’t wait to get my set later this week to play.
Bright and Beautiful
Now how can you get your hands on these bundles.  For Australian residents.
1. Email or phone me your order.
or
2.  Shop at my online store.  Head over here NOW to check them out. You can order them and they will be shipped direct to your door.
Thanks for stopping by.  Have a Happy Stamping Day 🙂
Jenny
Classes

BEGINNER’S CARDMAKING CLASSES!

I am starting a new series next week for people who would like to have a go at Cardmaking OR maybe they have lost their MOJO and are having trouble pulling out their stamps again. If you are in the Wollongong area I would love you to join in.  Cardmaking is a lot of fun and brings great pleasure not only to you when you make them but for the special person receiving your card.

SO, maybe you would like to come along or you know someone.  Tell them about it.  Here are the details.

“Classes just for the Beginner – or for someone who wants to kick their MOJO in to gear!!”

During these classes we will go through basic Stamping Techniques such as simple stamping, stamping off, masking, 2 step stamping and many others.

WHEN:  These are run over 2 sessions.

Friday 8th August at 10am or 7.30pm in East Corrimal.

And Friday 5th September 10am or 7.30pm. 

*Can’t make it, we can work out another time.

COST:  $15 per week or $20 for the 2 sessions paid up-front.

RSVP: Wednesday 6th August.


Drop me a comment and I will get back to you with further details shortly.

Jenny

My DIgital Studio

ANOTHER DIGITAL BON-VOYAGE!!

A month ago I showed you a Bon Voyage card I made with MDS for my son as he headed off to Fiji for 4 weeks.  You can see that card here if you missed it. I can say he has now returned safely. The day after he returned my daughter set off for China as part of a trip with her Dad’s employer. There are over 100 children from countries all over the world.  She will be away for 3 1/2 weeks (One sad Mumma again!).  It is a big adventure for her at only 13 years, but a fantastic opportunity.  So, with her leaving I had to make another Bon Voyage card (I hope this doesn’t become a regular thing!). Once again I turned to MDS to create it.

My Project 52-001

She loves orange and loves daisies so I thought this was fairly close.  She loved it anyway.  The dotty background was a digital DSP (I can’t remember the name of it now).  The stamp set was the digital ‘Enjoy Every Moment’ for the text and the flowers. I added a couple of other digital stamps.  (I really need to make a note of the stamps I use!).   The speech bubble was a punch which I coloured in Tangerine Tango and added a mat in Daffodil Delight.  I was going to add real bling to it but in the end just went for the Digital Rhinestones.

Have you tried MDS yet?  You can always download the free MDS Trial version and have a play to see how it works. Then if you like it, you can download the software and add your digital elements as you go.  Check out the link to the right for my store and you can see there how you can go about downloading it. If you need any help, just ask me. I will try and help you out.

Thanks for stopping by.

Catalogues, Stampin' Up!

THE STAMPIN’ UP! CATALOGUE IS NOW LIVE!

Yes, Today is the day! The 2014 Stampin’ Up! Catalogue is live! YAY! I can’t wait to share with you the wonderful products we have: Great new stamp sets, Gorgeous new papers, fun new Dies, lovely new In Colors, Blendabilities and Project Life.  You will want it all!

You can view it Online HERE Now.  Even better why not get your own copy.  I can send one ANYWHERE in Australia.  

20140602_AnnualCatalog_en-US-CA

Yesterday I shared some of the displays at my Launch I held on Saturday.  I thought I would show you the card we did as a Make and Take today.  I CASED this card from Pinterest. This is using the Stamp Set ‘Kinda Eclectic’. You can see what is in this stamp set below. I think this will become a favourite in the catalogue.  This is using some of the new In Colors: Blackberry Bliss and Hello Honey, with Very Vanilla.  The great thing too with this set is that the butterflies fit the Elegant and Bitty Butterfly punches.  I like the little touch of Gold Twine on the card too.

P1120931


So go and check out the Catalogue now if you haven’t already done so or let me know and I will get one to you.
Have a Happy Day 🙂