3D projects, cards

BIRTHDAY STEP CARDS!

Last week we had a stamp day with my stamping buddies Leonie N, Andrea and Tracey.  They are always good times.  I have been wanting to make the Block/Step cards you might have been seeing around the blogosphere. I had a chance to make them that day. So here are my versions, then I will share you the link to the instructions.

Firstly, using ‘Amazing Birthday’ stamp set.

P1140117

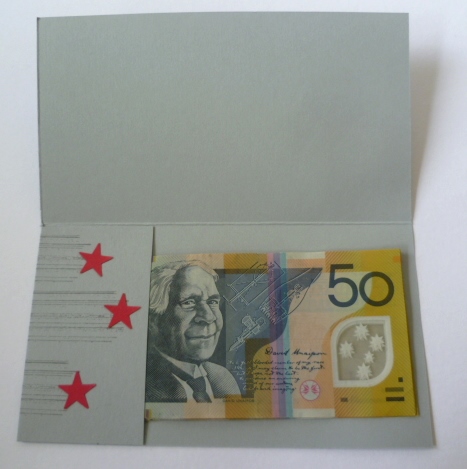
I used the DSP ‘Sweet Taffy’.  Isn’t it cool?? I love all the bright colours in this pack.  A little brightness and sparkle makes for a HAPPY Birthday.

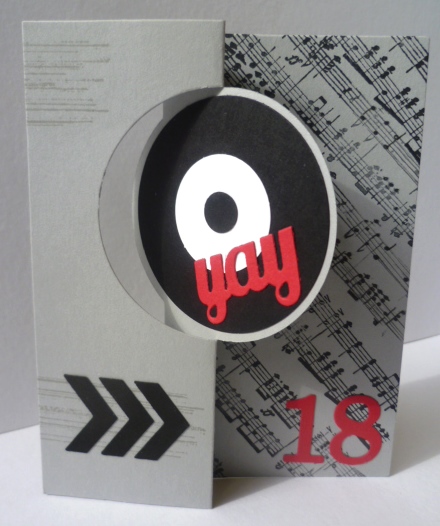
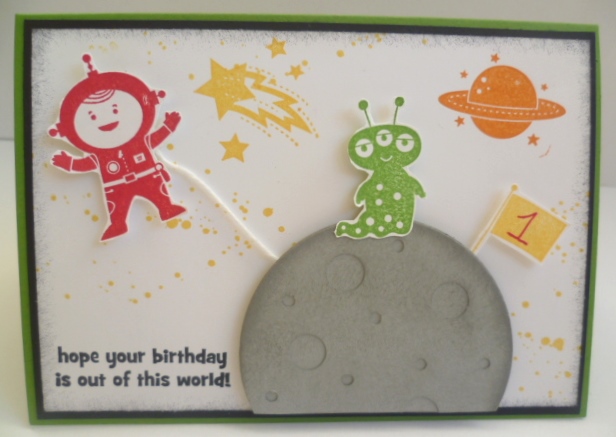
Now another version. This time for the menfolk. I used the ‘Amazing Birthday’ set again and also the ‘Traveler’ set.

P1140114

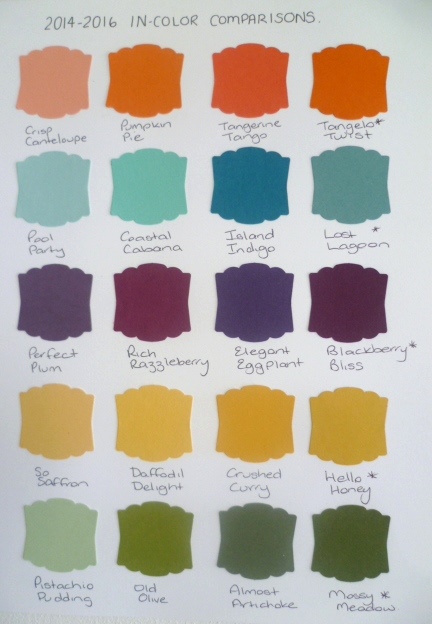
I have also used the new In Colors – Mossy Meadow, Hello Honey and Tangelo Twist. I stamped the background on the Mossy Meadow cardstock BEFORE assembling it!!! 😉  Then I stamped the other images separately and cut them out and adhered them on.  I added a silver button and a Linen Thread bow.

Now for instructions.  There are a few tutorials you might find but I found this one on Libby’s blog. Check it out here. Click on the link just a little way down to take you to the template.  I just changed it slightly.  Since our Australian card size is longer, instead of cutting the cardstock to 28cm x 10.5cm, I made the length 29cm.  Which meant I didn’t have to add the extra little strip (10.5cm x 2cm) to join the block card.  So I scored the card on the long side at 3.5cm, 7cm, 10.5cm, 14cm, 17.5cm, 21cm, 24.5cm and 28cm.  Cut and assemble the box as it says in the template. I just added Sticky strip along the small tab that was left on the end and adhered it together.  Hope that all makes sense.  I do love making these.  They are fun.  Now I have done these two I will make some more again soon.

Thanks for stopping by,

Jenny

My DIgital Studio

ANOTHER DIGITAL BON-VOYAGE!!

A month ago I showed you a Bon Voyage card I made with MDS for my son as he headed off to Fiji for 4 weeks.  You can see that card here if you missed it. I can say he has now returned safely. The day after he returned my daughter set off for China as part of a trip with her Dad’s employer. There are over 100 children from countries all over the world.  She will be away for 3 1/2 weeks (One sad Mumma again!).  It is a big adventure for her at only 13 years, but a fantastic opportunity.  So, with her leaving I had to make another Bon Voyage card (I hope this doesn’t become a regular thing!). Once again I turned to MDS to create it.

My Project 52-001

She loves orange and loves daisies so I thought this was fairly close.  She loved it anyway.  The dotty background was a digital DSP (I can’t remember the name of it now).  The stamp set was the digital ‘Enjoy Every Moment’ for the text and the flowers. I added a couple of other digital stamps.  (I really need to make a note of the stamps I use!).   The speech bubble was a punch which I coloured in Tangerine Tango and added a mat in Daffodil Delight.  I was going to add real bling to it but in the end just went for the Digital Rhinestones.

Have you tried MDS yet?  You can always download the free MDS Trial version and have a play to see how it works. Then if you like it, you can download the software and add your digital elements as you go.  Check out the link to the right for my store and you can see there how you can go about downloading it. If you need any help, just ask me. I will try and help you out.

Thanks for stopping by.

3D projects, cards, Masculine

MONEY HOLDER FOR THE BOYS!

Hope life is going well in your corner of the world??  Here it is cold and windy – but I guess you have to expect that for this time of year.  Yesterday was my gorgeous boy’s 18th Birthday.  I can’t believe how the time has flown.  I thought I would show you the card and gift I made for him.

You might recognise the card???

P1130120

I used this card for my Convention swap a few month’s ago.  Josh loves vinyl records so thought this idea would be really cool for him.  I used the Circle Thinlets Die to cut the Smoky Slate card base.  I used the Music Notes wheel (now retired) to run over the card in Black Stazon.  The black circle was punched with the 2 1/2″ circle Punch and the white inner circle was punched out with the 1 1/4″ circle.  The small black circle was punched with the 2 step Owl Punch.  The ‘YAY’ is cut from Real Red card using the little extras in the Circle Thinlets set.  I could have used the Chevrons in the set too but these ones were punched with the Chevron Border punch.  The ’18’ is cut using the ‘Timeless Type’ Die (now retired).   I stamped the streaks in Smoky Slate from ‘Gorgeous Grunge’ too.

Here is a close-up.  Josh thought it was pretty cool and even at 18 had fun flipping it! 😉

P1130123


Here is the inside with just a simple “Happy Birthday” from ‘Fabulous Phrases’.

P1130127

I forgot to take a photo of the Money Holder on it’s own but you can see it in the photo at the top. For this I followed the theme of the Vinyl Record.  I stamped over the front of the card using the streaks and splodges from ‘Gorgeous Grunge’.  The stars were punched from the new ‘Itty Bitty Accents’ pack and the greeting is from ‘Label Love’.  Here is the inside of the Money Holder.  I added some more streaks and stars.

P1130125

I will give you directions so you can make your own Money Holder.  They can just add a little extra to the gift rather than just adding it inside the card.  I didn’t take step-by-step photos but I think it is fairly straight forward  – I hope 🙂

MONEY HOLDER   (The finished pocket is 16cm long)

METRIC

Cut you card 21cm x 16cm.  Score on the short side at 8cm.

On the long side score at 5cm. Cut off the Top Left Hand section. (This will be the smaller tab section)

Add adhesive along the top and bottom of the lower Left Hand section and fold over to create a pocket.

IMPERIAL (These are approximate.  Check your card size – and your money size).

Cut your card to 8 1/2″ (ie the width of the card) x 6 1/2″. Score on the short side at 3 1/4″.

On the long side score at 2″. Cut off the Top Left Hand section. (This will be the smaller tab section)

Add adhesive along the top and bottom of the lower Left Hand section and fold over to create a pocket.


Have a happy day.  I hope to go and create today.

Catalogues, Stampin' Up!

THE STAMPIN’ UP! CATALOGUE IS NOW LIVE!

Yes, Today is the day! The 2014 Stampin’ Up! Catalogue is live! YAY! I can’t wait to share with you the wonderful products we have: Great new stamp sets, Gorgeous new papers, fun new Dies, lovely new In Colors, Blendabilities and Project Life.  You will want it all!

You can view it Online HERE Now.  Even better why not get your own copy.  I can send one ANYWHERE in Australia.  

20140602_AnnualCatalog_en-US-CA

Yesterday I shared some of the displays at my Launch I held on Saturday.  I thought I would show you the card we did as a Make and Take today.  I CASED this card from Pinterest. This is using the Stamp Set ‘Kinda Eclectic’. You can see what is in this stamp set below. I think this will become a favourite in the catalogue.  This is using some of the new In Colors: Blackberry Bliss and Hello Honey, with Very Vanilla.  The great thing too with this set is that the butterflies fit the Elegant and Bitty Butterfly punches.  I like the little touch of Gold Twine on the card too.

P1120931


So go and check out the Catalogue now if you haven’t already done so or let me know and I will get one to you.
Have a Happy Day 🙂
cards, Catalogues, Classes, Stampin' Up!

THE CATALOGUE IS LAUNCHING!

The excitement is building.  The new Catalogue starts TOMORROW!! Lots of new goodies to see.  I had my Catalogue Launch on Saturday.  It was a huge day and I thought I would show you some photos.  There are lots of photos so I apologize is advance. 🙂

I had 2 sessions on the day with lots of lovey ladies.  Yet I didn’t take a photo of the groups! Not to worry, you can see some of the display.

Goodie Bags for everyone!


Close-up of the bag.


New Product display of colours and ribbon!

This is a close-up of the flowers.  These flowers were inspired by a display I saw at Convention.

Close-uo of the flowers using Moonlight DSP paper Stack and Clear Faceted Buttons.


New Stamps and Samples


Who wants a Party?? Book a Party, Pick a prize envelope


Close-up of the Flower.


Colour Comparison with the new InColors (far right on the chart)
Colour Comparison with the new In Colors (far right on the chart)

There were other displays with the Blendabilities and Project Life but I think I have bored you enough 😉

So onwards to tomorrow now.  The new Catalogue.  Can’t wait!

Have a happy Day 🙂


cards, My DIgital Studio

DIGITAL BON VOYAGE!

My son Josh heads off to Fiji today for 4 weeks with Year 13 Gap Year Program that he has been doing this year.  They will be involved in the communities there providing care, support and ministry training.  It is a huge endeavour and while I am very excited for him to go and for all that he will experience, as a Mum it is hard to see them fly the nest.  😦

I wanted to make a card to send him off with but I didn’t have any stamps suitable so I made one on MDS (Stampin’  Up! Digital software program).  I am still finding my way around MDS but I SO LIKE it when I can just click ‘Undo’ if I am not happy with something I have put on there.  No wastage of card!!  After it was done I just printed it off on our printer. So here is my card.

My Project 50-001


I used the Digital sets: World Tour and Travel Log.  The Background DSP is ‘Made from Scratch’ (I think!).

Thanks for looking.  I am off to console myself now.  I might just play with real ink and stamps today.

Have a Happy Day 🙂


cards

BLAST OFF FOR A 1 YEAR OLD!

I made this card a few weeks ago now just before Convention but with the excitement of Convention and the new Catalogue I hadn’t got around to showing you this yet.  This card was made for one of my Great Nephew’s 1st Birthday.  This is using ‘Blast Off’ which is on the retiring list.  It is such a cute set.  Here is the card.

P1120074

It was quite fun stamping and cutting these little characters out.  For the grey “moon” I cut 2 circles from Smokey Slate cardstock using the Circle Framelits and with one I punched out holes using the Crop-A-Dile and a small circle punch.  I then adhered them together and sponged the edge all around and over it randomly.  I used ‘Gorgeous Grunge’ to create little splodges in Daffodil Delight. For the spaceman I taped some White Baker’s Twine to the back of him and to the back of the moon to let him “float” around.  A cute little card for a cute one year old.

Make sure you grab this set before it leaves us in 2 weeks.  Then it is gone!!  You can check this cute set out below.

In the meantime, Happy Stamping 🙂

Stampin' Up!

THE 2014 STAMPIN’ UP! CATALOGUE LAUNCH IS HAPPENING!!

Catalogue Launch

I hope you can join me.  They are a lot of fun and I know you are going to want to see the new Catalogue.

Book early though so  you won’t be disappointed.

If you can’t make it and would love a Catalogue, drop me a message and I will get one to you.  $5 plus Postage.

cards, Stampin' Up!, swaps

2014 SOUTH PACIFIC CONVENTION SWAPS!

As promised, I finally have my swaps from last week’s Stampin’ Up! Convention all sorted to share with you.  I have tried to organise them into separate categories to make it easier.

So here they are ……

Vintage/Shabby Chic Style

P1120603

Masculine type

P1120610

Geometric and a few others

P1120608

Technique Style 

P1120611

Flowers of all types

P1120613

Butterflies

P1120615

3D (tags, notebooks, boxes)

P1120616

Christmas

P1120618


I hope some of these inspire you in your creating.  That’s why I like to share them.  If you have any questions on any of them or would like some close-ups then let me know.

Enjoy 🙂

Stampin' Up!

BE A PART OF THE STAMPIN’ UP! FAMILY!

ecard_Signandsave_AU

I am sure you have been hearing all the stories about how great the Stampin’ Up! Convention was. Over the time you have heard about the great discount you can get on all your products as a Demonstrator.  Did you know you can enjoy being a Demonstrator for the discount yourself, or you can take it further and build a small business earning some pocket money to fund your stamping addiction.  In my 5 years with Stampin’ Up! I have had a blast.  I have grown personally and I have friends now from all over the world.  Not to mention how much I have learnt with my stamping.

Why not take the step yourself???  I can assure you, you won’t regret it.  If you find it is not working you can drop, no questions asked.  So what are you waiting for???????

Stampin’ Up! have announced a special offer available until June 30th.

Join for only $85.

What do you get for that.

– $90 value of products of your choice PLUS business materials such as order forms and catalogues.

– 20% regular discount on all your products.

– 30% discount on your first order.

– The opportunity to meet so many like-minded people and be inspired by the exclusive Demonstrator Forums.

– With the new catalogue coming out very soon you are able to include Preorder products available from the new Catalogue including Blendabilities, and Project Life. (Get the products before anyone else!)

– Build a business or enjoy the discount for yourself.


The Starter Kit for $169 (receiving up to $235 of products) is still available.  Why not ask me for a no-obligation Information Pack. I would love to welcome you to my team “Jen’s INK.”  I will be with you all the way wherever your journey takes you.

Email or phone me for your pack or to ask any further questions. OR if this if you know you want to join now then head to my website and Join Online Now HERE!

Jenny