3D projects, Stampin' Up!

NEW YEAR CREATING WITH BUTTERFLY BASICS!

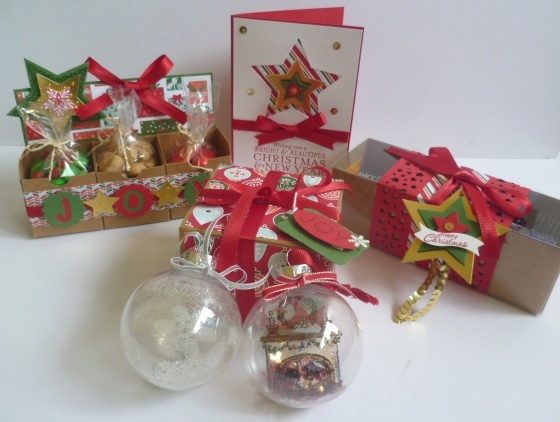
Happy New Year to you all.  I hope you have had a lovely Christmas and New Year celebrations. We had a really nice family time.  I love these special moments.  I have been in my craft room the past week though.  I can’t keep away.  I have a number of projects to share with you over the next week. It has been so nice to ink up some new stamps.  Today I thought I would show you a little gift box I have just made.  This is using the new Bundle ‘Butterfly Basics’.

P1150789       P1150788


I have used Coastal Cabana.  I cut a butterfly from the butterfly Dies from Whisper White and one from the silver foil sheets.  (Read below for some tips for cutting out these little intricate dies). I sponged around the edge of the white butterfly in Coastal Cabana.  The strip under the butterfly is vellum which I have embossed with the Perfect Polka Dots Embossing Folder and then flagged the ends.  The little postage stamp is heat embossed with silver embossing powder.  I added a strip of Rhinestones to the centre of the butterflies for some bling.

For the box I recreated the little box I showed in a post some time back.  You can find all the details HERE.

BUTTERFLY DIES CUTTING TIPS

These butterfly dies are very intricate and like similar ones you might have a few problems cutting them out.  I thought I would share my tips in cutting them to have a nice clean cut.

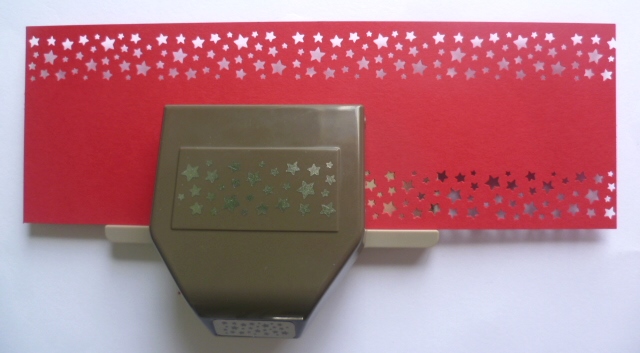
1. Use baking paper between your die and cardstock. You may have to also add a scrap piece of copy paper to aid the cutting further. So lay your card down on the bottom Big Shot cutting plate, place a piece of baking paper over the card, top with your die face down then add the scrap piece of copy paper. Place the top cutting plate over it.

2.  When running through your Big Shot you might want to run back and forth a few times.  I found I needed to run it through about 6 times.

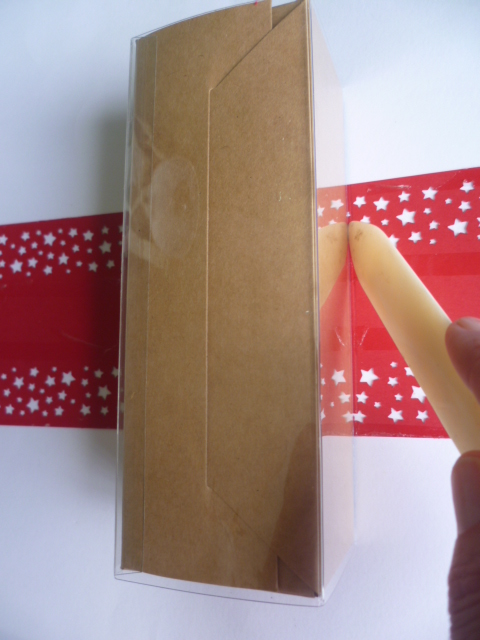
I had several attempts playing around with this die to cut well.  After some frustrations (and maybe some mumblings under my breath!), I found this to be the best result.  The butterfly lifted almost cleanly off the die.  I just used the Paper Piercer to start popping it in the holes and lift it slightly and then it would lift off quite easily.  See how you go trying this but do persevere as it is such a beautiful die and combines so lovely with the Butterfly Basics stamp set.

I look forward to sharing more projects with you so stop by again soon,

Jenny

3D projects, Christmas

12 WEEKS OF CHRISTMAS REVIEW!

Did you enjoy the recent 12 Weeks of Christmas projects?? There were a lot of awesome projects by the team. What was your favourite project do you think???  I would love to hear what you thought.

I was looking at my projects the other day and noticed a theme.  I didn’t plan it like this though. These are my projects I created over the 12 Weeks.  Do you notice anything???

P1150540

I seemed to have a theme of using the Nordic Noel DSP and different Gift Packaging that Stampin’ Up! has available.  I have to say it is so great that there are so many different sizes and types available.  These do make dressing up gifts and treats quick and easy.  For these projects I used the Tiny Treat Boxes (only available now until January 5th), the Kraft Gift boxes and the Tag a Bag Boxes.

If you missed these posts you can find them all here.

Tiny Treat Holder

Clear Ornaments and Gift Box

Tag a Bag Box Treats and matching card.

If you want to check all the projects from our 12 Weeks of Christmas then just click on the tag below of “12 Weeks of Christmas” and all the posts should come up.

It might be a bit late to make any of these projects for this Christmas but maybe they will be useful for next Christmas or another occasion.

Have a wonderful Christmas surrounded by the ones you love and may you take some time to reflect on the Greatest Gift we have been given.

I am taking a break from blogging for a week so I will see you with more creative projects in 2015. Thanks for being part of my journey this year. 🙂

Jenny x

Merry Christmas manger

cards, Christmas

I JUST HAVE TO SHOW YOU THESE CHRISTMAS CARDS!

I am very proud to show you these cards today.  I can say that because I didn’t make them.  These were made by my clever Mother-in-law (who is 87!).  She has just started getting more into cardmaking recently and just loving it.  I loved these cards she has just made and thought I have to show you her fabulous work.

Firstly on this card, trees were punched with the Tree punch from Rich Razzleberry from the Brights Designer Series Paper Stack.  The white paper has been embossed with the Square Lattice Embossing Folder and adhered to a Tempting Turquoise card base. A non-traditional colour scheme here.

P1150629

These next 2 use the ‘Festival of Trees’ set.  The left card is on a Real Red card base.  The scallop edge is cut with the Scallop Thinlet and adhered at an angle.  Great idea!  The star is from the ‘Bright and Beautiful’ stamp set.  The one on the right is on a White card base and the edges sponged.  The scallop edge this time is ran through the Big Shot with the Delicate Details Embossing Folder to give it some texture. The greeting is stamped on a piece of white card and added to the card.

P1150628

Now for the next two. The one on the left has a large star cut from the Pool Party base card then a piece of Pacific Point card is adhered underneath.  A star is cut from Silver Foil Sheet and then another star is stamped and cut out with the matching Framelits and then layered together.  The greeting from ‘Bright and Beautiful’ is matted on a Pacific Point card piece and adhered to the card.

The right one is on a Real Red card base.  The ornaments are from ‘Ornamental Keepsakes’ stamp set.  Two Wild Wasabi Ornaments are stamped directly onto the Whisper White card mat. Another ornament is stamped in Real Red and cut out with the Framelits.  The “JOY” is from the ‘Bright and Beautiful’ stamp set and stamped in Smoky Slate.

P1150626

Now for the last two which I think is very clever.

P1150624

The one on the left is on a Blackberry Base.  The front of the card is cut at an angle.  Then a Whisper White angled piece is adhered to the front.  Stars are cut from Blackberry Bliss, Silver Foil and a white one stamped.  These are all layered together and the greeting stamped on the front. Inside on a Whisper White card mat the smaller stars are stamped in the upper right corner and partway down on the right side.  This is in Smoky Slate and I think Cherry Cobbler (?).  The card on the right is on a Whisper White card base.  The angled piece that was cut from the other card is adhered to the front of this card.  Then a large star is cut from both Blackberry Bliss and Whisper White and half the white star is adhered to the Blackberry card.  (Clever!!).  Then another star is cut from Silver Foil Sheet and one stamped on Whisper White. These were layered on the front of the card and a greeting is added.

What do you think?? Pretty clever, Hey! I am so proud of her.  I think she has done an awesome job.  So why don’t you stand and applaud my Mother-In-Law’s great results.  Or why not drop her a comment here and tell her what an awesome job she has done.  I know she would love that.  Her name is Verna BTW. 🙂

Thanks for stopping by and seeing these wonderful cards today.

Well, I might just have to go back to showing you my projects next post!!

Until then, Happy Stamping,

Jenny 

3D projects, Christmas

12 WEEKS OF CHRISTMAS – BONUS PROJECT!!

Latte 12 weeks Header

Wait! it’s not Thursday when we usually post our 12 Weeks of Christmas projects.  I know.  We have a Bonus project for you today created by Leonie.  This is a really cute Santa Slider Card.

SantaPocketSliderCard

So you pull the tab and ribbon and this is what happens …

SantaPocketSliderCardopen

He is a pretty excited Santa jumping up and down with glee at all the presents he has left you. 🙂

Leonie had a lot of fun making this card and she has included a Video Tutorial as well as a written Tutorial as some things are hard to put into words. While it may seem a little fiddly at first they do become easier the more you make them.

Here’s the Video Tutorial ….

Now as always we have a special Latte Girls 12 Weeks of Christmas Bundle …

Latte Girls 12 Weeks of Christmas Bonus Bundle 2 – just $60 plus shipping.

bundle

Now maybe you’d really like that tree punch so lets add that and you can get all four items for $80 plus shipping!  Now how nice would that be wrapped under the tree?  Now if you want it for Christmas you’ll need to order it within the next couple of days to make sure it arrives in time and you may like to opt for tracking for an extra $3.95 to be sure.

Remember you’ll need to contact me to get this bundle at this price as its exclusive to the Latte Girls 12 Weeks of Christmas Design Team!

Want the written tutorial? No worries – simply comment here with your email address and I’ll send you a copy!

Thanks for stopping by.  Have a Happy day 🙂

Jenny

3D projects, Christmas

12 WEEKS OF CHRISTMAS – WEEK 11!!

Latte 12 weeks Header

Another fantastic project for you in our 12 Weeks of Christmas series.  Today Narelle brings you this great Table Decoration.  Doesn’t this look cool??  Your very own Christmas Tree made out of paper that can adorn the centre of your table this Christmas.

IMG_2241

Narelle said it was so much fun to make and really didn’t take long either.

She added some sparkle by using the Silver Sparkle Dazzling Details and some scattered gold sequins from the Gold Sequin Trim.

PC102073

Then she made a star for the top using the Star Framelits and the Bright and Beautiful Stamp Set.
PC102074
PC102072
If you want to make one for your Christmas table, then be sure to email me or drop me a comment for the instructions.
 
The complete supply list to make your own is in the instructions, but as always we have a bundle deal for you.
Purchase these.
products in bundle
and get this FREE!
products in bundle - Copy
This deal is only available by contacting me, and is not available in my online store. So make sure you contact me soon.
Have fun creating these. 
Jenny


cards, Christmas

A SHABBY CHRISTMAS STAR!!

I was playing around a couple of weeks ago with some “bits” that were sitting around on my table.  I love this “shabby” style of Christmas card I made. (If you could call it that style!).  Here it is.

P1140936

I had a piece of silver glimmer paper with a star cut out from a previous project.  I really didn’t want to waste it.   Hey! It was nicely centred and positioned the right way especially compared to some other stars I had cut recently.  I layered a scrap piece of DSP from Nordic Noel DSP onto the Lost Lagoon base card.  I adhered the silver Glimmer piece onto this and added a smaller star cut from Lost Lagoon.  To the centre I added a little silver button and a White Baker’s Twine bow.  The greeting from Ornamental Pine is stamped on a strip of Whisper White card. I flagged the end of the strip.

This card really didn’t take that long to put together.  It is a one-of-a-kind though!! 🙂

Thanks for stopping by today,

Jenny

PS. Don’t forget the CLEAR-OUT SALE is on now. Some items are already sold out.  Head over to my store HERE and check them out.  You can order there and  it can be sent directly to you or email me your order.  (Australian Residents only). Thanks 🙂

Stampin' Up!

CLOSE-OUT SALE STARTING TODAY!!

q1_yearend_customer_12-5-1-5-2015_eng

Huge Sale announced today with some items up to 80% off.  Some great Christmas Gifts and little Stocking stuffers.  These are available while stock last so be quick.  

Here are just some of the items listed.  You can find many more exciting products reduced including some items from the current Holiday Catalogue.

4

Check them all out HERE.  I am placing an order this weekend, so email/phone me your order.  You can order directly online at my store from that link too.  

BE QUICK TO GRAB YOUR BARGAIN!


Uncategorized

12 WEEKS OF CHRISTMAS – WEEK 10!!

Latte 12 weeks Header

Week 10 of our 12 Weeks of Christmas.  That can only mean that Christmas is getting very close – which is a scary thought!  Today I bring you another project in our 12 Weeks of Christmas series.  I hope you like this project.

Today I bring you a Tag A Bag Gift Box and matching card.  

P1150415

When you are looking for gift packaging ideas Stampin’ Up! offer an assortment of bags and boxes that with some simple decorating they can make your gift very special.  To hold some yummy treats you can’t go past the Tag A Bag Gift Boxes.  These assemble very quickly without any adhesive at all.  These boxes can be found on p 201 of the Stampin Up! Catalogue and come in a pack of 8 for $11.95.  Great value!!

Here is the box for you.

P1150420

For this I have punched a strip of Real Red Cardstock with the Confetti Stars Border Punch, wrapped around a strip of the Nordic Noel DSP and tied around some Real Red Satin Ribbon.  I have the tutorial below. The cute tag is simply a number of stars cut with the Stars Framelits from Gold Foil, Garden Green and Real Red.  In the centre of the smallest star I added a single Gold sequin and added a small pearl coloured with the “red” colour in the Cherry Cobbler Blendabilities pack.  I added a length of the Gold Sequin Trim behind the star. The greeting is from Petite Pairs and cut using the Bitty Banners Framelits.

I made a matching card to go with the box.

P1150417

I cut a large star from the Whisper White card and adhered some of the same Nordic Noel DSP behind it.  Then layered stars in Gold Foil, Garden Green and Real Red to match the box although these were slightly smaller.  The smaller red star is punched from the Itty Bitty Accents punch set.  I added a single Gold sequin and coloured Adhesive Pearl to this too. The greeting is from the Bright and Beautiful set stamped in Real Red.  I wrapped around some Real Red Satin Ribbon and added a bow separately.  So much easier to add the bow separately.  It sits so much better.  I always have a tussle with the card and the ribbon. 😉  I finished it off with some single Gold sequins around the card.

TAG A BAG BOX TUTORIAL

Cut cardstock to measure 9.5cm x 28cm (3 ¾” x 11”). Punch along both edges with the Confetti Stars Border Punch. 

P1150400

Cut DSP 3.5cm x 28cm (1 3/8” x 11”). Adhere slong the centre of the punched strip.

Run adhesive along the back of your card strip with adhesive of your choice.  I used Fast Fuse. 

Place the middle of your card strip at the centre of the top surface on the Acetate sleeve for the box and adhere down.  Wrap the cardstock around the sleeve adhering each side as you go.  TIP: When you wrap the cardstock around each side run the Bone Folder along the edge to give a crisper fold. Check it out  in the photo how I have done it.

P1150402

Adhere the ends together at the base of the box.

Wrap your Red Satin Ribbon around the box and tie in a bow.  Create a tag of your choice to finish.

I am sure you could think of a few friends/workmates that you could whip up a few of these for?? Fill them with some chocolates, cookies even a small gift.  Decorate them as you like.

Of course, as with our past 12 Weeks of Christmas projects we have a special bundle for you and receive 10% off.

Tag A Bag Boxes   (130927)                                   $11.95

Gold Sequin Trim     (132983)                                 $8.95

Confetti Stars Border Punch (135861)                    $37.95

TOTAL    $58.85.  Your price with 10% off is $53. Only available by ordering through me directly not through my Online store. 

tag a bag box                   gold sequin trim                 confetti punch

Thanks for stopping by today.

Jenny


3D projects, Christmas

12 WEEKS OF CHRISTMAS – WEEK 9!!!

Latte 12 weeks Header

These weeks are just flying by! Week 9 of our 12 Weeks of Christmas projects.  Today’s project is brought to you by Virginia. These are great little boxes using the Curvy Keepsakes Thinlet.

setof5finished1a

This versatile little Thinlets set creates the sweetest gift box in a shape that can be hung on a Christmas tree, used as holders for party favours or bonbonniere boxes for weddings/engagements/christenings etc.  They can even be used with Vellum for a table decoration by putting a little battery operated tea light inside to make it glow.

The first sample is a gift box that shows you how you can use both sides of patterned papers to create a unique customised Keepsake boxes.  You do not have to have larger sheets of pattterned paper or cardstock either.

You can see how much they will hold by these photos below as well. Two standard tea light candles, or one Votive candle.

TrimTheTreeTagPetitePunch1a

 TrimTheTreeTagPetitePunchOpen1a       TrimTheTreeTagPetitePunchOpen1b

The tutorial  that you can request will show you exactly where to place your sheets of paper/card on your Big Shot machine’ magnetic platform so that you can make the most of smaller pieces, or, as in these samples, use two different patterned sheets from the Trim The Tree Double Sided Patterned paper stack (page 7 of the Holiday catalogue).

all4piecesgluedAndCurvedWithBoneFolder1a

For the next samples, Wirg has used translucent Vellum sheets (page 193 of the annual catalogue). You can cut out both pieces from an A4 sheet as well as stamp the little baubles from the Cheerful Christmas Stamp set (page 15 of the Holiday Catalogue) – or any stamp set of your choice.

 vellumCherryCobblerTagChristmasCheerTealightOpen1a     vellumCherryCobblerTagChristmasCheerTealight1a

For the Christmas one, Wirg has used Cherry Cobbler and stamped the pieces before gluing them together.  When assembling you can put them together so that the stamping is on the inside of the closed box. Doing this gives a more subtle look. If you put a little battery operated tealight inside, it’s gives a beautiful effect as you can see.

StippledBlossomBlackberryBlissKeepsakeBox1a

The 2nd Vellum sample uses stamps from the Stippled Blossom stamp set, Whisper White and Blackberry Bliss ink pad.  Isn’t it pretty!

Here is another sample. The Four Feathers stamps and matching Framelits are brilliant for this.

curveykeepsakebox2a     curveykeepsakebox2b

FYI the battery operated tea lights can be picked up at most Discount stores and are quite inexpensive.  Check your local discount stores. At this time of year, they are quite popular.

Tip 1: Remember, you can cut your A4 sheets of vellum in half and cut the two pieces you need at the same time as the Vellum is quite fine and you can do two sheets at once.  Don’t do this with cardstock and thicker papers as Framelits are quite thin so you may not get a clean cut right through.

Tip 2:  As ink can take a little longer to dry on Vellum, give it a blast with your heat tool to dry it. And please be aware, when using a Blackberry Bliss inkpad, it’s a very strong ink. The slightest bit still on your fingers or craft work area can transfer onto your vellum without you realising.

This week’s bundle deal, (which you will not find in my online store), is as follows;

  • White Vellum, A4 cardstock $10.95
  • Trim the Tree Paper Stack $11.95
  • Linen Thread $7.95
  • Gold Sequin Trim $8.95

That’s a total of $39.80 + SHIPPING. However, if you order the bundle from me then you only pay $35.00 (+Shipping) + also receive a free bottle of Tombow Multipurpose glue!

REMEMBER: if you want the pdf tutorial sheet with how to place your dies and using two different patterned papers to make these OR if you want to place an order then drop me a comment or email me. 🙂

Thanks for stopping by.  I hope you stop by again soon,

Jenny

Stampin' Up!

25% OFF TO JOIN THIS WEEK!!

Save more

THIS IS AN AWESOME OFFER.  YOU JUST CAN’T MISS OUT!!!!

JOIN STAMPIN’ UP! BETWEEN NOVEMBER 25TH AND DECEMBER 2ND AND PAY 25% LESS FOR YOUR KIT. PAY $126.75 AND RECEIVE $235 IN PRODUCTS OF YOUR CHOICE. PLUS – PLUS YOU PAY NO SHIPPING!!

That is $107 of FREE PRODUCTS!! Crazy right!!!

Joining now you won’t need to submit your first full quarter until the end of March 2015.  BUT with this offer any orders you place during December you receive a 5% rebate.  That is an added bonus on top of the discounted Starter Kit. 

Have you considered joining the Stampin’ Up! family?  Are you still really not sure about it all and have questions??  Let me help you out. 

When you join the Stampin’ Up! family you get a regular 20% discount on all your purchases.  You get a few freebies thrown in along the way too.  You can choose to build a business and collect orders from people around you or enjoy the discount just to indulge in your own hobby.  It is entirely up to you! Plus, you get a sneak peek of the new products and catalogues coming out and get to preorder products before the general public.  This is great since we will be getting a new Occasions Catalogue on January 4th and you will get to see it in early December.

I have been with Stampin’ Up! for over 6 years now.  I have had so much fun sharing stamping with others.  I love to see people discover stamping for the first time and love to share new stamping techniques with others to help them extend their own stamping.  Making new friends is an added bonus whether they are through my classes or online from places all over the world.

When you join my team, Jen’s INK. I will assist you in whatever way you need. Whether it is how to get the best discount for your own purchases or how to take that step and hold stamping events with your friends and family. You can join us at our team meetings and cheer one another on with their creative projects and achievements – big or small.  Whether you are here for the short term or plan on staying around for a while, we all help each other out.  Even if you are a distance away you won’t miss out on my help and support so if you are from anywhere in Australia, then come and join in the fun.

If you would like more information, then ask me for a special information pack. You can email me or phone me and we can talk about it further.  I look forward to talking with you more. 

If you are ready to join right now, Head to my Website HERE and get ready to join the Fun!! Have your $235 shopping List ready to go. 🙂

Jenny

Join