3D projects, Christmas

12 WEEKS OF CHRISTMAS – WEEK 4!

Latte 12 weeks Header

We bring you another Christmas project this week for our 12 Weeks of Christmas – and today it is my turn to share a project.  I do hope you like it.  Today I have a Tiny Treat Gift Holder for you.

P1140690
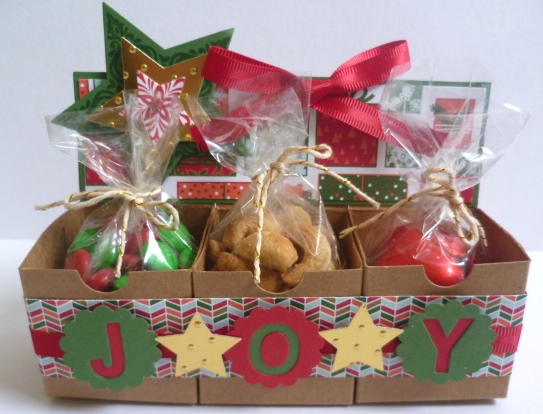
This little Treat Holder will fit a variety of treats all together for you to give someone special this Christmas.  Really it is just so simple.  I have used 3 of the Tiny Treat Boxes available in the Holiday Catalogue.  These are a bargain at $11.95 (AUS) for 24 boxes.  They are so cute and there are so many different ways you can use them.  This would be a really cute gift to give someone as a little extra or for those “Hard to buy for” people.

For this I have adhered 3 of the boxes together with Sticky Strip and then decorated them using the Nordic Noel Designer Series Paper.  I have added some stars from the Bright and Beautiful stamp set and cut with the Star Framelits. Additional stars were cut from Gold Foil Sheets with the smallest Stars Framelits.  The gorgeous Red Satin Ribbon finishes the box off.  Of course, you can decorate these boxes however you like.  Fill some Cellophane bags with treats and tie them off.  I used the Gold Twine for this.

If you would like a detailed tutorial to create this project then just drop me a message or email.  If you need any products to create the project then let me know or you can order directly at my Online Store Here.

And of course, we have a special bundle for you this week to help you create this project. These are the items you will receive in your Bundle AND receive 10% off!  

Bundle Price is $44.80 plus Shipping and Handling.

I hope you like today’s project.  I would love to see your version when you create it so make sure you drop me a photo.
 
Happy Christmas creating!!
 
Jenny 
Stampin' Up!

STOCK UP ON YOUR STAMPING SUPPLIES THIS WEEK TO CELEBRATE WORLD CARDMAKING DAY!!!

From 1-6 October, receive 15% off select cardstock, adhesives and Inkpads.  Plus receive 20% off Select stamp sets.  Check out the details below and email or phone me the order. Or you shop directly at my store HERE  You have to be quick though!

stock up and save image


Here are the stamp set to give you a closer look. (in order as listed).

big news        playful pennants   choose happiness    petite pairs    so very happy


Great bargains to build up on your stamping supplies.  Remember only available until 6th October.

Uncategorized

COME AND TRY OUT THE BLENDABILITIES!

I am sure you have heard all about the Blendabilities by now.  You have probably watched the videos.  They are great for colouring and blending the line image stamps. Why not come and try before you buy at my Blendabilities class.

Here are the details.

BLENDABILITIES CLASS

Friday July 25th.  10am or 7.30pm at my classroom in East Corrimal.

COST: Please note there are 2 different prices costs and different RSVP dates.

Class only:  $15  RSVP: Wednesday July 23rd.

OR

**Blendabilities Starter Kit: Includes

1 pack of Blendabilities

1 Memento Ink pad

1 Color Lifter (Free)

Blended Bloom Stamp set

TOTAL       $54 (class Free)    **This must be ordered and paid for by Friday 18th July to receive it back in time for the class.

CAN”T MAKE IT?? Let’s organise another time.

Here is one of the cards we will make on the day.  Come and join in BUT make sure you RSVP in time 🙂

P1130113

cards

OMBRE ZIG ZAGS!

I saw a card on Pinterest that I really liked the look of so I thought I would recreate it.  I thought that I would go with the Ombre look (ie a graduation in colour tone).  I have used the Tasteful Trim Bigz XL Die to create the zig zags.  I did one – AND why not create 4 different ones. (Apologies for the bad lighting.  It has been overcast lately).

P1110857

The sentiments are from ‘Perfect Pennants’ and ‘Hip, Hip, Hooray’ stamp sets.

I will show you them individually.

P1110859

Colours are Night of Navy, Pacific Point, Tempting Turquoise and Sky Blue.  Base card is Tempting Turquoise.

P1110862

Colours are Garden Green, Gumball Green, Wild Wasabi and Pistachio Pudding.  Card Base is Gumball Green.

P1110864

Colours are Tangerine Tango, Pumpkin Pie, Blushing Bride and Pink Pirouette.  Card Base is Pumpkin Pie.

P1110866

Colours are Cherry Cobbler, Rose Red, Melon Mambo and Crisp Canteloupe.  Card Base is Rose Red.

The Ombre effect is quite “in” at the moment.  Why not go and make an ‘Ombre’ card yourself.

Thanks for visiting.  Stop by again very soon,

Jenny

3D projects

CRAFT FAIRS PART 3 – GIFT BOWS!

Another project I wanted to share with you today are these cute little gift bows I made to sell.

P1100415

There were 3 little gift bows per card.  I thought they would be cute for people to stick just straight onto a card or gift box. To sell them I adhered them to card that I had stamped with the Postcard background stamp.   I have to say though they didn’t sell well.  I think I should have had some samples of cards or gift boxes with them on to show how to use them.  Next time!  Here are some close-ups of them.

P1100417

P1100420

I used retired DSP to make the bows.  The original idea came from Karen’s blog here.  She has the measurements there but I will give them to you in Imperial and metric.

Large Bow

Cut 4 strips:

1″ x 8 1/2″  (2.5cm x 21cm)           – Fold loops over and secure ends to create a circle.

1″ x 6 3/4″ (2.5cmx17cm)               – Fold loops over and secure ends to create a circle.

1″ x 5 1/4″ (2.5cmx13.3cm)           – Cut a ‘V’ from each end. This is your tail piece.

5/8″x 3 1/2″ (1.6cmx8.9cm)         – After layering all the pieces, wrap this piece around the middle and adhere.

Small Bow

3/4″ x 7″ (1.9cmx17.8cm)                     –  Fold loops over and secure ends to create a circle.

3/4″ x 5 1/4″ (1.9cmx13.3cm)              – Fold loops over and secure ends to create a circle.

3/4″ x 4″ (1.9cmx10cm)                       – Cut a ‘V’ from each end. This is your tail piece.

1/2″ x 2 1/4″ (1.2cmx5.6cm)              – After layering all the pieces, wrap this piece around the middle and adhere.

Oval Bow

Punch 4 Extra-large ovals.                  With 2, fold over and secure the ends with adhesive.  Don’t crease when folding though.  With the other 2 ovals cut a ‘V’ from one end of each of them.   Layer them to form a bow.

These don’t take  long to create and is a great way of using up those little bits of DSP you have lying around.

Are you enjoying these posts?? I have one more post to share with you tomorrow on Craft Fair projects.  See you again then,

Jenny