Uncategorized

WELCOME TO YOUR NEW HOME!!!

I needed to make a card for a lovely friend of mine who recently moved in to a new place of her own.  After many years of personal issues it was really lovely to see her now finding her own way. The dilemma was what can  I use to make a card for her?? I usually do punch art for these occasions and I just went looking through my blog posts and realised I hadn’t shared any of them before. I don’t know how I missed that!! I decided to dust off a stamp I have had since before I joined Stampin’ Up! over 6 years ago. Previously I have coloured this with pencils or just inked in one colour.  Today I dragged out the Blendabilities for it!

So it’s not Stampin’ Up! and I can’t tell you the name of this stamp sorry.  It didn’t have the name or company on the block.  The rest of the card is all Stampin’ Up! though.  I thought I would show you the card still.

P1140699

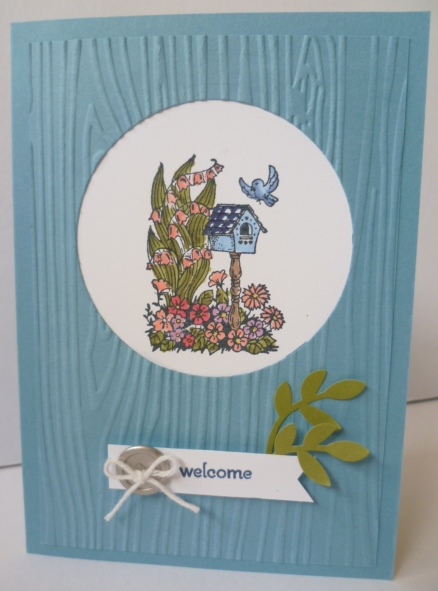
The base card is Marina Mist.  A second piece of Marina Mist was cut just slightly smaller than the front of the base card.  I cut a circle in that piece with a Circle Framelit and then this piece was embossed with the Woodgrain Embossing Folder.  On Whisper White card I stamped the image in Memento Ink and coloured this with various Blendabilities.  I adhered that piece under the embossed Marina Mist card and adhered it onto the card base.  The greeting is from Petite Pairs stamp set.  I coloured the “welcome” on the ‘Welcome Baby’ stamp with a Night of Navy Marker and stamped it on a strip of Whisper White.  I flagged the end of the piece and adhered that to the card with Dimensionals.  I added a Silver Metal Button and  Whisper White Twine bow.  I prefer using glue dots to adhere these. When it was done  I thought it was a little plain so added some Old Olive leaves punched with the 2 step Bird Punch.

Thanks for stopping by and indulging me today.  I hope life is good in your part of the world. 🙂

Jenny

Christmas, My DIgital Studio

12 WEEKS OF CHRISTMAS – WEEK 5!!

Latte 12 weeks Header

The weeks are flying by! We are up to Week 5 of our 12 Weeks of Christmas now.  This week’s project is brought to you by Virginia.  Today we a have a project to show you how you can use My Digital Studio (MDS) to create your own projects. This is great when a stamp set you are after or one that has retired it may be available in MDS. You can print these out  and colour them using your Blendabilities.

PartSnipOfLO1a

Virginia has created a Hybrid Scrapbook page.  She has used the Poinsettia and Leaf from the ‘Joyful Christmas’ digital stamp Brush set (#135269).  You can print these out using your Microsoft Word programme but you need to print them out using an inkjet printer on Whisper White A4 card stock.  Virginia worked out how many she wanted to colour in and printed a number of them at a time.

     JoyChristmasBrushStampSetDigital                                         49325592b

Colouring is so easy using the Blendabilities  to colour in the Poinsettia  in two sizes and the leaf in 3 sizes. These were coloured using the Cherry Cobbler, Old Olive, Daffodil Delight and Smoky Slate Blendabilities alcohol markers. The lightest of the Smoky Slate being used to help give more shading and depth to the colouring.

BlendiesColouringSnips1a

Next after colouring them in, Virginia cut them out with a small pair of paper snips.  Or you may use an electronic die cutting machine if you have one and you are comfortable using it’s print and cut functions.  After she cut them out, she gave the backs of the coloured and cut out image a bit of ‘burnishing’ with the stylus using the scoreboard and bone folder. Doing this makes them more 3d looking.  Just a tip: put the Stampin’ Piercing mat underneath as cushioning.  

To Create the page:

Wirg _ scrap photo

Virginia took three rolls of washi tape (Watercolour Wonder set, main catalogue) and put a strip of each along two edges of the 12×12 so they crossed over in the bottom left hand corner.  These three different rolls of Washi tapes are perfect for any occasion but really shine on a Christmas layout. She layered the black and white photo onto Cherry Cobbler card stock.  Using the ‘Gorgeous Grunge’ stamp set you can stamp the paint splatter with Cherry Cobbler ink to create a background. The coloured in images were then placed around the sheet of 12×12 Whisper White card stock and were adhered using Dimensionals and snail adhesive.

The year 1994 is from the cork stickers from the Project Life Seasonal Snapshot Accessory pack. Using the finest of the Project Life journaling pens, Virginia did a little journaling between the lines of the washi tape.

If you would like a full copy of how Virginia created this layout including how to print out from either MDS or Microsoft Word then send me a message or comment and I will send it out to you.

Now for this week’s special, how about this:

For $70.00, purchase the Cherry Cobbler, Old Olive and Daffodil Delight sets of Blendabilities, the Color Lifter and get the Watercolour Wonder Washi tape pack FREE!

That’s $70 plus postage with Free washi tape (valued at $8.95)  Contact me to place your order!

Thanks for stopping by.

Jenny

3D projects, cards, Christmas

12 WEEKS OF CHRISTMAS – BONUS!!!

Latte 12 weeks Header

Have you been enjoying the 12 Weeks of Christmas projects the last few weeks.  Well, today I have a bonus project for you from the very clever Libby. This bonus project is a bit of fun and you could use the tags to write recipients names on them or use the back of the screen to write your personal message.

GetYourSantaOn13.jpg screen divider

HERE IS WHAT YOU NEED TO RECREATE THIS CUTE PROJECT.

  • Stamp Set – Get Your Santa On
  • Card – Very Vanilla, Red Glimmer Paper
  • Ink – Tuxedo Black Memento Black; Cherry Cobbler; Old Olive
  • Punches – Itty Bitty Accents Punch Pack; Decorative Label; Scallop Tag Topper; Confetti Stars Punch
  • Ribbon – ½” Cherry Cobbler Seam Binding
  • Adhesive – Liquid Multipurpose Glue
  • Blendabilities – Cherry Cobbler; Old Olive; Pumpkin Pie; Smoky Slate; Skin Tone; Colour Lifter; Daffodil Delight
  • Other – Basic Jewels Pearls; Stampin’ Trimmer; Simply Scored; Bone Folder; Acrylic Blocks; Stampin’ Mist; Stampin’ Scrub


GetYourSantaOn18.jpg screen divider

This card opens so you can create your own scene using all or most of the stamps from Get Your Santa On and it has little tags inserted so you can add some little surprise messages or images. This particular one will fold down to fit into a C6 sized envelope.  

If you would like a detailed PDF tutorial to create this card then drop me a message or email and I will get one sent your way. 

As we have done with our other 12 Weeks of Christmas project, we have a special bundle for you. Now this bundle is only available if you order through me and not through my online store.

SPECIAL BUNDLE OFFER

Get your Santa On $27.95

Confetti Stars Punch $37.95

P & P $5.95

TOTAL = $71.85 get a free Tuxedo Black Memento Ink worth $9.95

Contact me today to order this special bundle just for Australian Residents.

Thanks for stopping by today.

Have a great weekend,

Jenny

3D projects, Christmas

12 WEEKS OF CHRISTMAS – WEEK 4!

Latte 12 weeks Header

We bring you another Christmas project this week for our 12 Weeks of Christmas – and today it is my turn to share a project.  I do hope you like it.  Today I have a Tiny Treat Gift Holder for you.

P1140690This little Treat Holder will fit a variety of treats all together for you to give someone special this Christmas.  Really it is just so simple.  I have used 3 of the Tiny Treat Boxes available in the Holiday Catalogue.  These are a bargain at $11.95 (AUS) for 24 boxes.  They are so cute and there are so many different ways you can use them.  This would be a really cute gift to give someone as a little extra or for those “Hard to buy for” people.

For this I have adhered 3 of the boxes together with Sticky Strip and then decorated them using the Nordic Noel Designer Series Paper.  I have added some stars from the Bright and Beautiful stamp set and cut with the Star Framelits. Additional stars were cut from Gold Foil Sheets with the smallest Stars Framelits.  The gorgeous Red Satin Ribbon finishes the box off.  Of course, you can decorate these boxes however you like.  Fill some Cellophane bags with treats and tie them off.  I used the Gold Twine for this.

If you would like a detailed tutorial to create this project then just drop me a message or email.  If you need any products to create the project then let me know or you can order directly at my Online Store Here.

And of course, we have a special bundle for you this week to help you create this project. These are the items you will receive in your Bundle AND receive 10% off!  

Bundle Price is $44.80 plus Shipping and Handling.

I hope you like today’s project.  I would love to see your version when you create it so make sure you drop me a photo.
 
Happy Christmas creating!!
 
Jenny 
3D projects, Christmas

MANY MERRY STARS!

I have to show you this new product in the Stampin’ Up! Holiday Catalogue supplement that was just released on Monday.  Stars just typify Christmas don’t you think and why not ‘Many Merry Stars’.

These kits contain all you need to create 26 stars.  All the diecut papers and embellishments.They come in all different sizes and look fun to sit on the top of a shelf or under the tree.

138104O1

Here is a video to show you how they are put together.


But don’t just think of them as stars sitting on the shelf.  There are so many other beautiful ways to create them.  Check out this gorgeous display.

stars

Here is a video to show you how to use this kit in other different ways.

If you would like to order your own kit of Many Merry Stars then drop me a message OR head over to my store HERE.

I hope your Christmas is a Starry one. 🙂

Jenny

Uncategorized

SHAKE IT UP WITH SHAKER CARDS!

Just a reminder: Saturday Stampers is on THIS Saturday 25th October at 2pm.  

WHAT ARE WE DOING????

‘Let’s Shake it up!’ (It’s funny that I am writing this just after I have heard Taylor Swift’s Shake it up!!).  Anyway,….

Come and find out how to make Shaker Cards. These are fun, interactive cards. Check them out!

P1140684

WHERE: My studio in East Corrimal  If you are local please come along.

COST: $20 BYO: Scissors and Adhesives. PLEASE RSVP: Thursday 23rd October.

I look forward to seeing you there!

Catalogues, Christmas, Stampin' Up!

‘MERRY AND BRIGHT’ CHRISTMAS SUPPLEMENT AVAILABLE NOW!

 I told you in the last post that there are some more offerings for our Christmas creating.  Well, the ‘Merry and Bright’ Christmas supplement is out now!  These products are designed to work well with the current Holiday Catalogue.  There are some fun Star Kits, a different Star stamp set, more Project Life offerings and a few additional kits and stamp sets.  These products are only available while stock last so you have to be quick to grab them.

You can view the Catalogue Online now HERE or I can get one in the mail one for you.  I have added the link in the right hand side bar so you can check it out later rather than come back to this post.  If you have any questions then don’t hesitate to ask me.  🙂


20141020TH_HolidaySupplement_en-SP


Catalogues, Christmas

STAMPIN’ UP! CHRISTMAS SUPPLEMENT!

Do you love creating for Christmas??? Do you just  create cards or like to decorate the house and send cute projects as gifts for your friends??? It really starts getting you in the Christmas mood when the creating begins – or is that just me!!!

Well, as if the Holiday Catalogue wasn’t enough for you Stampin’ Up! have released a Christmas supplement.  Starting October 20th, 2 days time!!!  Here is a sneak peek of the cover just to get your started.

20141020TH_HolidaySupplement_en-SP

There are stars and kits and Project Life.  

You will be able to check it out Online from Monday BUT if you want your very own “starry” catalogue then drop me a comment and I will get one to you ASAP.

“It’s beginning to look a lot like Christmas”    HAHA! Now I have got that song in your head I will sign off.  🙂  (sorry!)

Stop by again soon,

Jenny

3D projects, Christmas

12 WEEKS OF CHRISTMAS – WEEK 3!

Latte 12 weeks Header

We have another project in our 12 Weeks of Christmas series today. This project is brought to you by Narelle.   Check this project out for your Christmas entertaining.  This is a lovely Table Setting.

christmas setting

This table setting consists of a cutlery bag, a bonbon and a name place card.  I think these would really dress up your Christmas table and make it something special.
Here are some photos of the individual items and also some videos showing how to make the key components. For full instructions and a complete list of supplies, please email me for a detailed pdf.

CUTLERY BAG

cutlery bag

I just love this Cutlery Bag. I know you could just put the cutlery on the table next to the plates, but that would be boring, right ? Making this bag gives you a reason to create and show off a little to your guests. I am sure they will be appreciative of the effort you went to and the table will look so festive and special.

Here are a couple of videos showing you how to make the rosettes.

BON BON

bon bon

Bon Bons are a fun thing to have at Christmas time aren’t they?? The cute hat and funny jokes and the little novelty inside. But once they are pulled apart they are thrown away. With these Bon Bons not only are they a lot of fun but they will look pretty having them on the table. The bonus of these is that you can fill them with wrapped chocolates or something as an extra treat, and the guests get to keep them as a memento of a wonderful gathering with family and friends.

Here is a video how you can make them.

NAME PLACE CARD

name place card

Can you see this on your Christmas Table this year?? It would make all your guests feel pretty special.

The full materials you need for these projects are in the PDF that I can send you but here is some special products put together for the Bundle this week.

products _ table setting

We have these 4 products on offer in our Latte Girls’ 12 Week of Christmas Bundle Three(3). You can get all these products for the fantastic price of $77. That’s a saving of 10% . Gotta love that !

Contact me with  your order. This deal is not available online.

Don’t forget if you want the detailed instructions and a complete list of supplies used, please email me to get the pdf.

You can purchase everything you need to make these items and more, from my online shop.

I hope this helps you with your Christmas preparations.

Thanks for dropping by today.

cards

EVERYTHING ELEANOR FOR A WEDDING CARD!

Yesterday we went to a wedding for a work colleague of Glenn’s.  It’s always interesting when you don’t even know the bride and groom!! It was a lovely wedding though.  The wedding invitation was in a Crumb Cake colour with black swirls. I knew for the wedding card I wanted to replicate this.  The stamp set ‘Everything Eleanor’ was dusted off. I have hardly used this set but it was one I loved when it first came out.  Here is the card.

P1140587

It is hard to tell in the photo but I Heat Embossed the swirl, the flower and the greeting so it had a nice shine to it. The greeting is from ‘Petite Pairs’ and punched with the large oval punch.  I used the Crumb Cake Taffeta ribbon (retired) and some pearls to finish it off.  I thought it would be a bit heavy to have a Black card base so I matted the stamped piece in black cardstock and layered it on a crumb cake base.

I think the Bride and Groom will like it???

Have a good week this week.  I hope it is a creative week for you.  🙂