My DIgital Studio, Stampin' Up!

EXCITING NEWS! MY DIGITAL STUDIO AND SHOPPING ONLINE ARE HERE!!!!

It has been an exciting day!  I can hardly contain myself.  I have not one but TWO announcements for you.

1) You can now Shop Online with me.

2) My Digital Studio is here!!!

Let me tell you all about them.

SHOP ONLINE 24/7

Whenever creativity strikes you can Shop for your Stampin’ up! products.  Head over to my Website  HERE, click on the ‘SHOP NOW‘ Button at the top right and you can shop away.  How exciting!  Shop in your PJ’s.  Don’t forget to Bookmark this site so you can shop anytime.  You might not be thinking straight at 2 am in the morning to think about where you need to go 🙂  I will have the link in the side bar too.

MY DIGITAL STUDIO IS HERE

We have been waiting for this for some time now and FINALLY it is here.  Now you can create cards, tags, scrapbook pages, albums all at your own computer.  My Digital Studio will be $24.95 to download the software program and then you can add to this with extra stamps, brushes, paper etc for a small cost as these are updated by Stampin’ Up! You can check out the new updates every week.  Once you Download them you have it for life.

Digital Designing

Why not have a go at the 30 DAY FREE TRIAL.  To download this, head to my link to the Online store you see above and Click on MDS FREE TRIAL in the Left hand Column.  Give it a try.  It’s a lot of fun navigating around. Here is a card I created today while I was playing around with it.  I still have a bit too learn but it was fun.

birds

If you have any problems or questions drop me an email OR head to the MY DIGITAL STUDIO site for tips, videos or help.

I will show you some more projects as I create them.  I do love playing with real paper and ribbon though so don’t worry there will be PLENTY of those to show you.

Jenny
cards

SPONGED SWALLOWTAIL!

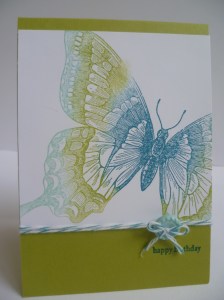
I love the ‘Swallowtail’ stamp in the current Seasonal Catalogue.  It is a large stamp but the detail in the image is beautiful and although it is big it can create some really “arty” cards.  I have been playing around with it a little recently.  Here is one card which has been really popular with my customers.  This card was inspired by a card I saw on Splitcoaststampers.

P1070717

For this card I sponged the stamp firstly with Island Indigo inkpad in the centre of the butterfly.  To do this I just picked up some ink on my dauber and dabbed directly on the stamp. Then I daubered on Lucky Limeade ink towards the outside of the wings and then right on the edges of the wings I daubered on Pool Party.  I love the gradation of colours.  I am so going to miss these colours in a couple of months.  I adhered the white card to the Lucky Limeade base card which was folded at the top.  I wrapped around some Island Indigo Bakers Twine and added a button.  The sentiment is from ‘Teeny Tiny Sentiments’ and was stamped in Island Indigo.  I think it probably should have been stamped a little lower but never mind now.

I hope to show you some more  cards using this stamp over the coming weeks.

Have a great week.  I look forward to you stopping by again soon.  Why not say ‘Hi’ and leave me a comment.  It is always nice to hear from you.

Jenny 

Uncategorized

LAST DAY OF SALE-A-BRATION!!

The day is here.  Sale-A-Bration ends tonight.  I have to say this has been my best one yet.  I am so thankful to my wonderful customers, hostesses and new members to my team.  To say ‘Thanks’ to them, I have just made up some little 3″x3″ cards to give them.

These are card for some of my lovely Hostesses.  Ssh!  Some of them haven’t received these yet!! 😉

This stamp set is “Workshop Words”.  I have used the Vine Embossing Folder and the Sycamore Street DSP.

P1070895

This is some of the cards I made for my lovely new team members.  I have used Madison Avenue.  The other stamp set is “A Little Greeting” from the Current Seasonal Catalogue.

P1070896-1

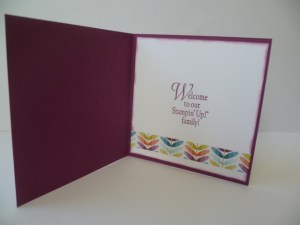
Here is the inside of the card.  I have used “Workshop Words” set again to stamp inside.

P1070898

Now that Sale-A-Bration is over there is still so much to show you from the Seasonal Catalogue.  That has been a little neglected lately.

Come and visit again soon,

Jenny

Uncategorized

STILL TIME TO SHOP OR JOIN!!

SALE-A-BRATION COMES TO AN END TOMORROW!!!!

SAB13LP_cust_Jan2213_SP_04

PLACE AN ORDER:

Time is running out!  You have only a little time to email/phone your orders.   Place your Order by Friday afternoon.  Choose one Sale-A-Bration item for every $100 purchase.  The difficult things is which one to choose!!!!  Check out the brochure by clicking on the link in the Right Hand column if you haven’t seen it yet.

SAB13LP_cust_Jan2213_SP_06

BE A PART OF THE STAMPIN’ UP! FAMILY:

Don’t forget the fantastic value in choosing the Starter Kit.  Pay $169 and receive $294 of products of your choice and pay NO shipping.  Come and join the Stampin’ Up! Family.  Lots of people have chosen to do this.  As a Demonstrator you receive a regular discount and if you wish to build a business doing workshops and classes, it is up to you. Either way, I am here to help you.  Don’t miss out on this fantastic offer.  Email/phone me now to talk to me about it.  I would love you to join my team.

Jenny 

cards, Techniques

END OF SALE-A-BRATION COUNTDOWN – 2

Second last day of Sale-A-Bration.  Here is a card for you using ‘Madison Avenue’ Stamp Set.  I demonstrated this at a workshop recently.  I CASED this one from our Demonstrator “Impressions” magazine.  Did you know you can colour your silver Glimmer paper ANY colour you would like??  I know you can buy the Red and the Champagne but sometimes it is nice to have a little sparkle in a different colour.  I will tell you about that shortly.   Here is the card.

P1070882

I have used the Vine Embossing Folder – and check it out!  Try reversing your folder sometimes to deboss the card.  It gives a different look.  The DSP strips are from Sycamore Street DSP.   You can’t really tell from the photo but I have also clear embossed the flowers on the Tangerine and the Summer Starfruit card.  I added some Summer Starfruit Satin stitched ribbon to finish it off.  See the Razzleberry Scallop Circle glimmer though.  It is a little hard to tell.  It is a little lighter colour than the Razzleberry colour is normallly but it gives a subtle shimmer.

To colour the Glimmer paper on this card I sponged the colour on using the Sponge Daubers. Just dab the dauber on the inkpad and “pounce” it over your card. Continually re-ink and pounce.  The more you dab the more intense colour you get.  I wouldn’t recommend doing a large area for this.  Maybe a brayer would work for that????? Not sure about that one but for small areas this is good to create your different colours.

P1070891

It’s a great effect and good to know you can have other colours to that lovely sparkly Glimmer paper.

Last day for Sale-A-Bration tomorrow.  I have one more card to show you tomorrow so stop by then.

Jenny


cards

END OF SALE-A-BRATION COUNTDOWN – 3

I’m ‘Feeling Sentimental’!!  Well, this is the stamp set I used on the card.  This is a great stamp set for the male cards.  This card was inspired by one I saw on Splitcoaststampers.

P1070886

I used the same colours and layout.  On the Black oval though I embossed this using the Stripes Embossing Folder.  I added a timber button threaded with twine.

Here is a close-up to show the embossed oval although it still is a little hard to see!

P1070887

There is so much detail in these images they really don’t need much more doing with them.  It is a simple card but I guess for a male they don’t really look too closely, do they!

Thanks again for stopping by.  The week is flying past and there is not much time left for Sale-A-Bration 2013.  This has been a fantastic 2 months and there have been some great products.  So don’t miss out on getting your freebies whether you shop or join Stampin’ Up!

Stop by tomorrow for the second last project of Sale-A-Bration.

Jenny

cards, Masculine

END OF SALE-A-BRATION COUNTDOWN – 4

I was playing around with the Sale-A-Bration set ‘Feeling Sentimental’ a few weeks ago and created this card.  Some distressing and inking I think it makes a great “MAN” card.  They are always hard to do, aren’t they???  I have used the Chevron Embossing Folder.  The brads in the centre of the wheel and on each end of the Natural Trim Ribbon are gold brads and I sanded them back slightly to rough them up!!!

P1070880-1

Thanks for stopping by today.  I have another card using this set to show you tomorrow, Day 3 of our Countdown, so stay tuned.

Jenny

cards

END OF SALE-A-BRATION COUNTDOWN – DAY5!

I can’t believe there is only 5 days left for Sale-A-Bration.  Where has the last 2 months gone??? I can’t believe it.  There is still so many cards I want to make with these stamps.  Some I haven’t event inked yet!  I am running out of time.  To mark the end of Sale-A-Bration though I thought I would show you a card to countdown to the end.

Here is Day 5 Card.  The other week I played around with the new Soda Pop Tops.  I think this card  is inspired by a card I saw on SplitcoastStampers.  

P1070713

I have used the Vine Embossing Folder but de-bossed it.  I think it gives it a different look.  The DSP flower is from ‘Patio Party’ and punched with the Blossom Punch. The centre flower is stamped in Raspberry Ripple and the small centre flower is in Midnight Muse.   They are from one of the Free Sale-A-Bration sets, ‘Madison Ave’.  See the centre of the flower though??? I have used the Soda Pop Tops.  This one was flattened in the Big Shot.  I will explain this just below.  The greeting is from ‘Fabulous Phrases’ and stamped on Whisper White and I have flagged the ends.  Some Raspberry Ripple Satin Stitched ribbon finishes off the card.

Flattening the Soda Pop Tops in the Big Shot is easy – and fun!!!  You might have seen how to do this elsewhere in Blogland but I will tell you what I did.  Here is the recipe I used for the Big Shot.

Platform – No Tabs.

Cutting Plate.

Scrap Card

Soda Pop Top (faced Down)

Cutting Plate.

Run all this through your Big Shot.  It is quite easy to turn.  I have used scrap card because it saves the soda pop top sticking in to the cutting plate.  Many blogs I have read haven’t done this step but I think it saves digging it out of the plate.  Then again maybe it is OK.

There is still a little time to get your orders in for Sale-A-Bration. For every $100 order you get to choose one of the great products FREE!  There is so many fantastic choices so don’t miss out.  Also, if you love the Stampin’ Up! products so much why not get a discount all the time.  Join the Stampin’ Up! family and during Sale-A-Bration get 25% more in your kit.  Pay $169, get $294 of Products.  How good is that!  BUT you only have until Friday.  So, hurry up!!!

Stop by tomorrow when I will show you another Sale-A-Bration project.

Jenny

cards

CASEING SHELLI’S VINTAGE VERSES

I can’t believe how fast Sale-A-Bration has flown by.  Only 10 days left.  How can that be!!! There is still so many wonderful products I haven’t played with yet!!  This is one card I created the other day.  Yes, I have CASED Shelli! I first found this card on the U.S. Stampin’ Up! Website.   You can find the card here on Shelli’s Blog.  Here is my version.

P1070877

I don’t think mine is as good as Shelli’s.  I used Crumb Cake instead of Sahara Sand and I think the DSP pennant at the bottom is not right.  I love the way there is that little strip of embossing using the Vine Embossing Folder along the bottom of the White tag though.  There is lots of Sale-A-Bration goodies on this card: Vintage Verses and Madison Avenue Stamp Sets. The Sycamore Street DSP, Vine Embossing Folder, Pool Party ribbon and button. All on one card.  I couldn’t have come up with so many of these on the one card, so Thanks Shelli!!!

Just before I go, have you checked out the Sale-A-Bration Catalogue yet?? There is a link in the Right Hand side bar so head over there now to check it out if you haven’t already.  There are Free Stampin’ Up! products for you as a Customer, a Hostess and/or as a new member to our Stampin’ Up! Family.  You can’t miss it out.  So hurry up time is running out!! If you want more details then head over here to an earlier post I did and that will fill you in on all the details.  There might not be a lot of time left for an In-Home workshop but did you know you can have a Catalogue Party. Pass the Catalogue around to your friends and collect their orders.  If they total $300 or more you still receive all the wonderful Free products that you would have for a $300 party.  How cool is that!!! So come on, pass the Catalogue around to your friends and get back to me- very soon though!!

Thanks for stopping by.  It is nice to have you visit.  I look forward to you visiting again soon.

Jenny

cards, Techniques, Tutorials

PAPILLION POTPOURRI CHALKBOARD

You have probably seen the Chalkboard Technique around Blogland by now haven’t you???  I have been wanting to have a go at this technique but hadn’t got around to it until a couple of weeks ago at our Team Meeting.  The wonderful Vanessa Webb showed us this technique.  I created the Chalkboard but didn’t assemble the card until a couple of days later.  This Chalkboard Technique went a few steps further than most of the ones you might have seen around.  I will share the details later but first here is the card.  Just note this is my first attempt so it is a little scratchy.  Ooh! Saying scratchy about chalkboard sends shivers down your spine!!!!!

P1070827

CHALKBOARD TECHNIQUE

1. Firstly rub your Black Cardstock with the Embossing Buddy. Stamp your greeting in Whisper White Ink onto the Black cardstock.

2. Pour over White Embossing Powder and heat emboss.

3. Stamp the greeting again in Whisper White and stamp just offset to the right of the greeting you have stamped already.  Use the Stamp-A-Ma-Jig to help you line it up right.  You don’t need to heat emboss this time.

4. Stamp images you wish to use in Whisper White and heat emboss with White Embossing Powder.  You don’t need to re-stamp these ones.

5.  Using coloured Pencils go over the images particularly where you had restamped on the greeting.  This creates a block type print.  (If you know what I mean!!). I added a bit of colour to the butterflies as well.

6.  Using a tissue pick up some Whisper White ink and dab off on scrap paper then rub over in patches on the black card to create rub marks.

7.  Optional step:  I draw a line edge around the card in pencil and you probably can’t see it well but I outlined all my images with white pencil.  It kind of creates a shadow.

8.  Assemble your finished piece onto a contrasting colour card mat and card base.

This is a fun technique.  If you didn’t want to do all the colouring.  Just stamp in Whisper White and Emboss in White Embossing powder.  Then rub the white ink over the card as I described in Step 6.  I will have to try the simpler version now.  Just add that to the list of projects to tick off!!!!

Thanks for stopping by and I hope you like this version of Chalkboard.  Leave me a comment.  It is nice to know you have been to visit.

Have a good day,

Jenny