3D projects, cards, Workshops

A BOXY BAG!!

I hope you all had a good weekend.  The weeks are just flying by.   It’s amazing to think that school holidays are just around the corner again!!!  It doesn’t seem that long ago that they headed back for this term.   As promised I said I would show you the creations we made at my ‘Mystery Hostess’ Workshop last week.  It was a fun day. We had several Rounds of Catalogue Scavenger Hunt to get familiar with the new catalogue.  And it’s always good when someone goes away with some special prizes!!

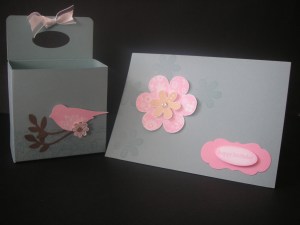
We made 2 projects.  A bag, known as the Boxy Bag and a card.

The little boxy bag is very cute.  It only measures about 11cm high.  I found the original idea here.  I had these instructions done out in metric but just can’t locate them at the moment.  So I will get back to you with that shortly. (Edited to add: I have now done another post with a Boxy Bag in metric measurements. You can find that post HERE). Before I assembled the box I stamped the flower from ‘Printed Petals’  The other flowers were stamped, cut and mounted with dimensionals after I put the box together.  This is a cute bag to put some little goodies in.

The small card was created with the strip of card that I cut off when cutting out the box.  It only measures 8.5cm square.  I thought that was a good use of card – and makes a nice matching gift set!!  It is a very simple card stamping several of the flowers onto Whisper White and matting it on So Saffron and then the Regal Rose.  The sentiment is from ‘Teeny Tiny Sentiments’ and stamped in Black.

On the way to making this card I had started off with a standard size card and then went smaller.  So I ended up with a similar card in several sizes!

I have to race off now.  It’s getting on to home time for the kiddies.  I will be back soon with more creativity!
cards, Tutorials, Uncategorized

LAUNCH WITH A CAUSE!!!

Last night we had our combined team Catalogue Launch.  We took the opportunity to use it as a fundraiser for Cancer Council.  It was a HUGE night, but I think everyone enjoyed it.  There was over 75 people there and we raised over $2500 for the night’s effort which was fantastic!  There will be more added to that over the coming weeks which can help in some small way to help in the research and treatment of Cancer.  So, what a great night!!

Each demonstrator had their own tables and did their own projects.  This is what we created at our table.  The lighting is not great, so I apologise for that.

Firstly the box,  I was inspired by this cute little box that Helen did here.  I altered the measurements and made the box larger, so you could fit small love note size cards (7.5cmx7.5cm) or a small cello bag with some choccie treats!!!  I have my measurements further below. 

I used the Very Vintage wheel across the front of the box in Baja Breeze. (NOTE: Do this before assembling!!!). I stamped the bird in Pretty in Pink with the new Level 1 Hostess set “Punch Potpourri”.   This is a great set.  It corresponds with a number of punches. I punched the bird out with the 2-step bird punch.  The small flower is from the small flowers in the set and stamped in Soft Suede and punched out with the Boho Blossoms punch. The leaves are punched out in soft suede and adhered straight onto the front of the box. I have used dimensionals to raise up the bird and flower.  The Rhinestone in the centre of the small flower is from some  newly aquired self-adhesive Rhinestones.  It didn’t take long to break open that pack!!  I punched out a hole with the small oval punch and tied a small bow with some of the gorgeous new Organza ribbon and adhered that with a glue dot.

Here are the instructions to the box.

MINI CARD BOX

1. Cut card to 24cmx16cm.  Score along the 16cm edge at 4cm and 12cm.  Score along the 24cm edge at 4cm, 12cm and 16cm.

2. Fold on score lines.  Along the 24cm edge, cut on each of the score lines until you meet the score line running along.  Repeat this on the other side.

3. Cut off the small 4cm square that is formed at the top, on both sides of the shorter edge.  This leaves a small tab in the centre measuring 8cmx4cm.  This is just on one end!  On this tab, use the small oval punch or Word Window punch to create a slot.

4. Stamp front of the the box as desired before assembling.

5. Use sticky strip or snail adhesive on side tabs and fold up on scored lines and adhere together.

6. Finish decorating box as desired.

Onto the card:

I used one of the new sets Printed Petals.  This is such a versatile set.  I stamped the small flower in versamark on the front.  I stamped the large flower in Pretty in Pink and the smaller one in So Saffron.  I cut these out and curled up the edges a little before raising them up on dimensionals.  Some more bling in the centre of these flowers with the Rhinestones.  The pink tag was cut with the Big Shot and the ‘Lots of Tags’ die.  I adhered this straight onto the card.  The greeting was from “Teeny Tiny Sentiments”  stamped and punched with the small oval punch.  I sponged the edges and raised that up with dimensionals.  It is a very simple card.  But it needed to be simple with so much else going on!!

I have rambled on a bit now but I will just show you a few photos of my lovely group of ladies hard at work.

Apart from some fun games we had to raise money we also had a large daffodil picture.  Everyone could place coins on it to fill the daffodil.  It was a great idea and I think we did well in filling it.  There is in fact $144 on there.  Isn’t that great!!!!

Just a “little” review of our night anyway.  It was worth the hard work.  I will be back soon with an account of my “Mystery Workshop” I had the other day.  There were lots of creating to be had there too!!!

Personal Ramblings, Stampin' Up!

PACK A PUNCH!!!

Look what I received the other day. This is from an order I submitted after the crazy discounts Stampin’ Up! had with punches and other products last week. I just thought it was so funny with box full of punches. I just had to show you!!  Not very often you get an order like this!!!

We have a big weekend here. Josh has his big Footy Grand Final tomorrow. Go the Corrimal Cougars!! Then it is Fathers Day on Sunday. So have a great weekend. I’m not sure if I will have much stamping time so I hope you can have a stamp for me!!

Stampin' Up!, Uncategorized

IT’S HERE! IT’S HERE!!!!

The new catalogue is finally here! How exciting! Many of us have been counting down the days until it arrived. Once again there are fantastic new stamp sets, gorgeous papers, lots of new accessories and wonderful new colours to play with. You can check out the catalogue by clicking on the link on the right hand side bar. If you would like to receive a catalogue in real life to look at and you don’t have a local demonstrator, then I can send you one at just $12.95. It is filled with lots of inspiration!

I’ll be back in the next couple of days to show you some projects with some of these yummy new products. So stop by soon.

cards, Stampin' Up!, Techniques

WHERE HAVE I BEEN???

Wow!  It’s been over a week since I have been back here.  What a week it has been!!!  Between running around with banks as our credit card had been swiped last weekend, organising the rides for the school fete that was on yesterday and organising my own stall, I had a funeral to go to and my husband left his job. Also, Stampin’ Up! announced huge discounts to their clearance sale before the end of the catalogue finishes tomorrow and my phone has been running hot with orders.   Today I have been at the orthodontist for my daughter as she got her plate fitted on her mouth.  Apart from all that, I really have no excuse!

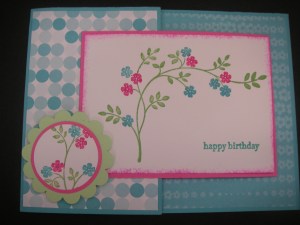
I thought I would come up for air for a minute and show you some more cards with retiring products.  It’s only 2 days until the new catalogue goes live.  How exciting!  These cards I did at a class a few months ago.  I am a bit behind, aren’t I???  These were for a Fun Folds class.  We did the Joy Fold card.  The tutorial to create this card can be found here.  I used the bright and funky “Pink Flamingo” DSP.  We used the direct to rubber technique with the markers to colour the tree from “Thoughts and Prayers”.  This was done twice and then a circle was punched with the 1 1/4″ circle punch from one  and then layered on a 1 3/8″ Pink Passion circle and then on a Gable Green scallop circle. This scallop was raised up with dimensionals to allow the flap to tuck.  Note:  Only add the dimensionals to one half so you can fit it under!!!!!  The edge of the white card was sponged with Pink Passion.

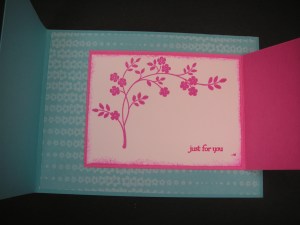
Here is the inside:

This time the tree image was inked up with the Pink Passion stamp pad and stamped onto whisper white.  The edges were sponged in Pink Passion again.  The greeting on the inside and outside was from the set “Teeny Tiny Sentiments”.

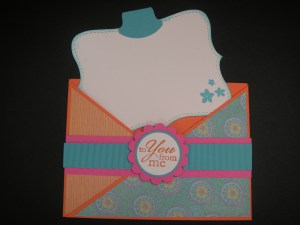
The 2nd card we did was the criss-cross card which can be found here.  This was another bright and funky card using the “Kaleidoscope” DSP.  For the inside card I cut a top note from Whisper White, added a tab using the circle tab punch.  I sponged the edges with Tempting Turquoise and the small flowers are from “Cottage Garden”.  On the front of the criss cross pocket I added a strip of Pink Passion, then crimped a strip of Tempting Turqoise.  The greeting is from the Hostess set “Best Yet”, then punched out using the circle punches and scallop circle.  These were layered and raised up with dimensionals.

Lots of retiring products on these cards.  I must run now.  I will be back in a few days with the new catalogue.  Whoo Hoo!  There are so many exciting new things in there.

Till next time, take care. xx

Uncategorized

HAPPY STAMPIN’ UP! BIRTHDAY TO ME!!!

Hip, Hip, Hooray!!!!  Whoo Hoo!  Today marks my 2nd birthday with Stampin’ Up!.  What a ride!  I have learnt so much and met so many wonderful people. Thank you to all my lovely customers and blog readers.  Your encouragement and support keeps me going!!!   To think, that I get paid to share all these yummy goodies from Stampin’ Up! Thank you to you all. It is so exciting to think that in just over 1 week the new catalogue is out.  There are so many fantastic products coming.

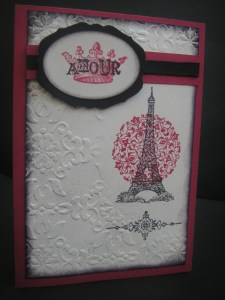
Just to give you a little sneak peek.  We made this card at our team training meeting last week.  This is using the new set ‘Artistic Etchings’.  Ness showed us this neat trick using the Big Shot  embossing folders to isolate an area you don’t want to emboss.  How cool is that!  This is  the ‘Vintage Wallpaper’ Textured Impressions folder.  I have to add this to my wishlist.  It is so gorgeous and so many wonderful things you can do with it.

Stamps: Artistic Etchings.

Ink: Riding Hood Red, Basic Black.

Card: Riding Hood Red, Basic Black, Very Vanilla.

Other:  Vintage Wallpaper Embossing Folder, Lots of Tags Die, Wide Oval Punch, Sponge Dauber.

It is a very exciting day today too as  Josh’s football team (Rugby League)  won their semi final today.  They were minor premiers and lost to this team last week in the last game of the season, so Well Done Corrimal Cougars Under 14’s.  Off to the WIN stadium in 2 weeks to play in the Grand Final.  Plus, can’t forget my daughter who turns the all-important “double Digits”.  She is turning 10!!!  Great excitment in our household this weekend. 

Enjoy your weekend however you spend it!!

cards, Techniques, Tutorials

FAUX WOOD!!

I’m back!  Our new computer is up and running.  I just need to get used to this new Windows 7 version. It’s a lot different, but it’s fast!

I have 2 more male cards to show you.  These are done with the faux woodgrain effect.   Have you tried this technique before?  It is a fun thing to do and everytime you do it, the results are different.  It’s a great manly technique.  I’ll talk about the technique shortly.  I will show you the cards first.  These cards I made last year.

This is using the retiring ‘Wanted’ set again.

I have created the woodgrain and then mounted it on a Chocolate Chip base.  I inked up the horses in Chocolate Chip and stamped them without reinking.  It looks like wild horses running!  I matted this on Chocolate Chip and adhered it to the card.  I looped some twine and then adhered that with a glue dot.  The greeting is from ‘Short and Sweet’.  I punched that out with the Word Window punch and then layered that with a Chocolate Chip Word Window Punch out.  I did stamp the inside with the paisley stamp onto Very Vanilla but I forgot to take a photo of that.

The other card is using ‘Owl Together Now’.  I’m a bit sad I haven’t used this set has much as I thought.  It is a very cute set.

I punched out a circle in the card with the 1 3/8″ circle punch.  I stamped up a little owl with Old Olive Ink onto Very Vanilla card.  I coloured just his wings with the So Saffron marker.  I adhered that piece under the woodgrain card with mounting tape and wrapped some twine around it.   Then mounted it all with mounting tape on a piece of Old Olive card.  This was adhered to the Chocolate Chip card base.  The greeting was from the set and punched out with the Large Oval punch.  The edges were sponged with Old Olive and then layered on another Large Oval punched out in Old Olive.  I offset them and adhered them with mounting tape again.  This is very cute.  It looks like the owl is peering out of his hole in the tree.

There are a lot of different versions of creating the woodgrain effect on the internet.  I found a tutorial on Splitcoast here.  I did mine on Very Vanilla card.  I used Creamy Caramel, More Mustard and Chocolate Chip inks.  A couple of tips I found:

– When you swipe your inkpad down the card, start off the edge of the card and try to run down in one movement.  It doesn’t matter too much, but you get lines across the card where you stop.  That just adds to the character of the wood effect though. Lay the inkpad flat to swipe down.

– Make your card piece a little larger than you want.  You tend to get a dark edge,  so you can trim it down.

– After I used the 3 colours (starting from the lightest first), I rubbed over parts of the card with white ink with a sponge (rubbing rather than dabbing).  Just apply lightly.  It might help sponging off on scrap paper first. 

– After using the white ink, you can always touch up the card by sponging (rubbing) on the 3 ink colours you have used until you are happy with the result. That is, you might want to add a little more golden colour then sponge on more ‘More Mustard’, or if you want it darker sponge on more ‘Chocolate Chip’.

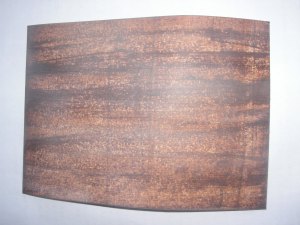
I was going to do up a tutorial for this, but I think the one on Splitcoast is simple to follow.  I found it a bit hard to swipe ink with one hand while taking a photo!!!!  Here is a sample piece I created while doing this though.

The card was curled up a bit that’s why it looks crooked.  Sorry about that  🙂

So you can go and create some faux woodgrain cards just in time for Father’s Day.  Until next time, Happy Stamping.  🙂

Personal Ramblings

DON’T YOU JUST LOVE COMPUTERS!!!

Just thought I would stop by quickly to let you know my computer has died.  It crashed 6 months ago and we managed to resuscitate it, but unfortunately I have to say it has gone forever!!!!  I am on our laptop at the moment, but I don’t have any photos or any other files.  Thankfully the lovely computer guy could recover everything and transplant the info. into our new one.  Hopefully it will be back in the next few days.  So, stop by again soon and I will be back to regular programming!!!

I hope you are having a lovely weekend and get some stamping time in.  One thing without a proper functioning computer I don’t spend so much time on here.  I’m planning on reorganising my craft space.  I need to make way for all these lovely new colours!!

See you soon.  🙂

cards

OUT WITH THE OLD!!!

You have probably all seen the “Last Chance List” now.  It is a HUGE list!  If you want to order anything then don’t delay.  Products are selling out fast.  If you haven’t seen this list yet, then you can click here.

I was going through some of my cards recently and realised that I hadn’t shown you some cards that I had made.  Some of these are with some retiring stamp sets.  So, I better show you before they are gone for good!

This one is with the stampset “Wanted”.  I borrowed this set last year to make some masculine type cards.

I inked up the horse in Night of Navy and stamped 3 times without reinking.  The third horse is a little faint in the photo.  I took several photos but it just wasn’t coming out clearly!!  I stamped the other images randomly in Night of Navy ink onto Bordering Blue card (a retiring colour).  The white was matted onto Really Rust cardstock (another retiring colour).  I wrapped some twine around and layered it all onto the Night of Navy card base – which is a bit hard to tell too.  The weather is a bit overcast so it is hard to get some clearer photos!! 

The greeting is from “A Little Birthday Cheer”, which is another retiring set.  I used the Really Rust marker on just the Celebrate stamp and stamped it onto Whisper White card and punched out with the Large oval punch.  I sponged the edge and put a staple through it.  This was raised and layered onto a Really Rust Wide Oval.  I inked up the star and punched it out with the small star punch.  I don’t know why this punch is retiring????  I added a silver brad and raised it up with mounting tape. 

I stamped the inside too.

Mind you, it does have a straight edge IRL!!!!  Not my day for photos today!  I didn’t add a greeting on the inside at the time.  That can be added when I give it away.  I adhered a piece of Whisper White onto the Night of Navy base.  On a strip of Bordering Blue I stamped the small shapes in Night of Navy and added this to the bottom.

I created another card with this set when I had it.  On this one I did the faux woodgrain.  So pop by in the next few days to see that.  For now, I have a million things I should be doing! 

Happy Stamping!!

cards, Personal Ramblings

STAMPING BUDDIES!

It’s always a lot more fun to get together with friends to stamp.  Yesterday we had a stamping day at Leonie S.  I went along with Andrea and Leonie and I met up with Tanya who had come from WA, and I met Lisa too.  Lots of laughs and stamping.

Here are some of the projects we made.

Leonie S. showed us how to make this cute little box using the Big Shot and the Scallop envelope die.  It’s a great size to add a few choccies as a small thank you to someone.  It is so quick to make.  Thanks Leonie!

The next project was this gorgeous card shown to us by Lisa.

The photo doesn’t do it justice.  The flowers were created by punching out several scallop circles from the scallop circle punch.  The black circles were distressed and scrunched, and unfolded and scrunched some more until the layers separated.  This created a faux suede effect.  It was a bit time consuming but is very effective.  The Kraft scallops were stamped with the swirl from Baroque Motifs.  Then they were all assembled together to form this lovely flower.  The vanilla card was stamped with the En Francais script in Sahara Sand and the edges sponged.  The edge of the Vanilla and the black was punched with the Eyelet border punch.  Some Kraft taffeta ribbon was scrunched and adhered to the card.  Those black leaves with the flower wer made using the Big Shot ‘Little Leaves’ Die.  This was all assembled on a Kraft card base which had the swirls from Baroque Motifs stamped around the edge.  Thanks Lisa.  I think I will be making this card again – perhaps in some other colour combos?????

I will just show you a few photos of our busy group.

Andrea and Leonie N. busy creating!
Andrea and Tanya!
A quick group shot as we dash out the door!

 Thanks for stopping by and seeing all our antics!  It’s so great when we can catch up with friends we meet on our blog travels.

Thanks for stopping by.  Have a good day.  🙂