3D projects, Personal Ramblings, Tutorials

WHAT A GREAT WEEKEND!!

I have just had the best weekend with a few stamping buddies.  While at the Stampin’ Up! convention in May this year a group of us who shared together decided that since the Incentive Trip was beyond us for this year then we should hold our own.

Leonie N. and I have been planning it for the past few months.  It all came together this weekend.  It was such fun!!!  Each of us shared a Make and Take, we had prize patrol, lots of special gifts and our “Night of Nights” Award Dinner.  I thought I would share some of our ventures and creating over the next few days.  

Firstly, I can show you what I made for each of my lovely friends.

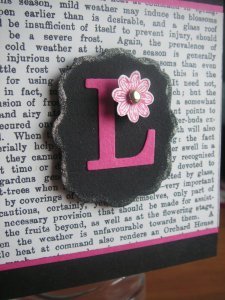
I used the Newsprint DSP with Melon Mambo and black cardstock. The black card measures 16.5cmx8.5cm.  I scored it on the long side at 6.5cm.  This enabled the piece to bend easily.  I punched a circle in the top part with the 1 3/8″ circle punch.  I cut a 1 3/8″ circle from melon mambo and then a scallop circle over this to cut it out.   The label was cut with the “Lots of Tags” Die and I rubbed Champagne Shimmer Paint around the edge.  I cut the letters with the alphabet die and adhered that to the tag.  The small flower from the hostess set “Punch Potpourri” was stamped in Melon Mambo and punched out with the Boho Blossoms punch. I added a gold brad and raised that up off the letter with dimensionals.  Here is a close up to see it.
This is what was waiting for the guests.  Leonie had made up some fruit punch.  Doesn’t it look exotic!!!

Here is everyone enjoying them.

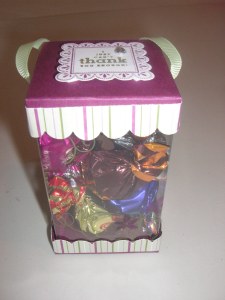
Andrea gave Leonie and I these special little chocolate boxes for organising the weekend.  Aren’t they gorgeous???? I’m sure they will taste yummy too, but you won’t know that, will you!
Stop by over the next couple of days and I will show you some of the cards that we made.  Maybe I can show you some other things we got up to too!!

Awards, Personal Ramblings

A SPECIAL AWARD!!

I just found out I received a special blog award.  It is very nice to receive these.  I feel very honoured.  My very loyal blog friend Lynda passed this award on to me.  Lynda is so encouraging and always leaves her lovely comments.  Go on over and visit her blog.  She makes such lovely cards and projects.  I always love to see what she has been up to. (Don’t forget to leave her a comment, because she is always so lovely to leave comments on mine and many other blogs.  It makes your day to receive one).

Here is my wonderful award.

The other special thing about this award is that was started by my very good stamping buddy Andrea.  She is such a lovely friend and if you haven’t stopped by her blog, you have to.  She creates such beautiful cards.

Thank You Lynda for my very special award.  I am very touched. 

I think I am meant to pass this on to some others but I will have to think about that one. 

Thank you to you all too for stopping by my blog.  Don’t be shy to leave a comment.  It’s always nice to know you are not talking to yourself!! 

I have some fun things to show you that I have been up to lately so stop by again soon. xx

cards, Tutorials

ORNAMENT TAGS!

I have been having fun creating this week.  I can’t show you everything yet.  That will have to wait until next week.  What I can show you are these little tags I have been making.  They are so quick to make.  You can whip up a number of these in no time ready to adorn your gifts this Christmas.  I have put together a simple tutorial to show you how they are done.

These are little tags using the set “Delightful Decorations” and the matching ornament punch.  It is so great there is a matching punch for this set.  I don’t think I could be bothered cutting them out!

  What you will need:

Stamps: Delightful Decorations (121502)

 Ornament Extra Large Punch (119847)

Whisper White Cardstock                          

Real Red Ink

Adhesive Rhinestones (119246)

 1/8” (3.2mm) Real Red Taffeta Ribbon

 1. Cut Cardstock 10cmx6cm. Score on long side at 5cm and fold on score lines.

2. Ink Ornament Stamp from Delightful Decorations in Real Red ink. Line stamp up over piece of card so tip of ornament hangs just over the edge of the folded card. Stamp image.

3. Place card into ornament punch. Line up image in the window. Have the top of the punch just off the edge of the folded edge of the card. See Photo 1 to assist you. Punch out the ornament.

Photo 1


4. Tie a bow with the Real Red Taffeta ribbon and adhere to the top of the punch with a glue dot. Add an adhesive Rhinestone to the centre of the ornament. See Photo 2

Photo 2

5. Now you have a tiny tag for Christmas that opens out for you to write inside.

Why not try other variation and different colours??? See Photo 3

Here I have used a different stamp in the set. The Old Olive Tag is simply stamped and punch out on a single layer of card and tied with gold cord at the top.

Photo 3


 Enjoy making these.  I have a fun weekend ahead with some stamping buddies.  I can’t wait!  I will have lots of stories to tell.  (Although, there will be some things that can’t be shared!!!!) LOL

Stampin' Up!

DRESS UP YOUR CHRISTMAS!!

It’s that time of year to start thinking Christmas!  Stampin’ Up! have just announced a fantastic special to help you with your Christmas Cards and gift packaging.  You can receive FREE exclusive ribbon when you

1) Purchase a Christmas bundle as shown below, or

2) Host a workshop over $550.  

Check out that ribbon!!!!!  You can choose from Mistletoe Ribbon Originals, Sleigh Bells, Riding Hood Red 1 1/4″  striped Grosgrain or Real Red 3/4″ Polka Dot Grosgrain.  These are for a limited time only.  The special is from now until 30th November, or while stocks last.  So don’t delay.  They are going to be snapped up!

Choose a Bundle.

Description Wood-Mount Item/Price Clear-Mount Item/Price
Gifted Bundle
Gifted Set (p21) and Jolly Holiday Designer Series Paper
124041; $66.90 124042; $56.90
Welcome Christmas Bundle
Welcome Christmas Set (p26) and Christmas Cocoa Specialty Designer Series Paper
124045; $69.90 124046; $59.90
Season of Joy Bundle
Season of Joy Set (p20) and So Swirly Stampin’ Around Wheel
124043; $67.90 —
Delightful Decorations Bundle
Delightful Decorations Set (p25)and Ornament Punch
124044; $72.90 —

Choose a ribbon.

Item Description Retail Value Cost with qualifying purchase/workshop
116792 Mistletoe Ribbon Originals $21.95 FREE
116795 Sleigh Bells Ribbon $15.95 FREE
113099 Riding Hood Red 1-1/4″ Striped Grosgrain Ribbon $19.95 FREE
115608 Real Red 3/4″ Polka-Dot Grosgrain Ribbon $19.95 FREE

Contact me today to place an order, or better still, book a workshop and I can show you and your friends some quick Christmas projects.


Uncategorized

WHY NOT JOIN IN A RIBBON SHARE????

Would you like to sample some of Stampin’ Up!’s great ribbons?  Why not join in on the ribbon share I have put together.  You can get to sample a selection of the ribbons and colours.  These shares are set out below.  All prices include the 5% Shipping and Handling.  Additional postage will need to be added if you would like me to send these to you.

RIBBON SAMPLER

Total of 10.4m of various ribbons                TOTAL $17.45

1.5m of 1 1/4” (3.2cm) Striped Grosgrain Ribbon Early Espresso.

1.5m of 1 1/4” (3.2cm) Striped Grosgrain Ribbon Old Olive.

2.2m of Real Red 5/8” (1.6cm) Satin.

2.2m of Very Vanilla 5/8” (1.6cm) Satin.

1.5m of Pretty in Pink 3/8” (1cm) Taffeta.

1.5m of Rich Razzleberry 3/8” (1cm) Taffeta.


 Or, Why not join in an embellishment share????

Here are the details:

EMBELLISHMENT SHARES

Designer Buttons Assortment

72 buttons (1 each of 3 designs in 24 colours)      $17.80

Antique Brads

5 brads 1 of each design                                                 $ 3.00

 I can only go ahead with the shares when I have enough numbers.  So, email me jghayward@yahoo.com today to take part. 


3D projects, cards

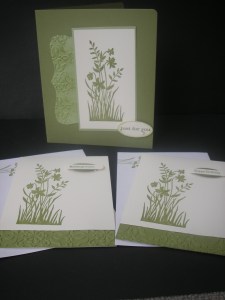
A CARD FOLDER “JUST FOR YOU”

I have been working on some card folders over the last week or so.  These would make great hostess gifts, or just a little “thank you” to someone.  Everyone needs a card now and then right!!!  They needed to be quick to make up, yet still impressive.  If you could say that about these ones anyway!!!  I used one of my favourite sets at the moment – “Just Believe”.

I did a bit of searching on the net but couldn’t find what I was after, so just made up these ones. 

This is the front of the folders:

The card measures 28cmx21cm.  Score the 21cm at 4cm and score the 28cm side at 14cm.  Fold up on the 4cm line. This creates a pocket. Fold in half on the 14cm scored line.  I rounded the corners at the top and then on the ends of the folded pocket inside.  I didn’t take any photos of the inside – sorry!  I had stamped the small leaf image from the set in Old Olive on the edges.  I added some Sticky Strip inside the pockets to adhere together.

For the front of the folder.  I cut a Top Not on the Big Shot on Certainly Celery Cardstock.  I then embossed it using the Vintage Wallpaper Embossing Folder.  I cut the Top Note in half and sponged Old Olive ink over the embossed edges.  I stamped the flowers from “Just Believe” in Old Olive ink onto Very Vanilla cardstock and layered it onto Certainly Celery Mat.  I inked up the words in Old Olive and punched it out using the Large oval punched and sponged the edges.  These were all layered onto the Old Olive card folder.  The words were raised with dimensionals and an adhesive Rhinestone was added for a bit of bling.  These folders were just big enough for 2 cards and matching envelopes.

Onto the cards:

These cards were cut at 10.5cmx 29.6cm and scored at 14.8cm in Very Vanilla Cardstock.  I cut off 2cm on one end.  I cut a piece of Old Olive cardstock 10.8cmx3cm and ran it through the big shot with the Very Vintage Wallpaper Embossing Folder.  (Actually because I did so many I had a larger piece and embossed it and then cut into 3cm strips).  I adhered this to the bottom edge of the Very Vanilla card.  TIP:  To make it easier to line up this piece, I layed the Old Olive piece on the bottom card, added adhesive to the top of the old Olive piece and then laid the top of the card over onto the Old Olive piece.  It makes it easier to line up.  For the text, I stamped the greeting from “Teeny Tiny Sentiments” in Old Olive and punched it out using the Word Window Punch.  Then adhered this to a large oval punched out in  Old Olive.  I raised this up with dimensionals.

I was pleased with the final result – and more importantly the recipients were very pleased. 

School has gone back now so hopefully there may be a little more time to create!  Until next time,

Happy Stamping!!

3D projects, Tutorials

ANOTHER BOXY BAG!!

It has been a little while since I have been back here.  I’m really sorry about that.  I don’t like to leave it this long between posts.  You’ll start to forget about me 🙂 – and I can’t have that!!!  Life has just been crazy these last few weeks and with school holidays thrown in it has been a bit tricky to make it.

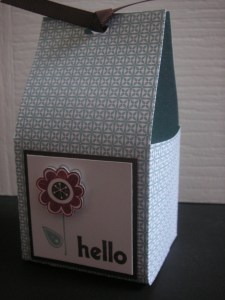
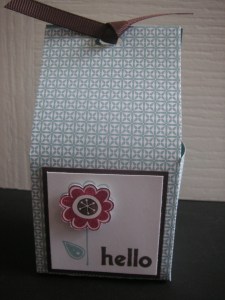
 In this recent post  I showed you the boxy bags.  They are so cute.  I said I would give you the metric measurements for them and I haven’t forgotten.  I’ll do that right now for you.  I will show you the bag I made some time ago when I tried these the first time.  I made this one for a special friend using the stampset “Hello Again”.  It was good I had a photo in the vault!

This is in the shadow a bit but it gives you an idea side on.  This is the front view.

It is using some DSP from the recently retired catalogue. 

Here are the metric measurements I used.  The original instructions can be found here.   The instructions can be a little confusing as to where to cut.   So you can follow the instructions there as they have step by step photos to show what to do.

Cut card 28cmx12.5cm, (which is 11″x5″).   On the 28cm (11″) side score at 11.5cm and 16.5cm.  On the 12.5cm (5″) side score at 3cm and 9.5cm. 

On the 3cmand 9.5cm scored lines cut from the end to the score line in the middle (that would be the 11.5cm scored line running down.  Turn around and repeat on the other end.    Cut off 7.5cm from these outside side flaps on each end.  (Check the photo if you are unsure).  Place adhesive on small tabs and adhere box together.  You can decorate the box as you like.  It is so cute – and very simple.  It would be great with Christmas approaching very quickly.

Now I promise I won’t leave it so long next time to return here.  I do have a lot I have been busy with.  So stop by again soon.  In the meantime go and make yourself a boxy bag!! 

cards, Stampin' Up!

FOR BABY!!

Do you get stuck sometimes with not knowing what to create, or your MOJO has gone AWOL????  Use the Stampin’ Up! Idea Book and Catalogue.  It is a great resource.  It’s not called an IDEA book for nothing!  Every page has so much inspiration.  You can pick a card and copy it exactly, or change the colours and stamps to suit you.  On this card I created a card from p86 of the catalogue.  I used the wheel “Baby Tees” on a scrap piece of Whisper White, and coloured it using the blender pen and inks.  I cut it out and adhered it to the Whisper White card base at the top.  On the Pretty in Pink piece I stamped the nappy pins from “Short and Sweet”.  I scalloped a strip of Pretty in Pink card and then tied Pretty in Pink Taffeta Ribbon around it.  This was layered onto the other pink card piece and then adhered on to the whisper white card base.  The greeting is from “Teeny Tiny Sentiments”.  It is a bit hard to see.

So next time your stuck, pick up your catalogue and have a look. 

School holidays have started here for us now, but I need to squeeze some stamping in there some time 🙂  Have a lovely weekend.

Classes

CELEBRATE WORLD CARDMAKING DAY!!!

Come along and celebrate

“World Cardmaking Day”

World Cardmaking Day is a day to celebrate the giving of cards. In today’s society it is so easy to text or email. The art of creating and giving cards is being lost.

Come along and join in the fun!  We will create this mini gift box and 4 love note cards.   This would make a great gift for someone special or for you to keep yourself.

WHEN: Saturday October 2nd at 2pm.

WHERE: My studio, East Corrimal

COST: $15. To be paid on booking.

 Includes materials and a Yummy Afternoon Tea.

RSVP: Monday September, 27th on 42844574 or email jghayward@yahoo.com

 PLUS: Grab some bargains! My retired stamps, card, ink etc will be for sale. (cash only on the day)

Don’t miss out.  Seats are limited.

cards, Challenges, Techniques

TRY A NEW TECHNIQUE!!

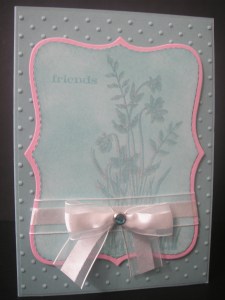
I was challenged this past week to try a technique I haven’t done before.  There is a lot of techniques on my “List to Do”!!  But I came across this technique recently and thought I had to give this a go.  It fascinated me.  It uses the Stampin’ Mist directly on your stamps. 

For this technique, firstly sponge your card all over with ink.  Then ink your stamp up with versamark and then mist the stamp lightly with Stampin’ mist.  Stamp onto your sponged card.  The image will appear.  I found the colour of the image will be different depending on the colour ink you have sponged with.  On this Baja Breeze card.  The image appears pink.  I found it was very faint so I stamped just next to it with Baja Breeze creating a shadow.  Where you have stamped with the versarmark image it is slightly raised and feels waxy.  It is amazing! 

I used the brand new stamp set “Just Believe”.  This is a beautiful set.  I cut the Top note out on the Big Shot before I had sponged and stamped.  I also cut out a Pretty in Pink Top note and layered it under this one.  I ran a piece of Baja Breeze card through the Big Shot using the ‘Perfect Polka Dots’ Impressions Folder.  I added some gorgeous Organza Ribbon and tied it using the “No Tie bow”  that Andrea has shown on her blog, originally done by the clever Selene.  These bows are so quick to do and look so elegant.

Next I tried Regal Rose.  That appeared more white. 

On the Regal Rose card I tied the ribbon and added a tag from the Tiny Tags set.   I layered the piece over a strip of Whisper White card that I had emossed on the Big Shot using the Vintage Wallpaper Die.  This is so beautiful!  I just added some bling at the bottom with the Adhesive Rhinestones.  This is a very simple card but I love the way it turned out.

So now, why don’t you go and try a technique you haven’t done before???  I have a lot on my list to complete!

Have a lovely weekend!