cards, Stampin' Up!

COLLAR CARDS WITH PLAYFUL PALETTE!

The Stampin’ Up! Designer Series Paper (DSP)  is so beautiful. The problem is you can only show one side at a time on a card. I think these collar cards are a great way to show off both sides. Have you seen these collar cards around?  They can go by other names too. They are very easy to do.

Playful Palette Collar Cards

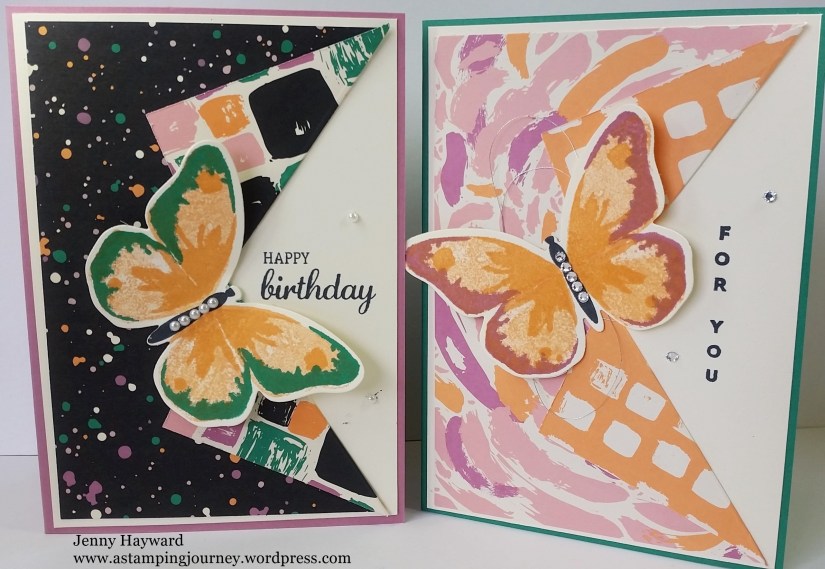
I saw the idea on Pinterest and using the Butterflies from ‘Watercolor Wings’ on a card on a forum I am on.  Both are great to show the colours.

I am not going to give you exact measurements for your cards of how to make them. Really you can make them any size you want. You have your standard base card, then the card mat which I have in Very Vanilla.  This is slightly smaller than your card base.  Then the DSP is slightly smaller than that. It depends on how wide the border you want too.

(OK if you are metric the base is 14.8cm x 10.5cm.  The mat is 14.4cm x 10.1cm and the DSP is 14cm x 9.7cm).

I have used the ‘Playful Palette’ DSP stack. On your DSP measure along on the long side and mark a point half way. Cut in to your DSP piece by about 5cm (2″).  Then fold back each piece to angle the paper and press to along the score line to crisp the fold. See too easy!

On the Very Vanilla piece I stamped the sentiment.  The one on the left is from ‘Best Birds’. The one on the right is ‘Vertical Greetings’.

For these butterflies:  The one on the left is stamped in Peekaboo Peach (stamped off), Peekaboo Peach and then Emerald Envy.  The one on the right is Peekaboo Peach (stamped off), Peekaboo Peach and then Sweet Sugarplum.

Isn’t it great to be able to see both sides of the paper.  🙂

Have a great weekend.  I hope it is a stamping weekend for you.

Jenny

cards, Classes, Techniques

FUN FOLD CLASS – IS FUN!!!

These are the fun cards we are making at my Saturday Stampers class this Saturday 15th August. (2pm). Cost $15 If you are local to Wollongong do come on by.  You just need to let me know by Thursday so I can have all the card cut.  They might look a bit tricky but they are really not hard to do.  I think you will like them.

P1170174

cards, Techniques

A NEW TECHNIQUE PERHAPS???

I was stamping one of the ornaments from Delightful Decorations a few weeks back and found it came out really strange.  I thought at the time it was my inkpad that desperately needed re-inking.  I really liked the pattern though.  Check it out –

Isn’t it a groovy pattern???  I thought it would make a great tag or something and so I just put it aside to look at later.  I pulled it out again this week and had a closer look.   It was a scrap piece of card that I used and had previously ran some adhesive over the card to stick it down to something.  It was just the glue stick variety adhesive.  I didn’t end up using the card then.  Where I had glued was where the lighter part of the image was.  The adhesive resisted the ink slightly.

I call this my “Adhesive Resist” technique!  LOL  So, do you think it will catch on!!! Maybe I will have to try it again sometime?? I thought it would be a fun thing to show you.

I hope your Christmas preparations are going ok?  Mine are VERY slow going?  I still have presents to wrap, but we put some lights up on our house today.  That was a first!

Happy Christmas to you all,

Jenny x

cards, Challenges, Techniques

TRY A NEW TECHNIQUE!!

I was challenged this past week to try a technique I haven’t done before.  There is a lot of techniques on my “List to Do”!!  But I came across this technique recently and thought I had to give this a go.  It fascinated me.  It uses the Stampin’ Mist directly on your stamps. 

For this technique, firstly sponge your card all over with ink.  Then ink your stamp up with versamark and then mist the stamp lightly with Stampin’ mist.  Stamp onto your sponged card.  The image will appear.  I found the colour of the image will be different depending on the colour ink you have sponged with.  On this Baja Breeze card.  The image appears pink.  I found it was very faint so I stamped just next to it with Baja Breeze creating a shadow.  Where you have stamped with the versarmark image it is slightly raised and feels waxy.  It is amazing! 

I used the brand new stamp set “Just Believe”.  This is a beautiful set.  I cut the Top note out on the Big Shot before I had sponged and stamped.  I also cut out a Pretty in Pink Top note and layered it under this one.  I ran a piece of Baja Breeze card through the Big Shot using the ‘Perfect Polka Dots’ Impressions Folder.  I added some gorgeous Organza Ribbon and tied it using the “No Tie bow”  that Andrea has shown on her blog, originally done by the clever Selene.  These bows are so quick to do and look so elegant.

Next I tried Regal Rose.  That appeared more white. 

On the Regal Rose card I tied the ribbon and added a tag from the Tiny Tags set.   I layered the piece over a strip of Whisper White card that I had emossed on the Big Shot using the Vintage Wallpaper Die.  This is so beautiful!  I just added some bling at the bottom with the Adhesive Rhinestones.  This is a very simple card but I love the way it turned out.

So now, why don’t you go and try a technique you haven’t done before???  I have a lot on my list to complete!

Have a lovely weekend!