scrapbooking, Uncategorized

“YOU SPIN ME RIGHT ROUND..”

It has been a while since I showed any scrapbooking.  Actually it has been a while since I have done any complete pages!  I have just been doing some small 6×6 for workshops.  I recently joined Soul Scrappers to work on my scrapbooking.    This weeks challenge was creating a project using circles.  I got a circle Scissors for Christmas and although I had a play with it at Christmas it kind of got packed away.  So – I thought this would be a great opportunity to work with it.  I thought these photos would really suit this theme.
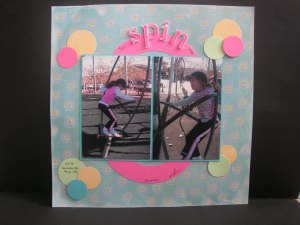
This is of my daughter playing on this incredible spinning swing at the playground at Homebush, Sydney.  She had a great time spinning on it. I cut a circle with the Circle scissors from Pink Passion cardstock, firstly cutting the inner circle and then the outer circle.  I cut the circle in half and layered it under the mats with the photos.  To create the title I stamped the words SPIN with the Schoolbook Serif Alphabet.  I cut them out and then covered them with Crystal Effects.  Not that you can see that very well!  I punched out circles with various punch sizes from cardstock and DSP (Good Morning Sunshine).  Don’t you just love that DSP that I have layered it all on?  This is the Kaleidoscope paper from the Summer Mini.  It is so bright and funky.  I inked around the edge of the paper with the white ink pad.

There you have it.  A complete scrapbooking layout from me!  Hopefully there is more to come. 

Thanks for stopping by!

cards, Workshops

HAPPY VALENTINES!!

Well, This is a weekend of LOOOOVE!!  I have a workshop tomorrow and the hostess has asked for some Valentines goodies!  I thought I would show you these now as I know nobody from the workshop will be looking at these before tomorrow!!

These are the projects I am showing.

Here are some close-Ups for you.

This is a 6″x6″ page.  I won’t go into details.  I think it is straight-forward.

Card: Kraft, Chocolate Chip, Real Red, Whisper White, Pink Flamingo DSP.

Ink: Regal Rose and Chocolate Chip Marker, Chocolate Chip.

Stamps: Priceless, Whimsical Words (SAB).

Other: Wide Oval Punch, Rhinestone Brads, Mounting Tape.

Actually on this page I have used the Regal Rose but the one I am showing tomorrow has 2 red hearts in the top left and the text uses Real Red and Chocolate Chip Marker.

This is the bag.

This is such a cute bag to make and so easy.  I found the template at Mel’s blog here.  I stamped the label from Vintage Labels (SAB set) first on Regal Rose then on Whisper White.  I punched out the Regal Rose with the wide oval punch.  I punched out the White label with the 1 1/4″ circle punch and layered it on the Regal Rose oval with mounting tape.  The paper is from the Pink Flamingo DSP again.  You can’t tell from the photo but I created the handle by punching a strip of Real Red card with the Lace Eyelet Border Punch on either side of the strip to create a fancy edge.  The hearts are from Priceless set again.

While I was at it I created another bag.

This one was using the Ski Slope DSP (retired from Spring Mini).  I created a label from the Vintage Labels and punch it out with the scallop circle punch.  Punched some holes out with my crop-a-dile and threaded through some Real Red grosgrain ribbon.  A very quick bag.  This is the Lucky Door Prize.  I have put in a cello bag with some goodies in.

Onto the card which is the Make and Take.

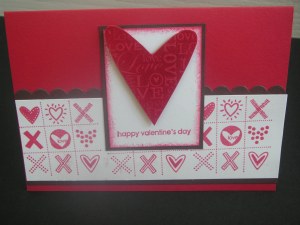
The hostess asked for heat embossing too.  It had to be very simple as many of the guests haven’t even stamped before.  I have used the set “Happy Heart”.  I stamped the Tic-Tac-Toe grid along the bottom in Real Red.  I matted this on Chocolate Chip scalloping the top strip.  I stamped and clear embossed the heart on to Real Red card.  I need to take better photos, you can’t see the shimmering heart!!!  After I cut it out I mounted it onto some Whisper White cardstock that I had sponged the edges with Red ink and stamped the text on.  The piece was matted onto Chocolate Chip card.  It was all put together on Real Red card base.

There you have it.  Now there is still time to get some of these projects done to give to your loved one!!!

Happy Valentines!

cards

HEARTFELT!!!

I recently borrowed “Heartfelt Thanks”  set from Ness.  I thought it would be a good 2-step set for my family stamping this week.  This is the card we ended up doing.  It is a very simple one.  I love this colour combo.  I use it quite a bit.

Stamps: Heartfelt Thanks, French script.

Card: Whisper White, Baja Breeze, Ruby Red, Chocolate Chip.

Ink: Ruby Red, Baja Breeze, Chocolate Chip.

I stamped the “French Script” background stamp on Ruby Red.  I scalloped a strip of Chocolate Chip card and adhered this above the Ruby Red.  I stamped the solid flower image in Baja Breeze and then used the Stamp-a-ma-jig to stamp the outline in Chocolate Chip.  The greeting was stamped in Ruby Red on Baja Breeze  and the edge was sponged in Ruby Red ink.  This strip was raised on mounting tape over the flower image.

This is the second card I made.

On this second card I stamped the flower head image 3 times in Regal Rose and then stamped the outline in Rose Red.  I matted it on Certainly Celery.   I used the scallop edge punch to scallop the edge.  I then adhered this to Rose Red card.  I stamped the text in Rose Red on the Certainly Celery card.  Some Rose Red Double stitched ribbon finished it off!

Stamps: Heartfelt Thanks, Baroque Motifs.

Card: Whisper White, Certainly Celery, Regal Rose, Rose Red.

Ink: Regal Rose, Rose Red.

Other: Mounting Tape, Rose Red Double Stitched Ribbon.

There you go.  Some simple cards with a set that is not used very often now.  I had fun playing with them though.  I hope you like!!!!

Happy Stamping!

cards, Challenges

ESAD COLOUR CHALLENGE!

Hi Everyone!  Firstly, I want to say a BIG Thank You to everyone who stopped by my blog for the Sale-A-Bration Blog Hop, and Thank You to all your lovely comments.  It was very encouraging! 

The ESAD group are at it again.  This time Leonie has set us a colour challenge.  The colours are:

                    RIDING HOOD RED                      PUMPKIN PIE

                    OLD OLIVE                                BASHFUL BLUE

I would never have thought of using these colours together so I wasn’t sure how they would look, but I was really pleased with the result.  It is quite a bright funky card!!!! I got the layout for this card from last year’s UK Stampin’ Up! Catalogue.  I was quite impressed with myself too as I used several different techniques.  Can you pick them???

I have used Direct to Rubber, 2-step stamping and Rock and Roll.  There was a bit of cutting involved but it was fun to do.

Stamps:  Good Friend, Hello Again.

Ink: Pumpkin Pie, Bashful Blue, Old Olive and Ruby Red (sshh!!)

Card: Whisper White, Riding Hood Red, Bashful Blue, Old Olive.

Other: Mounting Tape, Corner Rounder Punch, Bashful Blue Grosgrain Ribbon.

You can join in the colour challenge if you want.  Create your card and then stop by Leonie’s Blog and leave a comment with your link.  You have until January 31.  So get creating!

Blog Hops, cards

SALE-A-BRATION IS HERE!!!

Sale-A-Bration starts today!  This is one of the best times of the year!  You might be joining me here from  Gardenia’s blog  as part of the ESAD-SU Sale-A-Bration Blog Hop, or you might be starting from here.  Either way, Welcome to my world!  

If you have just joined in then let me fill you in!  I am a member of  an online YAHOO group – ESAD-SU.  This stands for EXTRA SPECIAL AUSTRALIAN DEMONSTRATORS FOR STAMPIN’ UP!   This group is for Stampin’ Up! demonstrators in Australia and New Zealand and provides great support, information and often challenges, swaps and cyberstamps.  If you are a demonstrator and haven’t joined in yet why not stop by.  Leonie S will have all the details there as to how to join.

This blog hop is to showcase the great sets in the Sale-A-Bration catalogue. You can receive one of these sets for FREE with a $100 order.   How exciting!!  Just place your order with your local demonstator. 

On this blog hop there are over 40 blogs for you to visit.  Each one will show a  different project.  Now you can go in the draw to win some great blog candy by visiting all these blogs.  What you need to do is stop by EACH one and leave a comment on EACH blog.  Then email Leonie at leonie@stamp-a-latte.com to let her know you have completed the hop and have left a comment with everyone.  Now I would suggest you grab a drink now because you are going to be here for a while, but I’m sure you will come away with lots of inspiration!!!

Now on to my project.  I am using the “Happy Moments” set.  This is a lovely set with lots of different images and greetings for many occasions.  When I first saw this set, this idea popped into my head and  I don’t usually do “arty” style cards.

This is the card:

I stamped “French Script” background stamp in Creamy Caramel on Very Vanilla Card.  Stamped Baroque Motifs swirl in Chocolate Chip over the card (Don’t you just love that Set!!).  I sponged around the edge in Chocolate Chip ink.   I inked the Birdcage stamp with Chocolate Chip and Tempting Turquoise markers and stamped it on scrap card and cut it out and mounted it with mounting tape.  I stamped the greeting in Chocolate Chip, punched it out with the Word Window Punch and sponged the edges.  I added 2 silver brads and raised that with dimensionals.  I wrapped twine around the brads and wrapped it around the card.  This card was mounted on Chocolate Chip card base.

I stamped up the inside too.

I made a matching tag:

This is similar to the card.  I inked up the birdcage in Tempting Turquoise and mounted that with mounting tape.  I still think maybe I should do the cage in Chocolate Chip????  I scalloped the edge of Tempting Turquoise card and adhered that piece under the Vanilla card.  The greeting was stamped in Chocolate Chip and punched out with the word window punch.  I added one silver brad to it.   I punched out a circle in Tempting Turquoise and adhered this at  the top, punched a hole using the Crop-a-dile and threaded through some more twine.

Now catch your breath and you can move on to Julie’s blog and see her wonderful creations.  Don’t forget to leave a comment first to enter the draw to win some great “candy”!!!!

I hope you enjoyed your visit, please come again!!!    🙂

cards

A FRIEND FOR YOU!!

Ok, so I’m still catching up on a few cards. It is good to have holiday time to do them. I have had these stamped images on my desk for soooooo long, it is a bit ridiculous. I have pulled them out a few times but just couldn’t seem to get it together. So I thought the time had come to get it out of the way. I was trying to go for a ‘shabby chic’ style.  Not sure if I achieved that!!!!  I was pleased with the final result though.

Card: Pretty in Pink, Baja Breeze, Chocolate Chip, Whisper White.

Ink: Pretty in Pink, Baja Breeze, Chocolate Chip.

Stamps: Friends 24-7, Sanded Background.

Other: 1 1/4″ Circle Punch, 1 3/4″ Circle Punch, 1 1/4″ Square Punch, Baja Breeze (Ribbon Originals), Sponge, Mounting Tape.

Hope you like!!!

Enjoy the rest of your day 🙂

3D projects

SWEET TREAT PENCILS!!!

I have had these here waiting to show you for a while.  I was really pleased with the idea.  I was inspired for this idea from Marnie. She made these cute party favours with sticks. I thought instead of sticks I would try pencils.

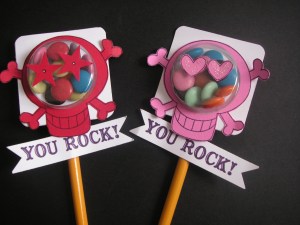
I have used the skulls from ‘Just Jawing’.  I have put together a tutorial to show you how they are done.

1. Stamp the skull in Basic Black on cardstock.  I used Pink Passion and Real Red for my 2 skull pencils.  Cut around the stamped image.  Cut 2 squares from Whisper White Cardstock measuring 6cm.  

From one square punch a circle using the 1 3/4″  circle punch.  From the other square punch a circle using the 1 1/4″ circle punch.   To make sure these were centred I first punched circles from scrap card and traced around these on the cardstock.

Round all the corners of both squares.  Punch a circle from the centre of the skull.  To ensure this would be centred on the skull I traced lightly around the scrap 1 3/4″ circle in pencil and then I could line up the punch.  I stamped the text on a strip of Whisper White card and then used the 1 1/4″square punch to create the flag notches.

2.  Remove the adhesive from the treat cup and centre this over the white square with the smaller circle.  Adhere the skull to the other square. 

3.  Fill the cup with your treats.  Adhere these 2 pieces together with Snail Adhesive or Sticky Strip.  Use the punched out circle from the 1 3/4″ circle and adhere this over the hole.

4.  I placed a piece of Sticky Strip onto the end of the pencil and adhered this to the back of the skull.  Rub over the pencil several times to ensure that it is secure.  It should hold quite well though.

5.  I cut out the eyes from the skull and added some 2 way glue and Dazzling Diamonds and placed this on top.  For the red ones I punched out 2 small stars from the Real Red card.  I added some eyes with a black marker and then added dots with a white gel pen.  I adhered the text banner with some sticky strip.

Wouldn’t these make great favours for a kid’s Birthday Party or for a craft stall?  What do you think?  If you don’t have the skull you could try flowers or something else.

Hope you’re enjoying your New Years Break.  I will be back soon with some more catch-up projects.   🙂

Personal Ramblings

HAPPY NEW YEAR!!!

I haven’t stopped by all week.  I’m just enjoying some family time and trying to catch up on some of those neglected jobs around the place.  One of those jobs we have been doing is backing up our Computer files.  When our computer crashed 2 years ago we lost everything.  It is so devastating to lose those family photos.  So we have now copied all our files to disc.  Have you done yours lately?  Don’t leave it too long.  

I have been creating too.  I have been working on my watercolouring and catching up on a few unfinished projects that have been lying around for a while.  I will show you those over the next couple of weeks, so make sure you drop by again.

Thank you for stopping by and a Happy New Year to you.  I hope that 2010 brings you Good Health and Happiness.  I hope that you continue your journey of stamping and papercraft. 


See you in 2010!!!


Personal Ramblings

HAPPY CHRISTMAS TO YOU ALL!!!

Just wanted to stop by and wish you all a Happy Christmas.  We hope you have a special time spent with family and friends.  Stay safe on the roads.

May you take some time to reflect on the Greatest Gift we have in Jesus.  The One who came as a baby to save us from this World.  What a Great God we have.  Who Loves us more than we can imagine or even deserve.  Praise God!!

Thank you for stopping by my blog.  I hope that you find some inspiration here.  I hope that you might stop by again and that you can share in my Journey of stamping and creating.

Bright Star
New Graphics


cards

A QUICK CARD AND A QUICK POST!!

This is a really crazy time of year, isn’t it???  So much to do, so little time! Why is it like this?  I always say next year I will start earlier!  Anyway, I thought I would stop by quickly and show you these cards.  This is my “Oh_no_I_need_some_more_Christmas_Cards! Look_I_have_some_scraps_of retired_Ski_Slope_DSP. That_will_be_good. I_will_cut_up_some_bits_and stick_them_on”  type of Christmas card.  You had to ask didn’t you?

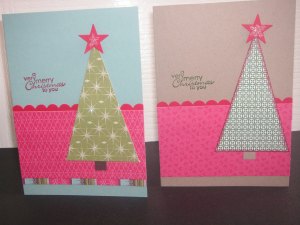
There was some sort of plan to it!!! I was inspired by this card on Jackie’s blog I saw some time ago.  It is a good way to use up some scraps.  I made a number of these up. 

For the tree, I cut a rectangle from the DSP measuring 6cmx9cm.  I marked across to 3cm on the 6cm side and cut the diagonal from that point to the corner. You can cut it into thirds like Jackie did but I was a bit lazy – and rushed for time.  I was pleased with the green tree one.  You might see closer.  I used the 2 way glue pen on the centre of the stars on the tree and sprinkled on some Dazzling Diamonds.  It is better IRL.
 

Must rush!  I hope all your Christmas Cards are done AND sent!!!  Till next time.  Happy Stamping! (If you have any time for that at the moment???)