
cards

CHERRY COBBLER “MERRY AND TYPE”

Just a quick one today.  I thought I would show you this card that I have had for a few weeks to show.  This uses the new set “Merry and Type”.  It is loosely based on a card I saw on SplitcoastStampers a while ago.  It is a very simple card.
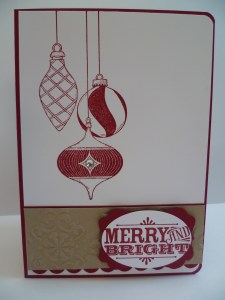
I stamped the baubles in Cherry Cobbler onto Whisper White card.  I embossed a strip of Crumb Cake ink with the Vintage Wallpaper Embossing Folder.  Behind this strip I adhered strips of Cherry Cobbler card.  The bottom one I scalloped the edge with the Scallop Border Punch.  This was then adhered to the Whisper White card.  I rounded the corners of this piece and the Cherry Cobbler Base card.  The greeting was stamped in Cherry Cobbler and mounted on a piece punched with the Decorative Label Punch.  I added a Rhinestone to the centre of one of the baubles.  So easy!  I think this is one that you could mass produce easily.

I’m off now.  See you again soon.

Jenny x

cards, Personal Ramblings, Punch Art

ANOTHER HAYWARD CARD!!!

This is becoming a regular occurence here.  My DH created another card yesterday.  He had to go to a wedding today and wanted to make the card.  The layout was inspired by a card I had saved.  I’m not sure who this was by but I have seen a number or similar ideas around.  Of course, we are using the Owl punch again – and these are very cute!  These aren’t the traditional colours you would use for a wedding card but they were chosen to co-ordinate with the outfits that Glenn and the person he was going with was wearing – don’t ask, long story!!

Here you are:

These owls took a little time to put together as they are a little fiddly.  I think the white breaks up the brightness of it a bit. I added the pearls to give it an elegant touch.

Card: Brilliant Blue (retired), Melon Mambo, Whisper White, Soft Suede, Basic Black, Crumb Cake and Real Red.

There you go another Hayward creation!!! I hope you like it 🙂

cards

POP-UP MERRY AND BRIGHT!!!!

I’m back!!!!!  Wow, it’s been a long 2 weeks without my usual blogging and blurfing.  I have really missed it.  It’s so good to be back online again.  I have been busy creating though.  It’s amazing how much you can achieve without being distracted by the computer!  I hope to show you some of the projects I have created over the next few weeks.  I think we are all getting in the mode for Christmas now with it fast approaching, so I will be showing you some Christmas cards – and mix it up with some other creations so you don’t get too sick of it!

For now I want to show you a card I made a few weeks ago.  This is using the new ‘Merry and Bright’ stamp set.

Here is the card.

This is called a Free-standing Pop Up card.  You can find the tutorial here.   Once you work out the folding, it is very easy to do – and it folds up flat to post.

For this one I stamped the ornaments once in Old Olive on the Whisper White card piece.  Then again in Real Red.  These were clear embossed and then cut out and layered onto the ornaments.  It is a bit hard to see but I stamped over the red base with the snowflake from Delightful Decorations.  A strip of red card was punched out with the eyelet border punch and adhered to the front of the box.  I finished it off with some Real Red narrow Taffeta ribbon and a Satin ribbon bow – and of course with some bling with the Dazzling Diamonds and Adhesive Rhinestones.

Thanks for stopping by.  I will be back again very soon with some more creations, so come and visit again soon.  Don’t forget to leave a comment – that’s always nice.  It’s nice to know you are not talking to yourself here!! 🙂

Jenny

cards

STITCHED STOCKING!!!

Just sneaking in while I have access to an ‘almost’ functioning computer.  I wanted to show you another card with the ‘Stitched Stocking’ Set.  I have used this set quite a bit this month and haven’t been able to show you very much, and this month’s promotion with this set is nearly over!

I CASED this card from Maggie’s blog here.   This is my card.

The card is Night of Navy and Baja Breeze.  On my card I embossed a square of vellum with the Vintage Wallpaper Embossing Folder and layered this on a scallop square cut from the Scallop Squares Duo.   I stamped the stocking twice and cut the cuff and heels from the second one and raised them with dimensionals.  I added the stocking loop and a Rhinestone for ‘bling’ factor.  The sentiment is from “Many Merry Messages” and stamped in Whisper White.  A simple card but still classy – I think!!!

It’s nice to be able to stop by and show you something.  I hope to be able to get back here in the next few days.  Hopefully our computer will be fully functioning by then!

I hope you are having a lovely weekend.  See you again soon,

Jenny x

cards

VINTAGE STOCKING!!

It’s that time of year to get started on Christmas cards.  It doesn’t seem that long ago that I packed up all my Christmas stamps from last year.  The year has flown by.  This card I have to show you today is using a very new stamp set.  The Stitched Stocking Stampset will be available in our upcoming Summer Mini Catalogue out on December 1st.  Since we all need to get our Christmas cards done now Stampin’ Up! have released this set as a special promotion during October.  You can order the Stamp set for $53.95 (wood mount) or $42.95 (clear mount), plus there is a matching punch.  Isn’t that great!  It saves you cutting out all those little bits by hand.  The Stocking Tag punch is available for $33.95.  BUT, you can get the BOTH for Free!  How????  Hold a workshop and if the sales are over $450 (not including Shipping and Handling) you get the both for Free!.  How good is that!  So you just have to have a workshop now don’t you?????

On with the card.  I went for a vintage style for this one.

I ran a piece of Very Vanilla card through the big Shot with the Vintage Wallpaper Embossing Folder and sponged over the edges with Crumb Cake Ink.  I layered this on Crumb Cake card and tied around some lace (my very last piece of this by the way.  Have to order some more).  Then I adhered this onto a Cherry Cobbler base.  I sponged a smaller piece of  Very Vanilla Card with Crumb Cake and stamped on the greeting in Cherry Cobbler from Teeny Tiny Sentiments.  I stamped the stocking twice on scrap Very Vanilla card and punched out the top and sole pieces of one stocking and raised them up with mounting tape over the other one.  I mounted this on the Very Vanilla card piece with mounting tape.  I applied Glass Glitter on the top part of the stocking with some multi-purpose adhesive.  It is a bit hard to see the shine of the glitter.

This is a very simple card really.  You know this stamp set and punch are great not just for creating Christmas cards.  You might have discovered other ideas in your blog travels.  I hope to try some other fun ideas with this soon, so I hope I can show you some of them.

So have you started your Christmas cards yet?????  It might be time to start!

Thanks for stopping by.  See you soon,

Jenny x

cards

MANHATTAN NEWLYWED!!!

I saw this idea a few weeks ago in my blog travels and have wanted to use it.  I finally got some time yesterday and created this card.

Card: Whisper White, Bashful Blue, Cheerful Treat DSP (hostess DSP).

Stamps: Teeny Tiny Sentiments.

Ink: Bashful Blue.

Other: Scallop Trim Border Punch, Modern Label Punch, Adhesive Pearls, White Taffeta Ribbon.

Do you notice the dress?? Check it out with a closer view.  Do you recognise it????

This was created with the Manhattan Flower Embossing Folder.  I found the idea on Amy’s blog here.  Although Betty Button was apparently the original creator.  The photo below shows the section of the embossing that you use.  Simply emboss the flower and turn it upside down.  The section is in the bottom right.

Now do you see it??  How clever is that.  Just cut around the outline of the embossed image and you have a gorgeous dress.  (Note:  Don’t worry about that extra embossed line above the top of the dress.  Just cut across the top of the dress.  I just realised I added that in).  I really like this idea.  Some people are just so clever!!!

Thanks for stopping by.  Enjoy your weekend.

Jenny x

cards

USING YOUR BLOSSOM BOUQUET TRIPLE LAYER PUNCH!!!

You might have seen these new Triple Layer punches in the Stampin’ Up! Catalogue.  They are great.  You can create various layers and patterns by assembling the punch outs in various ways.  I thought I would put together a chart to show you some of the ways you can layer these punches.  This is using the Blossom Bouquet Triple Layer Punch.  I used the colours from the Ice Cream Parlour ribbon and buttons that I had lying around.  They are Pacific Point, Old Olive, Melon Mambo and Daffodil Delight.  I hope you can see them clearly enough???

I think this is just the beginning of what you can do with this punch.  Maybe you can come up with some other suggestions.  Here are some close ups of some of them.

Apart from the various flowers you can create a tag  with the outer scallop and a centre.  You can pierce a hole in the top and add some twine to tie it on to your card or project.

Layer all the different punch outs together for a fancy flower, or create a cute embellishment to add to a card!

I had a lot of fun putting this chart together and I think it will be very useful.

This punch works differently to the other punches, so I came across a few videos on YouTube to see how they work.  You can check this one out here if you need some tips.

Have a play with this punch and see what you can create.

Have a great weekend.  We have a long weekend here, so I’m not sure what we will get up to.  I really hope I can get some stamping in.  With school holidays at the moment I am not getting much done.  That’s ok, we have been doing lots of other fun stuff!!

Thanks for stopping by,

Jenny x

cards

MOTORCYCLE MAN!!!

It is school holidays here, so not a lot of creating or time at the computer at the moment.  While I have a minute I thought I would show you a card I made a few weeks ago.  This was for my Brother In Law’s 60th Birthday in August.  This card was created using the ‘Motorcycle’ Stamp from the last mini Catalogue.  Unfortunately it didn’t make it to the new Catalogue.

I stamped the motorcycle in Black Staz On and coloured it in with the Real Red Marker.  Probably not very clear but I paper pierced all around the whisper white card and along the top and bottom edge of the Night of Navy Strip.  I tore the right hand edge of the Night of Navy Mat.  The DSP is from the Newsprint DSP from the last Catalogue which has now retired.  I tied some Night of Navy Grosgrain and twine around a clip to add some little embellishment.

I will show you a close up of the motorcycle.

I coloured parts of the bike with the Real Red marker, but then I ran over it with my Versamarker pen and clear embossed it.  It gives it quite a shine – if you can see it ok!!!!

I hope you like it.  Must run now though.  I am busy creating Christmas projects at the moment.  That’s a bit scary to think that Christmas is not that long away!

Stop by again soon,

Jenny x

cards

A QUICK BLOSSOM BOUQUET CARD!

Last Monday I got together with Andrea for our regular stamping day.  It was a shame that Leonie and Tracey couldn’t join us, but it was nice to just chat together.  I have to say though, we only created one card all day.  That doesn’t matter – it’s nice to just chill out and chat!!!

I brought along my new Blossom Bouquet punch.  It was good to have a play around with it.  It operates a little differently to the other Stampin’ Up! punches. If you would like to know how to use this punch then head over here to check it out.

This is the card I created.

The colours used are Confetti White, Baja Breeze and Crumb Cake.  The greeting is from the new Hostess set “Happiest Birthday Wishes”.

It was based on this card by Mary Brown at stampercamper.com.  Andrea had the card saved for her to CASE sometime.  The funny thing is when I got home and had a look I had saved the exact same card, so it was good to tick one off the list that we both had.

There are lots of ways to use this great punch and I am looking forward to using it a lot more soon.  As for now.  I’m off to bed- it is way late AGAIN!!!!

See you again soon,

Jenny x

cards, swaps

MY SWAPS IN RETURN!!!

Finally I can get back here.  This week has once again flown by.  Fridays come around so quickly!  Last post I showed you the card I created for my swap for last week’s Stampin’ Up! Regionals in Sydney.  I wanted to show you the cards I received in return.  There were so many that I have divided them into groups.  Sorry if it is a bit hard to see.  It is hard to capture the bling and detail on some of the cards.

"The flowery cards"
The Mixed Group
The 3D Swaps

There are a lot of creative ideas here with different ways of using a stamp or different layouts.  Swaps are great to be a part of.  I have to show you this card by itself though.  I have to say this is one of the stand-outs.  Not that there weren’t other really great ones!!!!!!

There are so many different elements to this card.  The light sponging, the subtle use of the “French Foliage” set (must add that set to my wish list!).  Notice the torn corner in the top right hand corner.  It is a subtle addition.  You can’t tell in the photo but the top 2 butterflies have been clear embossed and each butterfly was cut out.  That’s a lot of cutting for 20-30 cards.   I just don’t have it on hand to tell you the creator.  I will come back and edit this shortly to let you know.  I think this card will be added to my CASE file.

I hope you find these inspiring!!

See you again soon,

Jenny