Blog Hops, cards

IT’S SALE-A-BRATION TIME!!!

Yay! Sale-A-Bration starts today. It is a very exciting time because you get the free stuff! Gotta love that! You might be familiar with how it works, but if not here is the scoop ~

Sale-A-Bration runs from 24th January to 31st March.

Customers— For every $100 purchase receive your choice of an exclusive stamp set or paper pack or ribbon and brad pack AND they are gorgeous!

Hostesses— Receive a free Sale-A-Bration stamp set or ribbon/brad pack or paper pack with a $600 or more workshop, in addition to the normal Hostess rewards. Also, if your own order is more than $100 then you receive another Sale-A-Bration choice. As a hostess you get to keep the projects I make and you receive a current Catalogue for Free. Home workshops are a lot of fun!!

Recruits— Choose any current stamp set from the current catalogue for FREE when you sign up during this time. The Starter Kit is at a discount price of $249 – and you can choose the Stamp sets, Cardstock and Inkpads.

You can check out the choices by clicking on the link in the Right Hand side bar or ask me to send you a copy. OR Why not book your own workshop????

Here is a card I made last week with one of the Stamp Sets “Everyday Elegance”. That’s just one benefit about being a Demonstrator, you get to play with these early!!

This card was CASED from the US Demonstrator Magazine Stampin’ Success. It was actually a smaller card so I made mine a Standard size card. Since it was bigger I stamped another Swirly crown frame (if that’s what you want to call it!) underneath the pennant to fill up the space. I made the pennant longer and crimped near the ends. The frame is white embossed. I punched out a label with the Curly Label Punch and stamped the swirly label on the sides. I then cut it in half and adhered it either side of the pennant. I have used Lucky Limeade, Island Indigo and Pool Party. A little bling was added to the crown with an adhesive Rhinestone.

I really love this set and I have used it a lot already. I will show you some more creations in the coming weeks.

If you want to see some more creations today with the Sale-A-Bration products why not stop by the ESAD Sale-A-Bration Bloghop. I didn’t join in this time but you can start here at Nicole’s blog. I have just finished the bloghop and I am telling you these projects are awesome. There are some very clever ladies there. So stop on by – just have a little time up your sleeve though!! :)

See you again very soon with some more Sale-A-Bration creations.

Jenny x

cards, Challenges, Stampin' Up!

CHERRY COBBLER WEDDING INVITE!!

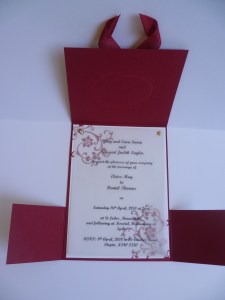
Recently Stampin’ Up! held a competition among the Demonstrators in Australia and New Zealand to create a Wedding Invitation.  Unfortunately I didn’t win.  I was happy with the end result but really with all the embossing on this card I don’t think you would want to make 60-80+ invitations of these.  I thought I would show you mine anyway.

I have used Cherry Cobbler and Whisper White.  The swirls are from ‘Elements of Style’. All of the swirls are stamped in Cherry Cobbler and clear embossed. That takes a little time!!  Before I stamped them though I dry embossed an oval on the top part with the Designer Frames Embossing Folder.  The greeting is from ‘Sincere Salutations’.  This was Gold embossed on scrap Whisper White and punched out with the Extra Large Oval Punch.  I added a bow with the Cherry Cobbler Seam Binding.  See the curled ends on the ribbon??  I wrapped the ends around a pencil and misted them with a little water.  Then I gave them a short blast with the Heat Tool.

This card is created with the Double Dutch Fold.  I found that on Splitcoast Stampers here.  It is a really cool fold.  Here is a different photo with the flaps open.

Here is the card open.  On the inside I stamped the swirls in Cherry Cobbler on Whisper White.   I made up a dummy invite for the competition.  I created this on the computer and then printed it out on Vellum.  This was attached at the top with Gold Brads.

I hope you like it.  I had a lot of fun creating it.

Before I go I wanted to say a HUGE Thank You to you all for your response and comments on my last post of the Tote Bag Tutorial.  I was so overwhelmed with the response.  Thanks so much.  I wanted to share this with you all –  my special blog readers.  I do hope you get to create one for yourself. If you haven’t seen it yet then just go back to the last post.

Till next time,

Jenny x

cards

FOR BABY LAYLA!!

I just wanted to stop by quickly and show you this card I created recently.  Just before Christmas we got a new ‘Great Niece’ to the family – gorgeous little Layla.  So I just had to make a card for the beautiful new arrival.

CARD: Whisper White, Pretty in Pink.

DSP: Flirtatious Specialty used for the paper and the doily was cut from one of the sheets and the edges sponged with Pretty in Pink.

INK: Pretty in Pink.

STAMPS: Stitched Stocking, Short and Sweet.

PUNCHES: Stocking Builder Punch, Scallop Oval and Large Oval.

OTHER: Pretty in Pink Grosgrain Ribbon, White Baker’s Twine, Perfect Polka Dots Embossing Folder.

I think that all covers it. 🙂

Don’t forget to grab your Stocking Builder Punch before they run out as this punch is not being carried over.  See you don’t need to just use it at Christmas time! If you don’t have a local Demonstrator contact me to order one for you and I can have it sent directly to you.

Ok, I better get going into the day.  I hope you have a good day.

Jenny x

cards

THE STOCKING BUILDER PUNCH IS GOING!!!

Stampin’ Up! recently announced that the Stocking builder punch in the current Summer mini catalogue will not be carried over into the New Idea Book and Catalogue in September.  PLUS  once current supplies of this punch run out it will not be continued.  So, it may not even last until the end of the Summer Mini catalogue at the end of March.

What does that mean?  If you haven’t got this punch yet, you better grab it now before it runs out.  This is a fun punch and co-ordinates so well with the Stitched Stocking stamp set available in the Summer Mini Catalogue.  This set and the punch are not just suitable for Christmas.  If you have been looking around the internet you will see some great creations using the stamp set and the punch for baby cards and other ideas.

So, what are you waiting for?  You can order the punch from me for $33.95 plus Shipping and Handling.  I can have it sent directly to you.  Don’t delay or you will miss out.  Here is a Christmas card we made at my Christmas Bling class a few weeks ago using the punch and the stamp set.

The row of Champagne Glass Glitter can be added by running a strip of Sticky Strip or a line of Tombow Adhesive and then sprinkling over the Glitter.   The card had been run through the Big Shot with the Lattice Embossing Folder.  The loop is made using Gold cord (retired).

Next week I will show you a cute baby card that I created using the punch and stamp set so watch out for that.

See you with more stamping in 2012.

Jenny x

cards, Techniques

A NEW TECHNIQUE PERHAPS???

I was stamping one of the ornaments from Delightful Decorations a few weeks back and found it came out really strange.  I thought at the time it was my inkpad that desperately needed re-inking.  I really liked the pattern though.  Check it out –

Isn’t it a groovy pattern???  I thought it would make a great tag or something and so I just put it aside to look at later.  I pulled it out again this week and had a closer look.   It was a scrap piece of card that I used and had previously ran some adhesive over the card to stick it down to something.  It was just the glue stick variety adhesive.  I didn’t end up using the card then.  Where I had glued was where the lighter part of the image was.  The adhesive resisted the ink slightly.

I call this my “Adhesive Resist” technique!  LOL  So, do you think it will catch on!!! Maybe I will have to try it again sometime?? I thought it would be a fun thing to show you.

I hope your Christmas preparations are going ok?  Mine are VERY slow going?  I still have presents to wrap, but we put some lights up on our house today.  That was a first!

Happy Christmas to you all,

Jenny x

cards, Classes

DASHER WITH LOVELY AS A TREE!

Just a quick post today.  I wanted to show you this card, I think it is one of my favourites from my Christmas Stamp-A-Stacks over the last few months.

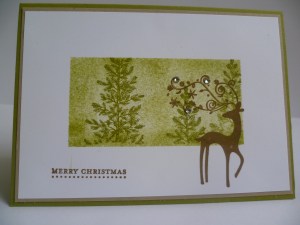
Sponging and masking – 2 of my favourite stamping techniques together!!!  I CASED this from Crafterbobbie on Splitcoaststampers.  I changed the colours and the greeting used.  Colours are Old Olive and Crumb Cake.  I also used Soft Suede instead of the Crumb Cake on some of the cards we did.  This is very easy to create.  To create your mask take a piece of copy paper the same size as your Whisper White card, cut a rectangle from the centre.  Add dotto to the back of the copy paper piece and add to your White card.

Stamp the tree from ‘Lovely As A Tree’ in Old Olive several times.  Offset the tree each time and re-ink before you stamp.  Sponge in Old Olive around the trees while you still have the mask in place.  Remove the mask and remove any adhesive residue from the white card using your trusty Adhesive Remover (something I have on my desk all the time when I stamp!).  Stamp up Dasher in the bottom right corner in Soft Suede and your greeting in the bottom left.  Adhere this to the Crumb Cake (or Soft Suede) mat and then to the Old Olive base.  Add some bling to Dasher’s Antlers with Adhesive Rhinestones.  See, easy!!

Don’t forget, you still have time to enter my blog giveaway for 20,000 hits.  I know it is a small number compared with some blogs, but I am excitied! When I started this I really didn’t think I would get many people stopping by my corner of blogland, so it is nice to see that people do stop by.  So to celebrate I wanted to say ‘Thanks’ by giving away a little prize.  See the previous post for details, or if you are subscribing you can check the details here.  You have until tomorrow night (Sunday night – Australian time).

Thanks for stopping by today. I hope things aren’t too frantic with all the Christmas preparations.  I still have wrapping to do and the cards to write.  I think I might put 2 elves here to work!!!!

Enjoy the rest of your weekend,

Jenny x

cards

MARINA MIST FLOWER GARDEN

I am just taking a break from sharing Christmas projects today as I wanted to show you this card I created recently.  This uses the new ‘Flower Garden’ Embossing Folder from the Summer Mini Catalogue.

I have embossed the Flower on Very Vanilla Card and inked the centres of the flowers with the daubers and Marina Mist inkpad.  The ‘celebrate’ is from my new favourite stampset “Fabulous Phrases”.  The vanilla card was matted onto Marina Mist card and then some Wide striped Grosgrain Ribbon in Marina Mist was tied around.  This was all added to a base of Soft Suede.  I just added an Adhesive Pearl in the top right hand corner.

Have you seen the new Summer Mini Catalogue yet???? Contact me and I can send one out to you (Australia only), or click on the link in the right hand column to see it online.  There are lots of new fun goodies in this one!

I hope your week is starting off ok??  Thanks for stopping by and I will see you again soon.

Jenny x

cards

“50TH WEDDING ANNIVERSARY – BAROQUE MOTIFS STYLE!!”

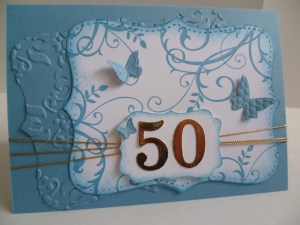
Our next door neighbours recently celebrated their 50th Wedding Anniversary.  It was such a great milestone I wanted to make a card to mark the great occasion.  It was a couple of weeks ago now but they have been away to celebrate so I have only just made them the card AND I really didn’t know what I was going to do for it.  I have been pondering on it for a while and I went searching and I still wasn’t sure.  Then I found this idea on SplitcoastStampers.  (Oh how I love that site.  It always gets you out of trouble!!!!).  I was inspired by a design I saw by sillyfilly there.  I liked the idea of using the Top Note die.  I dug out my poor neglected Baroque Motifs set.  This set always comes to the rescue too.  This is what I came up with.

CARD: Marina Mist, Whisper White, Gold card (non-SU!)

STAMPS:  Baroque Motifs.            INK: Marina Mist

OTHER: Top Note Die, Big Shot, Decorative Label Punch, Beautiful Wings Embosslits, Vintage Wallpaper Embossing Folder, Medium Sizzlits Die, Gold Cord (retired),

I even did the inside, although it is not very exciting!

Thanks for stopping by.  I hope your week is going well.  Stop by again soon.

Jenny xx

cards, Techniques, Tutorials

“SPARKLY TREE”

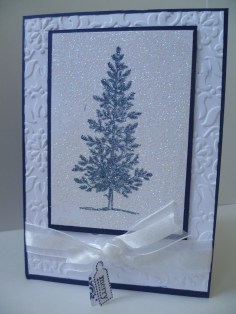
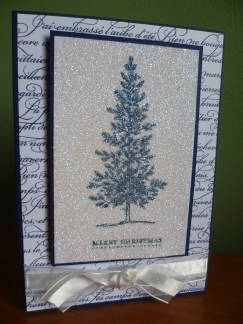
This post has been a while in the making.  I can explain and you might understand!!  A couple of weeks ago I had my ‘Christmas Bling Class’ and we did some fun cards using bling in different ways.  Christmas is a great time to go overboard with the ‘bling’.  I might show you some of the cards we did later, but this particular card got some attention.  This is a card I had as a sample but everyone wanted to know how I did it.  As time is running out to fit in another class, I promised them all I would do a tutorial on my blog AND now you can all benefit too.  So, finally here it is.  Now what has taken so long is that I needed to recreate the card to get some step-by-step photos.  Well, as what normally happens, it just wasn’t coming together right.  So I have had to redo the card AGAIN.  So ladies, I hope you appreciate this 😉

This is the original card. It is hard to see the sparkle in this photo but the whole tree panel is all sparkly!  Read on to find out more.

This glitter panel is created with Heat and Stick Powder and Dazzling Diamonds.  This really adds an impact – I think!  I am going to outline how to do this technique if you are not familiar with this.   Now I am a bit of a lazy stamper so I will also let you know a cheat step at the end.

Before you start here are some helpful tips:

Make sure you have a sticky versamark pad.  It really makes a difference.  That was where I went wrong when I first recreated this card.  I realised I was using an old Versamark pad and it was a bit dry.  Also, have your powder and Dazzling Diamonds ready to go so you can apply them straight away.

So, here you go:

GLITTER PANEL TUTORIAL

You will need:  Your stamped image, A versamark stamp pad, Heat and Stick Powder, Dazzling Diamonds, Heat tool.

1. Swipe your card firmly with your stamped image with the Versamark Pad.  Be careful to just touch the sides of your card with your fingers so you don’t wipe off any versamark from the card.

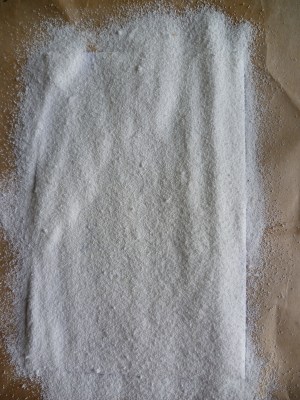
2. Pour over your Heat and Stick.  Yes, you want a good coverage!

Tip off the excess and tip the extra back into your container.  Heat the Heat and Stick with the Heating Tool to melt the powder.

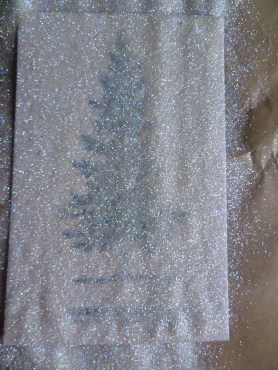
3. While the Heat and Stick is still hot and melted pour over your Dazzling Diamonds.

Pour off the excess back into the container and Heat set again with the Heat Tool.

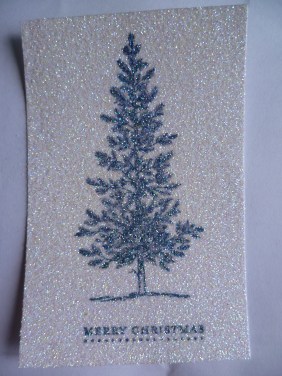
4.  The glittery panel is done.

CHEAT TIME:

Sometimes I cheat a bit to save time.  You can combine the Heat and Stick and Dazzling Diamonds in a container about equal amounts.  After you swipe your card with versamark then tip the mix over your card and heat it all in one go.  It does work although it may not be as sparkly!

And so for the finished card:

Psst! See the dark green behind the card.  That is my wall in my craft room.  It is a bit darker than in real life.  I have just taken photos of my craft room when I tidied up recently so I am going to post those soon.  We all like to spy on other stamping areas don’t we? So stay tuned for those very soon!

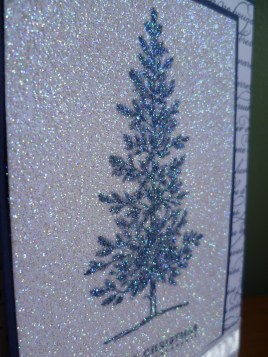
Anyway, here is a close up of the finished card.

Oooh! Sparkly!!!!

Now it is your turn.  Why not have a go at this technique yourself.  Send me a photo of your card.  I might show them off here.  I look forward to seeing them.  Maybe I will have to dig up some blog candy!! 🙂

See you soon,

Jenny x