cards, swaps, Techniques

A DOILY SWAP!!

Last Saturday was the Stampin’ Up! Sydney Regionals.  This is a great day meeting up with other demonstrators, seeing some fantastic new techniques and checking out some new products.  Part of the fun of these events is the swapping.  I can now show you my swap  card I created.

This is using the emboss resist technique (I have explained this below).  I was inspired by a similar card by Rhonda Wells I saw in my blog travels.  I found her card shown on another blog (which I don’t remember where now and I couldn’t find a blog for Rhonda).  Her card had a white base under the coloured card and coordinating ribbon.  I used the new Dotted Ribbon punch instead.  I was going to put it on the white base card but I liked it without it.   I did various colours as shown below.  Sorry the photo is not very bright.  It was 10pm the night before Regionals.  I had only just finished them!

Here are the others close up.

Rich Razzleberry and Regal Rose.

More Mustard and Lucky Limeade.

So which colour do you like best???  I liked the Wisteria Wonder myself but I was quite impressed how well the More Mustard turned out and that was quite popular.

To create the card:

Stamp the large doily in Versamark on Whisper White Card.  Clear emboss this.  Stamp the small doily in Wisteria Wonder (or colour of your choice) just to the right side of the embossed doily.  Sponge over ink on the large doily.  Wipe over with a tissue to polish it off.  (The colour really lifts in doing this).  Add your greeting (for this card I used a greeting from ‘Just Believe’) and adhere the white card to the card mat in a co-ordinating colour.  Add a strip of card down the left hand side which has been punched with the dotted ribbon punch.  Add an adhesive rhinestone to finish it off.  It is a very simple card and does look better in real life!!!

I received some great swaps in return so I wlll show you these next time, so make sure you stop by again soon.

Until next time,

Happy Stamping!

Jenny x

cards

A POOL PARTY DOILY!

This was a quick card I made last week using the “Delicate Doilies” stamp set.  I’m really loving this set.  It is so versatile.  You can create really elegant cards or really bright, funky cards. This set is a lot of fun to use.  For this card I used one of the new In Colors – Pool Party.  It is a beautiful soft green colour.

I stamped the large doily in the centre of the Card base with black Staz On.  I adhered a strip of Basic Black card across the centre.  A smaller doily was stamped on whisper white card in Black Staz On and then punched out with the 1 1/4″ circle punch.  A circle was punched out of Black with the 1 3/8″ circle and the two were adhered together and mounted with dimensionals over the black strip.  A large self Adhesive pearl was added to the centre.  The greeting from Sincere Salutations is stamped in black Staz On near the bottom of the card.  To finish, I rounded the right-hand top and bottom corners of the card.  This card really didn’t take long at all to put together. The inspiration for this card was from a card I saw on SCS.

Thanks for stopping by.  I have 30 unfinished swap cards sitting here and I’m really hoping my order comes in tomorrow so I can finish them for Saturday.  Otherwise, I might have to quickly modify some things!!!!!!!!

Jenny x

cards

A QUICK DELICATE DOILIES CARD!!

Just stopping by quickly.  Last Saturday was my Catalogue launch and Sale.  It was a great day.  I have been meaning to get here since but life has been a little busy.  I just wanted to show you the card we did as a Make and Take.  I used the beautiful new set, Delicate Doilies.  I’m really loving this set.  I have used it quite a bit now already and it is fast becoming a favourite.  There are so many techniques you can use with it.  This card was a very quick card, but shows just how lovely even a quick card can turn out.  Here is the card we made.

This card was inspired by a card I saw on SCS by Sandie Murphy.  I changed the colours around and the greeting.  I have used 2 new In Colors here, the Lucky Limeade and Wisteria Wonder.  I alse added Regal Rose.  I like how they work together.  This was layered on Lucky Limeade card and a Wisteria Wonder base.  The greeting is from Party This Way and stamped in Wisteria Wonder and then punched out with the Word Window Punch and then Wisteria Wonder punched out with the Modern Label Punch.  I’m sure by adding a few Rhinestones to this it will “Bling” it up a bit too!!!!!

I hope you like??  Thanks for stopping by.  Have to fly.  I have just started my swaps for our Sydney Regionals (which by the way is using this set, so stay tuned!), so I have to keep going.

Stop by again soon,

Jenny x

cards

ONE FOR THE BOYS!!

Yesterday I had my Card Class where we focused on cards for the boys.  Masculine cards are usually hard for everyone to do.  We can’t tizz them up with ribbon and bling like we do for the girls cards.  So in this class we created 2 cards and a tag.  For the boys cards sometimes we need to focus on using different techniques, add distressing and inking and you can replace the ribbon for twine.  I wanted to show you one of the cards we did in the class which was very popular.

The original card idea came from Linda here at Polka Dots and Paper.  Now I couldn’t find the card when I went back to it, but this is her original card.

I liked the idea of the embossed foil and creating the spanners with punches.  How neat is that!!!  So, here is the card we did. I simplified it a little from the original.   It was a bit hard to take a photo as you kept getting the reflection off the foil, but I think you get the general idea.

To create the foil mat, adhere regular kitchen aluminium foil to a piece of card.  I used Whisper White.  Then run the piece through the Big Shot with the Perfect Polka Dots Embossing Folder.

Then you can create your spanners.  I played around with the punches for a bit to get the right sizes.  Here are the punches used: Boho Blossoms Punch, 3/4″ Circle Punch, Word Window Punch and 1″ Circle Punch.  The strip is a piece of Crumb Cake card measuring 8cm x 1.3cm.  This was scored at 1/2 cm on the back to create the groove.  All the pieces were sponged with Soft Suede ink along the top edges.

The greeting from Teeny Tiny Sentiments was stamped in Soft Suede and punched out with the Word Window Punch, and then a piece punched out with the Modern Label Punch.  The spanners were raised up with dimensionals.  The aluminium piece was adhered to a Soft Suede mat and then Crumb Cake base.

Now I have to add that in last night’s class I had a couple of late cancellations, so instead of cancelling it Sarah dragged, bribed, or brought willingly her hubby along.  (I’m not sure which one of those it was!!!).  He was such a good sport though and even joined in.  He has a card done ready for his Dad for Father’s Day.  Well done Trevor, you did a great job.  Thanks for joining in.

I really shouldn’t be here right now.  We have our school fete on this Sunday.  I am nowhere near ready.  I haven’t done nearly as much as I wanted to and we have a family 60th today. So I better get moving.

Stop by again soon.  I love you visiting my world.  Add a comment to let me know you have been.

Have a good weekend,

Jenny

cards

GOOD-BYE “EXTREME GUITAR”

Just a quick post for you.  I have been meaning to get back here all week but it has been one of those weeks!!!  This card is one we did last week at my “Last Hurrah” class using Extreme Guitar.  I am really sad to see this stamp go.  It is so great for those teen boys.  I have used it a lot and I don’t think I will be getting rid of it in a hurry.  There are too many teens in our family so it will be getting a bit of a work-out still.

For this card I teamed it with the retiring Sanded Background stamp.  (I love that stamp too.  It works so well for male cards).  I have also used the spiral punch.  (That will be missed as well).  Here is the card for you.

Adding Extreme Elements and Short and Sweet, and tying around some twine finishes it of.  A very quick card to put together.  What a sad good-bye!

Have you got these items yet that are retiring?   There is less than a week left now of this current Catalogue. Unfortunately the Sanded Background stamp and the Spiral punch are sold out so be quick to get this Extreme Guitar stamp.  I can assure you it will be well used for those teen cards.  Don’t leave it too long though.

I am off now.  Busy day tomorrow and weekend ahead.  I will be back with more creativity early next week.  Have a good weekend and I hope you have time to stamp.

Jenny x

3D projects, cards

GOOD-BYE “HELLO AGAIN”

That title sounds a contradiction doesn’t it???  The stamp set “Hello Again” is another retiring set.  I have to say I haven’t used it a lot since I got it.  Last week I had my “Last Hurrah” class to say Good-bye to some of the products that are leaving us.  I chose this set to use and I had a lot of fun putting this together.  Everyone got to make this mini card folder and a set of Love note size cards.  Here is the set together.

A close-up will make it a bit easier to see!

There were 2 cards in Pretty in Pink and 2 in Rich Razzleberry.  The little box frame was created by inking up the clear block and stamping on the Whisper White card.

On the flower card, I stamped first with Old Olive onto the card piece and then with Rich Razzleberry and again with Pretty in Pink onto scrap card.  The Razzleberry flower was punched out with the 1″ circle punch and the Pretty in Pink was punched out with the small circle on the Owl punch.  On the other card I added some bling with the Adhesive Rhinestones on to the greeting strip. This was punched out with the Word Window Punch and then the Modern Label Punch.

Here are the Rich Razzleberry cards.

Both of these have bling added with either Dazzling Diamonds or a Rhinestone.

Now for the pouch that the cards go into.

The pouch was inspired by one that was made as a Make and Take at the US Convention last year.  It was for little ‘Inchy’ cards.  I adjusted this to fit the 3″x3″ Love note size cards.  I forgot to take a photo of it open but it just folds up. The flap is cut to a point.  This tucks into a slot created with the Word Window Punch.  The ribbon is stapled onto the flap and tied in a knot.

This is a great little set to play around with and it is a bargain at the moment.  This set is 25% off so you can grab it for only $16.46.  You have to be quick though.  Some of these retiring items have sold out already.   Have you checked out the retiring list yet??  If not, then check it out here.   Don’t wait around though, these items don’t last long.  Contact me to place your order if you don’t have a local demonstrator.

We did make another card at last week’s class but I will show you that next time.  That’s enough from me today.

Have a good weekend.  It looks like it is going to be a wet one here this weekend.  Mmm, maybe some stamping time!!!!

Stop by again soon,

Jenny

cards

GOOD-BYE “FRIENDS 24/7”

Friends 24-7 is another set retiring at the end of the month.  I don’t have this set but I used it one time from my lovely ‘Great’ Upline Ness.  This was well over a year ago now.  I stamped it all up and had ideas for it, then it sat on my desk unfinished for weeks, or more like months.  It just wouldn’t come together.  I played around with it a few times.  In the end I was sick of seeing it and just did something with it.  It is ok I think!  Anyway, here it is.  I think it was my first attempt at a vintage style card.

Stamps: Friends 24-7, Sanded (it’s a bit hard to see but this was stamped on the Baja Breeze strip).

Colours:  Pretty in Pink, Baja Breeze and Chocolate Chip.

Other: 1 1/4″ Circle Punch, 1 3/8″ Circle Punch, Sponges.  Baja Breeze Satin ribbon (from Ribbon Originals 2009-2010).

I had stamped the bird on the branch twice, once in Baja Breeze and once in Chocolate Chip.  I cut the Baja Breeze bird out and adhered it over the Chocolate Chip image using mounting tape.

We say Farewell to “Friends 24-7”.

Hope all is well in your part of the World.  Thanks for stopping by and hope you stop by again soon.

Jenny x

cards, Techniques, Tutorials, Uncategorized

MOTHER OF PEARL FLOWER

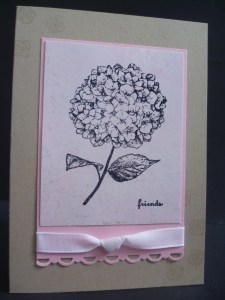
I wanted to stop by today and show you another Mother Of Pearl Technique card.  I created this card a few works ago as a Make and Take at a workshop.  I outlined the technique in the last post of the ‘Sail-Away’ Mother of Pearl card.  This weekend I took some photos while doing this technique again to help explain this a little easier.

Firstly,  here is the card.

The background is sponged with Pretty in Pink ink after creating the Mother Of Pearl.

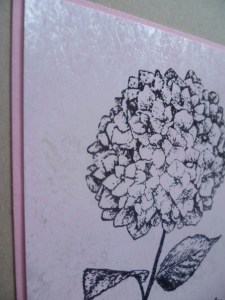
Here is a close-up.  You can see the shimmer!

Here is the technique again – with photos this time!!! 🙂

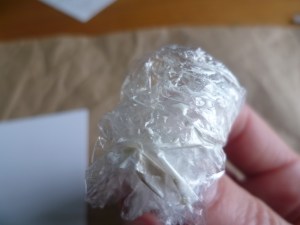
Pour out a little white shimmer paint on acetate or plastic lid.  Form a ball from Cling Wrap and dab into the paint.  You only need a very little.

Dab the ball of Cling Wrap over your Gloss card.  You don’t want to cover the card entirely.

This is what the card looks like when finished dabbing over the Shimmer Paint.  You need to leave this to dry or heat it with the Heating Tool.

Once dry, you can sponge over ink in what colour you choose.  Here I have used Pretty in Pink.

Give the card a polish over with tissue.  This really brings out the shine.

(Sorry the photos aren’t very clear.  It was quite overcast when I took them, but I hope it gives you some idea!)  🙂

Now once the card is prepared you can stamp the image on.  Remember to use Staz-On.

Now you know how it’s done you can get creating.  If you are in need of Shimmer Paint and you don’t have a local demonstrator, then let me know and I can order some for you.

Have a good day,

Jenny x

cards, Techniques, Tutorials, Workshops

MOTHER-OF-PEARL SAIL AWAY!

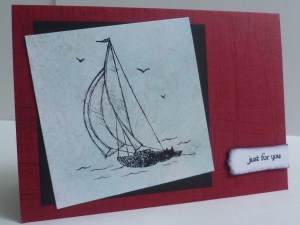
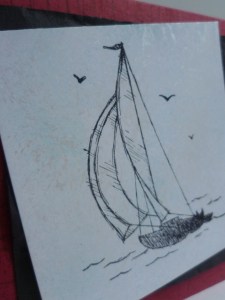
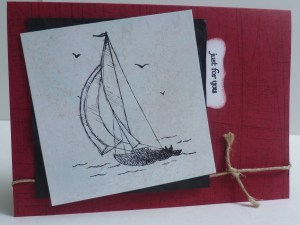
I thought with school going back this week that I would have lots of time to get back here, but I don’t know what happened.  Here it is the end of the week already.  I wanted to show you another card I have made using the fantastic stamp “Sail-Away”.  This one I created a couple of weeks ago for a workshop I did.  This is a great technique to use with this set and is so easy.  Here is the card.

If you are not familiar with the Mother of Pearl Technique, then I will describe how to do it below.  For this card, I used the sanded backkground on the Cherry Cobbler.  The greeting is from “Teeny Tiny Sentiments” and punched out with the Modern label Punch.  To stamp the boat I used Black Staz-on.  It is really important to use Staz-on as it is Gloss Card.

Here are the instructions for Mother Of Pearl Technique.  It probably would have helped to have some photos to help BUT I didn’t think of that this time.  So I hope you can understand it.

MOTHER OF PEARL TECHNIQUE

First off,  you need Gloss cardstock, white shimmer paint and a small piece of cling wrap.

I poured a small bit of shimmer paint onto some acetate.  You could use a plastic plate or even the plastic cases from your stamps. (you can easily wipe this off them when you are finished).  You don’t need a lot.  A little goes a long way!  Scrunch your piece of Cling Wrap into a ball and lightly pounce the ball onto the shimmer paint to pick some paint up.  Lightly pounce the ball onto the piece of Gloss cardstock.  You don’t want to completely cover the card, just in patches.   (Hope that makes sense!!).  You need to let the paint dry.  You can use the heat tool to speed up the process if you are impatient like me 🙂  Once dry you can sponge ink over the card.  (On this card I sponged with Baja Breeze). Then polish the card with a tissue.  This really brings out the shine.  Here is a close-up of the card.  (Not all that clear really, but I hope it helps a little).

Here is a stepped up version of the card.

On this one.  I scrunched up the Basic Black cardstock before adhering it to the card.  But before adding this I punched out the sentiment with the Curly Label Punch and adhered this under the Black piece and added some twine.

Using this technique I created another card which I shall show you next time.  Thanks for stopping by and please say ‘Hello’.  It’s nice to know I’m not talking to myself here.

Until next time,

Jenny x

cards, Challenges, Tutorials

INKSPIRATIONS CHALLENGE #77

I thought I would have a go at the Inkspirations Challenge for this week.  The sketch looked interesting.  You can check it out all the great entries here but here is the sketch.

I tossed a few ideas around.  Then I decided on this.  It is a different style of card but I think it still fits the sketch.  Here you go!

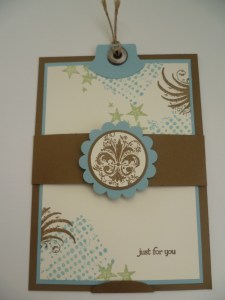
I call it my Tag Card.  I don’t know if it has any other name.  This is the size of a standard card  BUT Look ~~~

You can pull up the card. I thought it would be good to make something different – and it is a bit manly. Do you think?????

The stamps used are Extreme Elements and Teeny Tiny Sentiments for the greeting.  Colours are Soft Suede, Baja Breeze and Certainly Celery.  I added an eyelet to the top tag pull.  Here are the measurements:

TAG CARD

Card Holder: 14.4cm x 10.5cm.  (I made this slightly smaller than a card to allow for the tab if you wanted to use an envelope).

Centre Strip.  21cm x 3cm.  (You could just have a shorter strip that runs across the front and adheres just around the back.  I used the longer strip to wrap right around the card from the back and joins at the front.  Just to look neater.  The strip doesn’t quite join at the front so I just joined it with a short piece.  You can’t notice that under the scallop!).

Card:           Mat – 13.4cmx9.5cm.             Card – 13×9.1cm.

I was a bit bothered about the card staying in the holder, so I punched out a small oval from Soft Suede.  This was folded in half and then 1/2 adhered on the back with Tombow and then at the front I added small dots of Tombow glue at either end of the front half so the card will slip in at the top of it.  (Does that make sense???) .

There you have it – my entry for the Inkspirations Sketch Challenge #77.  I have to say though, it is nothing fancy compared to those other gorgeous creations over there.  Go on over and check them out.

Thanks for stopping by today.  Come back soon  🙂

Jenny x