
cards, Tutorials, Uncategorized

IT’S A GIRL!!!

Recently we had some friends who had a new baby girl and I needed to make a card.  I haven’t had to make one of those cards for a long time.   I don’t have any cute little kiddies stamps, let alone baby stamps.  A long time ago when I made some baby cards I used to make these cute little nappy (diaper) cards.  So, I thought I would do another one of those, with a few additions.  I still had some nappy cloth.
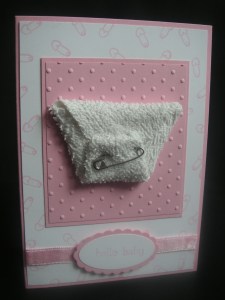
I used the little nappypin from ‘Short and Sweet’ to create some background card on the Whisper White cardstock.  I ran some Pretty in Pink card through the Big Shot with the Perfect Polka Dots Textured Impressions Folder and layered this on some more Pretty in Pink card. I created the nappy (diaper) using the kite fold.  I have the instructions below for that.  I adhered this using Tombow adhesive, but Sticky Strip would work.  I stuck a safety pin through the top layer.  I don’t think many people use nappy pins anymore!!! I wrapped around some Pretty in Pink Taffeta ribbon.  Then punched out the greeting from Teeny Tiny Sentiments with the Large oval punch and Scallop oval punch.  I think it is quite cute, for a very cute little girl!!!!

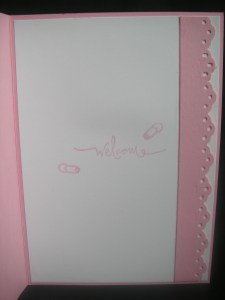
This is the inside of the card. Just a very simple strip of Pretty in Pink punched with the Eyelet border punch and layered on some Whisper White cardstock.
Here is the Kite fold nappy (diaper) that I did.  I have used paper to show this here.  Cut a piece 8cmx8cm.

Fold 2 of the corners in to the middle.
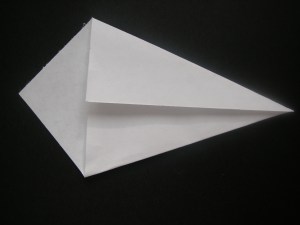
Fold 2 corners in to the middle.

Fold down the top edge over the 2 folds.  Then fold up the bottom point.  I tucked the pointy end under.
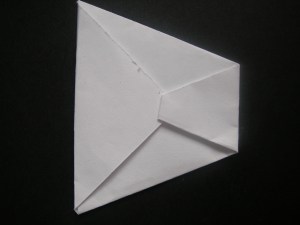
There it is!!!

Hope you enjoyed this card???  I better go and do something with my day!!

Have a Happy day 🙂

cards

FOR THE HAPPY COUPLE!!

I had to quickly whip up an engagement card for some lovely friends of our’s.  It was the same couple I recently made the housewarming card for here.  Isn’t it always the way – they get the dog, the house and then get married!!!  I didn’t have any specific stamps for engagement so I wasn’t sure what to do.  I came across a card similar to this the other day in my blog travels, but I’m not sure where it was now.  I did change it a bit.  I dusted off the old Baroque Motifs set which I haven’t used in ages.  It always gets you out of trouble!  I hope it wasn’t too pink for them!

Stamps: Baroque Motifs, Warm Words, Teeny Tiny Sentiments.

Ink: Pretty in Pink, Rose Red.

Card: Rose Red, Pretty in Pink, Whisper White.

Other: Eyelet border punch, Boho Blossoms Punch, Scallop Oval Punch, Big Shot – Lots of Tags, Pretty in Pink Taffeta ribbon, sponge, 2 way glue pen, Dazzling Diamonds. 

Here is the inside.

I should have taken a photo of a close-up of the flowers and forgot.  I punched out the flowers with the Boho Blossoms Punch, and sponged the edges.  I layered them together and then added some DD with the 2 way glue pen.  Just a bit of bling for the happy couple!

It was sent off today, so I hope they liked it.

Thanks for stopping by.  🙂

cards

A SCALLOPED EASEL!

It is my Mother-in-Law’s birthday today.  I knew she would be expecting something special, so the pressure was on!  Her favourite colour is red so I wanted to use this colour.  After much contemplating and hours trying to put this together, I finally finished!  AND she was pleased!!!!

Here it is.

I created a standard easel card base, but for the top I cut a scalloped circle using the Big Shot.  The flowers were made using the 2-step Bird Punch.  The Whisper White circle was cut with the Circle Scissors. I then ran it through the crimper one time then turned the circle 1/4 turn and ran it through again to create a faux seersucker effect, if that is what you call it.  The sentiment is from Teeny Tiny Sentiments from the Autumn Mini.  So, what do you think?

Thanks for stopping by.  Enjoy the rest of your weekend.

cards

A SCALLOPED CARD!!

At last week’s team meeting, the lovely Andrea showed us how to make these cute scallop circle cards.  They are created using the Big Shot and Scallop Circle Die.  Aren’t they gorgeous???

They are so simple.  This one is made with the Raspberry Tart DSP. I have used the ‘Vintage Vogue’ Stamp set too and rock and rolled the flower in Pretty in Pink and Rose Red.   Full instructions on how to make this card can be found here on Andrea’s blog.  So go and stop by there and check them out.  Check all the other beautiful creations that Andrea does while you are there.

Now I must run.  We have an early start tomorrow to head to QLD. 

Happy Stamping!  🙂

cards, Challenges, Techniques

RAZZLEBERRY MEDALLION SKETCH CHALLENGE

It has been some time since I have been able to play in a challenge.  I have wanted to take part in the Just-Add-Ink Challenges since they started, so I have finally had some time.  This week was a sketch challenge.  You can see the sketch here.

This is my completed card:

I used the Medallion background stamp for this.  The scallop border was created using the Scallop border punch.  The clever Marelle Taylor explained how to do this using the scallop circle.  You can check that out here.  It is the same principle just carefully snipping very close on every 2nd scallop.  I added dots on each scallop using the signo white gel pen.  The card is very simple.  Here is a close up of the ribbon though.

To create the bow I used 3 different lengths of the Polka Dot Rich Razzleberry ribbon.  The first length I wrapped around the front, the second piece I cut points on each end and then adhered this to the middle of the other ribbon.  Then I looped another piece and put Sticky Strip on the back of the ribbon to hold.  Then stuck this on using Sticky Strip.  I adhered some of the Cottage Wall DSP to the back of a clear button and then cut around the button.  The sentiment is from “Teeny Tiny Sentiments”.   I stuck this on using Sticky Strip too. 

So, my first Just Add Ink challenge completed.  I hope to have time to play again soon.  They are such fun and a great way to extend your creativity. 

Happy Stamping  🙂

cards

A NEW HOUSE!!!

Just stopping by quickly.  I have to confess I haven’t done any stamping ALL week.  My husband has been off on Long Service Leave for SOOO long.  I think it has been 7 weeks now.  He still has 5 weeks to go.  (I am going a little insane here!!!)  SHH!  Don’t tell him. 

 I thought I would show you this card I made a couple of weeks ago.  We have some friends who recently bought a house – finally!!  They have been trying to get in the market for so long and if you know what the Sydney market is like you know what a difficulty that is.

Now, the paper is not Stampin’ Up! (shhh!).  I was clearing out some stuff.  It matched so well with the Close to Cocoa and Sage Shadow cardstock.  I wheeled the Neighbourhood wheel on Whisper White twice.  I cut one out and coloured it using the markers.  This was raised up with mounting tape.  The sentiment is from Teeny Tiny Sentiments.  I love that set.  It is so versatile.  On the ‘Just for You’  stamp I inked up the ‘for you’ with the close to cocoa marker and punched it out with the Circle Tab punch.  I stuck that under the main panel.  I punched out the small star in So Saffron and inked the edges.  Then added a brass brad and raised it up with mounting tape too. 

Now for the inside.  Just simple.

I just wheeled the house again and coloured it and cut it out. 

Well, I hope I get time to stamp this week or I won’t have anything to show you will I?  Just need to get hubby busy!

Happy Stamping!

cards

VINTAGE COTTAGE GARDEN!

I had time to stamp for myself the other day which was so nice. I have been inspired by all the beautiful cards created with the Vintage Vogue set from the current Autumn/Winter mini. As yet I haven’t got that in my collection, so I played around with what I had. Here is the end result.  WARNING:  Anyone with an aversion to pink (*Lynda*) should look away now!!!

I stamped the leaf from “Fresh Cuts” in Pretty in Pink around the edge of Whisper White card and then sponged the edges.  I did the same with a smaller piece of Whisper White.  On this piece I stamped the words from Cottage Garden in Rose Red.  I inked up the Sanded background in Pretty in Pink ink and kissed the solid flower from Cottage Garden set.  This gave a different effect to the flower.  I inked up the small flowers in Rose Red and cut the larger one out and adhered this to the centre of the flower.  I raised up the flowers with mounting tape.  With the ribbon I adhered sticky strip along a strip of white card and ruffled up the Rose Red grosgrain ribbon onto it.  I added some glue dots on the outside to help hold it into place.  I then adhered the strip onto the card.  I did the ribbon separately as I was a bit worried about messing up the whole card if I got the ribbon stuck on wrong.  You could stick it straight on if you were feeling brave!!

Here is a close-up of the flowers.

To finish off, the inside:

I hope you like my version!!

Happy Stamping!  🙂

3D projects, cards, Workshops

IT’S GETTING CLOSE!!!

Can you feel the excitement????  It is only 3 sleeps till we leave for convention.  This is my first convention, so I’m so excited! It will be so good to get away with my best stamping buddies.  We are going to have such fun. 

The last week or so the cardstock has been flying around here trying to get my swaps done.  I put the last ones together today!!! Whoo Hoo! I’m so relieved.  But, I can’t show you those yet.  I just have a few other things to do now and then I’m off.

Thought I would just stop by quickly and share a project I did at a recent workshop.  I wanted a quick project of a box and notecards.  I decided to show the pizza box.  This can be found here at splitcoast stampers.  I used the set “Bloom Away” which hasn’t seen ink for a while, and I knew these ladies would appreciate them.

This is a close up of the top of the box.

The little note cards.  These are 3″x3″ size.  I realised I didn’t take a close up of one of the cards, but I think you can get an idea of them.  I wanted to keep them very simple.  The stamps have such fine detail I didn’t think it was necessary to colour them for this.  The punched flower is using the Boho Blossoms punch.  I inserted a gold brad through it and raised it up with dimensionals.  The greetings are from “Teeny Tiny Sentiments”  in the Autumn/Winter mini catalogue.  This is such a versatile set with so many greetings, and is such good value considering you get 24 stamps in the set.

Stamps: Bloom Away, Teeny Tiny Sentiments.

Card: Chocolate Chip, Ruby Red, Baja Breeze card and DSP, Very Vanilla.

Ink: Chocolate Chip, Ruby Red.

Other: Word Window Punch, Lots of Tags Die (for box), Boho Blossoms Punch, Scallop border Punch, Gold Brad, Dimensionals.

Now, if you pop back in the next day or 2 I will show you the card they all got to make.  The hostess wanted a male card.  They are always difficult to do.  I showed them a few techniques that can be used on male cards.  So, don’t forget to call by.

Happy Stamping!!

cards, Uncategorized

A TRI-SHUTTER 50TH!

I have seen these Tri-shutter cards around blogland recently and have been wanting to make one.  It was my Sister-in-Laws 50th Birthday last week so I thought it would be a good time to make this special card.  I first made this red one but when it was finished I found it was a bit too pink for her liking.  So I made another one up.

I have used the Pink Flamingo DSP. This is a great way to use up those little scraps you have lying around.  The greeting label was cut with the Big Shot and the  Tags die. The centre was punched out with the Wide oval punch.  I didn’t have a 50th stamp so hand wrote that.  I punched out some butterflies, first from Rose Red card and then some from the DSP and sponged the edges. 

 The leaves were punched with the 2-step Bird Punch and the flowers punched out with the Boho Blossoms punch.  You can see a close up of the flowers here.

After I punched the flowers out, I sponged the edges with Rose Red ink and then adhered them together.  I added a drop of Crystal Effects to create a centre dot. 

So, here is the other version.

I have used Night of Navy as the base card.  The DSP was  from the Baja Breeze Patterns paper and Urban Garden.  These are really fun cards to make and impressive when they open it up! 

Thanks for stopping by.  Happy Stamping!!

cards, Techniques, Uncategorized, Workshops

I’M BACK!!!

I’m back, did you miss me???? You probably didn’t even realise I had gone. LOL  Well, I have the computer back now.  I can’t say it is working fantastically still.  We will have to see how things go.  This last week I realised how much I get done when I’m not wasting, spending time on the internet.  It has been school holidays so we have had some fun family times together, we have had our roof replaced so we had no water and power for a day, but I have been very creative.  I will show you all  the projects eventually.  You will have to wait some time to see my convention swaps though.  4 weeks to Convention!  I’m so excited!

I wanted to show you the Make and Take from the workshop the other week.  My lovely hostess wanted ‘Pretty and Pink’.  I wanted to use the Big Shot and some of the other lovely products from the new Autumn Mini Catalogue. So, here is the card they all got to make.

Card: Regal Rose, Rose Red, Certainly Celery, Whisper White.

Ink: Regal Rose, Rose Red, Certainly Celery.

Stamps: Cottage Garden, Warm Words.

Other: Big Shot, Textured Impressions Folder Dots, Eyelet Border Punch, Dimensionals.

I ran a piece of Regal Rose cardstock through the Big Shot with the Dots Textured Impressions Folder and added this to the front of the Regal Rose base card to create another layer.  The flowers were stamped on scrap paper inking first in Regal Rose and then rock and rolled in Rose Red.  They were cut out and raised up with dimensionals. 

So, is it Pink and Pretty enough?????

Of course, I stepped it up.  Here is the stepped up version.

I added some Regal Rose Grosgrain ribbon and a clear button.  I threaded some Regal Rose ribbon through the button.  The text was stamped on scrap card and punched out with the Large oval Punch and then a scallop oval punched out with Regal Rose.  I added some dots with the white gel pen.  There you have it!  Hope you like!!!!!

Stop by again soon and I will show you some of my other new creations.