3D projects, Christmas

12 WEEKS OF CHRISTMAS – WEEK 12 – CHRISTMAS CRATE!

Here we are.  Week 12 of our 12 Weeks of Christmas Series.  When I started this series I thought it was so far off to the end.  It has come around so quickly.  I hope you have enjoyed the projects I have shared over the last 12 weeks.  Today is a fun Christmas treat box.

It’s a Christmas crate.  Fill it with treats to give as a gift but wouldn’t it look great as a place marker on a table for Christmas.

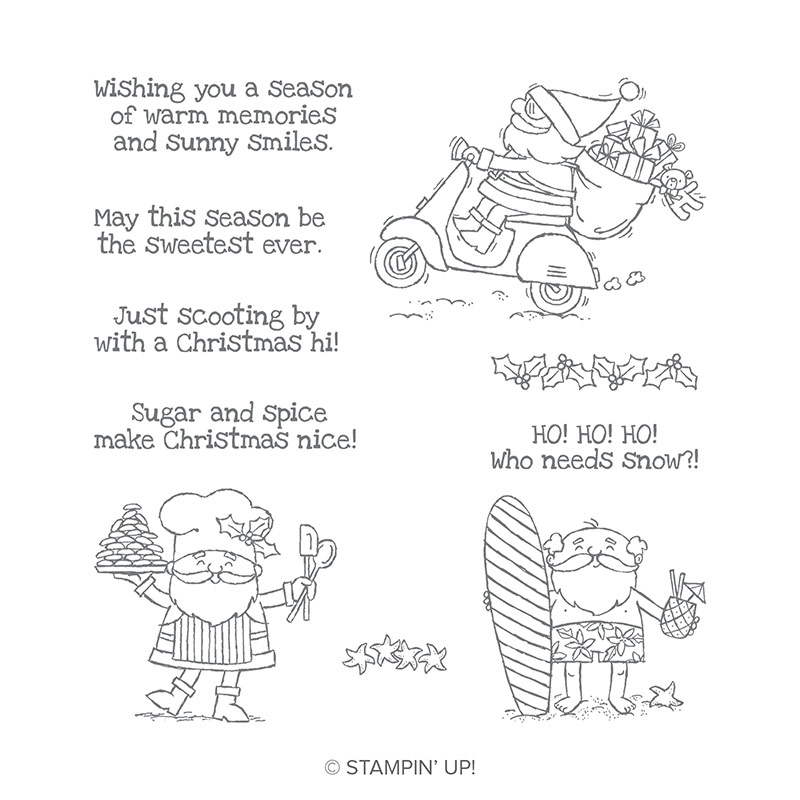
The So Santa set works so well for our hot summer Christmas events.  No snow here in Australia. Sun, sand and seashells right? 🙂

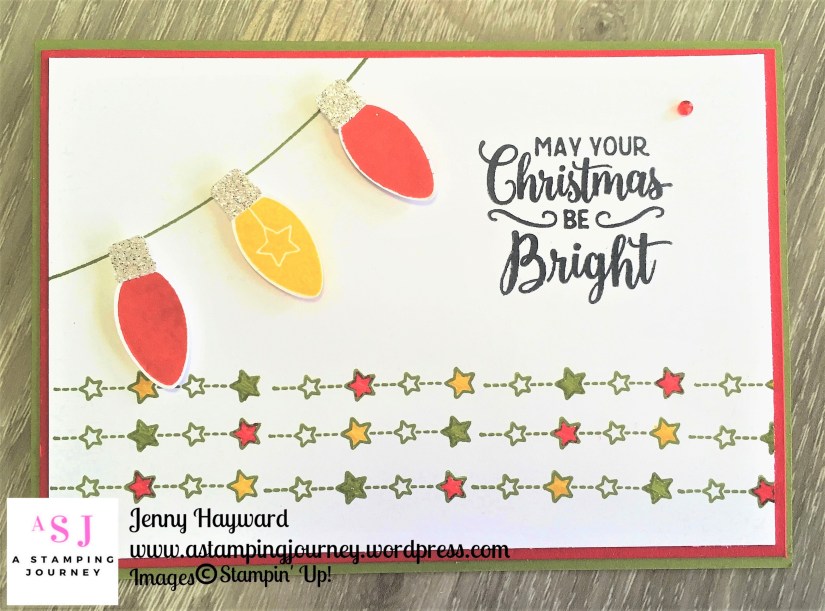
To make the crate I used the Wood Crate Framelits.  Simply cut 2 from Real Red cardstock and assemble as normal.  Before I assembled the box I stamped over it with the Holly Strand in several places.

I measured the width of the crate to know what size width for the red cardstock.  Look what else I have used?? The Rectangle Stitched Framelits.  Brand new coming in the Occasions Catalogue on January 3rd. I am so excited for these.

The So Santa image was stamped on Thick Whisper White and coloured with the Stampin’ Blends.  And look also, a new Stampin’ Blends colour – Balmy Blue. I like to outline the images when I colour them in light Smoky Slate blend.  It helps to add depth to your images and make them POP!

I added a little dazzle with Silver Glimmer Paper punched with the Duet Banner Punch.  I cut the banner in half and adhered it under the sentiment to extend the length.  The sentiment was cut with one of the smaller Rectangle Stitched Framelits.

I hope you have enjoyed this series.  It’s been fun.  If you missed some of the projects over the last few months then click on the tag for 12 Weeks of Christmas and it will show  you all of them.  It might be a bit late for this Christmas but you could file it away (or  PIN them) for later.

Thanks for following me along,

Jenny

3D projects, cards, Catalogues, Christmas, Stampin' Up!, Tutorials, Videos

WEDNESDAY’S WOW! #50 – CREATING A PYRAMID CARD (AND MAYBE A GIVEAWAY!)

Here we are Wednesday’s WOW! #50.  I really didn’t even consider I would get to that number when I first started just this year.  How fun it has been sharing fun projects and videos with you.  Have you enjoyed them??  Today for #50 I have a special project that I have been sitting on for a few weeks waiting to share with you – and Today is the day! And since it is such a big milestone I thought I would have a little giveaway on my blog.  It’s been a while since I have done that so be sure to read all the details below.

So today’s project is … A Pyramid Card.  Have you made one of these before.  I thought it would be fun to make one and share it with you.

This is the front view.

This is the back view.

I have put together a video for you and have some photos too below.

Apologies in advance for the video quality.  I am working on that. 😉

CREATE YOUR OWN PYRAMID CARD

The Pyramid card can be made to any size.  The principles to make them are the same.  Work out the approximate height you would like and the size of the card squares will be approximately three-quarters of that height.

Tutorial and measurements for the Pyramid card above.

Cut 3 squares of card to 10.5 cm (Just over 4”).

Cut 2 squares of Designer Series Paper (DSP) slightly smaller than is 4mm or 1/8”.  Squares for this one would be 10.1cm or 4”).

1) Score each card piece diagonally once.  Fold on the scored line.

2) Cut both squares of DSP in half diagonally.  Flip one triangle over to use the opposite pattern.  You may choose to use a completely different piece of DSP for a different pattern choice.  You may choose to have each piece the same. Adhere the DSP triangles onto one panel of each card

3) (NB: In these photos I didn’t adhere the Designer Series Paper before assembling). Position one of the squares behind another square underneath the other square.  Before applying adhesive, check the position so you only apply adhesive to where it is needed.  Repeat this for each card piece.

Be careful where you place the adhesive as you won’t want to place it all over your card.

4) You can choose to adhere the third square to the first square to assemble it permanently or you can add a Velcro dot to the edge piece, or add ribbon to tie it together so it can come apart to lay flat for posting.

– Decorate your Pyramid card as you like.

BLOG GIVEAWAY

OK, now for the prize.  Since it’s the 50th Wednesday’s WOW! I have a Blog Giveaway of … some BLING! We all love bling and let’s face it we can use it to cover up a multitude of mistakes.  Who does that?? 🙂

WHAT YOU NEED TO DO

I will pick a winner at random.   To enter please leave a comment on where you are from and what you love seeing when you come to visit my blog.  I will close the entries on Friday midday. AEST  The bling giveaway is only for Australian residents only sorry.  BUT if you are an international visitor please leave a comment and I will send a handmade card off to you.  I am allowed to do that. 🙂

So enter away.  And thanks for visiting me.

Jenny


cards, Catalogues, Christmas, Stampin' Up!

12 WEEKS OF CHRISTMAS – WEEK 11 – ALL IS BRIGHT!

I know I have featured the All is Bright Designer Series Paper a lot recently for my 12 Weeks of Christmas.  But hey! it’s a fun, festive paper and so easy to make cards with and that is what 12 Weeks of Christmas is all about.

Here we have Week 11 of our 12 Week of Christmas series.

The card base is Garden Green. The red card mat was embossed with the Softly Falling Embossing Folder. The piece of All is Bright Designer Series paper which is about 7.5cm wide (3″) was cut to a banner ends with scissors.  The circle wreath from the Making Christmas Bright was stamped in Garden Green.  The sentiment was stamped in black and the Bright was stamped in Real Red.  I added some Red Rhinestones for dress up the wreath.  This circle wreath was adhered on to a scallop circle in Gold Foil cut with the Layering Circles Framelits.  Before adhering this piece to the card I added some Red Satin Ribbon hanging from behind it.  

I love the brightness of this card and the festive feel to it.  Very traditionally red and green Christmas don’t you think?

So next Friday is our last project for our 12 Weeks of Christmas.  That’s crazy! That means it’s almost Christmas.  I don’t know about you but I am totally not ready.  How about you?

Just a note on this stamp set too the Making Christmas Bright.  This stamp set is carrying over BUT not as a bundle.  If you like this stamp set then grab it now and get it at 10% off for the Bundle.  It is too late for this year’s projects but then you are all ready for next year.

You can grab it in my store now -> HERE at $61 for the bundle which includes the Making Christmas Bright stamp set and the Bulb Builder Punch.  Please use the Host Code: BZ6KB7SU or you can contact me directly.  

Thanks for visiting me,

Jenny

cards, Catalogues, Christmas

STAR BORDER WITH MAKING CHRISTMAS BRIGHT!

Another card for you with the Making Christmas Bright Bundle.  This one I wanted to use the star strip that is in the set.

I stamped the star strip several times and across the card and stamped 3 rows of the star strip.  It took some time lining them up.  I did try using the Stamparatus but it wasn’t lining up properly so I just stamped it by “eye”. I held my breath and just stamped.  That’s how it is done didn’t you know. 😉 I coloured the stars with the markers using Real Red, Old Olive and Daffodil Delight.  The colours are really bright.  It is actually Real Red.  Something happened in the editing. 🙂

The string was stamped across the corner for the 3 bulbs to run along it.  The bulbs were punched out with the Bulb Builder Punch. and raised up with Dimensionals.

This card was inspired by Sara’s card -> HERE.

Are you liking this bundle yet?  Lots you can do with it.  Are you liking that you can get it as a bundle now and save 10%? From January it will be individual prices so I would get it now if I was  you. 🙂 Grab it in store -> HERE. It is $61 AUS for the bundle now.

Thanks for stopping by with me.  I have another card with this Bundle to share with you tomorrow for our 11th Week of 12 Weeks of Christmas series so be sure to stop on by.

Jenny

cards, Catalogues, Christmas

ALL IS BRIGHT LIGHTS!

This card today is using the Making Christmas Bright bundle.  This one is CASED from Erika Rodriguez on Mary Fish’s blog I found the card on Pinterest but it just went to her blog and not the actual post so sorry about that.  This is the original card on Pinterest -> HERE.

This is my version.

For my card I added extra lights and greenery. The lights are punched from card using the Bulb Builder Punch. That makes it so much easier.  It takes a few minutes to adhered the tops on to the Bulbs but that’s ok. The sentiment on mine is from the Star of Light stamp set.  I thought it worked well with the card.

I used the Pretty Pines Thinlits for the branches.  It’s all finished with a Real Red Satin bow.

Some more to come with this bundle.  Never fear. 🙂

Thanks for visiting me today,

Jenny


cards, Catalogues, Christmas

MAKING CHRISTMAS BRIGHT CATALOGUE INSPIRED!

I have a few cards to share with you using the Making Christmas Bright Bundle in the Holiday Catalogue.  You can see this bundle on page 6 and 7 of the Holiday Catalogue.

For this card I was inspired by the card on page 7.

For my sentiment I stamped it on Whisper White card and then cut it with a square from the Stitched Shapes Framelits.  I cut a red one from one of the squares from the Layering Squares Framelits.

The base is Call Me Clover and I stamped the light string and the bulbs a number of times over the card.  An individual “bulb” was stamped on scrap white and punched with the Christmas Bulb Builder Punch.  The “top” part of the bulb was punched out in Pineapple Punch card.

It’s a fun set and great to have a punch to cut those little bulbs.

Here is the bundle.

This Bundle is being carried over but if you buy it now you will get it at 10% off.  After this month it will be available individually and who wants to pay more then!

Grab it in store now -> HERE.  Please use the HOST CODE: BZ6KB7SU

I have some more cards with this set so stop on by again soon.

Jenny

Catalogues, Christmas, Stampin' Up!

DOUBLE POINTS AND MORE NEWS!

I am heading away this week BUT that doesn’t mean the show doesn’t go on.  I have posts ready for you to go out so you don’t miss the inspiration. Well I hope it is inspiration.  Before I go I have some important updates.

DOUBLE LOYALTY POINTS

Did you know I have a Loyalty Program?  Yes! It is my VIS (Very Important Stampers) Loyalty Points Card.  For every $50 order with me you receive 1 point.  Collect 10 and you receive $24.95 of Free products of your choice.  I keep a tally for you and let you know when it is full.  There is no expiry date too. It is very exciting when you get to choose free products.

This week I am going to be away.  I have to say I am excited to get away – but this time of year is crazy.  Anyway, you benefit.  Get 2 POINTS FOR EVERY $50 orders this week.  You will be chocking up the points quickly to get your free products.

All you have to do is place a minimum $50 order in my store this week.  Great timing with the Year-End Closeout Sale too.  Make sure you don’t mark your order anonymous because I can send out your Thank You card and tick off those loyalty points. 🙂

Head to my store to shop -> HERE.  Only for Australian residents.  Please use the Host code: BZ6KB7SU

NB: Please note you may not receive your order until after Christmas.

——–

YEAR-END CLOSEOUT SALE IS ON 

It’s happening and some items are selling out already.  Have you checked it out?  These are retiring items from them current Holiday Catalogue and some surplus products from the Annual Catalogue. SOme items are reduced too which is a bonus. Do check it out and do order now if you want anything.

For the Year-end Closeout products Visit -> HERE

————-

REQUEST THE 2019 OCCASIONS CATALOGUE

They are on their way.  Do you want one?  You can now request the 2019 Occasions Catalogue And the Sale-A-Bration Catalogue.  (Australian residents only)

Head -> HERE to fill out the short form with your details.  They will be sent out late December to you.

————–

FREE TOTE WHEN YOU JOIN


Do you like this Tote?  Pretty cool hey! And it fits so much in it.  Use it to take your crafting goodies to your next stamp camp or a class you are doing?

You know what.  It’s FREE!  You have the option to choose this when you join Stampin’ Up! during Sale-A-Bration.  Yeah! you pay just a little extra on your kit ($61) but not as much as it is worth (valued at $87). There are only limited supplies that is why I am telling you now.  I missed out on buying one as a Demonstrator so I don’t want you to be disappointed.  Start planning now and get on it on January 3rd.

Here are the options.

OPTION 1: $315 of product for $169 – Pay no shipping.

OPTION 2: $315 of products Plus the Tote Bag for $210 – Pay no shipping.

Once you join you save on your Stampin’ Up! products each time you order with your minimum 20% discount.   How is that?  Pretty cool.  Why pay full price.

Ask me for a no-obligation information pack by emailing me at jghayward@yahoo.com      This will be mailed out late December as I will be away this week.

———-

Lots of information to digest.  Email me if you have any questions.  I will have limited internet this week but I will respond to you as soon as I can.

Have a great day,

Jenny

cards, Catalogues, Christmas, Stampin' Up!

12 WEEKS OF CHRISTMAS – WEEK 10 – STYLISH CHRISTMAS BRIDGE FOLD!

Week 10 for our 12 Weeks of Christmas series.  Can you believe it?  Have you been following along over the weeks?  I hope so.  It’s been fun but I can’t believe it’s coming to the end.

Today I have a Bridge Fold card for you.

I have used the set Stylish Christmas for this which can be found in the Annual Catalogue.  Don’t forget about those great Christmas sets that are in the Annual Catalogue.

The original design for the card was from Lyssa’s blog ->HERE.

I redesigned the card to make it larger and also converted it to Metric measurements.  I will add them below.

BRIDGE FOLD CARD

** These are for the metric measurements.  For Imperial measurements, head to Lyssa’s blog post in the link above. NB:  My version is taller at 14.8cm.  You would cut your card at 5 7/8″ instead of 4 1/4″ if you want that to be the same.  Each of your strips would be longer too at about 5 3/4″. Hope that makes sense.

Base card – 14.8cm x 20.3 cm.  Score at 3.2cm, 6.3cm, 14cm and 17.2cm

Front Strips – either card or co-ordinating paper. 2 pieces measuring 2.8cm x 14.4cm.

Centre Mat – 7.3cm x 14.4cm.

Centre piece – 6.9cm x 14cm.  Whisper White.

Front Strip – 3.2cm x 14cm.

Fold the Base card.  Adhere the strips to the front.  Stamp the centre piece as you like.  Adhere on to Centre mat and adhere to the Base card in the centre.

To adhere the Front strip: Fold the left hand edge to create a z-fold.  Adhere the strip in position on the left hand piece by lining it up to the left hand edge.  Leave the Right hand folds open, adhere the right hand edge of the strip on to the right hand edge.

Decorate the card as you would like.  Have fun with it.

Thanks for stopping by,

Jenny

Catalogues, Christmas, Stampin' Up!

MAYBE A CHRISTMAS GIFT FOR YOU IN THE YEAR-END CLOSEOUT SALE?

It’s happening now! Stampin’ Up! have just announced retiring items from the 2018 Holiday Catalogue and some have been discounted.  You will want to see these.   Some of them are up to 40% off.  

Some items from the Annual Catalogue that are in surplus too are listed.

Check them all out in my store -> HERE and get ready to shop.

Just some of the items you will see.


Christmas Traditions Punch Box reduced to $54.60


Bright Copper Shimmer Paint reduced to $10.50


So Santa (Wood mount reduced to $37.80


Candy Cane Builder Punch reduced to $24.80

HOW TO ORDER:

Contact me directly

OR

Shop online through my store -> HERE.(same as the link above)  Please use the Host Code: BZ6KB7SU

Thank you in advance for your orders.  I do appreciate them.  Every order receives a gift from me to say Thanks.
Go and grab yourself some bargains – or a Christmas present 😉
Jenny
3D projects, cards, Christmas, Classes

FOR OUR LAST CLASS LET’S MAKE CHRISTMAS TAGS!

It’s our last class for the year this weekend. I know life is busy at this time but if you come along you will make a set of 6 Gift Tags and a Gift Box.  That will help you out for tagging your gifts this Christmas.

I think you will like these.  Here is a peek.

Here are the details.

WHEN: Friday 7th at 10am and Saturday 8th at 2pm.

WHERE: My studio in East Corrimal.  If you are a Wollongong local come and join in.  We don’t bite. 😉

COST: $15 (extra $5 to use my adhesives).

PLEASE RSVP:  By Thursday 6th.  Book early though to reserve your seat.  Email me at jghayward@yahoo.com or comment below.

I look forward to seeing you.

———

While our classes might be finishing for the year the creating isn’t so be sure to stop by as I share my creations with you.

Thanks for stopping by,

Jenny