Blog Hops, cards, Catalogues, Sale-A-Bration

ESAD 2020 MINI CATALOGUE AND SALE-A-BRATION BLOG HOP!

Time for another ESAD Blog Hop.  This time we are sharing projects from the new 2020 Mini Catalogue and Sale-A-Bration.  I can’t wait to see what everyone has created.  You might have come from Cathy’s Blog -> HERE or starting from this blog.  The full list of participants will be below.

Firstly with the Blog Hop.  What is ESAD anyway??  

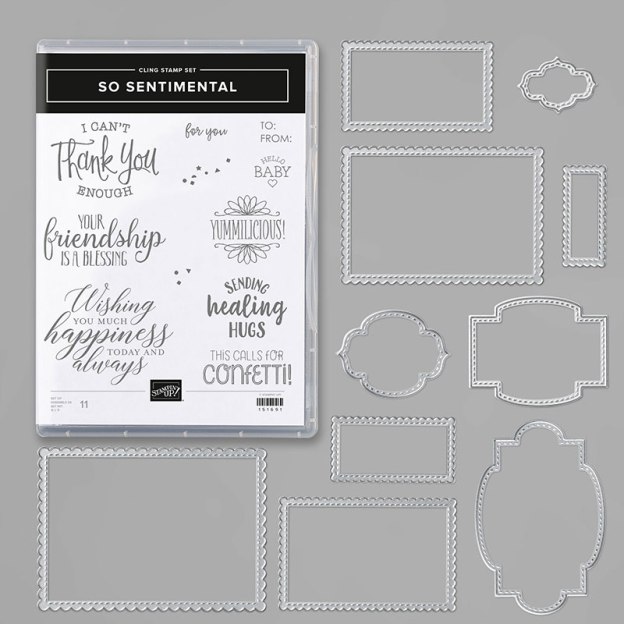
Now for my project.  It’s a very hard decision to work out what you are going to use with these Blog Hops.  There are so many new and exciting products.  What’s a person to do?? 🙂  In the end I chose to use the new So Sentimental Bundle because I love the Stitched So Sweetly Dies.  I think many people will love them.  I have made a few projects with them recently but today I have this one to share with you.

I created a card and a little treat holder with the Kraft Pillow boxes.

With the card you don’t need too much with the gorgeous Peaceful Poppies Designer Series Paper.  Add a piece of this to a Granny Apple Green card mat and add this to the Poppy Parade card base.  The Granny Apple Green is not a colour that is featured in the paper but I think it gives it a little POP against the Poppy Parade colour.

The sentiment from the So Sentimental stamp set was stamped on white and cut with one of the label shapes in the Stitched So Sweetly Dies set.  This was layered on to a piece of Granny Apple Green cut with one of the other label die shapes.  It’s hard to tell but I embossed the green card with the Pinewood Planks 3D Embossing Folder to give it some texture.

I tied around some Granny Apple Green Crinkled Seam Binding Ribbon.

Wait, what?? Granny Apple Green Crinkled Seam Binding Ribbon.  Where is that in the catalogue??

It’s actually the Whisper White Crinkled Seam Binding Ribbon on p 25 of the 2020 Mini Catalogue.  You can create any colour ribbon you like with the Stampin’ Blends.

Check it out below.  Just run along the ribbon with the Stampin’ Blends Marker. It dries quickly and ready to use on your projects.

Now for the Treat Holder.

Assemble the Kraft Pillow Box. Then wrap a strip of the Peaceful Poppies Designer Series Paper around the Pillow Box.  I wrapped around some more ribbon I had coloured around the box too.

The label for this box was using a different stamp in the So Sentimental stamp set and cut with different dies in the Stitched So Sweetly dies.  The Granny Apple Green card was embossed with the Pinewood Planks 3D Embossing Folder as well.

If you haven’t noticed the So Sentimental Bundle you can find it on p 20 of the Mini Catalogue. It has the different label shapes and Stitched Scalloped Rectangle dies of varying sizes. Great for layering together.  Available for $56 AUD.

Order in my store -> HERE. Please use the Host Code: R26WHBUN

Now you are off to Mae’s blog to continue your Hop.  Head -> HERE.  Follow along on the Hop with the list below if you get lost.


Blog participant List:

  1. Nicole Wilson
  2. Shannon Kissane
  3. Rochelle Laird-Smith
  4. Denise Buetler
  5. Rachael Lewsley
  6. Bronwyn Eastley
  7. Lou Kitzelman
  8. Libby Dyson
  9. Sue Vine
  10. Peta Stephen
  11. Monique Fielder
  12. Narelle Fasulo
  13. Cathy Pinchbeck
  14. Jenny Hayward
  15. Mae Collins
  16. Cheryl Algie
  17. Richelle Fletcher
  18. Kathryn Ruddick
  19. Kayla McCreadie
  20. Jenny Bowman
  21. Charmaine Black
  22. Sharon Dalton

Thanks for visiting me today.

Also, you can order these So Sentimental in my store -> HERE.  Please use the Host Code: R26WHBUN

All orders receive this month’s Tutorial Bundle as a little Thanks. And also select your Sale-A-Bration free product with your order over $90.

Jenny


3D projects, cards, Catalogues, Stampin' Up!

WEDNESDAY’S WOW! #77 – GET A SCALLOP ON IT!

This week’s Wednesday’s WOW! #77 is a fun, versatile product that I have just noticed.  I thought you might like to see just how versatile this product is.

We are looking at the Scalloped Note Cards and Envelopes.

With these Note Cards and Envelopes you receive 5 each of 4 colours: Balmy Blue, Old Olive, Powder Pink, Terracotta Tile.

They make very quick cards that have that nice decorative scalloped edge.

And don’t forget to stamp the envelopes.

Don’t just think of them as the cards and envelopes though.

These are created by Stampin’ Up! artists.  Aren’t they sweet. Sorry I am not sure exactly how this treat box below is made but it is using the notecard scored and folded.

How clever is this treat holder? Just pop a little treat in the envelope and give it to someone special.

These are very inexpensive to have some quick cards and packaging on hand.

They are available in store now -> HERE.  $14 for 20.

What do you think of them??  Pop them in your next order.

Have a great day,

Jenny


3D projects, Catalogues

MOSAIC MOOD TEA BAG HOLDER AND A TAG!

I have 2 projects to share with you today.  I made them a few weeks ago but just getting to show you now.

I have these cute little Tea Bag Holders.  I made them up to send out with some of the Annual Catalogues.  These were made with the Mosaic Mood Specialty Designer Series Paper.  The paper is so shiny.  It is gorgeous really and I think they turned out ok with it.

Nothing like pouring over the new catalogue with a cup of tea in hand. 😉

The sentiment is from the Delightful Day stamp set.  It is stamped on Mint Macaron and punched with the Timeless Label Punch.  Then backed on a white circle and the ring shape from the Stitched Labels Dies.

The little holders were made using the Envelope Punch Board.  I know it is retired but I love this little tool for making quick envelopes. The Tea Bag Holder is a Pootles one and you can find it -> HERE.

With some of the scraps from these little Treat Holders I made up a couple of tags.  These were for the Lucky Door Prizes for my launch.

I used the Delightful Day stamp set again too and the Stitched Nested Labels Dies. It’s so easy to make quick tags with the Delightful Tag Topper Punch.

Hope you like them.

Thanks for visiting,

Jenny

3D projects, Catalogues, Classes, Stampin' Up!, Tutorials

GINGHAM TEA BAG TREAT HOLDER!

I had my Summer Sizzler Catalogue Launch on this weekend for the Occasions and Sale-A-Bration Catalogue.  It was a fun time sharing lots of the gorgeous new products and samples with them.

I will share some of the cards I have made over the next couple of weeks.  Today I thought I would share with you the little Treat Holders I made for everyone who came to Thank them for coming.

These cute little Treat Holders are made using the new Gingham Gala Designer Series Paper stack.  The paper is 6″x6″ (15.2cmx15.2cm) and are just the right size for these.  I made them in some of the different colours.  I took a photo of 3 of the different colour ones.  I have also used the lovely Organdy Ribbon that is available as a free choice for Sale-A-Bration. I will tell you how to make them below.

To decorate the front of them I stamped one of the butterfly stamps from Butterfly Gala set using Black Memento ink and these were then coloured with the Stampin’ Blends.  Using the Butterfly punch makes life a lot easier.  No fussy cutting them. 🙂 The sentiment is from the Well Said stamp set.  I stamped the “THANKS” on to Whisper White and punched it out with the Classic Label Punch.  I then could trim off each end. I find this a much easier way of doing it.

To make the Treat Holders

1. Take your 15.2cm x15.2cm (6″x6″) piece of paper.  I have used the Gingham Gala Designer Series Paper stack.

Line the left hand edge of the paper on the 6.7cm (2 5/8″) mark on the Envelope Punch Board.

Punch the paper and score on the score grid of the Punch Board.

2. Turn the paper 90′.  Line up the little score tab on the previous score line.  Punch and score.

Turn the paper another 90′.  Line the tab mark on the score line, punch and score.  Turn again and repeat.

3. Round the corners using the corner rounder on the punch board.  Fold on the score lines. Decide which side you want showing on the outside, place that side facing down when folding.

NB: In the photo below I hadn’t turned it over at this point.

Fold up the bottom tab.  Place adhesive on the 2 outside edges of this tab. I used Snail adhesive.  Fold in one side tab and adhere down. Before folding in the other side tab place adhesive on the inside bottom edge of this tab.  Fold over and adhere down.

Decorate as you like. To add ribbon, punch a hole in the top tab and thread through your ribbon.

This is a great size for a Tea Bag packet, chocolate, Gift card or other treat.

Enjoy.

Jenny


3D projects, cards, Christmas, Classes

FOR OUR LAST CLASS LET’S MAKE CHRISTMAS TAGS!

It’s our last class for the year this weekend. I know life is busy at this time but if you come along you will make a set of 6 Gift Tags and a Gift Box.  That will help you out for tagging your gifts this Christmas.

I think you will like these.  Here is a peek.

Here are the details.

WHEN: Friday 7th at 10am and Saturday 8th at 2pm.

WHERE: My studio in East Corrimal.  If you are a Wollongong local come and join in.  We don’t bite. 😉

COST: $15 (extra $5 to use my adhesives).

PLEASE RSVP:  By Thursday 6th.  Book early though to reserve your seat.  Email me at jghayward@yahoo.com or comment below.

I look forward to seeing you.

———

While our classes might be finishing for the year the creating isn’t so be sure to stop by as I share my creations with you.

Thanks for stopping by,

Jenny

3D projects, cards, Catalogues

PILLOW BOX CARD HOLDER!

I just received the Kraft Pillow Boxes recently. These are lovely little boxes for little treats. I will do that with them soon but I had different ideas for this little project.

I made a little pocket with a matching note card and envelope using the Narrow Note Cards and Envelopes.

This is a great size to give a little note to someone as a pick-me-up or a Thanks.  Add a chocolate treat or even a Gift Card.

To make these little pockets, simply cut the top off the Pillow Box just under the curved score line.  Then assemble the Pillow Box.  Decorate it as you like after it is assembled.

To decorate mine, I added a wide strip of the Share What You Love Specialty Designer Series Paper and then a narrower strip over the top.  I wrapped around some Rich Razzleberry Velvet Ribbon and adhered a bow with a Glue Dot.  The sentiment from the Love What You Do stamp set was stamped in Rich Razzleberry and then I cut around the ‘friend’ word with scissors.  That was raised up with Dimensionals.

The Narrow Note Card was stamped with the flowers in Memento Black and then “filled” with one of the small “dot” type stamps in Rich Razzleberry.  I added some Old Olive leaves.  Of course, finished off with a Linen Thread bow and a Pearl from the Adhesive Artisan Pearls. The envelope was stamped with a matching flower.

These are so quick to make.  I think I need to make some more so I can have some on hand to give out.  How will you decorate yours?

Thanks for stopping by.

Catch you again soon,

Jenny


3D projects, Tutorials

LOTS TO LOVE VALENTINE FLIP TOP BOX!

So it is Valentine’s Day here tomorrow apparently.  We don’t celebrate Valentine’s Day in a big way in Australia.  You might give your “significant other” a little chocolate treat and I do give my 2 kiddies (well they are mostly adults now), a little chocolate treat.

I thought that this year I should do SOMETHING! I have had the Lots to Love Box Framelits for a couple of weeks and not used them.  I had this in mind for about that long too.  So I just managed to create it in time.

I call it a Flip Top Treat Box. I am sure you could use the idea for a Gift Card not just chocolates.

This is with the Flip Top open. Mmm! Chocolate Hearts!

It has a little card insert in it to add the Chocolates. I added a Glue Dot under each one to stick them them to the card. I added a loop of ribbon which was adhered to the end of the card and then I added a small red punched circle to cover it.

CREATE YOUR OWN FLIP TOP TREAT BOX

1. Cut 2 of the box shapes from the Lots To Love Box Framelits from your card.

On one piece which will be your top score it at half way along the long side of the box. This will be at 6cm (2 3/8″) which is from the scored line measurement not from the start of the curved edge.

2. Place adhesive on the underside along the long tabs ONLY to the half way point that will be adhered to the box.  You don’t want to adhere the whole section or it won’t open. I added the adhesive on the curved end half.

3. Adhere the top piece to the bottom piece of the die-cut box.  Your bottom piece will have the curved end to the opening end as shown in the photo below.

4. Decorate the box as you like.  I used the Party Pandas set.  The hearts were cut from the Lots of Love Box Framelits set. The sentiment was cut with the Layering Square Framelits.

So cute enough for Valentine’s do you think?  Maybe it is a little late now to whip some up but file it away for another special Occasion.

Below I have a collage image ready to PIN.

Have a great day,

Jenny