3D projects, Catalogues

MOSAIC MOOD TEA BAG HOLDER AND A TAG!

I have 2 projects to share with you today.  I made them a few weeks ago but just getting to show you now.

I have these cute little Tea Bag Holders.  I made them up to send out with some of the Annual Catalogues.  These were made with the Mosaic Mood Specialty Designer Series Paper.  The paper is so shiny.  It is gorgeous really and I think they turned out ok with it.

Nothing like pouring over the new catalogue with a cup of tea in hand. 😉

The sentiment is from the Delightful Day stamp set.  It is stamped on Mint Macaron and punched with the Timeless Label Punch.  Then backed on a white circle and the ring shape from the Stitched Labels Dies.

The little holders were made using the Envelope Punch Board.  I know it is retired but I love this little tool for making quick envelopes. The Tea Bag Holder is a Pootles one and you can find it -> HERE.

With some of the scraps from these little Treat Holders I made up a couple of tags.  These were for the Lucky Door Prizes for my launch.

I used the Delightful Day stamp set again too and the Stitched Nested Labels Dies. It’s so easy to make quick tags with the Delightful Tag Topper Punch.

Hope you like them.

Thanks for visiting,

Jenny

3D projects, Catalogues, Classes, Stampin' Up!, Tutorials

GINGHAM TEA BAG TREAT HOLDER!

I had my Summer Sizzler Catalogue Launch on this weekend for the Occasions and Sale-A-Bration Catalogue.  It was a fun time sharing lots of the gorgeous new products and samples with them.

I will share some of the cards I have made over the next couple of weeks.  Today I thought I would share with you the little Treat Holders I made for everyone who came to Thank them for coming.

These cute little Treat Holders are made using the new Gingham Gala Designer Series Paper stack.  The paper is 6″x6″ (15.2cmx15.2cm) and are just the right size for these.  I made them in some of the different colours.  I took a photo of 3 of the different colour ones.  I have also used the lovely Organdy Ribbon that is available as a free choice for Sale-A-Bration. I will tell you how to make them below.

To decorate the front of them I stamped one of the butterfly stamps from Butterfly Gala set using Black Memento ink and these were then coloured with the Stampin’ Blends.  Using the Butterfly punch makes life a lot easier.  No fussy cutting them. 🙂 The sentiment is from the Well Said stamp set.  I stamped the “THANKS” on to Whisper White and punched it out with the Classic Label Punch.  I then could trim off each end. I find this a much easier way of doing it.

To make the Treat Holders

1. Take your 15.2cm x15.2cm (6″x6″) piece of paper.  I have used the Gingham Gala Designer Series Paper stack.

Line the left hand edge of the paper on the 6.7cm (2 5/8″) mark on the Envelope Punch Board.

Punch the paper and score on the score grid of the Punch Board.

2. Turn the paper 90′.  Line up the little score tab on the previous score line.  Punch and score.

Turn the paper another 90′.  Line the tab mark on the score line, punch and score.  Turn again and repeat.

3. Round the corners using the corner rounder on the punch board.  Fold on the score lines. Decide which side you want showing on the outside, place that side facing down when folding.

NB: In the photo below I hadn’t turned it over at this point.

Fold up the bottom tab.  Place adhesive on the 2 outside edges of this tab. I used Snail adhesive.  Fold in one side tab and adhere down. Before folding in the other side tab place adhesive on the inside bottom edge of this tab.  Fold over and adhere down.

Decorate as you like. To add ribbon, punch a hole in the top tab and thread through your ribbon.

This is a great size for a Tea Bag packet, chocolate, Gift card or other treat.

Enjoy.

Jenny


3D projects, Blog Hops, cards, Catalogues, Stampin' Up!, Tutorials

STAMPIN’ DREAMS BLOG HOP – IT’S A LOVE THEME!

We are back with the Stampin’  Dreams Blog Hops for 2018.  We start off the year with a Love theme.  You might have come from the super, talented Juana’s Blog or starting here with me.  Either way, enjoy the Hop.

I don’t do a lot of  “lovey dovey” stuff and don’t usually do anything for Valentine’s Day but lately I have had to do a lot of wedding and engagement cards so maybe this Hop would be a good one for me. 🙂

For my project I have created a “love” Panel card and Gift Card Holder.  

I just received the Bubbles and Fizz Designer Series Paper which is a Free choice for Sale-A-Bration.  I noticed in the pack this sheet with the circled hearts in Calypso Coral so I thought I would use that.  It looked pretty cool! The Panel card idea was inspired by a card from a recent papercrafts Magazine.  I thought it was a little bit different to the standard card.

Here is a closer view of it.  The middle section of the base card is cut off and a separate card mat adhered to the front.  I will give you details to make your own further below.

I added the hearts from the Sunshine Wishes Thinlits in Calypso Coral and Dazzling Diamonds Glimmer Paper.  It needed something else when I had finished so I added a little bow with the Calypso Coral Sheer Ribbon.

The Gift Card holder is created with the Envelope Punch Board with the Gift Card size and scoring instructions on the board (the first one listed).  I added a strip of the Designer Series paper around it.  Just a note on that:  As the card holder is made in card it is a little thicker so the flap can’t tuck in to the envelope without  squishing it.  So I just left it open.   The “for you” is from the Mini Treat Bag Thinlits.

CREATE YOUR OWN PANEL CARD.

– Cut a standard size Card base.  From the front panel cut a piece off the front at 3cm (1 1/4″) down from the front score line.  On the piece you cut off, cut a piece off that at 3cm (1 1/4″).  **NB: For Imperial do check the measurements.  Basically you are cutting off a section down from the top of the fold line and then cutting a piece of that cut off section the same measurements.  You can vary the measurements to however you like.

– Make the panel piece the size you like.  This piece, the Calypso Coral mat measures 8cm x 12.3cm (3 1/8″ x 4 7/8″).  The Designer Series Paper piece is just slightly smaller.

– To assemble the card.  Lay down the White card strip that you cut off previously.  Line it up with the bottom edge of the back of the card base.  Adhere the panel on to the top and bottom edge pieces remembering to only place adhesive at the top and bottom at the back of the card mat for the panel.  I hope that makes sense. 🙂


NOW CONTINUE TO HOP

Now you can continue on your way around the Blog Hop to see the other “Love” projects.   Head on your way to Alejandra’s Blog -> HERE.  (I can’t add the list of participants on my hop as I have a WordPress blog but you shouldn’t get lost, just keep following the links on other blog posts).

Enjoy,

Jenny

3D projects, cards, Tutorials

POP UP EASEL CARD!

A customer called in last weekend and showed me a card she had made. She had gone to a class to do it.  (It wasn’t a Stampin’ Up! class and I don’t know who the original creator is). I loved the idea of the card so I had to make one. I had a little time to play around with it the other day. I call it a POP UP EASEL CARD. I used Confetti Celebration on mine.  I will show you the photos of the card (sorry, lots!) and then give you the instructions.

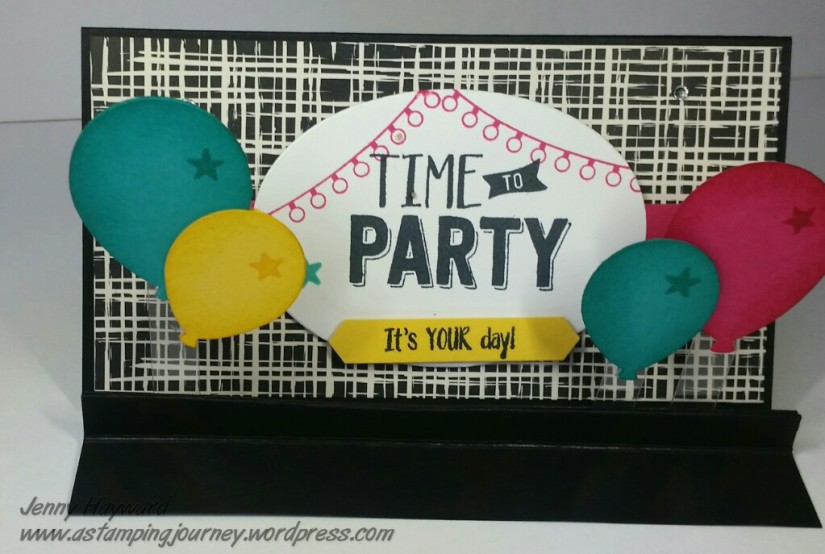
This is the front of the card.  The Rhinestones you see is what holds up the Easel part.  The balloons are suspended on strips of acetate in a folded crease.

Easel front

This is another view front on.  The Designer Series Paper is from the Playful Palette pack. The balloons are punched with the Balloon punch in Bermuda Bay, Daffodil Delight and Melon Mambo.  I sponged around the edges with the sponge and added a small star that from the stamp set.
Easel card

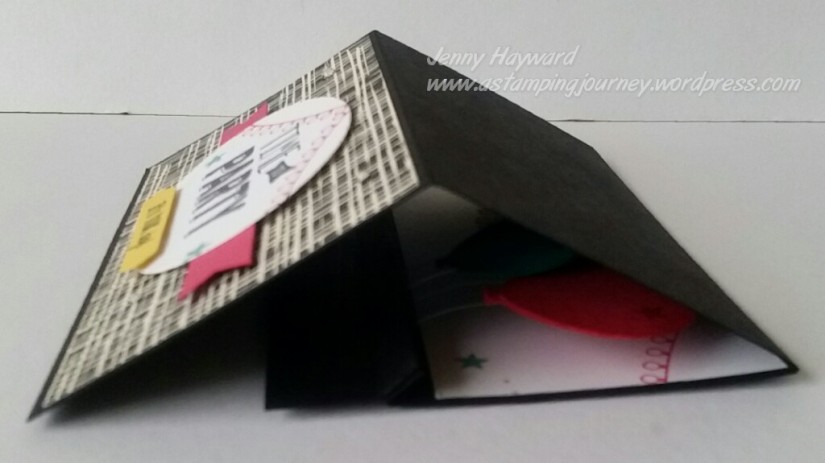
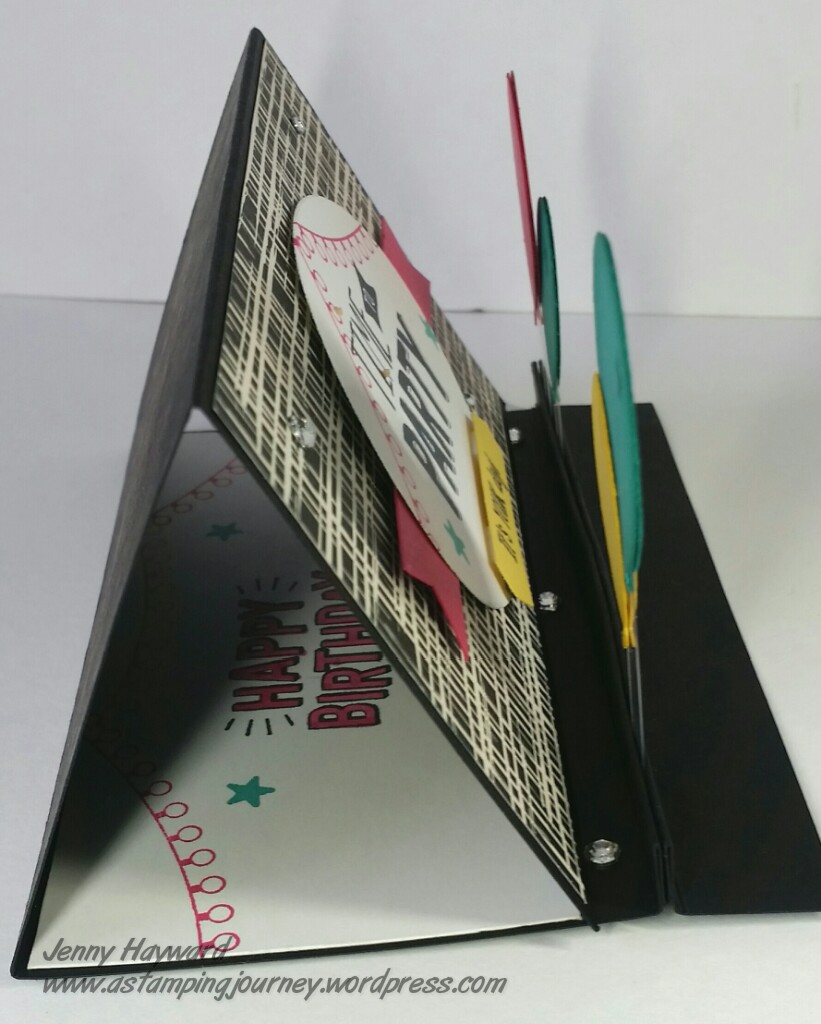
Side on view gives you an idea of the suspended balloons.  I punched 2 each of the balloons and adhered one to the front and back of the strip of acetate to keep it tidy.

You can see the side view and inside of the card with the sentiment that I will show you below.
Side view of Easel

The card can fold flat for postage.

folded inside

When it is folded flat it is a square card measuring approximately 15cm x 15cm (6″ x 6″) so you would need to make an envelope to fit but that is no problem with the Envelope Punch Board!

folded

This is inside of the card.  I continued with the sentiments from the Confetti Celebration set.
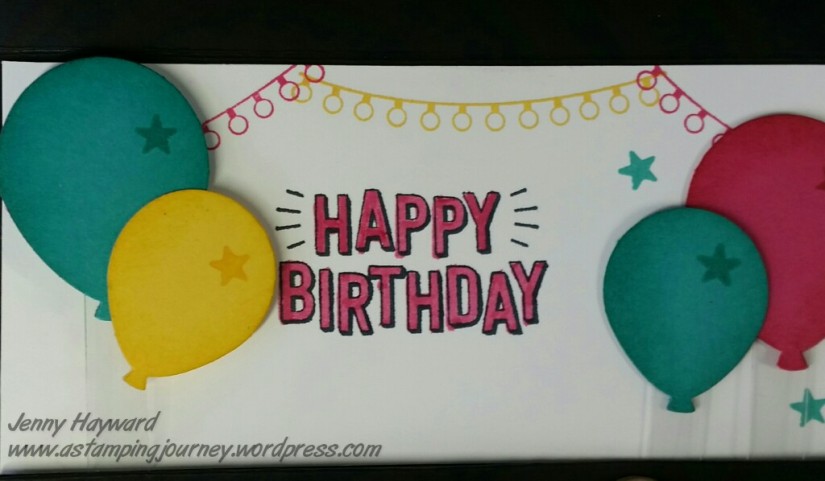
 inside

You can see when it is open that the balloons can fold flat against it.  This is a trick too. Whatever image or shape you have suspended in the front crease, you need to fold it against the inside of the card to test it out first before you put it together to be sure that it will fit below the score line for when it is folded flat.  You can’t have it squashed in. 🙂 Check the photo below to see what I mean. The balloons sit just below the score line.
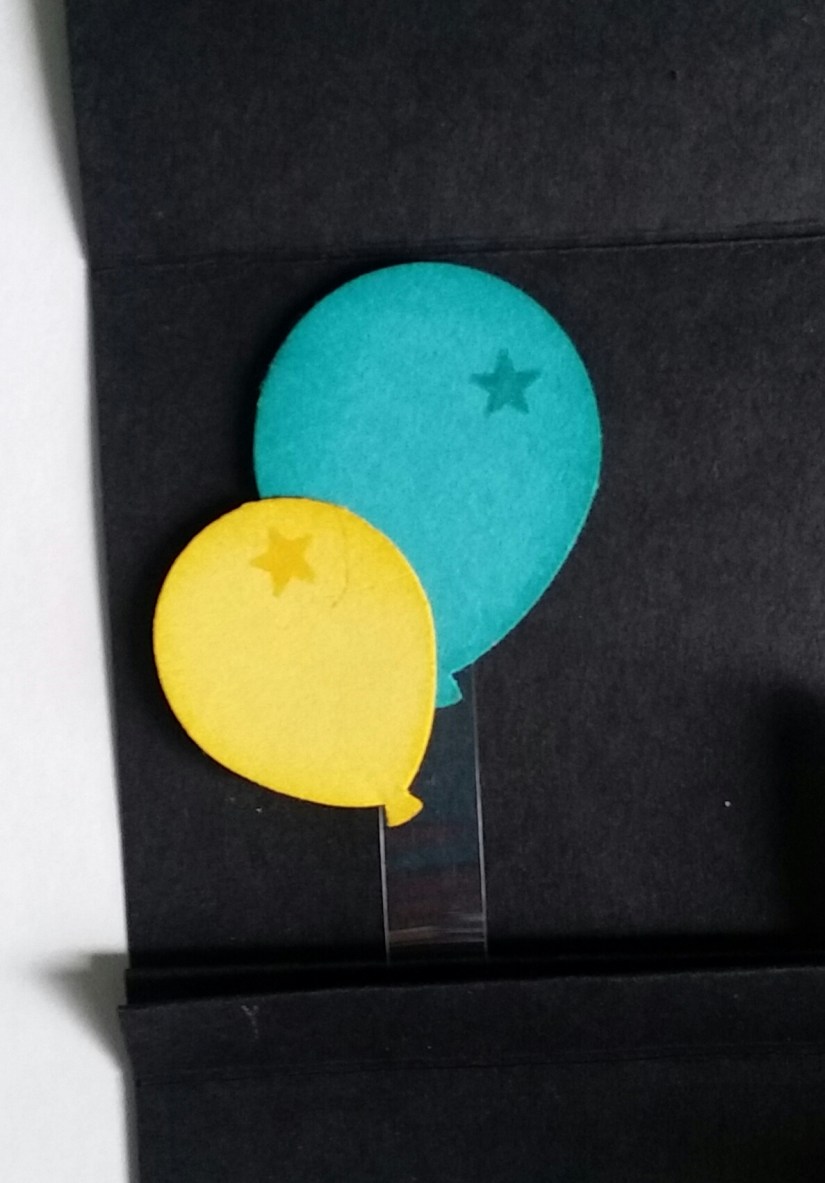
Balloons lying flat

Now I will tell you how to make your own.

POP UP EASEL CARD

NB: I have included metric and imperial measurements.  For those following the Imperial measurements can you please just check these.  Maybe do a test run first. I am just concerned with all the “16th” measurements if they are correct.  🙂

What you will need:

Cardstock for base 14.8cm x 29.8cm (5 7/8″ x 11  3/4″).

Designer Series Paper 14.4cm x 7.6cm (5 7/8″ x 3″)

Whisper White card (inside piece) 14.4cm x 6.6cm (5 7/8″ x 2  3/4″)

Scrap card for your suspended images (Of your choice.  I have chosen balloons for this one).

Acetate strips 1 cm x 4-5cm (1/4″ x 1  1/2″-2″) You will trim these as you make the card depending on where you want your images to sit.

To construct your Easel:

1. On the long side score your card at 2cm, 3cm, 4cm, 5cm, 6cm, 13.8cm and 21.6cm.

(3/4″, 1  3/16″, 1  9/16″, 2″, 2  3/8″, 5  7/16″ and 8 1/2″)  – Please check the measurements.

2. Fold on all the score lines starting as I have shown in the photo in a concertina fashion creating a “M” shape at the beginning and then after folding it as a Valley fold on the next 2 score lines. (ie folding it up towards you). I haven’t shown those folded in this photo.
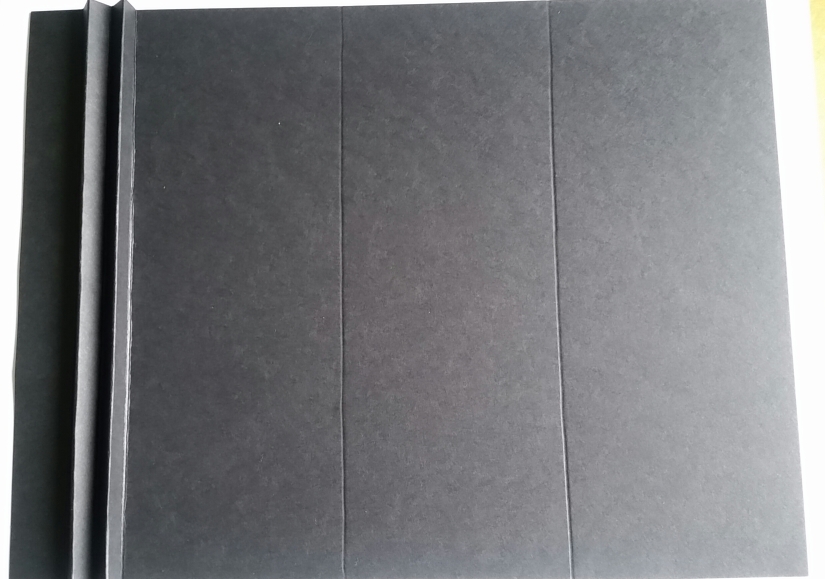
scored card

3. On the back of the card, place adhesive behind each side of “peak” that is formed. in the “M”. Adhere these together.  Check the photo below. (sorry if it is a little unclear).    This is it turned back to the correct side of the card.  It now becomes more a “V” shape which will be your crease for your acetate strips.

folded piece

4. After you have stamped and punched your images adhere them to the acetate strips. I used Fast Fuse to adhere them but you could use glue dots or other tape. I punched 2 balloons so adhered one to the back and one to the front of the acetate strip. Check the length of the acetate strip with the image to see if it is the right length BEFORE you adhere them in. 🙂 Trim the strip if necessary remembering you want to make sure they fit below the score line as I described above.

Place your adhesive (Fast Fuse or tape) along one edge inside the crease and adhere the acetate strips in place. Once in place then adhere the crease together. See the photo below.
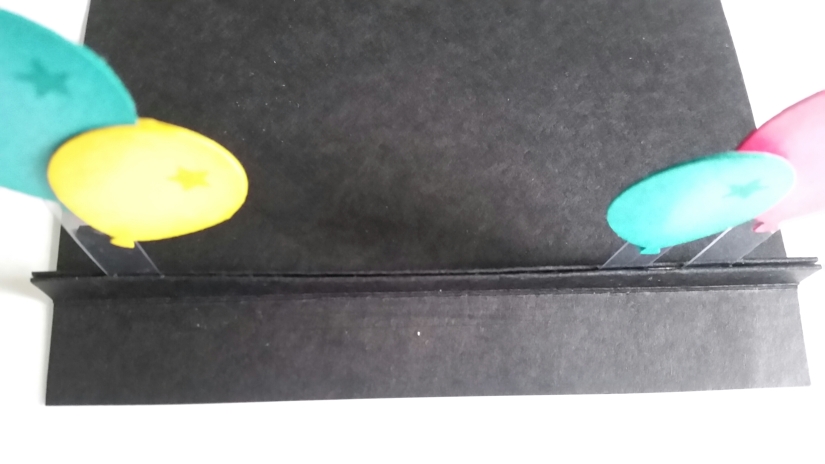
Balloons suspended

5. Now you can create the front and the inside as you like.  I adhered the Designer Series Paper piece on the front.  The Whisper White piece I stamped and adhered inside.

+++

I hope you can follow this.  Perhaps I need to start making videos. 🙂  If you have any questions please don’t hesitate to ask me.

Jenny
3D projects, Stampin' Up!

EASTER TREAT BASKETS!

Can you believe it is Easter in a few days?  I have been busy making some Easter Treat Baskets.  Some were for my Easter class last week but I also have an Easter Night Markets tomorrow so I have been getting ready for them too.  I thought I would show you some of the projects.

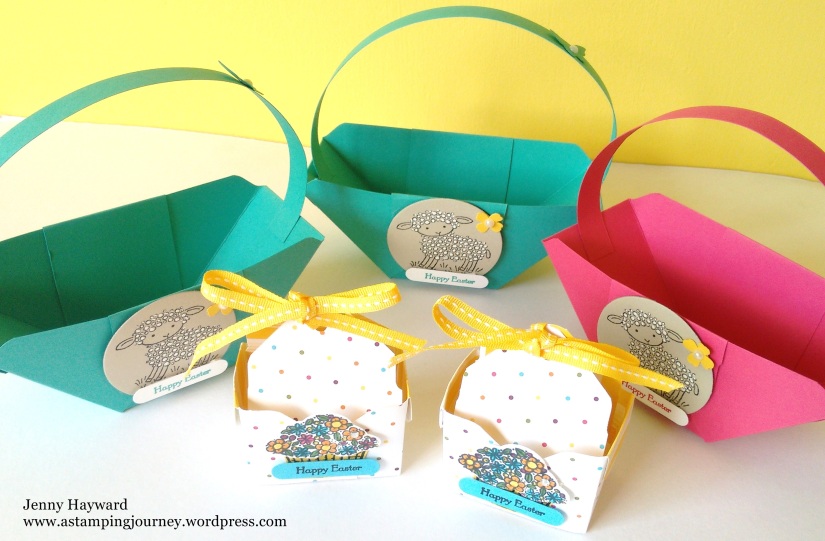
Here are some of the baskets I have made.

image-5308

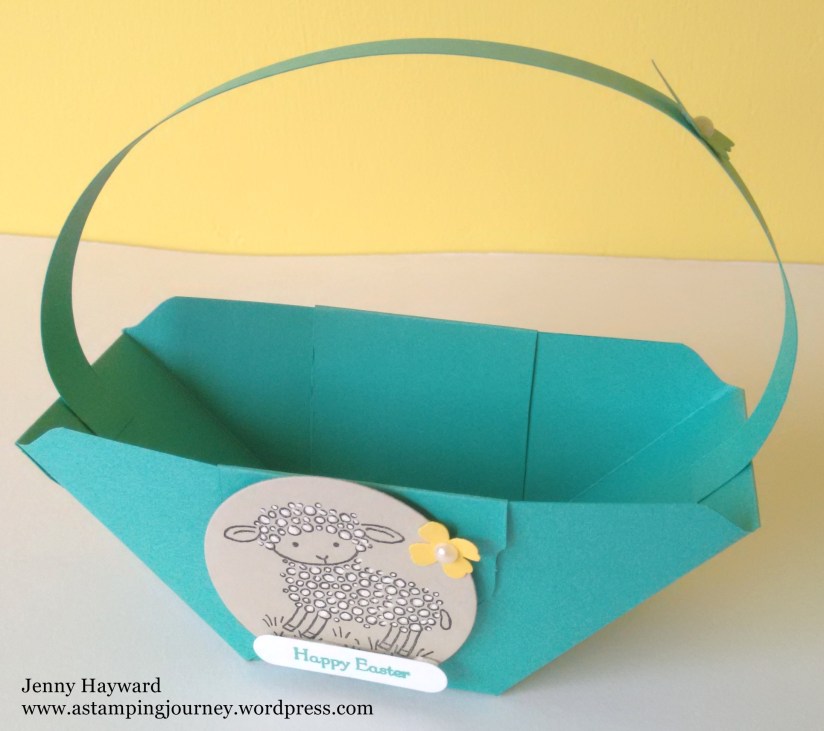
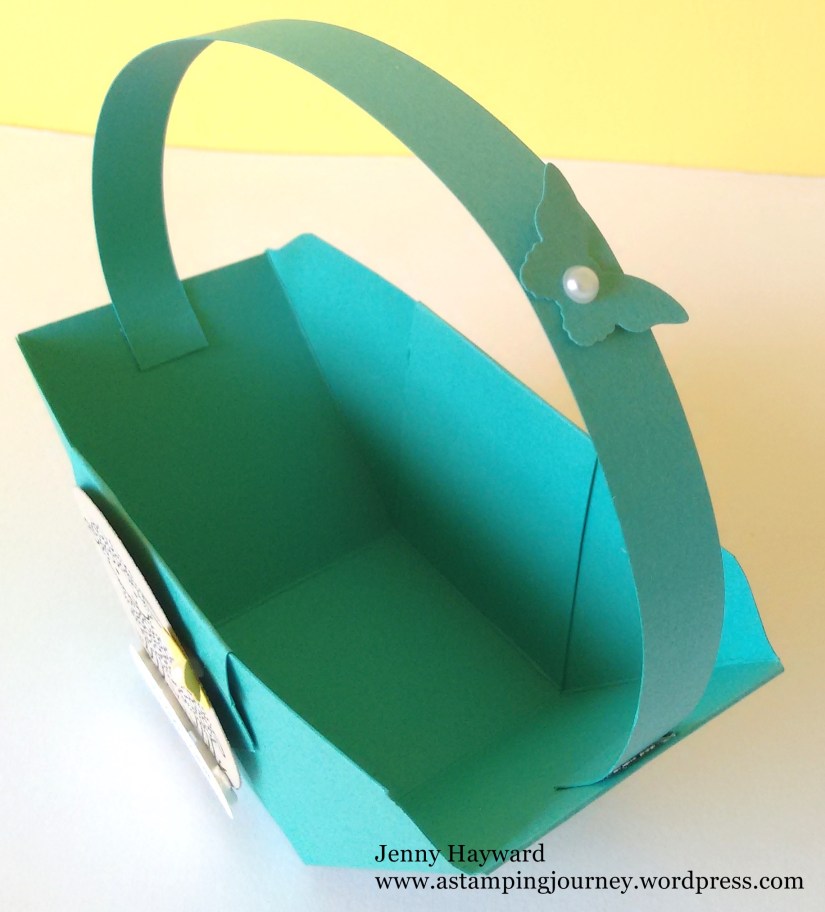
The Bermuda Bay and Melon Mambo baskets wereone we did at my Easter Class last week.We made them in the Bermuda Bay. This is made with the Envelope Punch Board.  There are a number of similar tutorials on the internet but the one I used for this basket was by Deb Valder and you can find that HERE.

image-5313

I stamped the ‘Easter Lamb’ on Sahara Sand and cut it with a Circle Framelit.  Then I coloured the fleece with the white Gel Pen.  I saw this idea on Pinterest which I thought was very clever. The greeting is from ‘Teeny Tiny Sentiments’ and I added a flower punched in Daffodil Delight using the ‘Itty Bitty Accents’ Punch pack.

image-5315

I added a mini butterfly punched with the ‘Bitty Butterfly’ Punch too to finish it off.

Now these cute little bags are made with the Envelope Punch Board too. (Have you got one of these punch boards yet? They do more than just envelopes!.  Add one to your next order.)

image-5316

These little bags are called Bag in a Box baskets by Sam on Pootles.  You can find the Youtube video to make these HERE.  I used some retired Designer Series Paper.

The little flower basket image is from the set ‘Sprinkles of Life‘ which is the Ronald McDonald House Charities stamp set.  I stamped the basket on Daffodil Delight and hand cut that out.  I stamped the flowers and punched this out with the punch. Then they were coloured with the Stampin’ Write Markers. The sentiment was stamped on Tempting Turquoise and punched with the Word Window Punch.  I tied it up with some Retired Daffodil Delight ribbon.

I have some more Easter ideas that I will share tomorrow so come back again. 🙂

Jenny

cards, Stampin' Up!

A FLOWER WITH THE ENVELOPE PUNCH BOARD!!!

It has been a while since I have had a good play with my Envelope Punch Board apart from some quick envelopes and gift Card Holders.  What about you????  I came across this really cute flower that can be made with the Envelope Punch Board.  I have to try this I think but I thought I would share this with you first.  I have the video link below for you.  Have a go! If I wasn’t so busy at the moment I would give it a try but I am getting ready to head off on Friday to Melbourne for the Stampin’ Up! Onstage Event.  This was a last minute decision so things are a little crazy 🙂

Here is the card to give you an idea.  This was created by the clever creators at Stampin’ Up!

EPB flower

To make your own check out this video link.  How cool is this??

If you haven’t got the Envelope Punch Board yet then I would suggest you rectify that.  🙂 You can order directly from me or from my Online store HERE.

Have a super wonderful day.

Jenny
cards, Catalogues, Stampin' Up!, Workshops

2015 CATALOGUE LAUNCH MAKE AND TAKES!

I thought I would show you the Make and Takes we made at my launch last weekend.  I shared some of the fun in an earlier post.

Firstly, we made a bookmark showing the new Incolors and using the cute new set “Sprinkles of Life”.

The top of a strip of Whisper White (5cm x 21cm) was punched with the Scallop Tag Topper Punch. One of the greetings was stamped in Memento Ink at the top.  How cute is this saying?? Right at the bottom the cone was stamped in Tip Top Taupe and then each ice-cream scoop stamped in a different colour.  There is a matching punch which we could have punched out the scoops but to keep it simple and quick they were just stamped directly on to the card.  Everyone could choose their colour of the new Incolor Dotted Lace Trim.

P1160820

Now for the card. I changed my mind a few times with what we do leading up to this.  This card was inspired by a few cards I had seen on Pinterest.  Once again, each guest could choose their own colour.

This is using the set ‘I Think You’re Great’. The scallop lines were stamped in Delightful Dijon (or what they chose). The “hi” cloud was stamped in their matching base card colour and hand cut.The flowers were punched from Watermelon Wonder card using the small flower punch in the Itty Bitty Accent Punch Pack. A little bling and some white twine finished it off.  Now of course it’s nice to have a matching envelope.  So with the new Envelope paper we could make one using the Envelope Punch Board.

P1160860

For some guests who didn’t like the “hi” on their card they could make an alternative in their chosen colour with the “Happy Birthday” from ‘Remembering Your Birthday’ set.  It was nice to have a matching envelope to go with it too. 🙂

P1160813

Sorry if you missed my launch last weekend, I know for some people distance is an issue 😦  If you would like me to share some fun projects with you and your friends, why not invite me to come to your place and we can have some fun stamping together.  If you are further afield, then you can have a Catalogue Party yourself.  Collect some orders from your friends and send them to me.  I can have the orders sent back directly to you – and the bonus you still earn all the exciting little hostess benefits yourself.  You can check off some of those items on your Wish List – and get them for Free!! Do it!  🙂

Thanks for stopping by today.  It’s nice to have you visit me from near and far.  Have a wonderful day xx

3D projects, Christmas

12 WEEKS OF CHRISTMAS – WEEK 12!!

Latte 12 weeks Header

Can you believe it.  It’s Week 12!! Where have those weeks gone??  They have certainly flown by. Today’s project is brought to you by Libby.  She has some quick and easy gift giving ideas.  They are so cute. 🙂

Christmas is only one week away and if you are looking for some quick stocking stuffers these projects will fit the requirements.

All you really need for these projects is the Envelope Punch Board and a few punches including the Scallop Tag Topper Punch.

Project 1 – Candy Cane Treat Box

candy cane treat

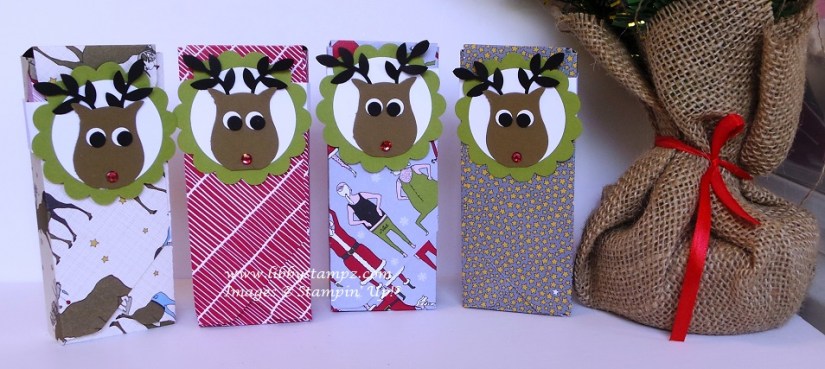
These little pouches are quick and easy to make with the Scallop Tag Topper Punch, some Jiggle Eyes, ribbon, Blendabilities ( to colour the Rhinestones) and some Candy Canes of course. They easily fit 2 Candy Canes inside and could fit more if you wanted or some other treats. If you don’t want to give sweets, it would fit some coloured pencils inside or other small gifts.

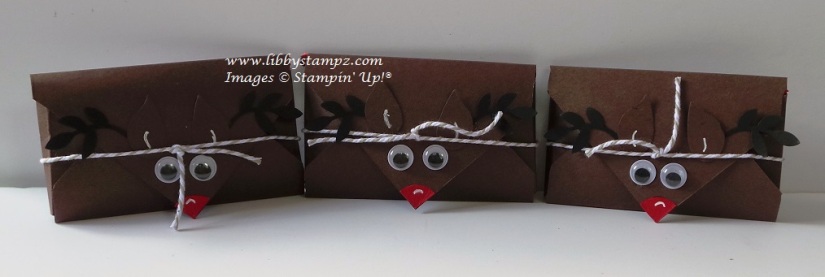
Project 2 – Reindeer Poop (M & Ms Peanuts)

reindeer poop

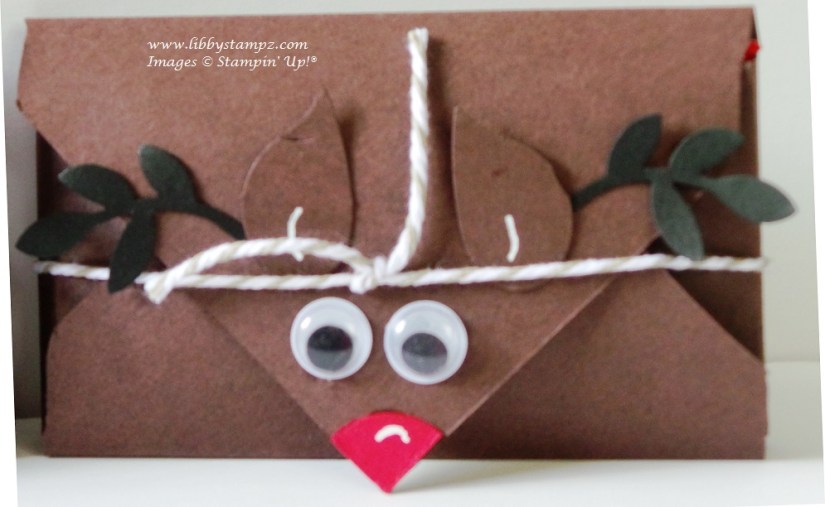
This little treat is made using the Envelope Punch Board, some Jiggle Eyes, the Bird Builder Punch, ½” Circle Punch and the White Signo Uni-Ball Gel Pen for highlights.

reindeer poop close-up

It fits 1 small packet of M & Ms inside quite neatly and on the back I have adhered the Reindeer Poop Poem (available in the pdf).

Project 3 –Maltesers Pouch

Malteaser pouch

This treat uses the Envelope Punch Board again. It’s a pouch with a Belly Band and fits 1 of the Merryteasers in it. It would also fit individual chocolates such as Freddo Frogs, Caramello Bears, and Santas etc.

malteaser pouch - single


Of course we have a bundle for you.

Latte Girls Week 12 Bundle –

Just $90 plus postage. (RRP $101.85 + postage). Save over $10!

Bundle 1

Or Upsize your bundle and get the Santa & Co DSP as well for the special Latte Girls price of $105 + postage (RRP $120.80 + postage).

Bundle 2

Remember you will need to contact me to get this bundle at these prices as it’s exclusive to the Latte Girls 12 Weeks of Christmas Design Team! 

Do you want the written tutorial? No worries – simply comment here with your email address and I’ll send you a copy!

Thanks for stopping by today.  Enjoy creating these cute treat pouches.

Jenny


3D projects

IT’S A CRACKER!!

I have been wanting to share this with you for a while. Finally I can! Giving Gift cards are popular at Christmas so why not dress them up in a novelty gift holder.  Here is a Cracker Gift Holder made with the Envelope Punch Board.

P1100630

So how can you make it??  Check out the tutorial below.

1. METRIC: Cut card 14.8cmx14.8cm. Score your card at 6cm and 12cm. Fold on the score lines.

    IMPERIAL: Cut card to 6″x6″.  Score your card at 2 3/8″ and 4 6/8″.  (I hope those sound right as I am not too sure of the correct way to represent it!!).  Fold on the score lines.

2..On the folded edge, line the left hand side of the card on the Envelope Punch Board at 2.5cm (1″). Punch.  It is a bit hard to punch through so press firmly.

P1100785

Flip your card over to the other end. Line up at 2.5cm (1″) and Punch.

 P1100786

3.  Now punch on the front bottom edge of the holder.  It is easier to open it out. Line up at 2.5cm (1″) and punch.  Then flip and punch at 2.5cm (1″) on the other end.

P1100788

4. Fold up where the narrow scored line is. Does this make sense?? The part that forms the pocket.  Turn it over.  Line up at 2.5cm (1″) and punch, flip the holder over and punch again at 2.5cm (1″) on the other end.

This is how it should look when you fold it out.

P1100791

There you have it.  I hope this makes sense.  Please comment/email me if you are unsure.  Sometimes it is hard getting all the details in writing.

To assemble this, add Sticky Strip inside on the narrow edge on both ends.  Adhere together to form a pocket. Now decorate it as you like and then add your Gift Card.

Why not make it a Stampin’ Up! Gift card to give this Christmas??  These ones are available especially from me (Australian residents only).

P1100632

Now go and enjoy making your own Christmas Cracker Gift Card Holder.

Until next time,

Jenny

3D projects, Stampin' Up!

CHRISTMAS BON-BON WITH THE ENVELOPE PUNCH BOARD!

The Envelope Punch Board is one HOT item at the moment.  I have been having so much fun with mine.  Last week I made this Christmas Bon-Bon.  I shared it on my Facebook Business page and realised I hadn’t shown you all yet.  (If you haven’t LIKED me on Facebook yet, make sure you look me up so you don’t miss out on some of the projects I post).

P1100497-1

These are so easy to make.   You can whip up a few of these at a time.  They will be great filled with some treats to give out at Christmas.  You can find the video on how to make these here.  I have used the lovely ‘Season of Style’ DSP.  For the tag I have used ‘Chalk Talk’ stamped in Gumball Green and the Christmas Bauble is from the ‘Best of Christmas’ set.  Here is a close-up of the tag if you want to see it.

P1100497-2

So have you got your Envelope Punch Board yet??? If not, why not???  You do have to have one you know! Don’t just think they are for envelopes!

We have a wet Monday here but that is good.  The ground is so dry.  We so need the rain.

Thanks for stopping by,

Jenny