3D projects, Catalogues

MOSAIC MOOD TEA BAG HOLDER AND A TAG!

I have 2 projects to share with you today.  I made them a few weeks ago but just getting to show you now.

I have these cute little Tea Bag Holders.  I made them up to send out with some of the Annual Catalogues.  These were made with the Mosaic Mood Specialty Designer Series Paper.  The paper is so shiny.  It is gorgeous really and I think they turned out ok with it.

Nothing like pouring over the new catalogue with a cup of tea in hand. 😉

The sentiment is from the Delightful Day stamp set.  It is stamped on Mint Macaron and punched with the Timeless Label Punch.  Then backed on a white circle and the ring shape from the Stitched Labels Dies.

The little holders were made using the Envelope Punch Board.  I know it is retired but I love this little tool for making quick envelopes. The Tea Bag Holder is a Pootles one and you can find it -> HERE.

With some of the scraps from these little Treat Holders I made up a couple of tags.  These were for the Lucky Door Prizes for my launch.

I used the Delightful Day stamp set again too and the Stitched Nested Labels Dies. It’s so easy to make quick tags with the Delightful Tag Topper Punch.

Hope you like them.

Thanks for visiting,

Jenny

cards, Catalogues, Stampin' Up!

ONE FOR ALL MINI THANKS!

I hadn’t got around to sharing this little card with you.  This card is just a small love note size, so 7.5cm x 7.5cm (3″x3″).  I made quite a few of these mini cards recently for Customer Thank You cards.  This is using the lovely One For All set.

I made 2 different versions. One in a Mint Macaron card base with the flower and stamping in Mint Macaron too and a Calypso Coral banner.  Then one in a Calypso Coral base card, stamping and flower with a Mint Macaron banner.  I cut the banner free hand by cutting in to the ends of the strip.  I added a Vellum circle cut from the Stitched Labels Framelits.  The flower is cut from the Seasonal Layers Thinlits.

I sent these out as a little Thanks for customers who ordered the last month or two.  With a little token gift too of course.

If you are in Australia you can purchase your Stampin’ Up! supplies from my store -> HERE and they will be sent directly to you.  Ask me for the current Host Code. Alternatively, drop me a comment or message and I can arrange your order.  I appreciate each and every order. 

Thanks for visiting,

Jenny


cards, Catalogues, Christmas

WISHING YOU WELL CHRISTMAS!

Yesterday I shared a card using the Wishing You Well set.  When I made that one I made a similar Christmas version.  It shows just how versatile this set is.  The layout is exactly the same as yesterday’s version with just a couple of changes.  Head back to the post to see it if you missed it.

This is the Christmas version.

For this one, the base is Shaded Spruce and the wreath is stamped in Shaded Spruce.  I am really liking this colour lately.  It’s a great green for traditional Christmas cards.  The bow was stamped on scrap white and cut out separately – with scissors – no punches or dies available. 🙂  The bow was raised up with Dimensionals.  The “spots” from Timeless Textures were stamped in Smoky Slate this time.  The strip of paper is from Under The Mistletoe Designer Series Paper available in the Annual Catalogue.  The sentiment from the Wishing You Well stamp set fits nicely in the Stitched Labels Framelits.  I layered the white stamped and diecut piece on to a Shaded Spruce one.  TIP: to do this diecut a Shaded Spruce one, cut it in half vertically and separate the piece as you layer it under the white one.  I added some Red Rhinestones to finish the card off.

I hope you like this version. Christmas is coming up way too quickly don’t you reckon??  3 months today.

Have a great day,

Jenny

Catalogues, Personal Ramblings, scrapbooking

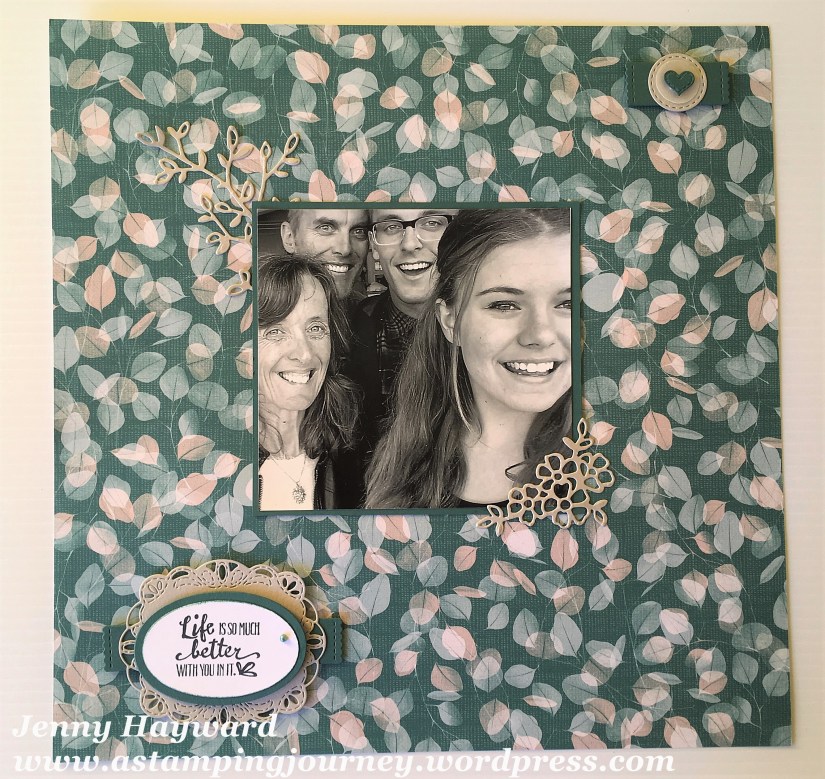
FAMILY SCRAP PAGE WITH NATURE’S POEM PAPER!

If you have followed me for a while you would notice that I don’t do a lot of scrapbooking.  I have done a page here and there.  (If you want to see some of them then be sure to click on the tag ‘scrapbooking’ at the top and it will take you to some of the posts).

I have had this photo for a couple of years now with the idea of scrapping it.  I needed to make a page this week and thought of this photo again – and it was time to do something with it.  So … I made a scrap page. 🙂

Here it is for you.

WHAT I HAVE USED

Card and Paper: Nature’s Poem Designer Series Paper, Tranquil Tide cardstock, Sahara Sand cardstock, Whisper White, Vellum.

Stamps: Petal Palette.         Dies: Petals and More Thinlits, Layering Oval Thinlits, Stitched Labels Thinlits.

THE PROCESS

Choosing the photo was the easy part but working out how to put it together took a little time.  I first went through some scrapbooking page ideas I had pinned on Pinterest.  I also looked at some ideas I saved to my computer and in some magazines.  I wanted to use some of the gorgeous Stampin’ Up! paper in some way.  I had thought in strips.  I tried a few sheets of paper that I had to see what worked.  I found that this piece looked the best against the black and white photo.  I thought I might cut it in strips with some other prints from the Nature’s Poem pack but I liked this piece left as it was.

I narrowed down the stamps and the dies to the Petal Palette set and cut a few pieces from the Petals and More Thinlits and the Stitched Labels Framelits.  I played around with the positioning and then added the sentiment.  I have to say it was a fun process putting the page together and I was happy with the way it turned out.

Now don’t hold your breathe for me to scrap another page in a hurry.  😉

Thanks for visiting,

Jenny

Catalogues, Stampin' Up!

BLENDED SEASONS AND BONUS DAYS!

August is an exciting month with some awesome happenings.  Let me tell you about them.

COLOUR YOUR SEASON

The Blended Season Bundle is a limited release bundle.  It has some gorgeous stamp images and sentiments for many occasions.  The matching  Stitched Season Framelits you will love.  They leave a stitched edge on the inside and outside of your diecut.  Use them in many ways.  If you love the Stitched Shapes and the Stitched Labels Framelits, these are a must have.

Bundle Available in Wood mount $134.00 AUS  Clear Mount $113 AUS

Dies on their own $57 AUS

So you can colour these beauties, Stampin’ Up! have added another colour set of Watercolor Pencils. $21.75 AUS

If you want to order any of these you need to be quick.  They are only WHILE SUPPLIES LAST.  I don’t want you to be disappointed so get in early.  (To order see below).

BONUS DAYS

What a “bonus” that Bonus Days are on this month when the gorgeous Blended Season is available.

HOW IT WORKS

For every $90 in orders during August you get to earn a $9 voucher to redeem in September.  How cool is that.

NB: After your order is placed you will receive an email with a code.  You must keep that email with the code so you can use that for your redemption in September.  You can earn as many Bonus Days vouchers as you like. 

TO ORDER

Email me directly at jghayward@yahoo.com

OR

Order online in my store -> HERE.   Please use the Host Code: WRQSC9N3

Have a wonderful day,

Jenny

cards, Techniques, Tutorials

5 WAYS WITH PAPER – DAY 2!

Day 2 of 5 Ways With Paper.  I have another great card to share with you using your lovely paper.

This card was inspired by one by Lisa Pretto on inkbigacademystamps.

I have used the Share What You Love Specialty paper again – because it is so gorgeous!

TO CREATE YOUR OWN

On your base card adhere a piece of co-ordinating card slightly smaller than your base.

Cut your pieces of paper.  You can make them any size you like of course but to give you the measurements I have used:

Top Left piece measures 8cm (width) x 9.5cm (length) or 3 1/8″ x 3 3/4″.

Bottom Right piece measures 8cm (height) x 7cm (width) or 3 1/8″ x 2 3/4″.

Decorate as you like.  I cut a decorative label from the Stitched Labels Framelits.  The sentiment is from the One For All set.  I sponged around the edge of the white oval with Old Olive.  The little Razzleberry flower is cut from the Seasonal Layers Thinlits. It needed something underneath the label.  I played around with a few different options but I wasn’t happy with them.  In the end I went with a strip of Rich Razzleberry card that I had flagged both ends.

Hope you like it.  Thanks for visiting today,

Jenny

cards, Techniques, Tutorials

5 WAYS WITH PAPER – DAY 1!

Do you love the gorgeous Stampin’ Up! paper?  It is so fantastic isn’t it.  We buy it, look at it, stroke it – and then file it away for a special occasion.  Do you do that?

We have a wonderful Paper sale on at the moment to buy 3 and get one free.  More of that gorgeous paper to file away.  Well, this week we are going to get that paper out and use it (I would like to write that last sentence in capitals but you might not like me yelling at you). Each day this week I will bring you a different way to use that paper.  Remember the hashtag from a few months ago when I shared ways to use paper #usethatpaper  Well, let’s get on with it again this week.  Who is in?

For today’s card I have used the gorgeous Share What You Love Specialty Designer Series Paper.  It is not one available as the Buy 3 get one free promotion but it is so beautiful to use and probably one of those packs you have sitting there too special to use.

The idea for this card came from Jackie Bolhuis from klompenstampers.

This style of card works really well with beautiful prints on both sides of the paper.

HOW TO CUT YOUR PAPER

Firstly, cut your piece of Designer Series Paper just slightly smaller than your card base.  (Metric paper size would be 14.4cm x 10.1cm). The US card sizes are different to the South Pacific (and I think) Europe market, so I will just give you a general guide but if you cut your paper to about 1/8″ shorter on both sides to the front of your card base. Card base being 5 1/2″ x 8 1/2″ I think. On your short edge cut it vertically at the point about 2/3 the way across.  For metric measurements I cut it down at 7cm.

Take the Left hand strip, turn it 90′ anticlockwise and cut it approximately 2/3.  For metric, this was at 8.4cm.  Place it aside and it’s easier if you keep it in it’s position one above the other. Take your right hand strip that you had cut previously, turn it 90′ clockwise (so reverse direction) and cut it at 2/3.  For metric this would be at 8.4cm. Place it next to your previously cut pieces in their positions.

You should have 4 sections of different sizes.  With the bottom left piece flip that over.  For the top right piece flip that piece over. Adhere these pieces in position on your card base.

FINISH YOUR CARD

Decorate your card as you like. I had the decorative strip and the sentiment sitting on my desk from unused projects so it was good to be able to use these. The strip was cut with Dazzling Diamonds Glimmer Paper from the Petals and More Thinlits.  Shame you can’t see the sparkle from that. The sentiment is stamped with a greeting from Happy Birthday Gorgeous and cut with a Framelit from the Stitched Labels Framelits.  I cut the decorative circle one in Petal Pink which is from the Stitched Labels Framelits also. It is hard to see but I also cut a small circle from Vellum from the Stitched Shapes Framelits.


Come back tomorrow and each day this week as I bring you a different way to use your paper.  Thanks for visiting me today,

Jenny


cards, Catalogues, Challenges, Stampin' Up!

COLOUR INKSPIRATIONS CHALLENGE #35 WITH NEUTRALS!

Initially this Colour Inkspirations Challenge #CI35 this week stumped me.  All neutrals!  Now with the colour revamp though we had a mix of other colours. (which I am still trying to get my around as neutrals!).

I had a little time today to play – and it’s nice to play with new toys. I used the gorgeous new Botanical Bliss Bundle (Botanical Bliss stamp set and the Botanical Tags Thinlits).

We were required to use 3 of the Neutrals colour collections.  I chose Merry Merlot, Mossy Meadow and Crumb Cake.

The sentiment is stamped and heat embossed in Copper.  It is cut with one of the dies in the new Stitched Labels Framelits. I finished it with some Copper Thread loops.

You can play along too if you are quick.  It finishes Monday night (AET).  Head -> HERE to the Facebook group.

Jenny


cards, Catalogues, Classes, Stampin' Up!

FINALLY CATALOGUE SHOWCASE MAKES!

Last weekend I had my Catalogue Showcase. Lots of fun, creating and pouring over the new catalogue and new colours.  I have been wanting to share the projects we made all week but I wanted to finish with the Delightfully Detailed projects first. SO, today I can share them.

We looked at the new catalogue and colours.  I shared an overview in this post -> HERE.

To try the new colours everyone got to make a bookmark using the Waterfront set.

On the top they could use the Scallop Tag Topper Punch or the new Detailed Trio Punch.  We used some of the new Black Cord to tie it off.

For the card we used the fantastic new Stitched Labels Framelits.  I have mentioned these previously.  These are a must have I think.  We used the Love What You Do stamp set and some of the gorgeous Share What You Love Designer Series Paper.  A little addition with the Share What You Love Artisan Pearls finished the card off.  The sentiment for this is from Happy Birthday Gorgeous.  I think everyone was in love by the end of the session. 🙂

I had mentioned the Stitched Labels Framelits back in this post -> HERE.  I didn’t share this chart I had made at the time to show how each of the Framelits cut.  You might like to see it.

These are the Framelits

Hope your weekend is going well.  It is blowing a gale here so hopefully I won’t get blown away. 😉

Visit again soon,

Jenny


cards, Catalogues, Stampin' Up!

OH SO ECLECTIC FRAMED WITH STITCHED LABELS!

I mentioned the Stitched Labels Framelits 2 posts back.  Ooh! I am in love with these.  I am sure you will love these.  I have used the Stitched Shapes Framelits so much and these will be a nice addition.  So I was playing with them again over the weekend.  With these cards I used the “old” set Oh So Eclectic.  And oh! another new love – Gorgeous Grape!!

Here are the cards.

I kept the layout the same on both.  This first one is in Lovely Lipstick – one of the new Incolors.

The “stitched” background was cut with one of the dies in the set on a smaller piece of card than the card base.  I did that twice. Once at the top and then at the bottom.  The white card was cut with one of the ornate frame dies and the flower and leaves stamped from the Oh So Eclectic set was raised up on this.  The sentiment is from the stamp set and stamped on Granny Apple Green card and cut with one of the label dies.  A little Silver Thread was wrapped around and adhered on the back of it.

The Gorgeous Grape card was created in a similar way.  Under the white diecut frame I added a piece of Dazzling Diamonds Glimmer Paper that I had flagged the ends.  I stamped 2 flowers from the Oh So Eclectic set.  The outline was stamped in Gorgeous Grape and the inside was stamped in Highland Heather another new colour.

Here are the Stitched Labels Framelits.  How nice are they???

It has some great dies for the sentiments and a few little ornate ones.  The line ones I mentioned in the previous post.  I found it helpful to use the rubber mat for the top plate in the Big Shot to reduce the line from the edge of the die.  I will be using these dies a lot I think.  You need these dies. 🙂

These are available in my store -> HERE now.  $57 AUS  Please use the Host Code: FRS6ZZ6G

Thanks for stopping by,

Jenny