cards, Catalogues

SOFTLY FALLING BALLOONS!

Another quick card with the Lift Me Up Bundle.  This was inspired by a few different cards on Pinterest.

Are you liking this bundle?? I love it. So much fun.

TO RECREATE THIS CARD:

On a piece of Marina Mist Card cut 3 of the cloud shapes from the Up and Away Thinlits Dies. Stamp some clouds with Marina Mist ink on to the card. Emboss the card piece with the Softly Falling Embossing Folder.  

Stamp the sentiment on a strip of Whisper White Card.  Adhere to the Marina Mist card mat with Dimensionals.  Tie around some Crushed Curry Baker’s Twine a couple of times.  Adhere the whole piece to Thick Whisper White card base.

On scrap white card stamp a large balloon in Crushed Curry and a smaller one in Tangerine Tango. Cut them with the Thinlits and raise them up off the card with Dimensionals.

Thanks for stopping by.  Have an awesome weekend.  I hope you have time for creating.

Jenny

Grab the Lift Me Up Bundle in my store HERE now.


cards, Stampin' Up!, Workshops

ONE LAYER LIFT ME UP BALLOON IN PASTELS!

I have a simple one-layer card to show you today using the Lift Me Up Bundle. This uses the different shaped pieces in the Up and Away Thinlits.  The idea for this card was inspired by one I had seen on Pinterest.  I thought it was a clever idea.

The different pieces were cut with Blushing Bride, Sweet Sugarplum and Soft Sky.  The basket was stamped and cut from Crumb Cake. I sponged around the edge of each piece with the matching ink.  Using the same colour inks I stamped the “splodge” from Gorgeous Grunge over the card.  The sentiment was stamped in black.

Before adhering the pieces down, place them on the card in position.  Mark the place in pencil where the “strings” for the balloon would be.  Then remove the bottom piece and stamp the basket strings in.  Then adhere the balloon pieces and the basket in to place.  Add some Blushing Bride Baker’s Twine and a Rhinestone to finish.

I am so glad I can make more of these now.  I had lost one of the Thinlit pieces for weeks.  I was feeling very sad – and then yesterday sorting out stuff in the studio I found it on the floor under a table.  YAY!!

Have a great day,

Jenny

cards, Catalogues, Stampin' Up!

SENDING SMILES WITH THE LIFT ME UP BALLOON!

Another card to share with the Lift Me Up Bundle. This time I wanted to add some colour behind the balloon.  This is so easy to do with the shaped framelits in the Up and Away Thinlits set. This card was inspired by a card shared by a Demonstrator friend.  

sweet-sugarplum-hot-air-balloon

TO RECREATE THE CARD:

Adhere a piece of the ‘Falling in Love’ DSP to a Sweet Sugarplum card base.

Cut the large Hot Air Balloon from Very Vanilla Cardstock.  Using the shaped framelits in the Up and Away Framelits cut pieces in various colours of card.  I used Blushing Bride, Soft Sky and stick your card pieces down. Adhere the Balloon to your card.  Tie off some Sweet Sugarplum (from the Succulent Ribbon Combo) and some Very Vanilla Satin Ribbon and adhere on to the Balloon with a ‘Falling in Love’ Embellishment.

Stamp the sentiment on to Very Vanilla Card and cut that with one of the shapes. Sponge the edge with Sweet Sugarplum ink. Cut an oval from the Layering Oval Framelits from Sweet Sugarplum and layer them together.  Raise them up with Dimensionals.

A really very easy card once you put your Hot Air Balloon together.  Try it with different colour combinations perhaps?

Have a great day.

Jenny 

cards, Stampin' Up!

CARRIED AWAY DSP + HOT AIR BALLOONS = A GOOD MIX!

While I had everything out from making the card I showed you last post I thought I would put together another card.  This one also uses the Carried Away Designer Series Paper and Lift Me Up Bundle. It also has a similar colour scheme of the Peekaboo Peach and Night of Navy.

hot-air-balloon-_-night-of-navy

This time I stamped some small clouds on to the white card and layered over the DSP.  I added a piece of the Peekaboo Peach Ruched Ribbon before adhering it to the Peekaboo Peach card mat and then the Night of Navy Card base.

For the sentiment I inked just the “Happy Birthday” from the Lift Me Up Stamp set with the Night of Navy before stamping it and cutting it out with one of the Project Life Framelits.  You might just be able to see some silver Thread looped up behind the sentiment too??  The large Hot Air Balloon was diecut from Night of Navy with the Up and Away Thinlits.

I hope your weekend is going awesome??  Be back again soon,

Jenny


cards, Catalogues, Stampin' Up!

CLOUDY LIFT ME UP!

A couple of weeks ago I played around with the Lift Me Up Bundle.  I will share the cards with you over the next few days.  To start off I went looking around Pinterest.  I was inspired by THIS card from Helen in the UK.  Here is my version.

hot-air-balloon-_-circle

TO RECREATE THIS CARD:

I cut a circle with one of the larger Circles from the Stitched Framelits out of the cool Carried Away Designer Series Paper that is available Free with Sale-A-Bration. (How cool is it that this paper co-ordinates with the Lift Me Up Bundle.  Good thinking Stampin’ Up!).  That was adhered on to the white card mat.  The sentiment is stamped in Night of Navy at the bottom and then adhered on to a Night of Navy Card mat and then the Peekaboo Peach Card base.

Stamp the small Hot Air Balloon and cut it out with the Up and Away Thinlits.  Also cut some White clouds using the cloud Framelits too.  (I think some nice Dazzling Diamonds Glimmer Ppaer clouds would look good instead of the plain white). Adhere the Hot Air Balloon and the clouds over the DSP circle piece.  I added a little White Baker’s Twine bow to finish.

Get your ‘Lift Me Up’ Bundle HERE in my store.  Clear mount $78.25 AUS.  Wood mount also available.

I will be back very soon with another Hot Air Balloon card.

Jenny

Catalogues, Stampin' Up!

LAST MONTH OF SALE-A-BRATION!

Can someone tell me what happened to February?? It seems like I blinked and it is gone.  I hope the rest of the year doesn’t go like that.

Being March it means that we are in to our last month of Sale-A-Bration. Another name for Sale-A-Bration would be FREEBIES!!!  Because you get free stuff whether you Shop, Host or Join.

I thought I would just update you on how you can.

header_sab2017_eng

shop-2

Spend $90, Pick one of the Sale-A-Bration items.  (See the Catalogue link on the right).


host-2

Still time to book your own private Stamping event with me.  I have limited dates though.  You get an extra $40 of free products when the party order exceeds $400.  That is so easy to achieve with a few guests.

join-2

This is the most exciting I think.  I have had a number of people join my little team over the last 2 months. It’s so nice to have them whether they are hobby demonstrators (just want the discount) or if they want to hold classes/parties.  You choose!

Joining Stampin’ Up! means you save money.  First with your initial kit and then a minimum 20% discount every time you order.

TO JOIN – You pay only $169 (AUS).  You get $235 worth of products for that PLUS…..
Choose an additional 2 free stamp sets up to the value of $179.  AND there is no shipping to pay on all that! That’s $20 in itself!
In total you get $414 of products, but you are only paying $169.  Fair Dinkum!  You have to love free stuff.  Have a look at your wish list.  Is it longer than $169???

love-the-products_contact

Not only will you SAVE BIG TIME though there are so many other awesome reasons too.  Like lots of new friends (from all over the world), A great community of stampers within several different online groups,  Endless inspiration provided by Stampin’  Up! and other fellow demonstrators.

Not sure?? Visit my page HERE which will answer a few questions.   If you have any more questions don’t hesitate to ask.  If you are distance from me don’t let that worry you.  With technology the distance becomes so much closer.

Look forward to welcoming you to my JEN’s Ink. team.

Jenny


cards, Challenges, Stampin' Up!

DUSTING OFF THE DAHLIA FOR COLOUR INKSPIRATIONS CHALLENGE #04!

I had a little play yesterday.  I was supposed to do so many other things but really …….  🙂  I wanted to have a try at the new Colour challenge at Colour INKspirations.  I wasn’t sure if I would get a chance later this week and I missed last week.  This is the colours for this week.

colour-inkspiration04

I had been contemplating these colours all weekend and really wasn’t sure what to do with them.  I haven’t used Elegant Eggplant in YEARS!!  It was one of my “go-to” colours a long time ago. So I dusted that off and then looked at my stamp shelf to see what I could use.  The Definitely Dahlia stamp was one I hadn’t used in ages either.   After looking through Pinterest for a few minutes.  (Really only a few minutes.  You have to control yourself there!).  I was inspired to create a multi coloured flower.  So here is my resulting card.  I am still not sure of it but here it is!

definitely-dahlia-for-colour-inkspirations-04

TO RECREATE THIS.

The Dahlia – For the ‘Definitely Dahlia’ stamp I first inked it with the Crushed Curry, then sponged some Delightful Dijon in the centre.  The idea then was to sponge the Elegant Eggplant on the edges.  When I first did this and stamped the Dahlia the purple went a brown colour.  That was not what I wanted!  So after cleaning the stamp I repeated with the Crushed Curry and Delightful Dijon, then with a tissue I wiped off some of the Crushed Curry on the edges.  Then with a sponge I went over the edges with the Elegant Eggplant.

After stamping it, some of the colour was a bit faint to what I would have liked (it’s an old inkpad) so I went over the image with the Elegant Eggplant Marker to touch it up.  I then went over it with the Aquapainter just to smooth it over.

The Dragonfly – The patterned Dragonfly from ‘Dragonfly Dreams’ set was stamped with Black Stazon onto clear Acetate and then cut using the  Detailed Dragonfly Thinlits.  I adhered that on to the card with Glue Dots.

To Finish –  Stamp over some “dots” from ‘Gorgeous Grunge’ with the Crushed Curry.  I tied around some Crushed Curry Baker’s Twine a few times around the card.  The sentiment is from the ‘Dragonfly Dreams’ set.  The card is layered on to the Elegant Eggplant card mat and then on to a Thick Whisper White card base.  Always bling to finish with the Rhinestones right. 🙂

So what are your thoughts?? Certainly not as good as some of the stunning cards entered for this challenge BUT you just have to have a go.  Check out the amazing cards and you can join in yourself if you like.  Head over HERE to join on Facebook.

Get your Dragonfly Dreams Bundle or the Definitely Dahlia at my store HERE now. 

Jenny

cards, Catalogues, Techniques

EMERALD ENVY PAPER PIECING FOR BEAUTIFUL YOU LADY!

If you don’t like colouring too much here is a quick way to add colour. Try Paper Piecing. You can use this idea for any outline stamps.  I have done this with the Beautiful You set.

emerald-envy-lady

I CASED this card from a Demonstrator friend on a group I am on.

For the Paper Piecing technique:

Stamp your image in black onto Whisper White card.  Ink it and stamp it again onto patterned paper.  For this one I used the Emerald Envy pattern in the Playful Palette DSP stack.  Then cut your image from the patterned paper one cutting just on the outside of the black line.  Adhere this image onto your other stamped image on the White card.

To assemble the card:

On a piece of Whisper White card emboss it with the Lovely Lace Embossing Folder. Layer that on to some black card. (TIP: If you like to save on your cardstock you can just add strips of black behind the white.  That’s what I did!!). 😉  Adhere this to your Emerald Envy Card base.

Mat the stamped piece with the lady on to black card and adhere on to your card base. Stamp your sentiment onto a White card rectangle and mat this onto a black card rectangle.

There are so many ways you can use the Beautiful You set.  I hope I have inspired you.  I am sure there will be lots more to share with you later.  Next week I will be focusing on the ‘Lift Me Up’ Bundle so stop by.

Have a great weekend.  I have some serious house sorting to do.  The whole house is getting decluttered, including my craft room and studio.  So if I don’t return next week send out the search and rescue teams. 🙂

Jenny

beautiful-you

Order your ‘Beautiful You’ set in my store HERE.  for Clear Mount $49 AUS Wood mount $68. Don’t forget with Sale-A-Bration, pick up your free choice with your $90 order.

cards, Catalogues, Techniques, Tutorials

CHANGING THE DRESS LINE OF THE BEAUTIFUL YOU LADY!

I have been sharing lots of projects with the ‘Beautiful You’ set this past week.  When I first started seeing ideas with this set on Pinterest I noticed that some of the dresses were different.  I was curious and went investigating further. I thought I would share with you today how it can be done so you can create more with this set.

masking-dress-for-beautiful-you

I have put together a tutorial for you.

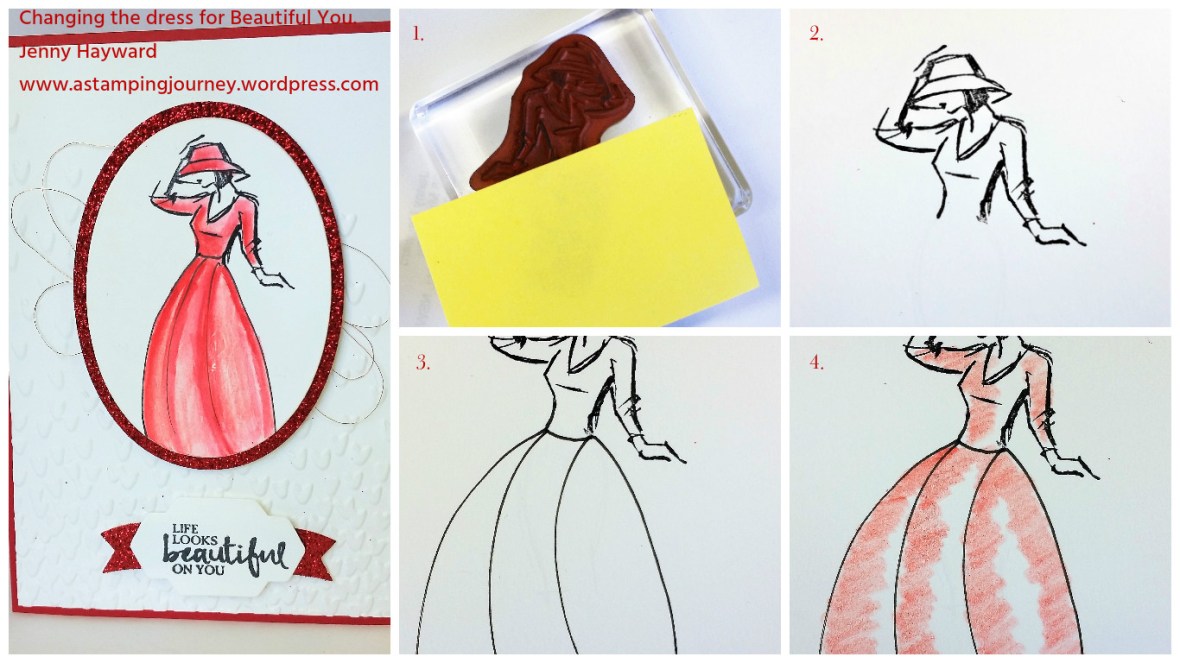
CHANGING THE DRESS LINE.

1. You can do either of two things. a) draw over the top part of the lady with the Black Stampin’ Write Marker or what I have done b) Place the stamp on the table top facing up. Mask the skirt area with a Post It note or piece of scrap paper. Leaving the stamp on the table ink up the stamp with the Black StazOn inkpad.  I have used StazOn as you will be watercolouring the image.

2. Stamp the image onto Thick Whisper White, Shimmery White card or Watercolor Paper as you will be watercolouring it.

3. With the Black Marker draw a skirt line that you would like.  If you prefer use a pencil and then go back over it with the Marker. You could create any style, short or long.

4. To Watercolour this I used the Real Red Watercolor Pencil, colour along the lines of the dress and the hat.  Using the Aquapainter blend over the colour.  You can build up the colour as you desire by going over the area but allow it to dry a little before adding more colour.

Assemble your card as you like.

beautiful-you_red-lady

To create this card I cut the image with the Layering Oval Framelits cutting a larger one with the Red Glimmer Paper. The sentiment was stamped in black and cut with a Framelit from the Stylish Stems.  Using the Duet Banner Punch I cut a banner from the Red Glimmer Paper and cut it down in the centre to adhere behind the sentiment.

To finish I looped around some Copper Thread and raised that off some Whisper White mat which had been embossed with the Falling Petals Embossing Folder.  Base card is Real Red.

Hope that was helpful for you.  You can use this idea to change different stamps. Go and experiment.

Jenny

Catalogues, Sale-A-Bration, Stampin' Up!

NEW SALE-A-BRATION OFFERINGS FOR YOU!

new-release-sab-copy

Have you loved Sale-A-Bration so far?  Getting those free products when you place your order.  That’s always exciting to get something free isn’t it??

Well today Stampin’ Up! have released 3 new products for you to choose from.  As if it wasn’t hard enough!

Here they are for you.

Reverse Words

reverse-words

Make a Medallion

medallion

Glimmer Paper

glimmer-paper

I just love the new sparkly Glimmer Paper. The Glimmer Paper comes in Bermuda Bay, Mint Macaron and Sweet Sugarplum.  There are 12 6″x6″ pieces.  (4 of each colour).  Just gorgeous!  Add that to your list. 🙂

Just a reminder as to how you can get these – for Free mind you!

Place a minimum $90 order and you can pick one of these or any other of the choices.  It’s really that easy.  And it is so easy to get to $90!

You can order directly from me by emailing me or Shop at my Online Store HERE. Please use the Host Code this week: S7PNC7CT

Thanks for shopping with me.

Have a great day.

Jenny