cards, Catalogues, Classes

A DAZZLING DRAGONFLY!

This card was the surprise card at my Stamp A Stack yesterday.  If you didn’t come you missed out!!! 😉  I thought I would show you today though.

P1160737-1

This is using a new stamp set called ‘Awesomely Artistic’. The card was inspired by a card on Pinterest by Julia Quinn.  I changed the colours and cut the banners with the Banners Framelits. The little greeting frame is cut with the Project Life Cards and Labels Framelits. I don’t do a lot of Project Life BUT I have found these little framelits great for greetings. The “Wish Big” greeting is from ‘A Dozen Thoughts’ stamp  set.

Of course a dragonfly has to have a little sparkle. I added some Dazzling Diamonds to the wings.

P1160738

I think this set has to be my most favourite set in the new catalogue.  I think you are going to love it so write it down on your wish list now.  Only a few days to go now until the new catalogue is out. Exciting!!!!!!!!!!!!!!!  🙂

Stampin' Up!, swaps, Techniques

FAUX SHAVING CREAM FLOWER!!

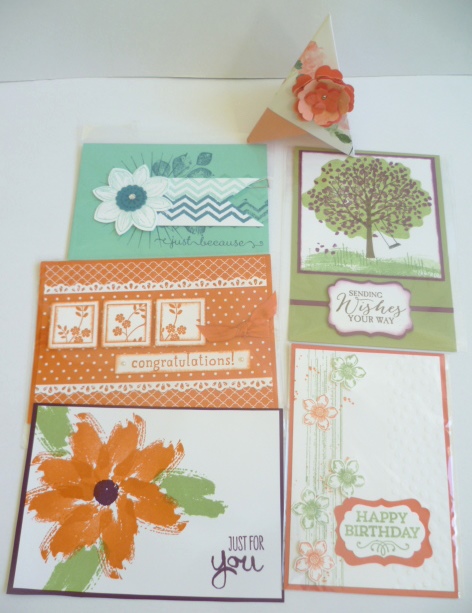
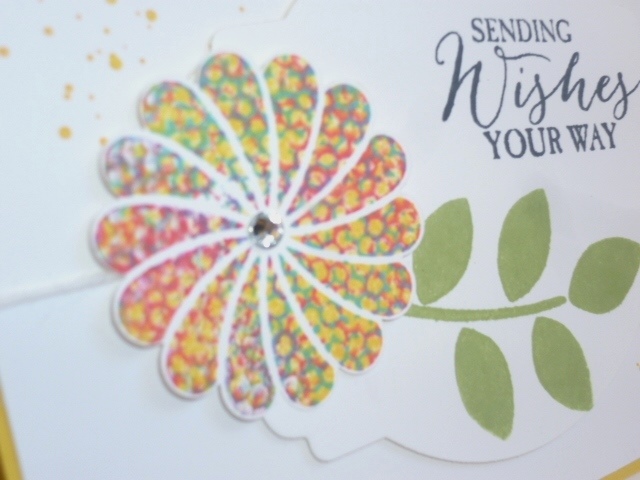
I have always been fascinated in the Shaving Cream technique but I haven’t got around to trying it. I think it is the mess!  The shaving cream and reinkers and ….. Just too hard!  SO, when I came across THIS technique on Splitcoaststampers a few weeks ago when I was looking for a different technique for a class, I thought I could really try this one.  Here is the card I made.

P1160643

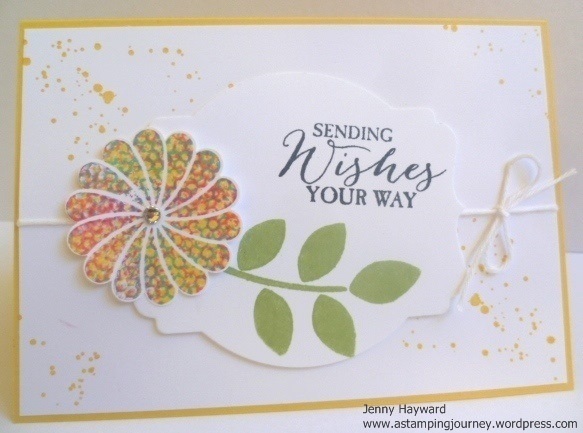
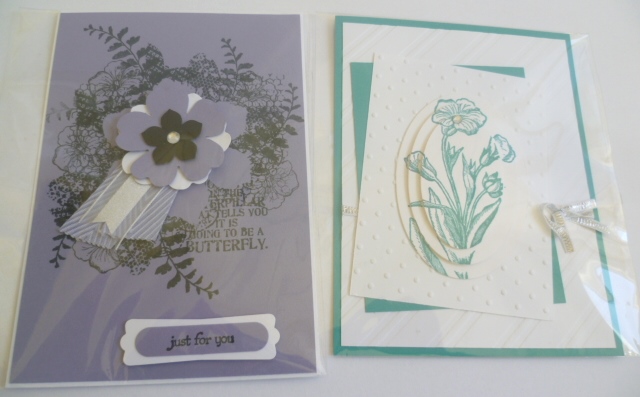
The layout for the card was INSPIRED from Deb Currier from artfeltcreations.com.  I changed a few things around and I created the Shaving Cream flower.  I loved the effect.  Here is a close-up. (OK a little blurry!)

P1160646

I don’t usually share a tutorial for the Technique Classes I do but this technique is so cool I just wanted to share this with you my lovely readers. Of course, you can read about it at the Splitcoaststampers link above too.  It is a bit like the Kissing technique if you have tried that.

SHAVING CREAM TECHNIQUE

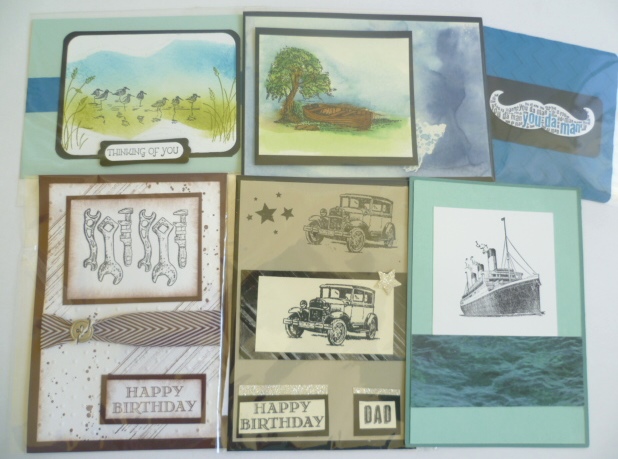
1. Choose 3 co-ordinating ink colours. I have used Daffodil Delight, Tempting Turquoise and Melon Mambo.  I found the darker colours didn’t blend well and just looked messy 🙂

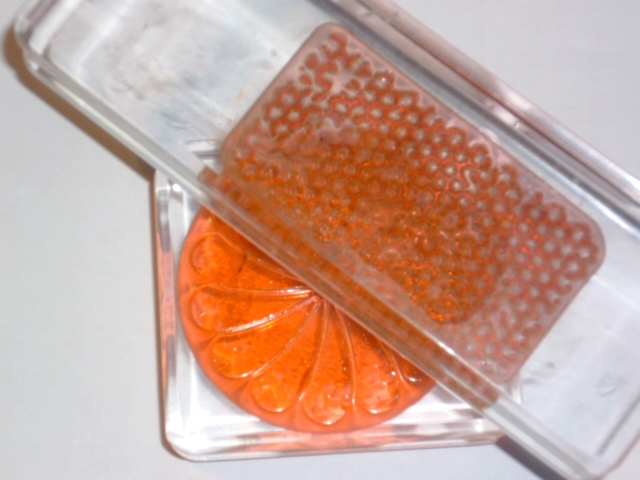
You will also need 2 stamps: One solid image stamp and one patterned stamp.  I have used the flower from ‘Crazy About You’ and the honeycomb pattern from ‘Butterfly Basics’.

2.  Ink up your solid image stamp with the lightest colour. Don’t stamp it on your card yet.

3. Ink up your patterned stamp with one of the other ink colours. Press it on to your solid image stamp and give it a slight twist.  Clean your patterned stamp and ink again in the same colour.  Press on to your solid stamp on the other part of your stamp and give a little twist.  See the photo below.

P1160660

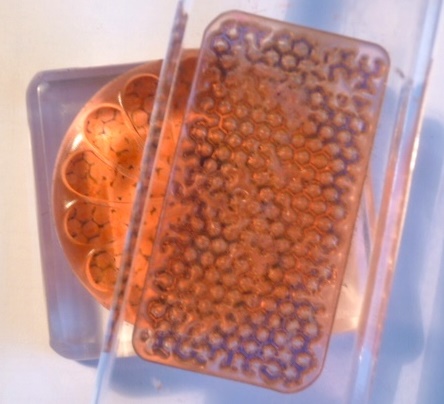
4. Clean your stamp again and ink your patterned stamp with the other ink colour.  Turn your solid image stamp 1/4 turn.  Then press your inked patterned stamp on to the stamp and give a little twist. Clean your stamp.  Ink it again in the same colour and stamp on the other part of your solid image stamp and give a twist.

P1160663

5. Now give your solid image stamp a little huff to re-moisten the stamp and then press on to your piece of card.

P1160667

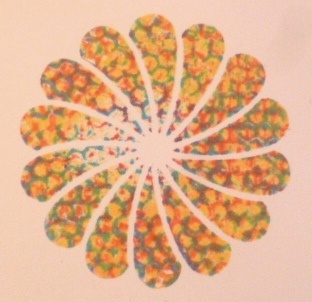
It gives a really cool effect.  Don’t you think???

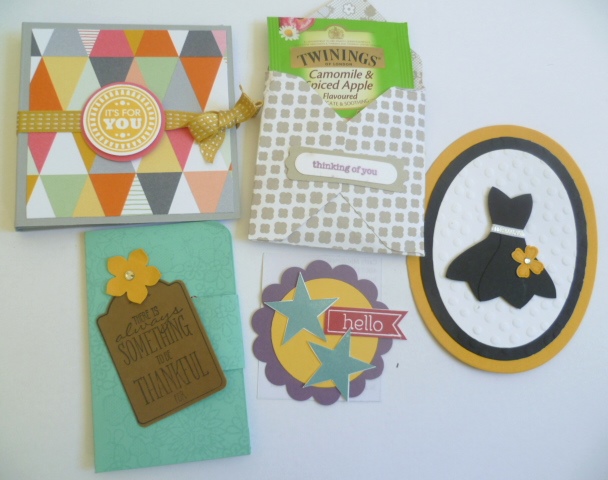
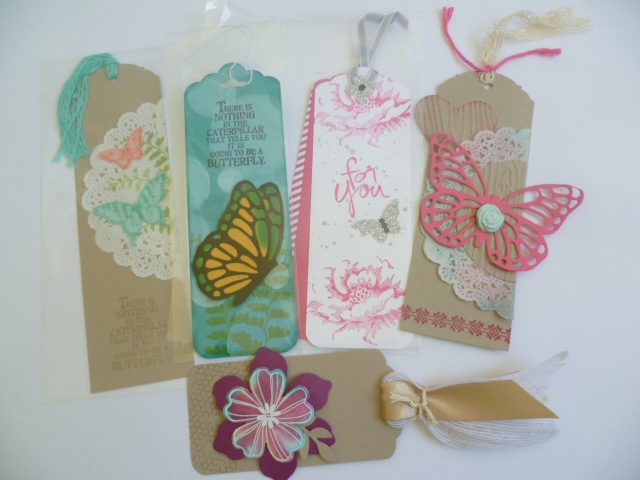
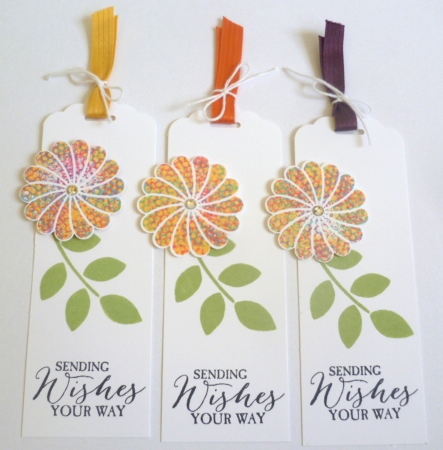
I really loved the effect so I made some tags up using this technique for our team swaps last week.
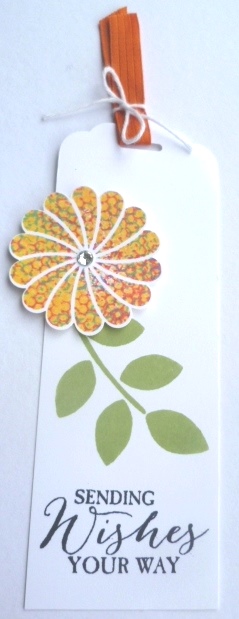
P1160671

Here is a close-up.

P1160727

So why not give this technique a try.  It is so cool and each time will work out different.

Have a happy, stampy weekend 🙂

Jenny

3D projects, cards, Tutorials

PAINTED BLOOMS BOXED SET!

There is only one week left of the current Stampin’ Up! Catalogue and the Occasions Catalogue.  I know there are lots of sneak peeks around of the new Catalogue but today I want to share a special project with you.  The Painted Blooms Designer Series Paper in the Occasions Catalogue is just so gorgeous and it saddens me that I haven’t used enough of it yet.  I had this idea in my head last week and just had to get this idea working before the week was out.

Firstly, I made the cards.  In the pack of Painted Blooms DSP there is a sheet with a gorgeous flower garden scene.  What could you really do with a sheet like this??? It just seems too nice to cut into it.  I saw this idea on Patty Bennett’s blog to cut the sheet equally and make a card set.  So I did just that!!  Here are my cards.

P1160748

Laying out all the cards like this you can see the lovely image.  It does seem such a shame to cut it up but it does make a gorgeous card set.  I changed the sentiments on my cards to the ones Patty had on her blog.  The bases for the cards were either Blackberry Bliss, Pool Party, Wild Wasabi or Rose Red.  I used ‘Perfect Pennnants’ for the sentiments in the top row.  If you have a look under the sentiment, I punched out a circle using the 1 3/8″ circle punch, cut it in half and adhered that under the sentiment to layer it..  The sentiments for the cards in the bottom row were from ‘Wetlands’ set.  I cut this out with the smallest banner die in the Banner Framelits set and I hand cut a narrow banner to adhere under that.

Now after making this card set I needed something nice to put them in.  I wanted a window gift box. I came across this idea from Chiaki on Stampingpro.  I used the Dressup Card Box listed HERE on the instruction Sheets.  I did change the measurements. (It took a little fiddling!). The Australian card bases are larger in size than the US and the envelopes I had were larger too (mine weren’t Stampin’ Up! ones – shh!). I will tell you my measurements shortly but here is the finished box.

box

ABOUT THE BOX

The lid for the box was made using another sheet in the pack of Painted Blooms DSP.  On the bottom of the box inside I adhered a matching piece of that DSP to line the box. I didn’t take a picture of that.  The Blackberry Bliss Satin ribbon is not wrapped around the whole box.  I wrapped a piece over the lid and tucked the ends just inside the lid.  That means the receiver won’t have to undo the ribbon each time they open the box.  I tied a bow with the ribbon and attached that to the top.

I cut a window in the lid – BEFORE ASSEMBLING – with the Deco Labels Framelits.  The width is a little wider than the Big Shot so I had to fold up one side and lay it over the framelit.  I adhered a piece of Window Sheet inside the box lid.  That just finishes it off.  I cut a large butterfly using the Butterfly Dies and adhered that straight on to the acetate.  A little bling never goes astray to finish off a project 🙂

Now for the actual box measurements.  I will give you the measurements I used. For those with Imperial measurements you can follow Chiaki’s tutorial.  I am sure those measurements will be fine.

THE BOX (Metric)

BOX BASE

Cut card 19cm x 24cm.  Score on each side at 3.2cm.  Cut up opposite tabs on both ends and adhere.

BOX LID

Cut card 21.5cm x 16.5cm.  Score at each side at 1.9cm.  Cut up opposite tabs on both ends.  Cut your window before adhering together.

Hope you like this project??  Thanks for stopping by,

Jenny

3D projects, Tutorials

LARGE TOTE BAGS ARE ALL THE RAGE!!!

You  might have seen lots of little Tote Bags around the internet???  They are great little gift bags to give those special gifts to others.  A few years ago now I created a larger Tote Bag as many of them were great for card sizes or small gifts but if you have a larger gift THEN a larger Tote is needed right???  The Totes I shared way back then continue to be a huge hit on my blog and they have a large number of repins on Pinterest every week.  SO, if you have missed it, I thought I would show you these again. I have another type of bag in the process at the moment and when I finally get to create them I will share that too.

So here is my Tote bags for you that you can make to give that special larger gift.  (maybe a top or scarf or LOTS of chocolates!!!). 😉

new tote                  P1030185

You can find the tutorial to make these in this post HERE.

A little while after making these I decided it was time for an update.

P1110769

You can find this Tote in this post HERE.  I followed the original tutorial with a few modifications.

I would love to see your versions so send me a photo. If you make one then don’t forget to give credit.  🙂

Have a great weekend,

Jenny

Stampin' Up!, Techniques

WEEKLY DEALS AND UPDATES!!

Wednesday again which means it is WEEKLY DEALS time.  I love these deals.  There have been some great deals lately to save you money.  I have a reminder too on the retiring list and Clearance Rack so you can check about that but before you leave here today you have to see this cool technique video I have posted below.

Here is this week’s deals.

May 19

Punches and Big Shot dies are always great! How can you get these??

Contact me directly to place your order

OR

Order Online at my store HERE.

Have you checked out the RETIRING PRODUCTS (see Here) OR THE CLEARANCE RACK (see Here)??? Items are selling out fast.  Check them out and contact me to place your order or Order online. (Australian residents only and if you haven’t got a current Demonstrator). 🙂

Of course, I can’t leave without sharing a project.  Check this fun technique out using Watercolouring and Spritzers. I love the effect!

cards, Masculine

MORE ADVENTURE BOUND CARDS FOR THE BOYS!!

As it is approaching the end of the Annual Catalogue AND the Occasions Catalogue, I really wanted to use up more of the great papers from the ‘Adventure Bound’ Designer Series Paper Stack before they are finished with. There are some great designs for those male cards we all struggle with.  So this past week I have been on a mission to make some cards with this stack.  I thought I would show you some of the cards.

First up, I CASED the card on the left from Leanne Greff (flowerbug) HERE but just changed it a little.  Then decided to turn it and change it some more. Colours used are Basic Black, So Saffron and Cajun Craze. Isn’t the brick print cool???

P1160655

For these next 2 cards I used the Traveler set and added some Burlap Ribbon and Island Indigo Cotton Ribbon.  Don’t be afraid to use ribbon on the boys cards!  Colours used here are Basic Gray, Island Indigo and Cajun Craze. The greeting is from ‘Itty Bitty Banners’.

P1160650

On these last 2 I will show you I decided to pull out some retiring sets.  I changed the stamps but kept the same layout.  The left is using Starburst Sayings and the right card is Blue Ribbon and I have used the White Jute ribbon (which only just arrived in my order a few hours earlier!!!).  I have used Island Indigo, Cajun Craze and Base Gray again and even added some sparkle with some Silver Glimmer Paper.

P1160648

I was happy with these little sets of cards. I hope you like them too??? 🙂

Have you got any ‘Adventure Bound’ DSP paper stacks yet?? There are some great designs and only $11.95 for 48 sheets: 4 each of 12 double-sided designs. They are just a little larger than a card front size and have some fantastic print images and patterns. You have to get this pack for your male cards. (Only 2 weeks left). You can see them (and order) from my online store HERE or you can contact me directly.

You can see some other cards I made with this stack some time ago by heading to this blog post HERE.

Thanks for stopping by today.  Come and visit me again.  Have a happy day wherever you may be.

Jenny

cards, Catalogues

‘HEY VALENTINE FISHIES’

The excitement is building for the new catalogue to start.  Not long now folks!  But we still have an Occasions Catalogue AND the current catalogue to see and I still have some projects that I haven’t shown you yet.  So let me show you these cute little fishy cards.

These are from the set ‘Hey Valentine’.  I stamped these some time ago and coloured them with the Blendabilities.  Yes that’s how long they have been sitting unfinished on my desk.  I wasn’t sure how to put them together.  Recently I pulled them out again and made the cards.

P1160430

This card was loosely based on the Clean and Simple sketch #283.  You can see that here.   The sentiment is from ‘From the Herd’ and the banners are from ‘Perfect Pennants.

P1160434

On this card I used ‘Gorgeous Grunge’  for the dots in the background.

This set is not just for your Valentine’s cards.  Otherwise you would only use this set once a year, but where is the value in that!!! These images are just so cute for any time of the year for the young kiddies.  I cut the greetings off most of the stamps in the set to make them more versatile or you could mask the greeting if you didn’t want to cut them off.

You can see another card I made with this set Here.

I have to show you this cute set.

valentine

Now you only have a couple of weeks to buy this set (June 2nd) so don’t delay.  It is $42.95 Wood or $30.95 Clear mount.  You can message me to order OR order Online HERE.

I am waiting (im)patiently for my preorder to arrive.  Hopefully today, fingers crossed.  Hope you have a Happy Day 🙂

Jenny

cards, Catalogues, Stampin' Up!

“FIRST PLAY WITH AWESOMELY ARTISTIC!”

Last week at Leadership at the South Pacific Stampin’ Up! Convention we were given this brand new set ‘Awesomely Artistic’.  I love this set. There are so many lovely elements so there will be lots of ways you can use this set. I really love the dragonfly. Yesterday I had a chance to play a little.

 P1160636

The base is Crumb Cake.  Other colours used are Rich Razzleberry and Blushing Bride.  The layout was loosely based on the clean and simple sketch #192. You can see that sketch in the PDF here.  (There are lots of sketches on this site that can help you out when you are stuck for ideas.  Check them out sometime).

This set will be available in Wood ($49.00) or Clear ($35.00) AUS.    I think it will be one to have on your wish list.

Have you ordered your catalogue from your Demonstrator yet??  If you are in Australia and don’t have a demonstrator yet then contact me to have a catalogue sent out to you.  This is just one of the lovely sets coming June 2nd!!!  Not long to go now.

Thanks for stopping by.  Hope your day is inky 🙂

Jenny

3D projects, cards, Convention, Masculine, Stampin' Up!, swaps

CONVENTION SWAPS!

I have finally had a chance to go through my swaps and take photos.  I thought you might like to see them. There are some great ideas. I have grouped them to help you see them.  If you would like a closer view of one or to know about it more then let me know.

Butterflies are always popular!

P1160588

Flowers of all types!

P1160590

I took photos of these next 2 separately to show you as I liked these ideas.

On the left is a collage card.  I have been wanting to try one of these.  One on the right is a triple layer stamped card using ovals.  It looks great!  (I will give this one a go too).

P1160592

A variety of cards here.

P1160596

Some ideas for the men!

P1160597

These are gift card holders, tea bag holder and little tags.  Check out the black dress.

P1160600

I had to take a close-up of the dress.  It is using the Bow punch.  How clever!

P1160602

Some little treat holders. Very cute!

P1160605

Tags and bookmarks

P1160608

There you go.  Thanks to those people who swapped with me. There are some great ideas for you to try.  What is your favourite??  What will you try first?? I think I will need to grab my bow punch and try the dress out.

Thanks for stopping by today.  Join me again soon,

Jenny

Convention, Stampin' Up!

SOUTH PACIFIC STAMPIN’ UP! CONVENTION IS OVER!

I have just returned home from the Gold Coast following the South Pacific Convention.  Oh! such fun!!! It’s always nice to spend time with friends and finally meeting up with your online friends. This is THE BEST!!!! If you have been to a Stampin’ Up! Convention you would know what I mean. If you haven’t you would have still experienced this if you have been to a stamp camp or even having a crafty time together with friends.  It’s the sharing of ideas, the friendship, the care of each other, the laughs, the fun …….

Anyway, I have taken LOTS of photos of cards and Projects but it will take some time to go through AND to photograph my swaps so bear with me there.  I will get to them this week and then I might just share some with you.  🙂

Now we did perhaps get our hands on the new Stampin’ Up! Catalogue???

OK, maybe a little excited!! Sharing the catalogue with one of my team, Sarah.

catalogue

There are lots of GREAT new products and once again Stampin’ Up! have done an excellent job on their co-ordination! You are going to want to see it. Now you will be able to view it online on June 2nd BUT if you are someone who likes to take their catalogue to bed and do some quiet reading, and you like to mark those post it notes right through them, Yes You!!! then you are going to want your own copy aren’t you!!

So if you don’t have your own Demonstrator AND you live in Australia then drop me a comment and I will get one in the post to you in the next couple of weeks.  Stock up on your post-it notes 😉 I am ordering the catalogues THIS WEEK!!

Now before I go I will give you a little sneak of the upcoming Incolors – because I am so kind 🙂 🙂

colour boxes

This was one of the displays at Convention.  They are such lovely colours.  From top left we have Mint Macaron, Watermelon Wonder, Cucumber Crush.  On the bottom from the left is Delightful Dijon and Tip Top Taupe. I am sure you will see more of these over the next few weeks.  I don’t know what my favourite is yet.  Maybe Mint Macaron or Watermelon Wonder.  What do you think???

OK, stay tuned for more 🙂

Jenny