cards

CARDS FOR MOTHER’S DAY!

I hope you have had a lovely Mother’s Day for those celebrating.  It’s a great day to spoil those Mum’s who do so much and many of those jobs go unnoticed.  I thought I would share my cards I made for Mother’s Day.

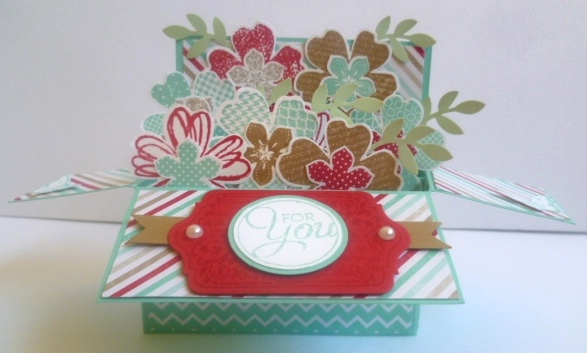
This one was for my Mum.  You would have seen the ‘Card in a Box’ type cards around.  They are everywhere in the blogosphere at the moment.  I had a class last Friday showing how to make the ‘Card in a Box’.  During the class I made this one up.  My Mum loves blue so thought she would love this.

P1120008


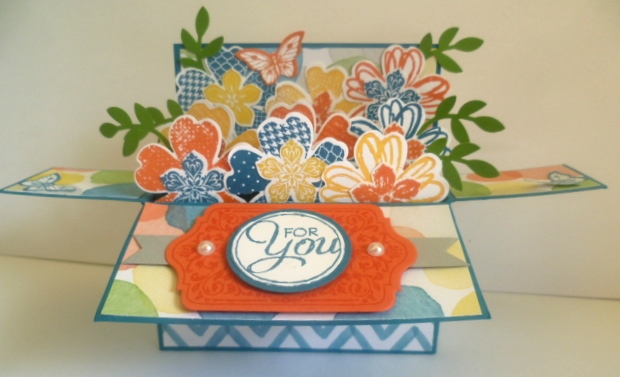
I have used the ‘Watercolor Wonder’ DSP on the box.  I used the colours in the paper when I stamped the flowers.  This was in Tangerine Tango, Daffodil Delight and Island Indigo.  I used the ‘Flower Shop’ and ‘Petite Petals’ stamp sets for the flowers and threw in some butterflies from ‘Papillion Potpourri’.  The leaves were punched with the 2 step Bird Punch from Gumball Green.  The label was stamped from Chalk Talk and cut with the matching framelits – no cutting with scissors!!!!  I just finished it off with the large adhesive pearls.

EDITED:  The link to make your own long ‘Card in a Box’ is here at Diane’s blog.

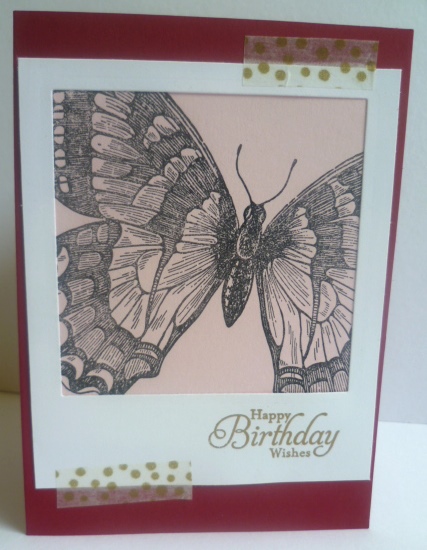
This next card was for my Mother-in-Law.  She loves pinks and reds.  This is a lot simpler.  It had to be quick 🙂

P1120011

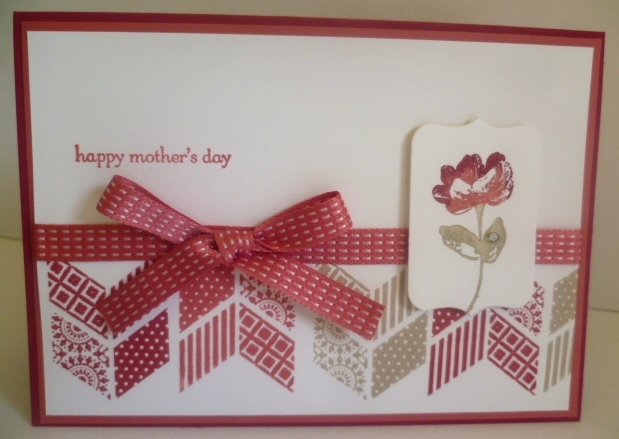
I thought I would ink up ‘Oh Hello’ set.  There won’t be many more opportunities for it as it is on the retirement list.  This card was CASED from one on Pinterest.  I just changed it a little bit and it is different colours.  I thought I would drag out some retiring colours too using Raspberry Ripple and Primrose Petals and teamed them with Crumb Cake.  I used the markers on the flower and then cut it out using the Chalk Talk Framelits.  It is finished off with some Satin Stitched Ribbon and the greeting is from Teeny Tiny Sentiments.

Thanks for stopping by today.  Enjoy the rest of your day/evening.

Jenny 


cards

FRAMED SWALLOWTAIL!

I can show you this card now.  I made this for my lovely blog friend Patti all the way in the U.S.  It is her birthday TODAY and I wanted to send her some special birthday wishes.  This card was inspired by one on Pinterest.  That card had the beautiful butterfly watercoloured.  I have to say I had 4 attempts at watercolouring this but it just wasn’t working.  I messed it up every single time.  So I stamped the butterfly on Pink Pirouette in black Stazon and left it be.  Really there is so much detail in this gorgeous stamp you really don’t need to do too much.  So here is my card.

P1110948

The original card had the frame cut using the On Film Framelits.  I don’t have those.  I used one of my Square Framelits and cut out the centre from a piece of Whisper White. I embossed the greeting from ‘Simply Sketched’ with Gold embossing Powder.  I added some strips of Gold Washi Tape to finish it off. Now I did mean to set it at an angle but it just looks like I stuck it down crooked.  The white frame was a little larger and it didn’t sit as well as I would have liked.  Once it is down it is not going to be moving!! The card base is Cherry Cobbler.

So make sure you go and say “HAPPY BIRTHDAY” to Patti on her blog here and check out her lovely creations while you are there.

Thanks for visiting.

Jenny

3D projects, cards, Classes

FLOWER BOX-IN-A-CARD!

You have probably seen the ‘Card in a Box’ cards around the blogosphere?? Have you made one yet?  They are so fun to make and really are easy once you get the basic box together.  There are so many ways to “fill” them.  This is one we will be making this coming week in my ‘CARD FRIDAY’ class.  If you are around the Wollongong area I would love you to join us.  So much fun to be had!

P1110971

Thanks to my friend Di Barnes for the inspiration.

Here are the deets for the class.

Come and learn to make a ‘Card in a Box’.  Give this to someone special or give it to Mum for Mother’s Day. 

WHEN: Friday May 9th 10am or 7.30pm at my studio in East Corrimal.

COST: $15

PLEASE RSVP: Wednesday 7th.

Email or phone me to book your place but hurry as places are limited.

Stampin' Up!

PHOTOPOLYMER STAMPS ARE HERE!!!

demoheader_photopolymer_demo_5.1.2014_SP

You have probably already checked out the Photopolymer stamps around on your blog travels.  Well I can say that they are here now in Australia.

From Stampin’ Up!

“Our top-quality photopolymer stamps stick extremely well on our acrylic blocks, are durable, and the transparent nature of these sets makes it easier to line up your images without the need of a guide”

Stampin’ Up! have released 2 Exclusive Photopolymer stamps sets but they will only be available during May. They are $23.95 each or grab them both for $47.90 and receive a FREE online class showing you 15 projects you can make with your new Photopolymer stamps.

Check them out.

Show and Tell stamps


Order your stamp set(s) NOW by contacting me

                               OR

Order them ONLINE HERE.  

Don’t forget to check out the new WEEKLY DEALS AND THE CLEARANCE RACK WHILE YOU ARE THERE. Great bargains to be had!


Uncategorized

HAPPY BIRTHDAY WITH CHEVRONS!

When I made this card I wanted to show a different way of using the Scallop Tag Topper Punch. This is such a versatile punch.  With a strip of Whisper White card you can punch both ends of the strip and create fancy “holes” for your ribbon to thread through.  I was really trying to come up with a fancy term for these little “holes” but there was nothing!!!  Anyway, you get the idea.

P1110646

I sponged around the tag with Summer Starfruit. The greeting is from ‘Perfectly Penned’. After threading through some Summer Starfruit Stitched Satin ribbon I layered it all on a piece of DSP from Birthday Basics and layered this on a Summer Starfruit card mat.  Then it was all adhered to a Raspberry Ripple Card base.  I punched out some chevrons with the Chevron Border punch from Raspberry Ripple, Summer Starfruit and Gumball Green.

Now these colours will be retiring very soon.  I would suggest stocking up NOW on the card, ink, ink refills and ribbon.  They go SO QUICKLY!!  Don’t wait until the retirement list is announced in a month or 2 to order them because I wouldn’t like you to miss out.

School holidays at the moment.  Although we haven’t gone away anywhere it has been a nice family time together but there has not been a lot of stamping time. I just sneak a little time here and there. I am working away at my Convention swaps which is just one month away.  YAY!! You will have to wait to see these swaps though.  Let me just say, why do I always choose involved cards to make as my swaps!!!

Have a great day/night wherever you are on this lovely planet 🙂

Jenny

scrapbooking

STAMPIN’ UP! + BECKY HIGGINS = PROJECT LIFE!!

BH_StampinUpAnnounce_041514_01

How exciting! Have you heard the news?? Stampin’ Up! and Becky Higgins have partnered together to bring you PROJECT LIFE!!! This is such a simplified system of scrapbooking.  Even I think I can handle this 🙂 The great thing too is that they will be available in Stampin’ Up! colours so they will co-ordinate with our card and ink and other embellishments.

Project Life Products will be available in the new Catalogue starting on July 1st.  (If you can’t wait until then, join Stampin’ Up! and you will be able to get your products early! I would love to welcome you to my team).  If you want to know more then head here to see what Becky Higgins herself says about this.

Here are some of the questions she answers.

Q: What types of Project Life products will Stampin’ Up! offer?

A: You’ll see Card Collections, Accessory Packs, Albums, Photo Pocket Pages, tools, other accessories, and Stamps, of course!

Q: Are the card designs the same as what we can buy in the stores?

A: Nope! We have worked with Stampin’ Up! to design all new products that are super fun and a perfect match to their existing color lines which will make coordination a breeze. Some of the Photo Pocket Page designs are the same and some are different than what we currently offer. 

Q: How do I buy these products?

A: Beginning May 1st, (THIS IS IN THE US) you can purchase products directly through the Stampin’ Up! website or, better yet, you can find a local demonstrator. PICK ME! PICK ME!! HERE IS MY DEMONSTRATOR WEBSITE TO JOIN AND TO SHOP!

Q: Why order through a demonstrator?

A: Stampin’ Up! has a worldwide demonstrator base who understand their products better than anyone. Many offer in-home workshops, online parties, and local events (depending on the demonstrator and the area). The personal expertise and service make purchasing through a demonstrator a wonderful and unique experience and can also form great friendships!

Q: Where do I learn about becoming a demonstrator?

A: Visit the Stampin’ Up! website to learn more. (See the question above for more information)

Q: How do I sign up to become a demonstrator so I can sell Project Life myself and make money doing it?

A: Once you’ve decided that this is a great opportunity for you, you can sign up through their website.   Here is my link again. 

Q: Are the products packaged the same as existing products (i.e. Core Kits, Mini Kits, etc.)?

A: Most Project Life by Stampin’ Up! products will be sold in Card Collections of 100 cards with 4×6, 4×4, and 3×4 card sizes included. Each card will be printed front + back as all of our current products, but you will not receive duplicates of any cards in the set. Oh – And we’re doing square (not rounded) corners on all of our cards with Stampin’ Up! Yes, there’s an awesome corner rounder punch included in the product line-up if that floats your boat. There will also be Accessory Packs available (sold separately) that will contain a variety of accessories to complement the Card Collection.

Q: Will the Project Life by Stampin’ Up! products be available in digital format?

A: They sure will! Stay tuned for more information on when those will become available.


So stay tuned here for more details as the time gets closer!!!! Excited Much!!

cards

CANTELOUPE ‘SO VERY GRATEFUL’!

I had a little time the other day and decided to just do some playing.  I grabbed the set ‘So Very Grateful’ which I only received recently and did some colouring.

P1110888

I cut some Whisper White card with the Top Note Die and then stamped the flower images in Black Staz On and coloured with the Markers using Crisp Canteloupe, Strawberry Slush, Summer Starfruit and Pistachio Pudding. I was pretty happy with the final result.  I can’t wait to get the Blenabilities though! I stamped the greeting from’Perfectly Penned’ .  I think I stamped that too high up.  I am not happy with all that white space in the middle. I tried adding a separate flower but wasn’t sure.  What do you think???

To assemble the card I stamped the flower image in Crisp Canteloupe ink on the Crisp Canteloupe base card.  I added some white Taffeta ribbon around the card.  I add a little piece of doily that was just inked lightly with ink and I adhered that under that Top Note stamped piece.  I added a white Taffeta bow to finish it off.

It was fun playing “just because”.

Thanks for visiting.  Hope you can visit again very soon,

Jenny

cards

TANGERINE HAPPY WATERCOLOR

I made this card a few weeks ago and forgot to show you.  This is using the stamp set ‘Happy Watercolor’.  The card was CASED from Pinterest from Allison’s blog here.

P1110378


I stamped the “splodges” from the set in Coastal Cabana onto Whisper White and then stamped the flower and the dots in Soft Suede.  The greeting is from ‘Simply Sketched’.  I stamped the flower again on scrap white card. I coloured the flower using Tangerine Tango and Daffodil Delight ink using an aquapainter and inkpads.  Just squeeze the ink pad a couple of times when it is closed then you can pick up the ink from the pool of ink on the lid. I cut the flower out and adhered this over the flower on the White stamped card after I had adhered this to the Tangerine Tango base card. To finish this off I adhered a few gold sequins randomly over the card.

Thanks for stopping by today.  Have a happy day 🙂

Jenny

Uncategorized

KID’S EASTER CARD CLASS!!

Looking for something for the Kids to do on the School Holidays.  If you are in the Wollongong area bring them along to my Kids Easter Class.  They will have lots of fun!

Tuesday 15th – KIDS EASTER CLASS. 2pm.  Come along and make this cute box and Easter card.  For Kids aged 7-13 years.

P1110852

Thanks for the inspiration to Di Barnes for the box and to Nancy Amato for the card.

 COST: $15.  RSVP: Sunday 13th. Get them to bring a friend along too for even more fun. 

Email or leave a comment you want to come but be quick as places are limited.

Can’t wait to see you.

Jenny

cards

OMBRE ZIG ZAGS!

I saw a card on Pinterest that I really liked the look of so I thought I would recreate it.  I thought that I would go with the Ombre look (ie a graduation in colour tone).  I have used the Tasteful Trim Bigz XL Die to create the zig zags.  I did one – AND why not create 4 different ones. (Apologies for the bad lighting.  It has been overcast lately).

P1110857

The sentiments are from ‘Perfect Pennants’ and ‘Hip, Hip, Hooray’ stamp sets.

I will show you them individually.

P1110859

Colours are Night of Navy, Pacific Point, Tempting Turquoise and Sky Blue.  Base card is Tempting Turquoise.

P1110862

Colours are Garden Green, Gumball Green, Wild Wasabi and Pistachio Pudding.  Card Base is Gumball Green.

P1110864

Colours are Tangerine Tango, Pumpkin Pie, Blushing Bride and Pink Pirouette.  Card Base is Pumpkin Pie.

P1110866

Colours are Cherry Cobbler, Rose Red, Melon Mambo and Crisp Canteloupe.  Card Base is Rose Red.

The Ombre effect is quite “in” at the moment.  Why not go and make an ‘Ombre’ card yourself.

Thanks for visiting.  Stop by again very soon,

Jenny