3D projects, Catalogues, Christmas, Stampin' Up!

CELEBRATE CHRISTMAS IN JULY WITH SOME STAMPING FUN!

Christmas in July 2016

We are celebrating Christmas in July next week (from 19th – 22nd July) so  come and join in the fun and see some cute projects to get you on your way for the silly season.

Each day I will be sharing a Christmas project that I hope will inspire you.  We will have time to chat and have some fun.  I will have some great specials through the week too.

There are 2 different ways to follow along. 

1) This will run through a Facebook group.  Please Click HERE to ask to join.  Invite friends of yours to join in too.

2) Not on Facebook? You can receive the projects by email. Please email me to ask to join in and I will send you an email each day with the project and the special. You will just miss out on the chatting.

The best part is – it’s all free!!! So come and join in!

Here is a sneak of one of the projects I will be sharing.  I can’t wait to share it all with you.

box front - Copy

Jenny

3D projects, Stampin' Up!

FRY GIFT BOX!

Just a quick one for you today.  I am heading off tomorrow to Sydney for the Stampin’ Up! Onstage event on Saturday.  Exciting!!! And the new Catalogue will be revealed.  More exciting!!!  🙂  Before I go though I thought I would show you another quick treat box I made for my markets last month.

This was the first time I have used the Fry Box after having it for some months.  I have used some retired paper for them. I have used the ‘All About Sugar’ stamp set to decorate them.

image-5340

I thought they might be good for the boys.  What do you think??  Fill them up with some cool treats or small toys.

Thanks for visiting.  I will fill you in on what I can tell you from Onstage when I come back.

Jenny

If you would like your own 2016 Stampin’ Up! Catalogue mailed to you, then drop me a comment. I know you want to rustle through those pages and make your list.  Stock up on your Post-it notes now. 🙂

3D projects, cards, Tutorials

PAINTED BLOOMS BOXED SET!

There is only one week left of the current Stampin’ Up! Catalogue and the Occasions Catalogue.  I know there are lots of sneak peeks around of the new Catalogue but today I want to share a special project with you.  The Painted Blooms Designer Series Paper in the Occasions Catalogue is just so gorgeous and it saddens me that I haven’t used enough of it yet.  I had this idea in my head last week and just had to get this idea working before the week was out.

Firstly, I made the cards.  In the pack of Painted Blooms DSP there is a sheet with a gorgeous flower garden scene.  What could you really do with a sheet like this??? It just seems too nice to cut into it.  I saw this idea on Patty Bennett’s blog to cut the sheet equally and make a card set.  So I did just that!!  Here are my cards.

P1160748

Laying out all the cards like this you can see the lovely image.  It does seem such a shame to cut it up but it does make a gorgeous card set.  I changed the sentiments on my cards to the ones Patty had on her blog.  The bases for the cards were either Blackberry Bliss, Pool Party, Wild Wasabi or Rose Red.  I used ‘Perfect Pennnants’ for the sentiments in the top row.  If you have a look under the sentiment, I punched out a circle using the 1 3/8″ circle punch, cut it in half and adhered that under the sentiment to layer it..  The sentiments for the cards in the bottom row were from ‘Wetlands’ set.  I cut this out with the smallest banner die in the Banner Framelits set and I hand cut a narrow banner to adhere under that.

Now after making this card set I needed something nice to put them in.  I wanted a window gift box. I came across this idea from Chiaki on Stampingpro.  I used the Dressup Card Box listed HERE on the instruction Sheets.  I did change the measurements. (It took a little fiddling!). The Australian card bases are larger in size than the US and the envelopes I had were larger too (mine weren’t Stampin’ Up! ones – shh!). I will tell you my measurements shortly but here is the finished box.

box

ABOUT THE BOX

The lid for the box was made using another sheet in the pack of Painted Blooms DSP.  On the bottom of the box inside I adhered a matching piece of that DSP to line the box. I didn’t take a picture of that.  The Blackberry Bliss Satin ribbon is not wrapped around the whole box.  I wrapped a piece over the lid and tucked the ends just inside the lid.  That means the receiver won’t have to undo the ribbon each time they open the box.  I tied a bow with the ribbon and attached that to the top.

I cut a window in the lid – BEFORE ASSEMBLING – with the Deco Labels Framelits.  The width is a little wider than the Big Shot so I had to fold up one side and lay it over the framelit.  I adhered a piece of Window Sheet inside the box lid.  That just finishes it off.  I cut a large butterfly using the Butterfly Dies and adhered that straight on to the acetate.  A little bling never goes astray to finish off a project 🙂

Now for the actual box measurements.  I will give you the measurements I used. For those with Imperial measurements you can follow Chiaki’s tutorial.  I am sure those measurements will be fine.

THE BOX (Metric)

BOX BASE

Cut card 19cm x 24cm.  Score on each side at 3.2cm.  Cut up opposite tabs on both ends and adhere.

BOX LID

Cut card 21.5cm x 16.5cm.  Score at each side at 1.9cm.  Cut up opposite tabs on both ends.  Cut your window before adhering together.

Hope you like this project??  Thanks for stopping by,

Jenny

3D projects, Masculine, Stampin' Up!

FACETED BOX FOR THE MENFOLK!!

A few weeks ago I saw a cute Faceted box on a Facebook group I am on.  Of course, one must have a go at one of these!  I thought I would show you my version.  Then I will show you where to go to make your own.

I thought for this it would be good to make a male version.

P1160084            P1160082

I have used Night of Navy and Crumb Cake cardstock and used a new stamp set from the Occasions Catalogue ‘Guy Greetings’. This is a good one to tuck some chocolates in for the males in your family.  They are always the ones that are hard to make for aren’t they!

What do you think??  I thought at first it would be really hard to make with all those angled sides, but it was really easy once you got the scoring and cutting right.

Do you want to make your own?? My lovely friend Sam created this box {waving HI SAM] 🙂 Here is the You tube link for you to make it.  Really it is not hard so don’t be scared off by all those angled sides.

Now the funny thing after Sam posted this tutorial things went a little crazy and little Faceted boxes were streaming onto our group page.  So fun to see all the versions.  You can check them out on Sam’s page.  She posted them to show how crazy things were. HERE THEY ARE!

So now go and check the Youtube video out and make your own version.  Why not send me a photo of your version and I can share it with Sam.  🙂

Happy Stamping,

Jenny

Uncategorized

12 WEEKS OF CHRISTMAS – WEEK 10!!

Latte 12 weeks Header

Week 10 of our 12 Weeks of Christmas.  That can only mean that Christmas is getting very close – which is a scary thought!  Today I bring you another project in our 12 Weeks of Christmas series.  I hope you like this project.

Today I bring you a Tag A Bag Gift Box and matching card.  

P1150415

When you are looking for gift packaging ideas Stampin’ Up! offer an assortment of bags and boxes that with some simple decorating they can make your gift very special.  To hold some yummy treats you can’t go past the Tag A Bag Gift Boxes.  These assemble very quickly without any adhesive at all.  These boxes can be found on p 201 of the Stampin Up! Catalogue and come in a pack of 8 for $11.95.  Great value!!

Here is the box for you.

P1150420

For this I have punched a strip of Real Red Cardstock with the Confetti Stars Border Punch, wrapped around a strip of the Nordic Noel DSP and tied around some Real Red Satin Ribbon.  I have the tutorial below. The cute tag is simply a number of stars cut with the Stars Framelits from Gold Foil, Garden Green and Real Red.  In the centre of the smallest star I added a single Gold sequin and added a small pearl coloured with the “red” colour in the Cherry Cobbler Blendabilities pack.  I added a length of the Gold Sequin Trim behind the star. The greeting is from Petite Pairs and cut using the Bitty Banners Framelits.

I made a matching card to go with the box.

P1150417

I cut a large star from the Whisper White card and adhered some of the same Nordic Noel DSP behind it.  Then layered stars in Gold Foil, Garden Green and Real Red to match the box although these were slightly smaller.  The smaller red star is punched from the Itty Bitty Accents punch set.  I added a single Gold sequin and coloured Adhesive Pearl to this too. The greeting is from the Bright and Beautiful set stamped in Real Red.  I wrapped around some Real Red Satin Ribbon and added a bow separately.  So much easier to add the bow separately.  It sits so much better.  I always have a tussle with the card and the ribbon. 😉  I finished it off with some single Gold sequins around the card.

TAG A BAG BOX TUTORIAL

Cut cardstock to measure 9.5cm x 28cm (3 ¾” x 11”). Punch along both edges with the Confetti Stars Border Punch. 

P1150400

Cut DSP 3.5cm x 28cm (1 3/8” x 11”). Adhere slong the centre of the punched strip.

Run adhesive along the back of your card strip with adhesive of your choice.  I used Fast Fuse. 

Place the middle of your card strip at the centre of the top surface on the Acetate sleeve for the box and adhere down.  Wrap the cardstock around the sleeve adhering each side as you go.  TIP: When you wrap the cardstock around each side run the Bone Folder along the edge to give a crisper fold. Check it out  in the photo how I have done it.

P1150402

Adhere the ends together at the base of the box.

Wrap your Red Satin Ribbon around the box and tie in a bow.  Create a tag of your choice to finish.

I am sure you could think of a few friends/workmates that you could whip up a few of these for?? Fill them with some chocolates, cookies even a small gift.  Decorate them as you like.

Of course, as with our past 12 Weeks of Christmas projects we have a special bundle for you and receive 10% off.

Tag A Bag Boxes   (130927)                                   $11.95

Gold Sequin Trim     (132983)                                 $8.95

Confetti Stars Border Punch (135861)                    $37.95

TOTAL    $58.85.  Your price with 10% off is $53. Only available by ordering through me directly not through my Online store. 

tag a bag box                   gold sequin trim                 confetti punch

Thanks for stopping by today.

Jenny


3D projects, Christmas

12 WEEKS OF CHRISTMAS – WEEK 9!!!

Latte 12 weeks Header

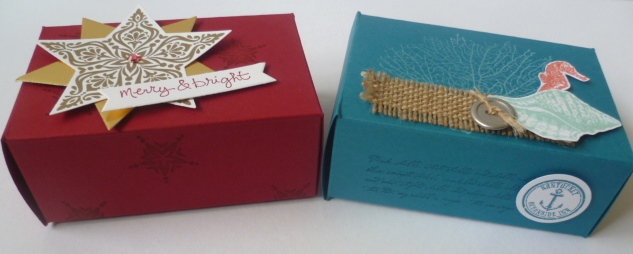
These weeks are just flying by! Week 9 of our 12 Weeks of Christmas projects.  Today’s project is brought to you by Virginia. These are great little boxes using the Curvy Keepsakes Thinlet.

setof5finished1a

This versatile little Thinlets set creates the sweetest gift box in a shape that can be hung on a Christmas tree, used as holders for party favours or bonbonniere boxes for weddings/engagements/christenings etc.  They can even be used with Vellum for a table decoration by putting a little battery operated tea light inside to make it glow.

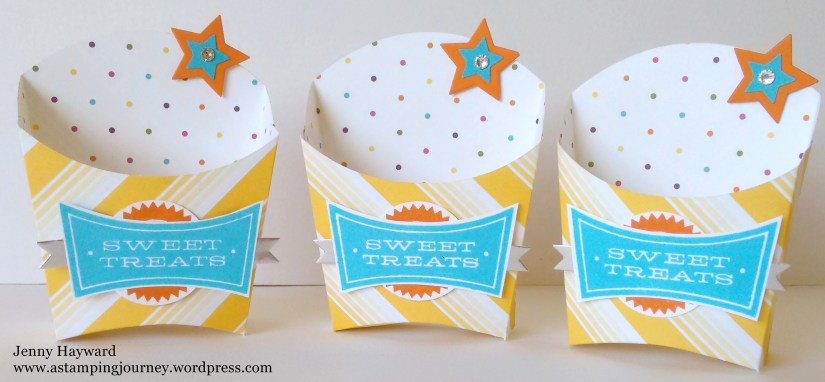
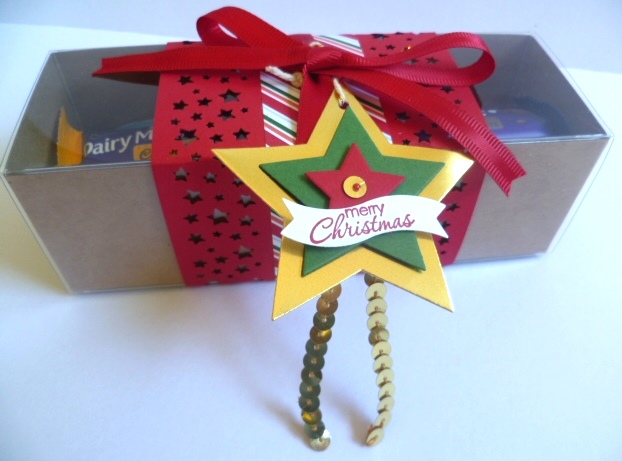
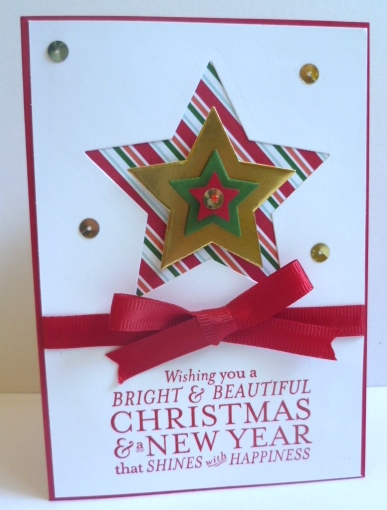
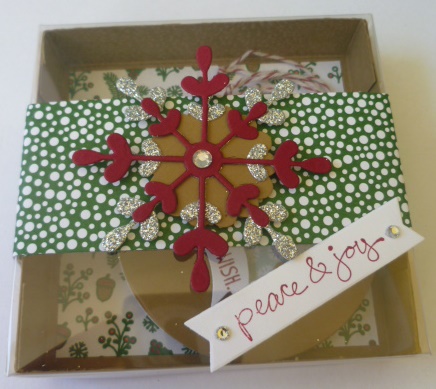
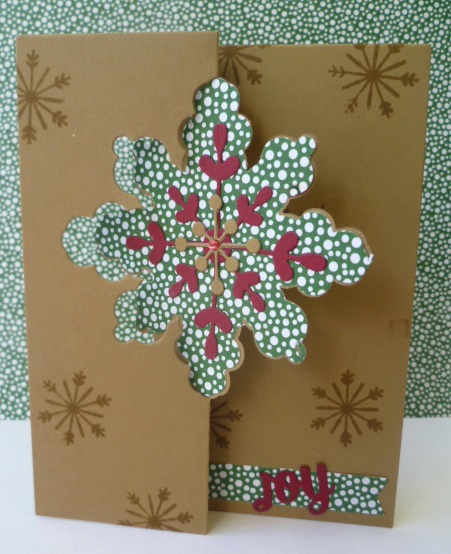
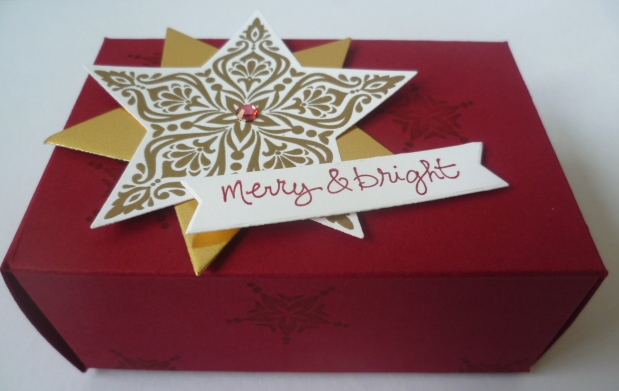
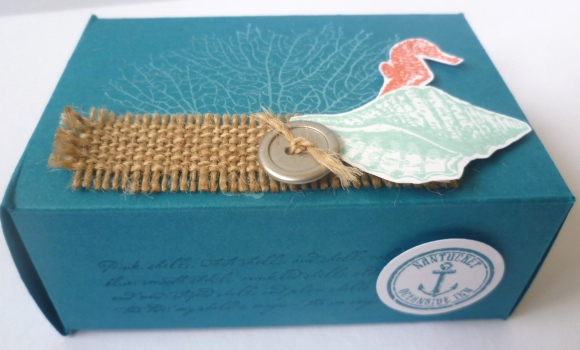
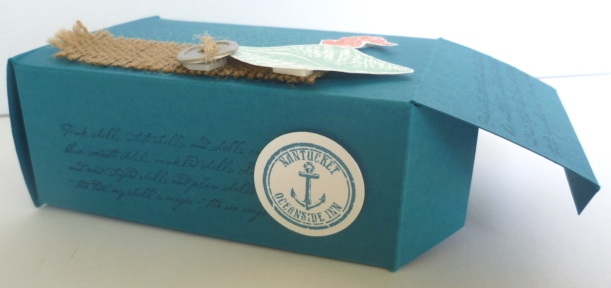
The first sample is a gift box that shows you how you can use both sides of patterned papers to create a unique customised Keepsake boxes.  You do not have to have larger sheets of pattterned paper or cardstock either.

You can see how much they will hold by these photos below as well. Two standard tea light candles, or one Votive candle.

TrimTheTreeTagPetitePunch1a

 TrimTheTreeTagPetitePunchOpen1a       TrimTheTreeTagPetitePunchOpen1b

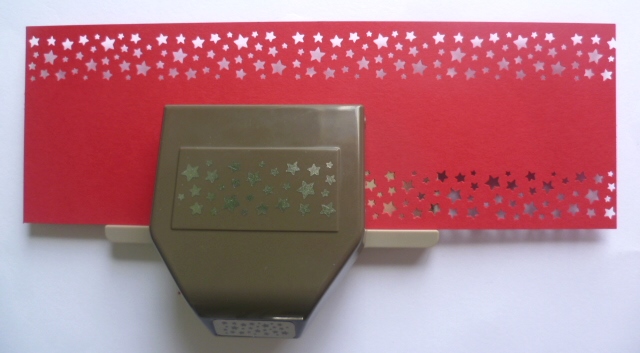
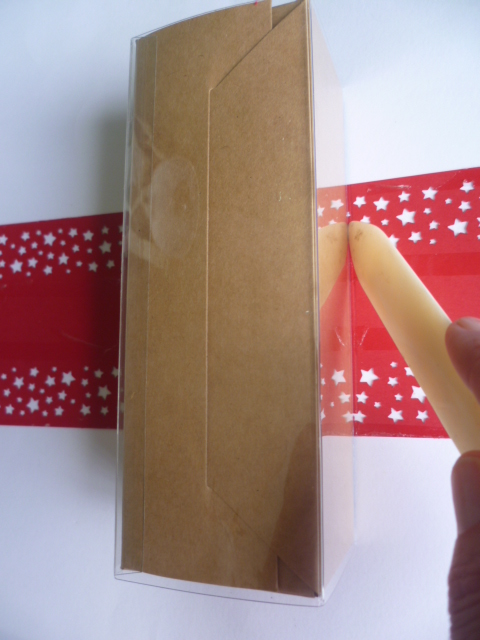
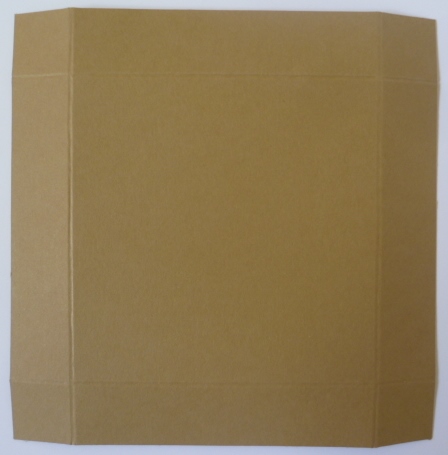
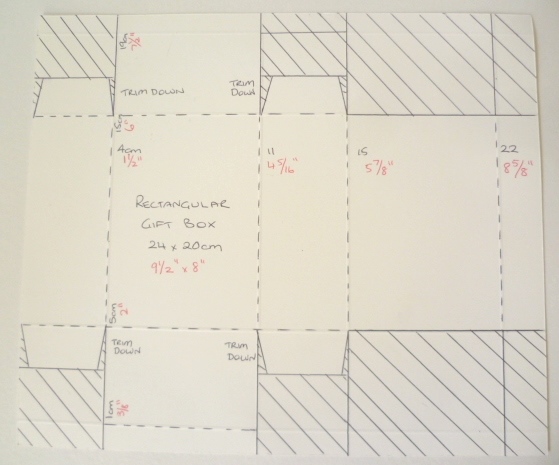
The tutorial  that you can request will show you exactly where to place your sheets of paper/card on your Big Shot machine’ magnetic platform so that you can make the most of smaller pieces, or, as in these samples, use two different patterned sheets from the Trim The Tree Double Sided Patterned paper stack (page 7 of the Holiday catalogue).

all4piecesgluedAndCurvedWithBoneFolder1a

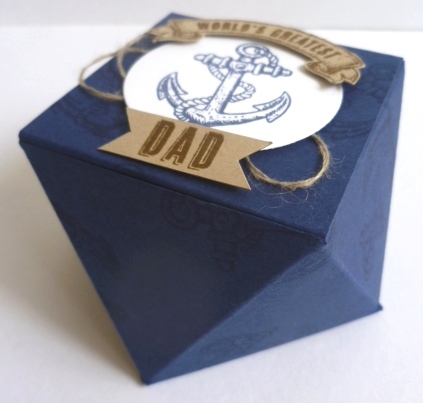
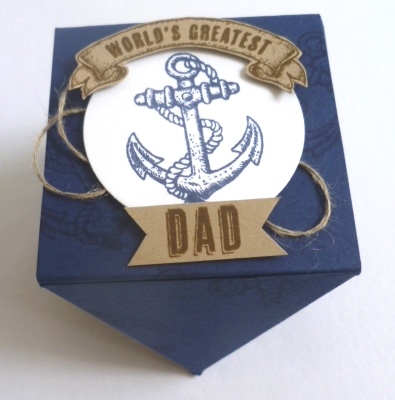
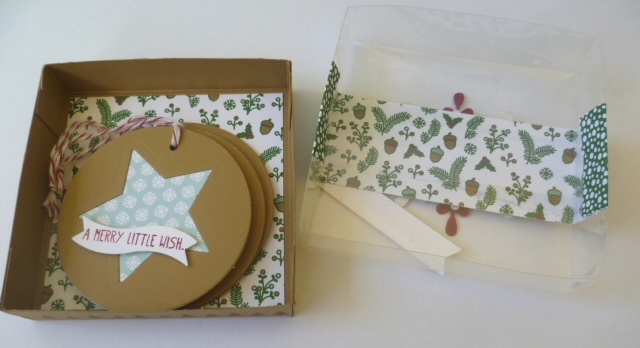
For the next samples, Wirg has used translucent Vellum sheets (page 193 of the annual catalogue). You can cut out both pieces from an A4 sheet as well as stamp the little baubles from the Cheerful Christmas Stamp set (page 15 of the Holiday Catalogue) – or any stamp set of your choice.

 vellumCherryCobblerTagChristmasCheerTealightOpen1a     vellumCherryCobblerTagChristmasCheerTealight1a

For the Christmas one, Wirg has used Cherry Cobbler and stamped the pieces before gluing them together.  When assembling you can put them together so that the stamping is on the inside of the closed box. Doing this gives a more subtle look. If you put a little battery operated tealight inside, it’s gives a beautiful effect as you can see.

StippledBlossomBlackberryBlissKeepsakeBox1a

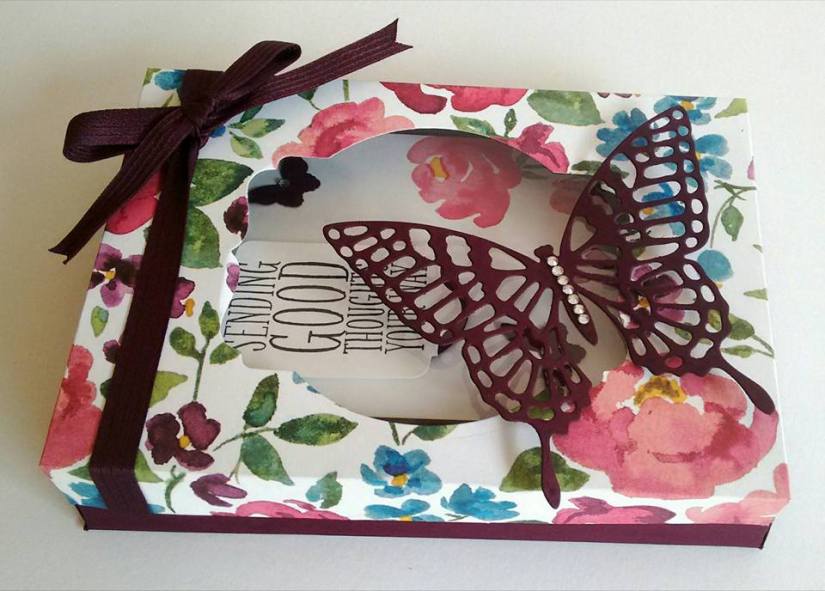
The 2nd Vellum sample uses stamps from the Stippled Blossom stamp set, Whisper White and Blackberry Bliss ink pad.  Isn’t it pretty!

Here is another sample. The Four Feathers stamps and matching Framelits are brilliant for this.

curveykeepsakebox2a     curveykeepsakebox2b

FYI the battery operated tea lights can be picked up at most Discount stores and are quite inexpensive.  Check your local discount stores. At this time of year, they are quite popular.

Tip 1: Remember, you can cut your A4 sheets of vellum in half and cut the two pieces you need at the same time as the Vellum is quite fine and you can do two sheets at once.  Don’t do this with cardstock and thicker papers as Framelits are quite thin so you may not get a clean cut right through.

Tip 2:  As ink can take a little longer to dry on Vellum, give it a blast with your heat tool to dry it. And please be aware, when using a Blackberry Bliss inkpad, it’s a very strong ink. The slightest bit still on your fingers or craft work area can transfer onto your vellum without you realising.

This week’s bundle deal, (which you will not find in my online store), is as follows;

  • White Vellum, A4 cardstock $10.95
  • Trim the Tree Paper Stack $11.95
  • Linen Thread $7.95
  • Gold Sequin Trim $8.95

That’s a total of $39.80 + SHIPPING. However, if you order the bundle from me then you only pay $35.00 (+Shipping) + also receive a free bottle of Tombow Multipurpose glue!

REMEMBER: if you want the pdf tutorial sheet with how to place your dies and using two different patterned papers to make these OR if you want to place an order then drop me a comment or email me. 🙂

Thanks for stopping by.  I hope you stop by again soon,

Jenny

3D projects

TAG BOX TUTORIAL!

Yesterday I showed you the projects I made for the Stamp-A-Latte Blog Hop using the Snowflake Thinlets.  If you missed it just head back to the post before.  I didn’t have time in that post to show you how I made the Tag Box so I thought I would show you that today.

Here is the cute box to show you again.

P1140518

Here is inside the box showing the tags I made too.  The green strip of DSP from the Nordic Noel DSP is not a Belly Band.  I just added it to the top of the acetate and adhered the ends inside the lid.

P1140519

You can decorate this however you want to.  The finished size is 9cm x 9cm x 2cm (3 1/2″ x 3 1/2″ x 3/4″). But how did I make it?? Here is the Tutorial for you.

TAG BOX

For the Base

NB: If you intend to stamp your box then do so before you assemble the box!!

Cut your card to 13cm x 13cm ( 5 1/8″ x 5 1/8″).  Score on each side at 2cm (3/4″).  

Fold on all score lines and cut up the 2 tabs on one side and again on the opposite side.

P1140461

Place adhesive on the small tabs and assemble the box.

For the Lid

Cut your Acetate to 13.4cm x 13.4cm (5 1/4″ x 5 1/4″) and score at 2.2cm (7/8″). 

Fold on all the score lines.  You may want to use the Bone Folder to burnish (press down) the score lines more.

Cut up on the 2 tabs on one side and then again on the opposite side.  Place adhesive on the tabs and adhere together.  I used Fast Fuse or you could use Sticky Strip.

This lid is a little snug.  You just need to jiggle it in but it works fine.

Decorate your box as you like.  I lined the base of this box.  The paper size I used was 8.5cm x 8.5cm (3 3/8″ x 3 3/8″).

These fit the tags in just nicely.  The tags are punched with the 1 3/4″ circle punch.

Don’t just think of them for tags though.  Why not add some chocolates???

P1140522

Enjoy making them. 🙂

Jenny 

3D projects, Blog Hops, cards, Techniques

STAMP-A-LATTE HOLIDAY BLOG HOP!!

Latte Holiday blog hop banner

Welcome to the First Stamp A Latte Holiday Blog Hop.  We all have some great projects from the Stampin’ Up! Holiday Catalogue to share with you today.  You may have just come from Narelle’s blog Here or you may be starting out here. Either way sit back and enjoy your little hop around.

Today I am focusing on the Snowflake Thinlets. I really like this Thinlets set.  They are so versatile for a number of different occasions not just Christmas.  Not only does it contain the Thinlet to create the Flip card but it has a 2 different size snowflakes, a tree, a heart, banner and 3 words (Brrr, Joy, snow).

snowflake thinlets

On to my projects.  I have made a cute little tag box and a flip card.

P1140514

Firstly, the card…

P1140516

I have used the Nordic Noel DSP with Baked Brown Sugar and Cherry Cobbler cardstock. The snowflakes stamped on the card are from the ‘Cheerful Tags’ set.  They co-ordinate so well with this die I think.  I cut a large snowflake in Cherry Cobbler and a smaller one in Baked Brown Sugar to layer them together.  The Rhinestone in the centre was coloured with the Blendablilites.

What made this Thinlet die even more useful is that recently I discovered that you can cut the centre large snowflake out.  I was watching the Stampin’ Up! Snowflake Thinlet video here and they showed this little tip.  I will show you below.

Cutting a Thinlet Snowflake.

Cut a piece of DSP or cardstock larger than the shape and cut it out with your Big Shot.

P1140456 - Copy

Turn the Snowflake to line it up in the Die the other way to cut it out completely.  I found it easier to lay the Die upside down on a cutting plate and place the DSP or cardstock into the Die rather than try and line the Die over the paper. Then you can just lay the other cutting plate on top and cut it.

P1140457

This is what you end up with. How cool!

P1140458


Now on to the box.

P1140518

Once again layering some cut Snowflakes on the top.  The greeting is from the ‘Good Greetings’ set that you can get for free this month. Check the blog post here if you missed those details.

Now on to the inside.

P1140519

I used the Nordic Noel DSP again. I added a strip of DSP on the top of the acetate lid but it doesn’t wrap right around.  I lined the bottom of the box too.  This one was the reverse side of the DSP strip used on the lid.  It holds these cute tags I made.  I just made 3 but you could easily fit lots more in there.

Here they are close-up.

P1140520

I used the 1 3/4″ circle Punch to cut the Baked Brown Sugar circles. The tree and snowflake are cut from the Thinlets.  The Star is one from the Star Framelits set.  These Banners were cut with the Bitty Banner Framelits.  Here is the back. The “to” and “from” is from the ‘Cheerful Tags’ set again.

P1140521


OK now you have had a photo overload.  I will spare you anymore so you can be on your way.  If you would like to know how I made the cute Tag Box then stop by tomorrow and I will post a tutorial.  I think I have taken up enough of your time.  You need to get on to the next blog now.  Thanks for stopping by today 🙂

Remember to stop by and comment on each blog so you can be in the running for a prize.  You will go in a draw for a Trim the Tree DSP Stack and a pack of Rhinestones (Australian Residents Only & Stampin’ Up! Demonstrators are ineligible for the Blog Candy).  Now on to Virginia’s blog Here.

If you get lost here are a list of blogs you will visit today.

  1. Leonie Schroder     http://www.stamp-a-latte.com
  2. Narelle Fasulo         http://www.simplystampingwithnarelle.com
  3. Jenny Hayward      http://www.astampingjourney.wordpress.com
  4. Virginia Hampson    http://www.stampinup.net/esuite/home/stampoutyourartwithvirginia/blog
  5. Libby Dyson           http://www.libbystampz.com

3D projects, Masculine

RECTANGULAR GIFT BOX!

I was playing around the other day and created this Rectangular style box. I was inspired by some packaging we received on something we bought.  I liked the design so I tweaked it to fit our Australian size cardstock.  Here are the boxes I made. Keep reading too for the tutorial to make your own.

P1140380


A Cherry Cobbler box ready for Christmas.  I used the ‘Bright and Beautiful’ Stamp set and embossed one of the gorgeous stars with Gold Embossing Powder.  I cut this out and one in Gold card with the Star Framelits.  I coloured a Rhinestone with the Cherry Cobbler Blendabilities.  BEFORE assembling make sure you stamp the cardstock.  So much easier!  The greeting on this box is from the ‘Good Greetings’ stamp set.  This is the Free set you can get this month when your party sales reach a minimum or $300.  This set is very useful with greetings for all occasions.

The Island Indigo box might suit the men in your life.  On this one I stamped the seaweed from ‘By The Tide’ with White Craft Ink.  The shell was stamped in Pool Party and the Seahorse in Calypso Coral.  I stamped the verse on each side of the box with Island Indigo ink.  For the Burlap trim I cut a length and cut off the sewn edges.  I then frayed the edges by pulling out some of the thread.  I used one of the threads to tie off on the Silver button.

Here they both are individually.

P1140381 - Copy     P1140387

Here you can see how the end flaps fold in.

P1140412

So do you want to know how to make one yourself.  Here you go.

RECTANGULAR GIFT BOX TUTORIAL

(Finished size is 10cm x 4cm x 7cm)

1. Cut cardstock METRIC:  24cm x 20cm.  On the 24cm side score and 4cm, 11cm, 15cm and 22cm.  On the 20cm side score at 1cm, 5cm, 15cm and 19cm.

                            IMPERIAL: 9 1/2″ x 8″.  On the long side score at  1  1/2″, 4  5/16″, 5 7/8″ and 8 5/8″.  On the 8″ side score at 3/8″, 2″, 6″ and 7 1/2″ (NOTE: I haven’t tested these measurements yet so I do hope they are correct! Let me know if I am wrong.  There are some odd measurements!)

Here is the template.  (This has now been updated).

P1140404

2. Cut off all the shaded areas.  Cut up on the tab lines (filled in line).  Where I have marked “Trim Down” I cut these tabs down shorter.  These are the tabs you fold in on the ends and then I angled the tabs to fold in more neatly.  I hope that makes sense??

3. Fold on all the scored lines.  Stamp the cardstock as you like before assembling.

4. Add Sticky Strip along the narrow tab on the right hand end (the underside).

5. Assemble by lining up the edge of the tab with the Sticky Strip to the other end.  Then fold in the flaps on each of the ends.

Hope this all makes sense.  Please ask if you are unsure.  Enjoy making them.

Jenny