cards, Christmas, Classes, Stampin' Up!

CHRISTMAS TAGS INSPIRATION!

Only days out to Christmas but maybe you still need some inspiration for your Christmas Tags. These could be added straight to a Card Front too for Cards if you prefer.

These tags we made at our last Christmas Tag Class recently.

I have used a number of different products on these tags. You could use the same or substitute with what you have.

These tags used: the Ornamental Christmas Bundle. The Festive Friends Bundle. Modern Christmas Specialty Paper. Peaceful Garden Designer Series Paper. The Patterned Tags Dies.

Here are some more Tag ideas that I have created from past years.

If you are still madly creating for Christmas I hope that you get it completed soon. And if it doesn’t get done don’t stress. All will be Ok.

Happy Crafting,

Jenny

cards, Catalogues, Christmas, Stampin' Up!

WEEK 9 – 12 WEEKS OF CHRISTMAS – A WINDOW CARD WITH HUMBLE HOME!

Week 9 of our 12 Weeks of Christmas series.

Today’s project is a Window card and it’s using the cute Humble Home Stamps and Punch. I have just recently bought this bundle so it was fun to play with.

This is the card I created. I have used the ‘A Little Bit Festive’ Specialty Designer Series Paper.

This is the inside of the card.

Don’t forget the Mini Tag you can create with the Circle cut out.

Follow along with the video below (or you can find it on my Youtube). The Full Tutorial with the measurements and directions will be sent out in next week’s Newsletter. Have you subscribed Yet? Find the link in the right hand column on my blog.

This is the Humble Home Bundle.

You can see it more in my store -> HERE.

If you have missed any of the past 12 Weeks of Christmas Projects be sure to check back on my blog. Click on the Tags for the name and it will come up with the posts. OR head to my Youtube and find them there.

Happy Christmas Creating,

Jenny

PIN It Now to come back to later.

Need any products for your crafting and you are in Australia? You can head to my store -> HERE. OR contact me directly.

cards, Christmas, Classes

QUICK CHRISTMAS TAG INSPIRATION!

I’m a little late to the party with this post. Life got away before Christmas to share these BUT… I thought I would share them anyway. You could save them or file them away for inspiration for next year. 🙂

These are some fairly quick Christmas Tags you can whip them up for your Christmas Gifts. You may even use some ideas for tags for other occasions.

We created these in my last class for the year. It was fun! Classes are on a little break now but will be back in the New Year.

For these tags we used Sending Cheer, Trucking Along and Cottage Wreaths.

I hope they can inspire you for later creating.

Happy Crafting,

Jenny

Time is running out for the Last Chance items. Those retiring from the current 2023 Holiday Catalogue. Be quick to get any of these favourites you like.

See the Last Chance items -> HERE.

If ordering Online please use the Host Code: ZRU4QJVE Or contact me directly.

3D projects, cards, Christmas, Classes

CHRISTMAS TAGS AND MORE CLASS

My local Wollongong crafters. Our last Christmas class in on this week.

It’s a Christmas Tags and More Class.

Create 6 tags (2 each of 3 designs) plus a Treat Box.

Here is a sneak.

It’s all happening in my studio in East Corrimal

WHEN: Thursday 8th 7pm

OR

Friday 9th 10am.

COST: $25

Please RSVP by Thursday morning.

I look forward to seeing you there.

Jenny

Catalogues, Classes

LAST CLASS FOR 2020!

Local people: Our last class for 2020 is on this weekend.  

I hope you can join in the fun.

We will be making some cute tags and also an additional surprise.

Here is a sneak.


WHEN: Friday 18th Dec. 10am and 7pm and Saturday 19th Dec. 2pm.

COST: $20. 

RSVP: 
by Wed Dec 16th. RSVP after only if space available.

BYO: Scissors and adhesives

Let me know ASAP by email at jghayward@yahoo.com or PH: 0439 844574 to reserve your seat.

Also, In Australia need to get your hands on the new upcoming Occasions Catalogue?

Drop me an email at jghayward@yahoo.com to request your copy and one will be in the mail ASAP. I am sending them out now.

Hope all your Christmas creating is going well?? I can’t believe how quickly it is sneaking up.

Happy creating,

Jenny

3D projects, Catalogues, Christmas, swaps

TEAM CHRISTMAS SWAPS!

It was the last team meeting for the year on Wednesday.  I wanted to share the swaps I received.  I have to say I didn’t get to make any swaps for this time but people were very generous in giving me one.

Firstly, this tag set is from Bonnie.  She made a cute little holder for the 6 tags.  There were lots of different stamp sets used to create these tags.

Christmas treats and a tag.  I liked the way Barbara made the tag using the Christmas Gleaming stamp set.  They are all lovely.  I am sorry I don’t have any directions for the little chocolate box.  The window is cut using the Stitched Rectangles  dies though.  It is really sweet.

Then an origami ornament from Vanessa.  I have seen these a few times recently.  I have wanted to make one but as yet haven’t had a chance.

You can see how to make them in this Youtube link -> HERE.

It might be too late for you with these for this Christmas but be sure to PIN them or save the ones you like ready for your creating next year.

Thanks for visiting me,

Have a great weekend,

Jenny

cards, Catalogues, Christmas, Techniques, Videos

WEDNESDAY’S WOW! #89 – TAGS, TAGS, TAGS!

Wednesday’s WOW! #89.  I have a cool new bundle to share with you today that I just discovered about.  It’s the Tags, Tags, Tags Bundle in the Holiday Catalogue.  Really I am a little slow sometimes.  Perhaps you haven’t noticed it yourself so I thought I would tell you about it.

The Tags, Tags, Tags Bundle is on p56.  There are 9 images in the stamp set on 3 stamps.  They are connected together. The 3 tags are cut at one time with the Trio die.  How cool is that! A bit of a time-saver.

Each tag die is a different shape.  And you could use these tags dies for any of your other sentiments that fit in the shape.  I love the shapes of them and one is stitched!

I really overlooked these dies. Did you?

Here is a closer look at how they cut.  These are using the Valentine’s stamps in the set but you get the idea.

While we don’t celebrate Halloween here or even Valentine’s Day all that much, the Christmas stamps are really sweet, but really those dies!!

What about some ideas from the catalogue of how to use these little tags.

Some more samples.  You could use these on cards not just tags.

If you want to check the Youtube video out to show these more clearly then head -> HERE.

If you want to see them in my store and/or order then head -> HERE.

If ordering please use the Host Code:3F2MRZYP

Also, Don’t forget there are only a few days left to go in the draw to win a new Stampin’ Up! Paper Trimmer.

Thanks for visiting me.  I love your visits,

Happy Stamping,

Jenny


cards, Catalogues, Stampin' Up!, Videos

WEDNESDAY’S WOW! #43 – ONE STAMP, ONE DIE = 16 TAGS!

How can you make 16 tags from One Stamp and One Die?? I have to say this intrigued me.  For Wednesday’s WOW! #43 this week I wanted to check out this Tags and Tidings Bundle and see how it worked.  I found the video from Stampin’ Up! to share with you.  Maybe you are intrigued by it yourself??  The stamps are very small so how can you use them on your projects? How can you line the stamps up so easily with the die so they cut?  So many questions.  So if you are the same check out the video below and don’t miss out on the end to see their cute projects.

Here are some of the Stampin’ Up! projects.  So these might be small but they are cute.  I like even how the background is stamped on the card with them.  I had considered cutting the stamps up as I thought it might be easier. (SHAME ON ME).  I think I will leave it as one stamp.  Much easier to use and great for that background.

What do you think now?  Have you got this bundle? I would love to see your projects with it.

You can see it in my store -> HERE now.  $71 for the bundle.

Thanks for checking this out with me today.  Have a wonderful Wednesday.

Jenny

cards, Catalogues, Christmas, Classes, Stampin' Up!, Techniques, Tutorials

CHRISTMAS TAG TIME CLASS!

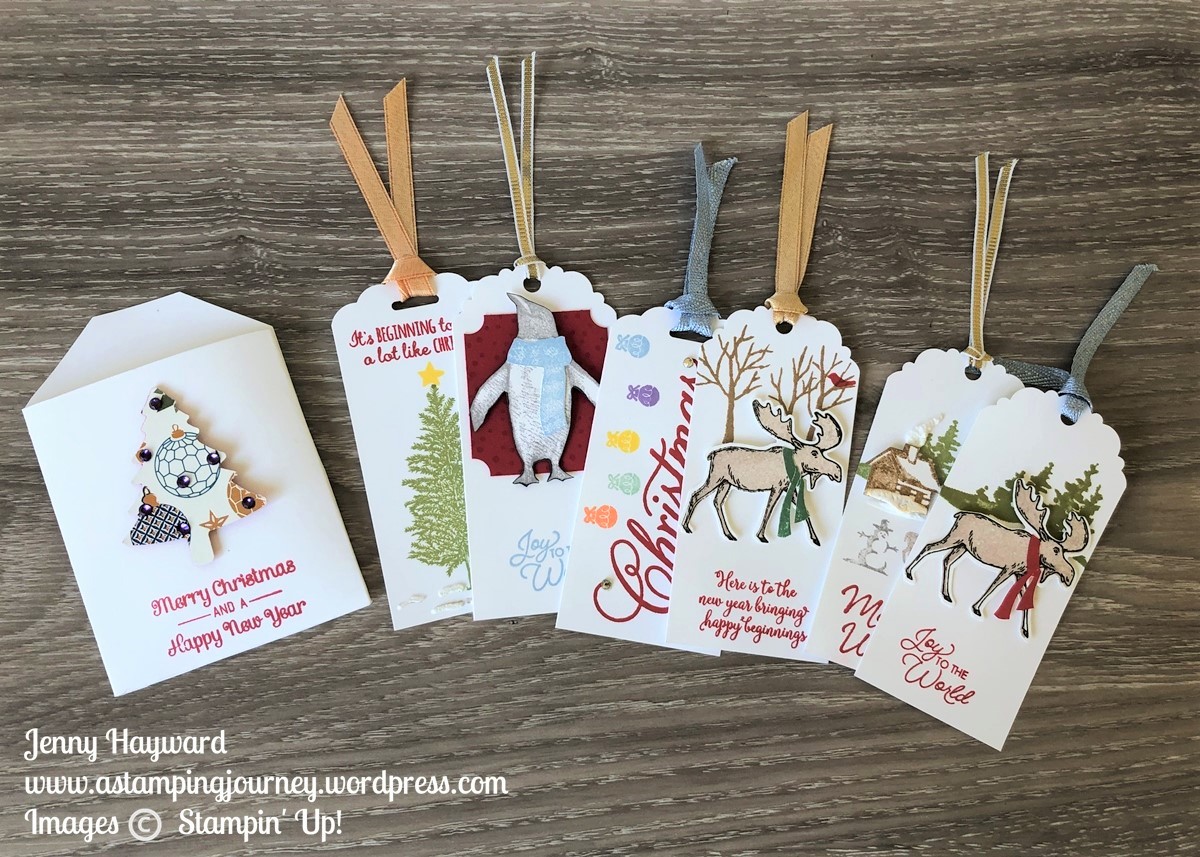
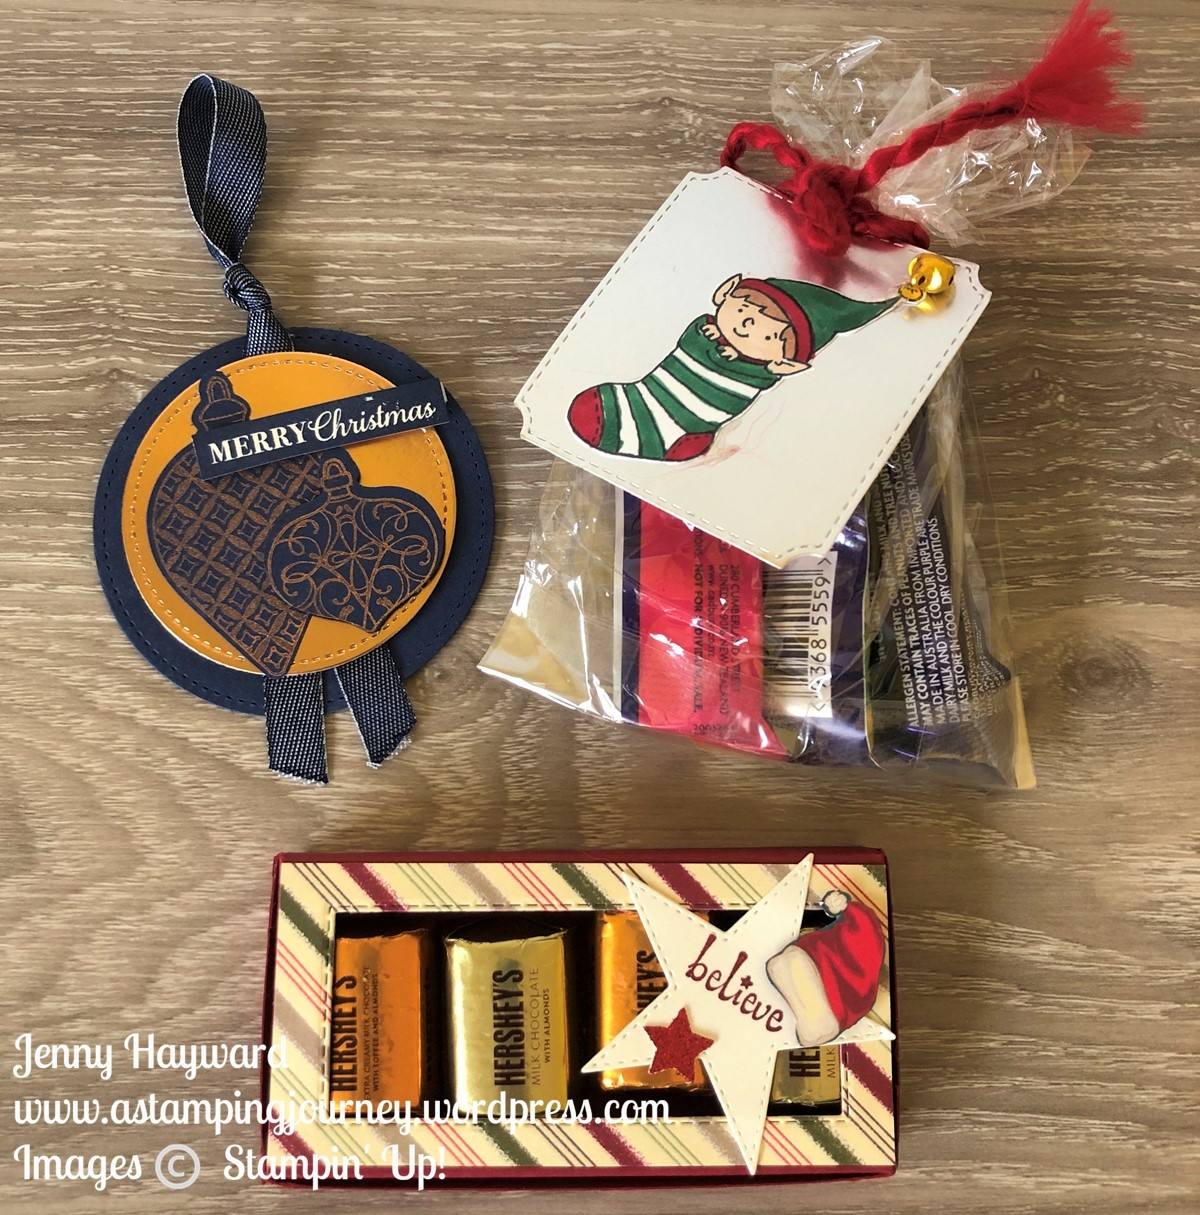
This Friday and Saturday for my last class for the year we made Christmas tags.  It was a lot of fun and my class members were very creative.  I wanted to share them with you.

Firstly, I made up a Circle Christmas tag which I will show you further below.  They all got to make one of these (or more if they wanted too).  Then I had some other tag samples from the past year or 2 I had made or received and put out my retired and current papers and ribbons and Christmas stamps and let them be creative.  I forgot to take photos from Friday’s class but here is Saturday’s creative achievements.

Aren’t they great???

——-

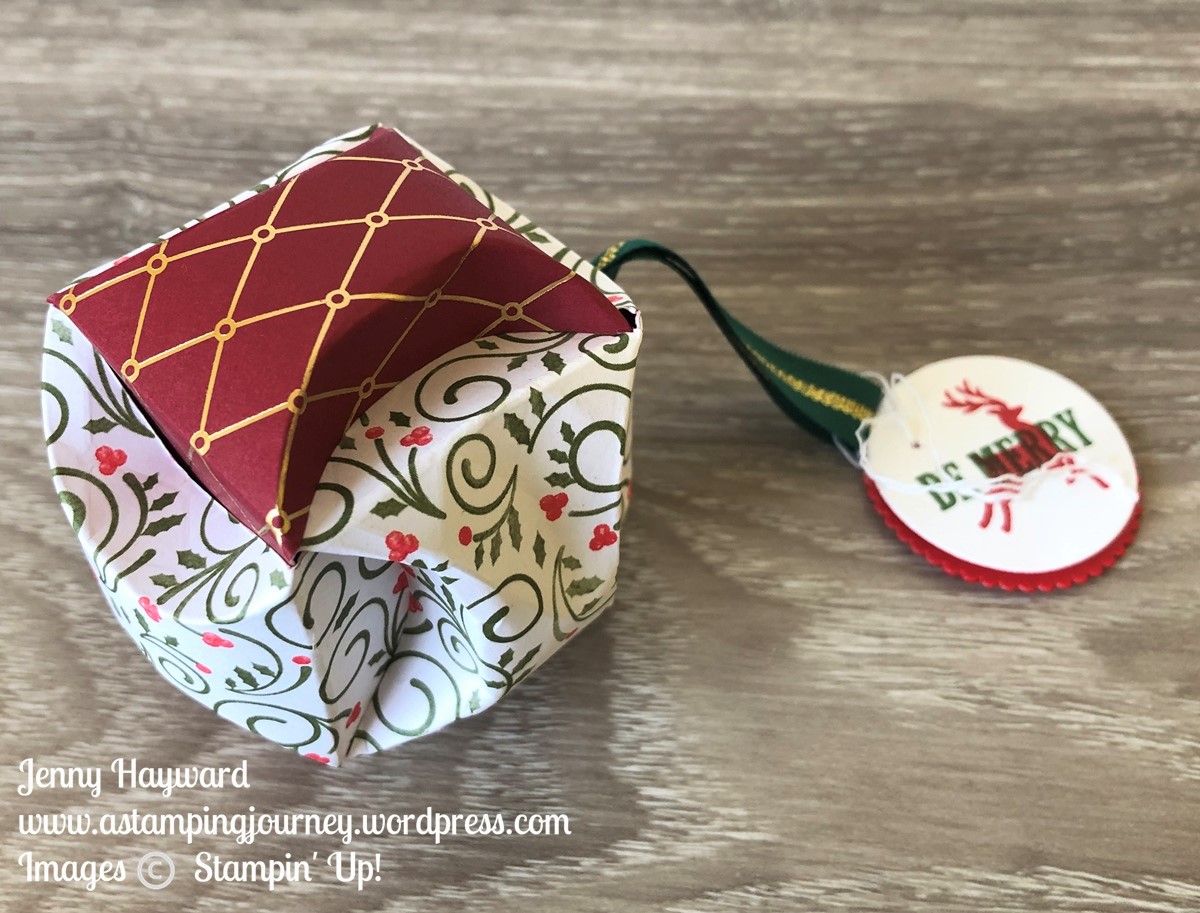
I wanted to show you the Carols of Christmas Circle Christmas tag particularly and how we made it.


You can make these type of tags to any size or any shape you like.  The principle is the same. I will give you the general instructions but then give you the measurements I used below.

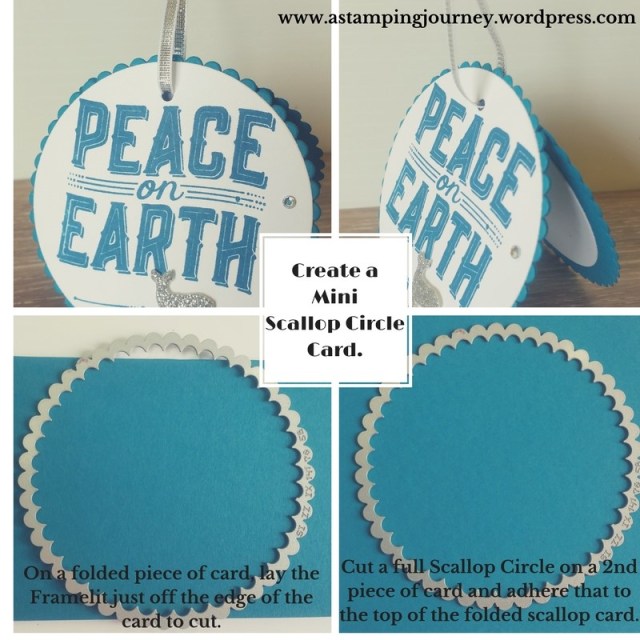
The card will be cut depending on the size of the circle Framelit you use. Cut your card to about twice the length of the circle and score in half.  This is for your card base.

You will need a second piece of card for the front measuring just larger than your die.

For the measurements for this tag:

Cut your card to 9cm x 18cm score at 9cm.  (3 1/2″ x 7″ score at 3 1/2″)

1. I used the Largest scallop circle of the Layering Circles Framelits.  Place the top of the Framelit just off the edge of the scored fold.  This edge won’t cut creating your fold for the card.

2. On a smaller piece of card cut a full size scallop circle with the same Framelit.  This is for the front of the card.

3. Adhere the full size scallop circle onto the front of the folded scallop card lining up the scallops carefully.  I found using the Multipurpose adhesive gives you a little more sliding room.

4. Using the largest circle in the Layering Circles Framelits cut a circle from Whisper White to stamp your sentiment from the Carols of Christmas set.

5. I cut a smaller circle in white to line inside the tag so you can write on.

6.  Using a hole punch or I used the Crop A Dile, punch through at the top to tie your ribbon through.  You may like to mark the place to punch with a pencil to mark it in the right spot.

Here is a condensed photo for pinning.

Hope you like it.  Everyone loved it that came to class.

Thanks for stopping by,

Jenny


3D projects, cards, Christmas

HOLLY, JOLLY GREETINGS TAGS!

Just a quick one for me today. I thought I would show you these really quick Christmas tags using the Holly, Jolly Greetings set.

candy-cane-tags

These were inspired by tags I saw on Pinterest.  I think the Whisper White card is cut to 5cm x 12cm (2″ x 4 3/4″) and the top punched with the Scallop Tag Topper Punch. The snowflake is stamped in Crumb Cake with the sentiment stamped in Real Red. There are a number of combinations you could make with these stamps for your sentiments. You can see the set below.

I added some small strips of the Candy Cane DSP with some Red Glimmer Paper. This is a great way to use up some of those small scraps you have lying around. I tied around some Real Red Twine and finished them with Rhinestones.  It wouldn’t take long to whip up a number of these classy tags to dress up your gifts for Christmas.

Here is the set for you to see if you haven’t noticed it.  This is in the Annual Catalogue p 34. ($49.00 W   $35.00 C).

holly-jolly-greetings

Thanks for visiting today.  I hope your day/ night is great.

jenny-_-signature

JUST A REMINDER: 

  • Stitched Shapes Framelits still available to order until the end of November PLUS 25% off select stamps.  See the details HERE. Please use the HOST CODE: YTKD9JKB  
  • Extravaganza is on.  Up to 40% off select products with Flash Sale on Monday 28th with additional items reduced.  Go in the draw to win the set Cozy Christmas with a minimum $20 order.  See the details HERE. 
  • All orders over $55 in November receive the Exclusive limited edition Pop Up Scrap Bin as a Thank You gift from me for your orders.  See these cute bins HERE.