Exciting news! You thought Sale-A-Bration was finished right??? Well I can tell you – it’s not! I have extra Sale-A-Bration goodies and you can grab one of these.
Maybe you missed out on one you liked when you ordered in the last month or 2. Or maybe you just didn’t get around to ordering. SO… here is your chance.
Place an order in my store (Australian residents only) over $90 or order by contacting me directly. Then take your pick. First in first choice. You have to be quick as there are limited numbers.
Order in my store -> HERE. Please use the Host Code: 4WESFNXP
OR contact me directly on 0439 844574
For each $50 order too you receive a token in my VIS Loyalty Club. Collect them for free products.
It’s Wednesday’s WOW! #119. Today let’s have a close look at this newButterfly Brilliance release. You might have seen these products around but I thought we would check out some of the particular unique features of it.
The new Butterfly Brilliance is a new collection of products released early. You might say you have enough butterflies …but really do you have such butterflies as pretty as these? And that paper! That on it’s own is just so gorgeous.
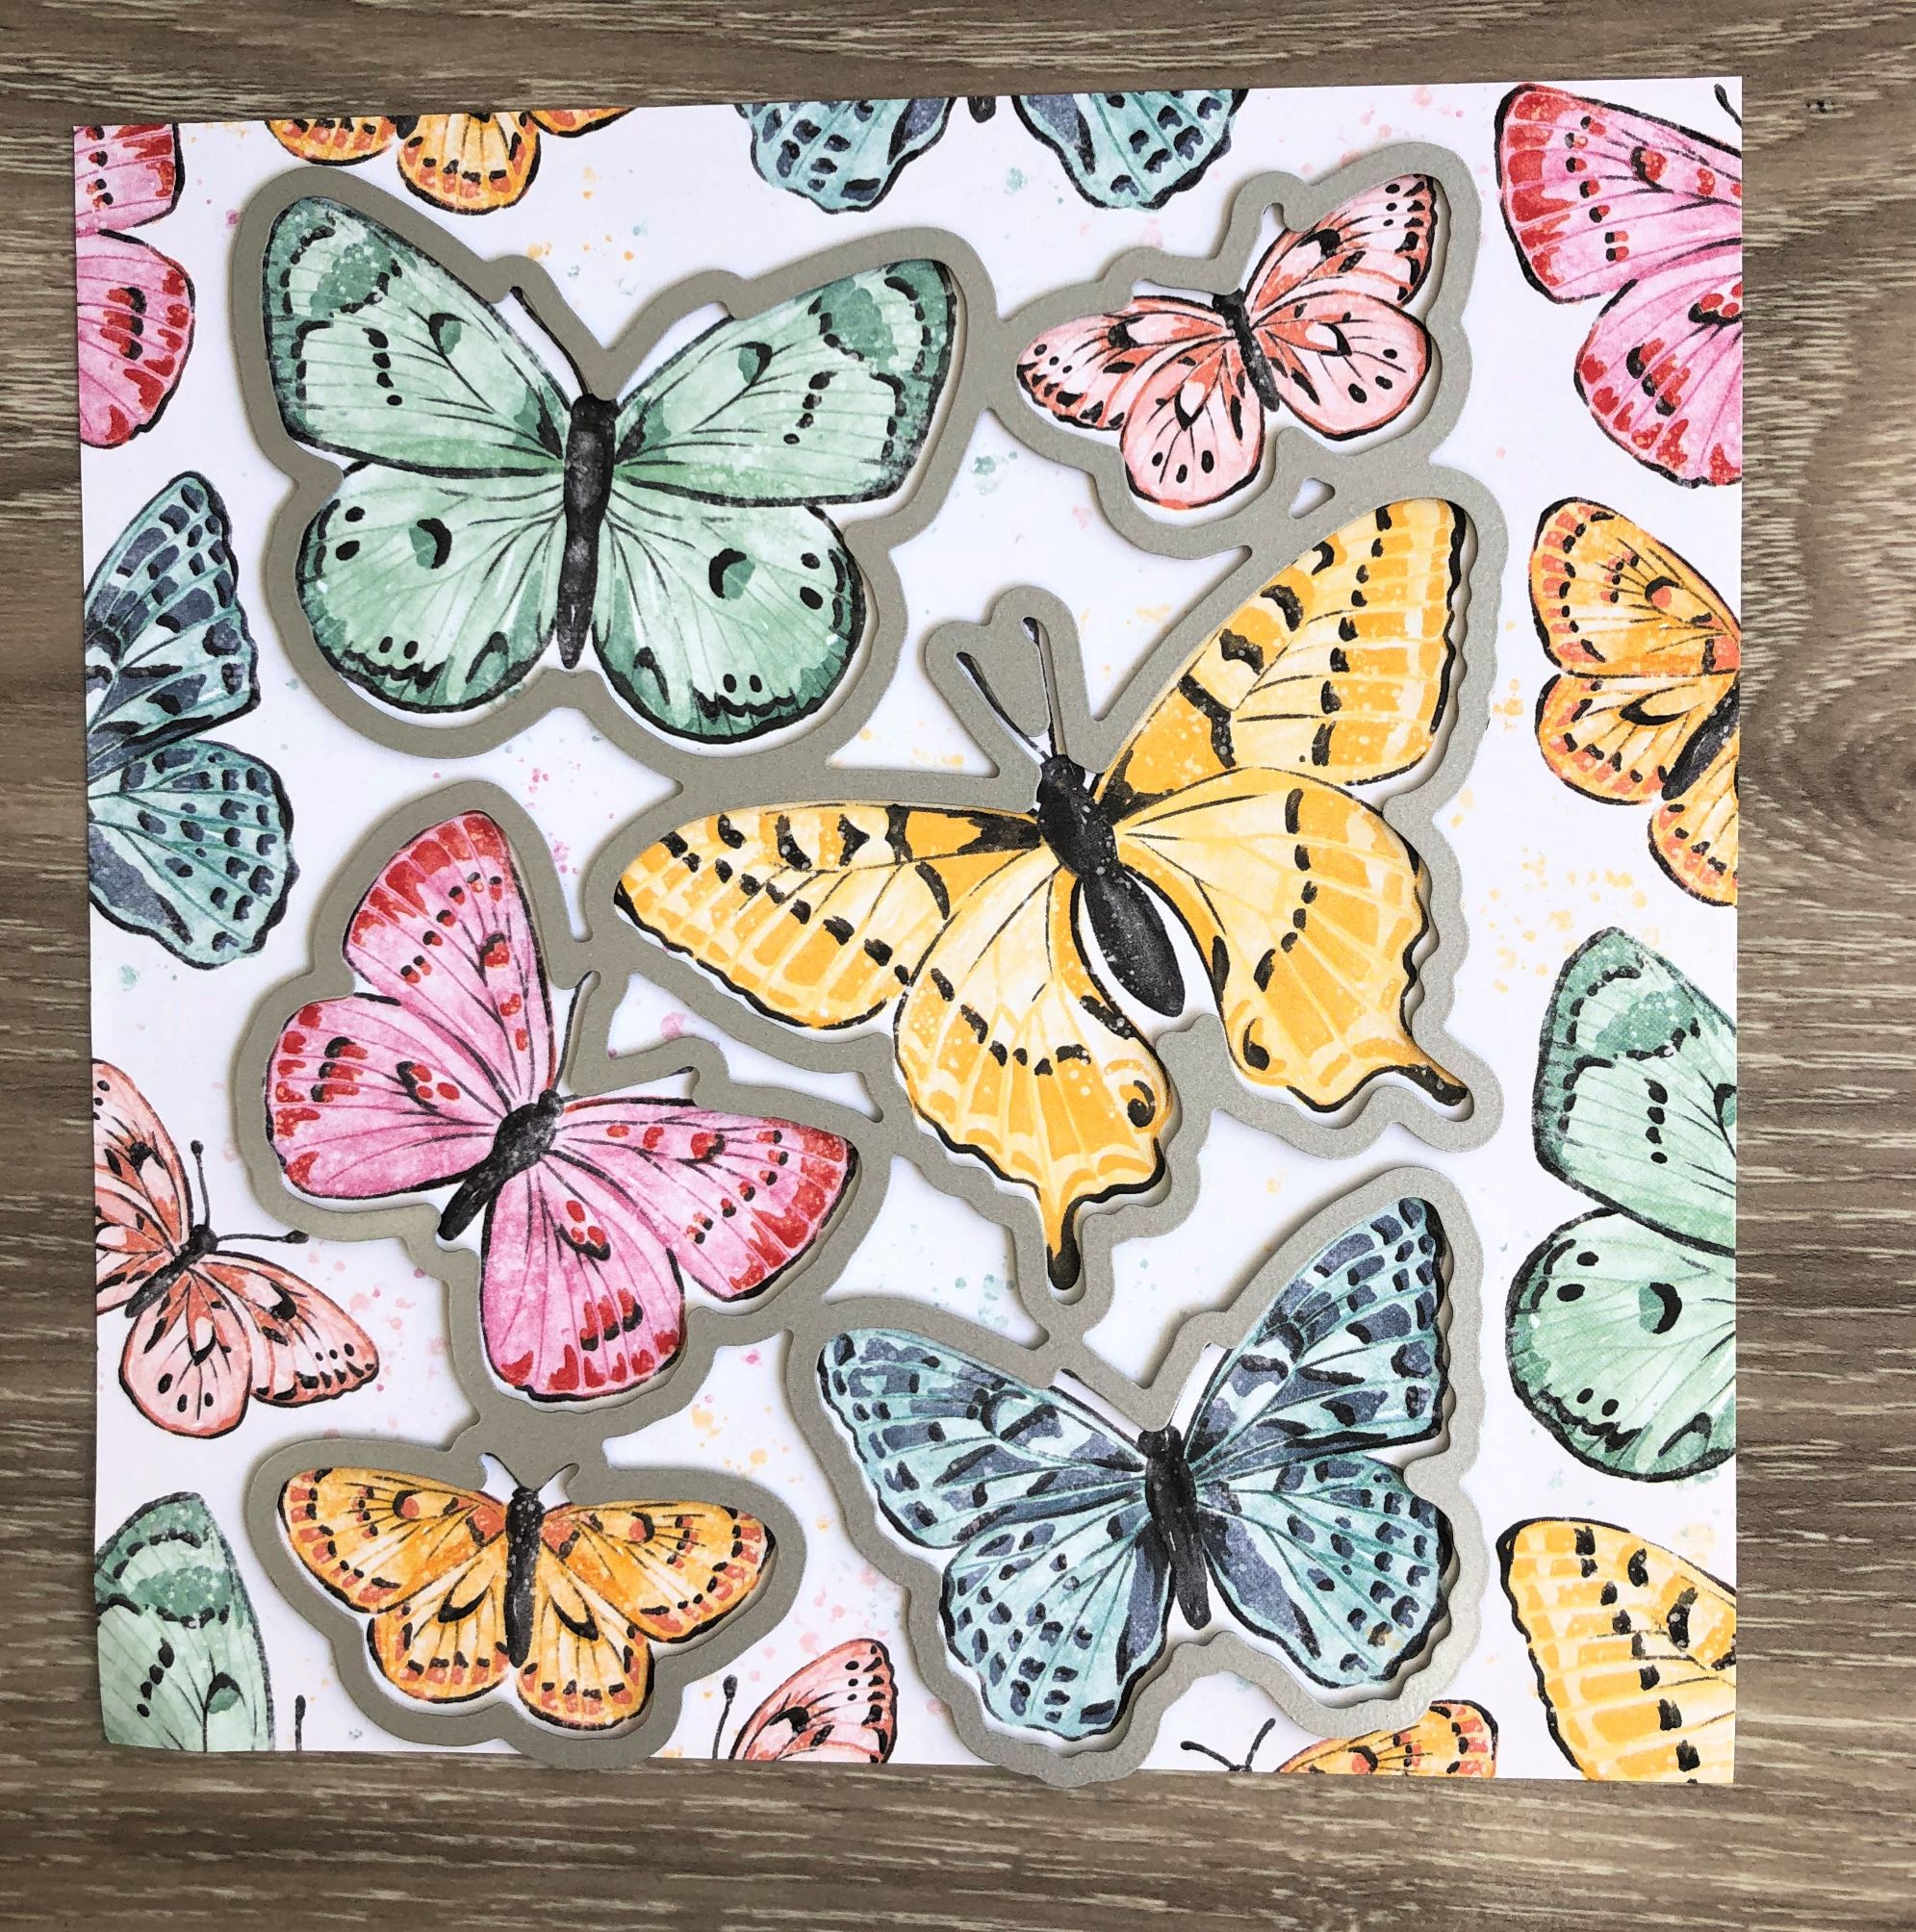
While the Butterfly Brilliance Bundle (stamps and dies) you will see in the new catalogue the gorgeous papers won’t be available. They are limited release. 😦 That’s sad as they are so pretty and the dies cut out some of the butterflies on this paper.
What do you do if you want all the butterflies? The solution is the Butterfly Brilliance Collection.$125 AUD Only available while supplies last.
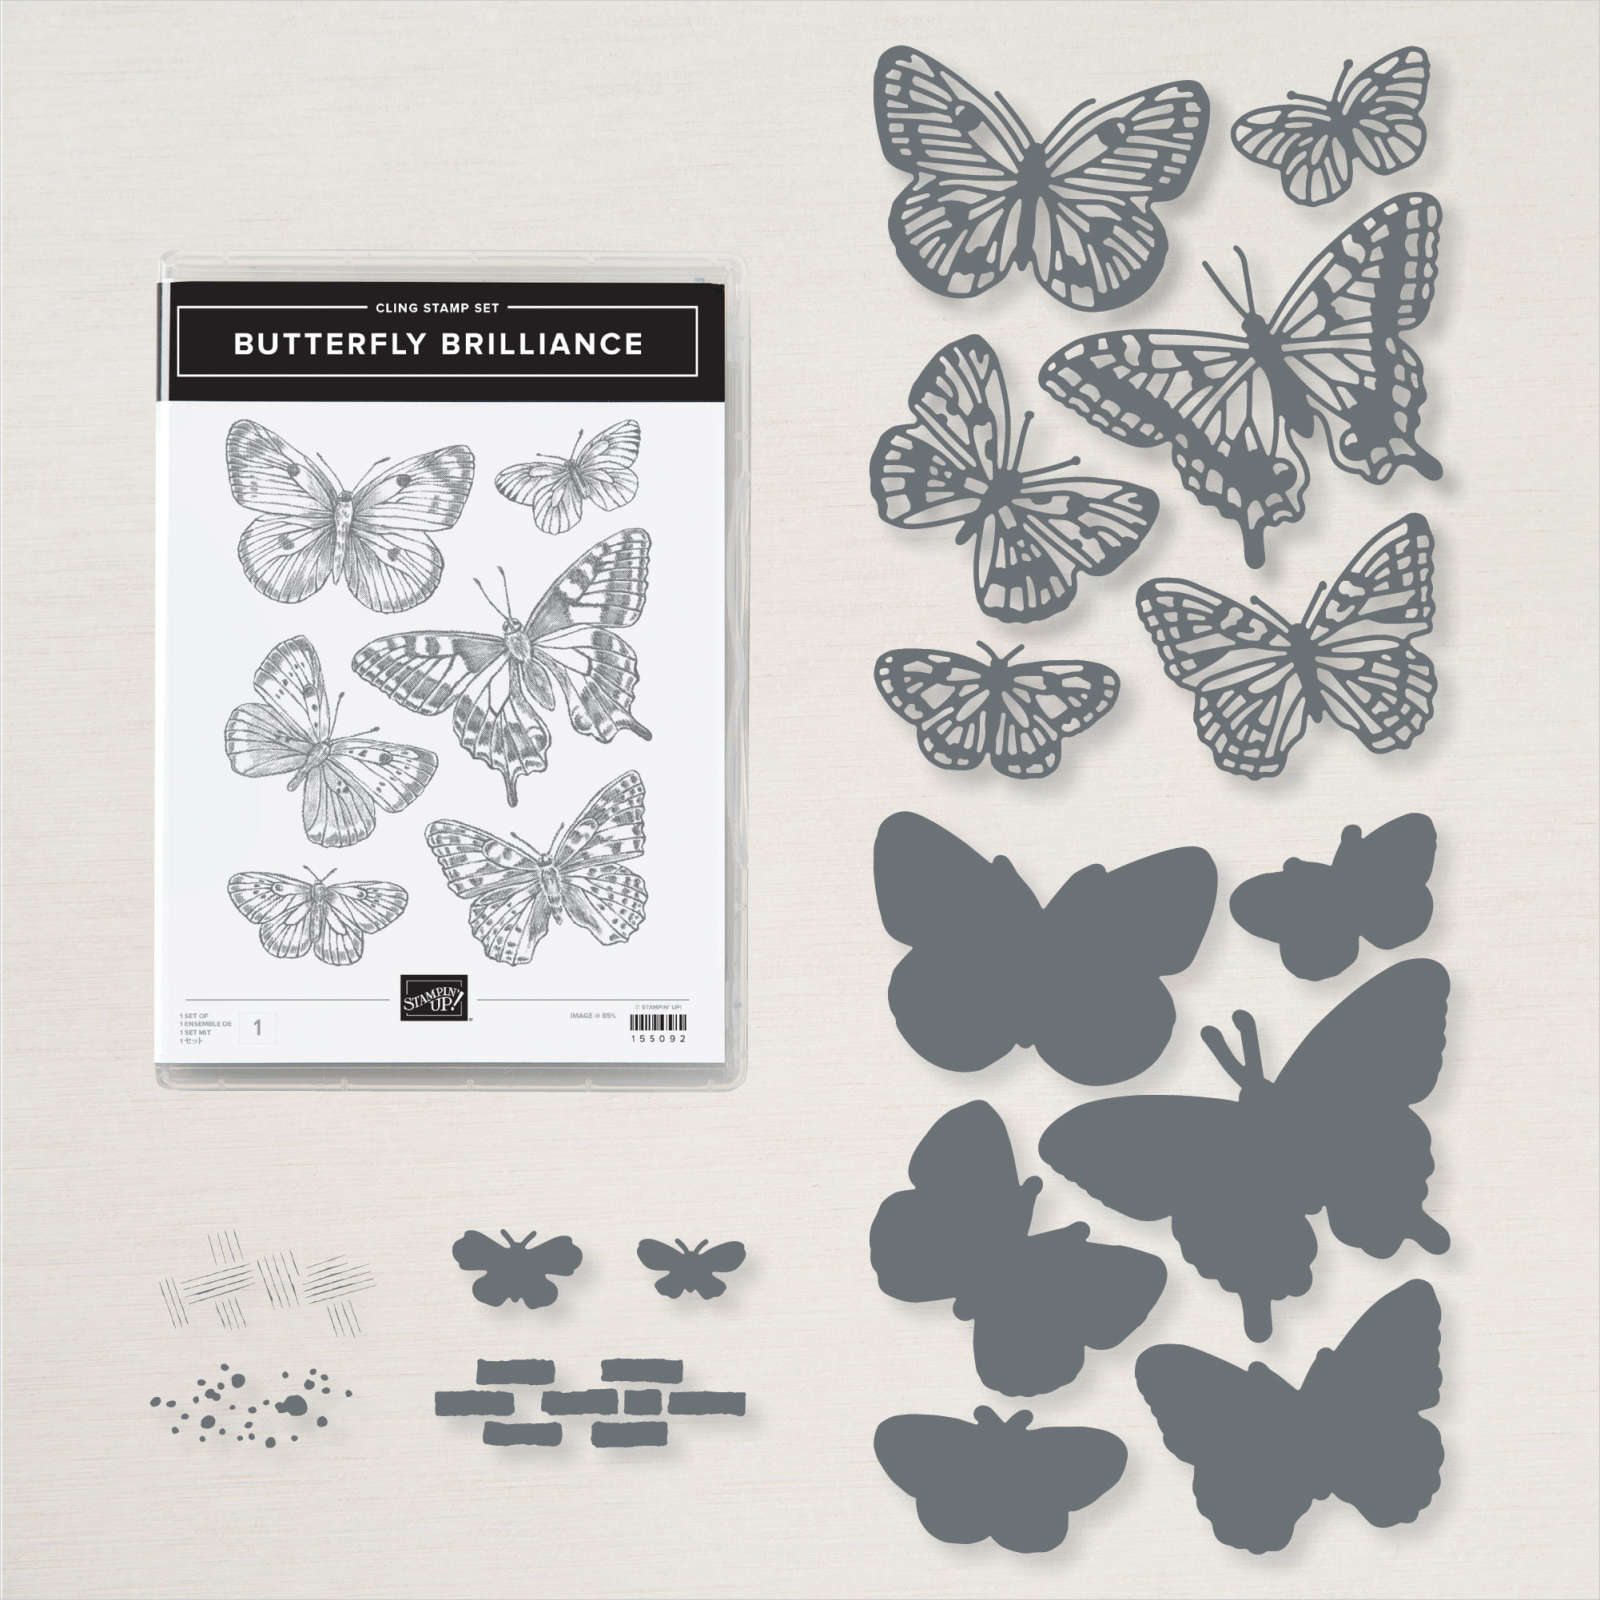
The Butterfly Brilliance Collection includes: – * Butterfly Brilliance Cling Stamp Set – * Brilliant Wings Dies – Butterfly Bijou 6″ x 6″ (15.2 x 15.2) Designer Series Paper – Natural Touch Specialty Paper
*The stamp set and Dies are available as a Bundle.
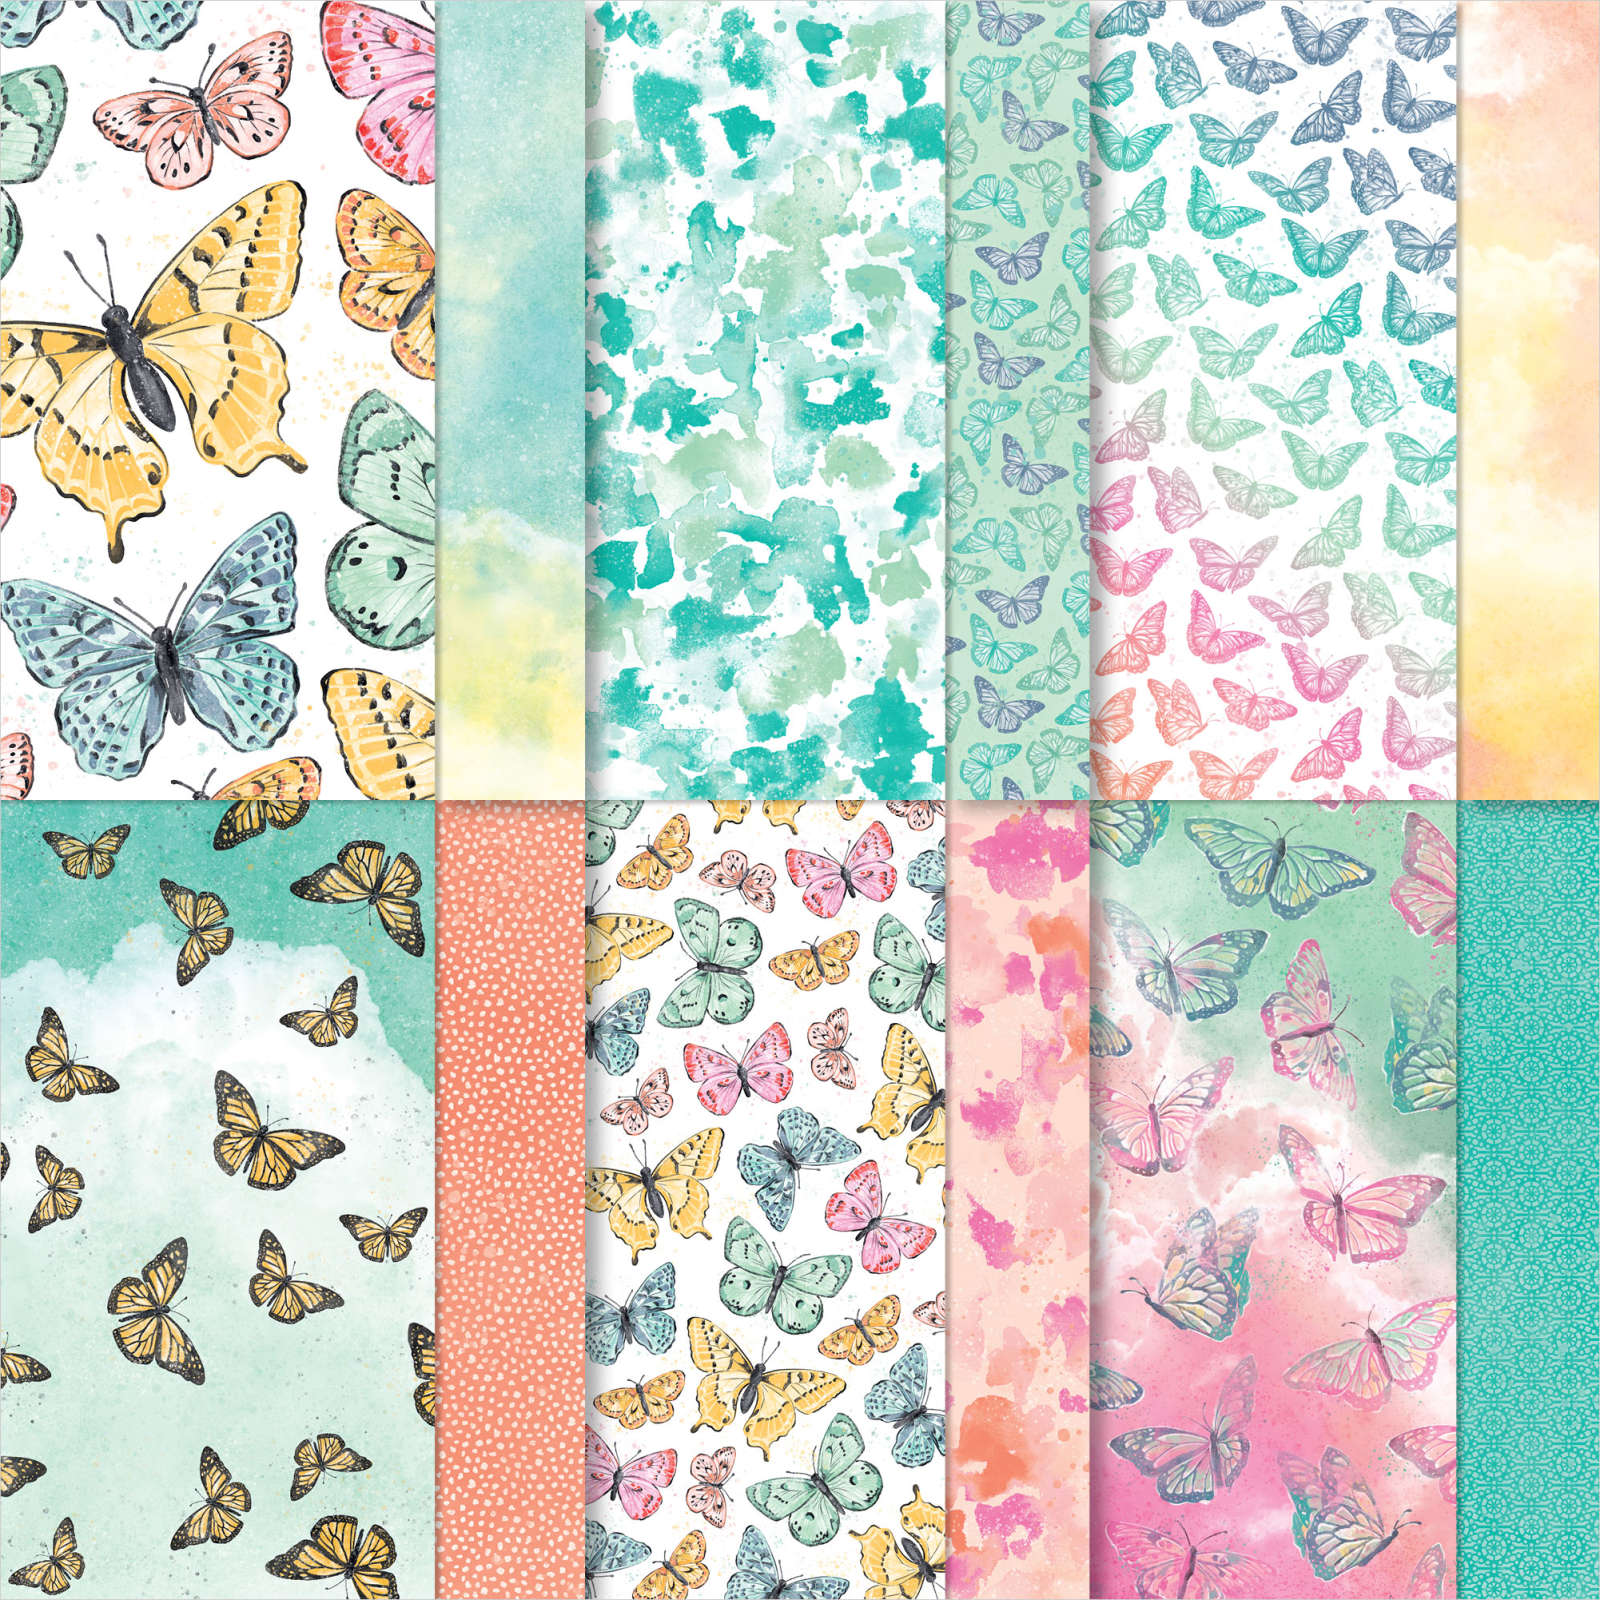
The Butterfly Bijou Designer Series Paper is available in 6″x6″ papers and there are 8 sheets of 6 different designs. Oh so beautiful! One side has the butterfly prints and the other has a more plain pattern OR … a beautiful watercolour wash.
And the colours! They are Basic Black, Bermuda Bay, Blushing Bride, Calypso Coral, Just Jade, Magenta Madness, Mango Melody, Mint Macaron, Misty Moonlight, Poppy Parade, So Saffron. So pretty together.
But check this out! The Brilliant Wings Die cuts the butterflies on some of the Butterfly Bijou DSP. No fussy cutting these beauties.
The other paper in this collection is the Natural Touch Specialty Paper. The pale woodgrain is versatile enough for any project and any time of year and will give a “textured” effect. Emboss it, use it with dies and you can even colour it with inks. There are only available while supplies last too.
You receive 2 sheets at 12″x12″ size. (30.5cm x 30.5cm). They both have a different pattern.
Now let’s talk a bit more about the Butterfly Brilliance Bundle.
BUTTERFLY BRILLIANCE CLING STAMP SET The images are so detailed.
Did you know that these butterflies are modelled after butterfly species from around the world?? Including the Clouded Yellow (Europe), Black Veined White (Europe & Asia), Coppers (New Zealand), Swallowtail (North America), Blue Copper (North America), and Painted Lady (Australia). How cool!
The butterflies are a single stamp so you can create a background or diecut them individually. You will need a Block F to use them. I would suggest using the Stamparatus to stamp them as it is so big but also if it doesn’t stamp as well as you would like it is very easy to restamp.
BRILLIANT WINGS DIES I mentioned above how you can diecut the paper. These dies cut the stamped butterflies also so you have individual butterflies. Why not layer them for a fun effect!
You might wonder what those funny little pieces in the dies do. Check them out.
They emboss the card or diecut a “brick” effect or a “splatter”.
So now you just want to go grab them right??
In Australia? You can head to my store and grab them right now -> HERE. Please use the Host Code: 4WESFNXP
Or contact me directly to help you with your order on 0439 844574
Watch out for my Butterfly Brilliance class coming soon.
Today for our Video I have put together some ideas for you to drag out some of that stashed paper that you are storing up for a special occasion and actually use it. Friday Flicks is showing 5 Ways to use your Pretty Paper!
I will share the cards and general measurements below the video. If you are receiving this update by email and the video is not showing then head to the Blog Post or it is now on Youtube as well.
Have you subscribed to my Youtube Channel yet? Be sure too so you don’t miss out on any videos. Head -> Here.
Below is the Flower and Field Strips card that was featured in the video.
The measurements are below.
White Mat – 13.8cm x 9.5cm 5 x 3 3/4″
Strip 1 – 13.4cm x 4.3cm 4 7/8″ x 1 3/4″
Strip 2 – 13.4cm x 3cm 4 7/8″ x 1 1/8″
Strip 3 – 13.4cm x 1.5cm 4 7/8″ x 5/8″
Card 2. Turn and Flip (Inspired by a card by Klompen stampers)
The sizes for cutting can be any measurements. These are my suggestions.
Cut paper to 14.4cm x 10.1cm 5 3/8″ x 4 1/8″
Cut the paper at 7cm 3″
Turn anti-clockwise and cut each paper at 8.4cm approximately 4″. Flip over 2 of the pieces and adhere straight to the card front.
Card 3: Paper Blocks (Inspired by a card by Lisa Pretto)
Cut 2 pieces of paper. They can be the same piece but reverse one side – 1) 8cm x 9.5 3 1/8″ x 3 3/4″ 2) 8cm x 7cm 3 1/8″ x 2 3/4″
Card 4: Half piece
14.4cm x 10.1cm 5 3/8″ x 4 1/8″ Cut the piece in half and flip one.
Card 5: This works well with a large flower print.
Fussy cut the flowers leaving an edge around the flowers. Raise up off the card with Dimensionals. Use a different pattern print for the card front. TIP: Use vellum between the pieces to break the elements up.
5 Cards and there are so many other ways too which I will share soon.
Hope you like this video and ideas.
Have a great day,
Jenny
In Australia? I would love if you were to shop with me. Head to my store -> HERE.
There hasn’t been a lot I have seen with this stamp set. I think the sentiments are really lovely though for those “hard to do” cards. The occasions that we struggle with.
The Heal Your Heart stamp set would be just the right set.
These projects below are created by Stampin’ Up! Artists.
Create a little gift box for some special treats. The flowers are created with the Dandy Wishes Dies.
And a soft delicate card created with the Fine Art Floral Designer Series Paper. What a beautiful saying this is. Add some vellum behind your sentiment to soften the paper if you feel it is too busy. It helps separate the paper and sentiment so it stands out more.
Hopefully they are not cards you need to make too often but it’s nice to have a stamp just for that occasion.
The Heal Your Heart set is a Free choice for Sale-A-Bration with your qualifying orders over $90.
Sale-A-Bration ends THIS SUNDAY FEB 28.
Don’t delay. Whether you choose this set or there are some other great stamps and pretty papers to choose.
Check them out in my store -> HERE. You can order there directly if you are in Australia orcontact me directly on 0439 844574. Don’t wait too long though.
If ordering online, Please use the Host Code: DMT9KWPQ
Hummingbird, Donkeys and pretty papers. It’s our last class for Sale-A-Bration. Join us near or far to CELEBRATE SALE-A-BRATION.
Here is a sneak of 2 of the 3 projects we will be making. (paper patterns may vary).
WHEN: Friday 26th Feb 10am and 7pm. (or By Mail see below)
COST: $20
RSVP:Thursday 25th Feb. Places limited so book early.
BY MAIL:Can’t make the class? Grab the class by mail.
$20 card kit plus $2 postage. You will need you own inks. If you don’t have the stamps then you can substitute with what you have. Order by Saturday 27th Feb.
Hope to see you,
Jenny
Don’t miss out on choosing your Free Sale-A-Bration item. Time is running out. This is the last week.
It’s been a bit hot here recently. What better way for this Sunday Suites by looking at the Ice Cream Corner Suite. Just looking at these make you feel nice and cool right? Although I should say for my readers in the Northern Hemisphere Ice Cream is not what you would be feeling like at the moment. I have heard it’s pretty cold and snowy there. Hope you can enjoy these fresh and cool products anyway.
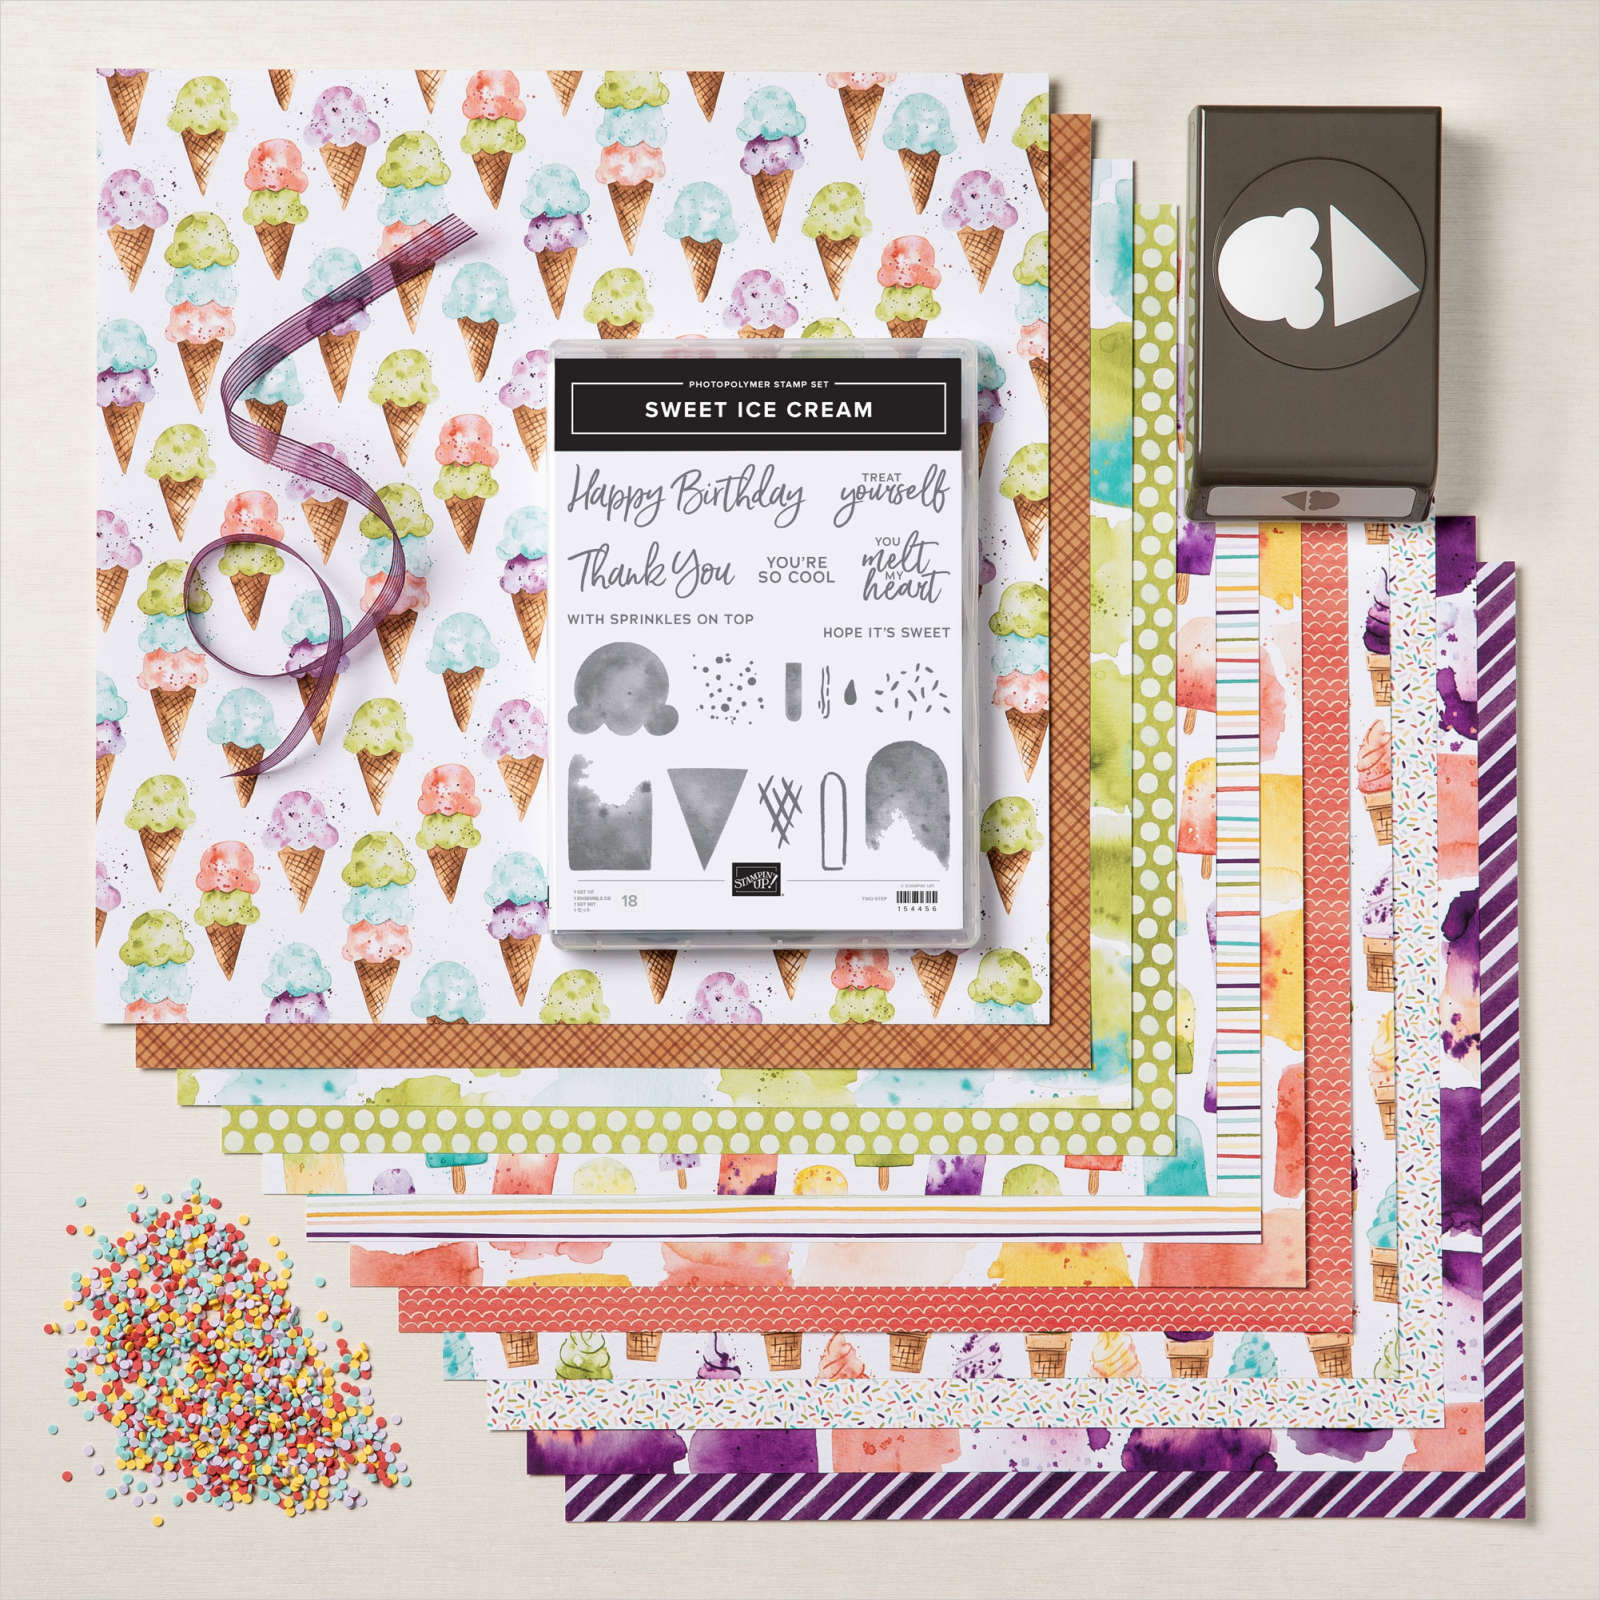
Below is the full Ice Cream Corner Suite Collection. In Australia it is $97.50
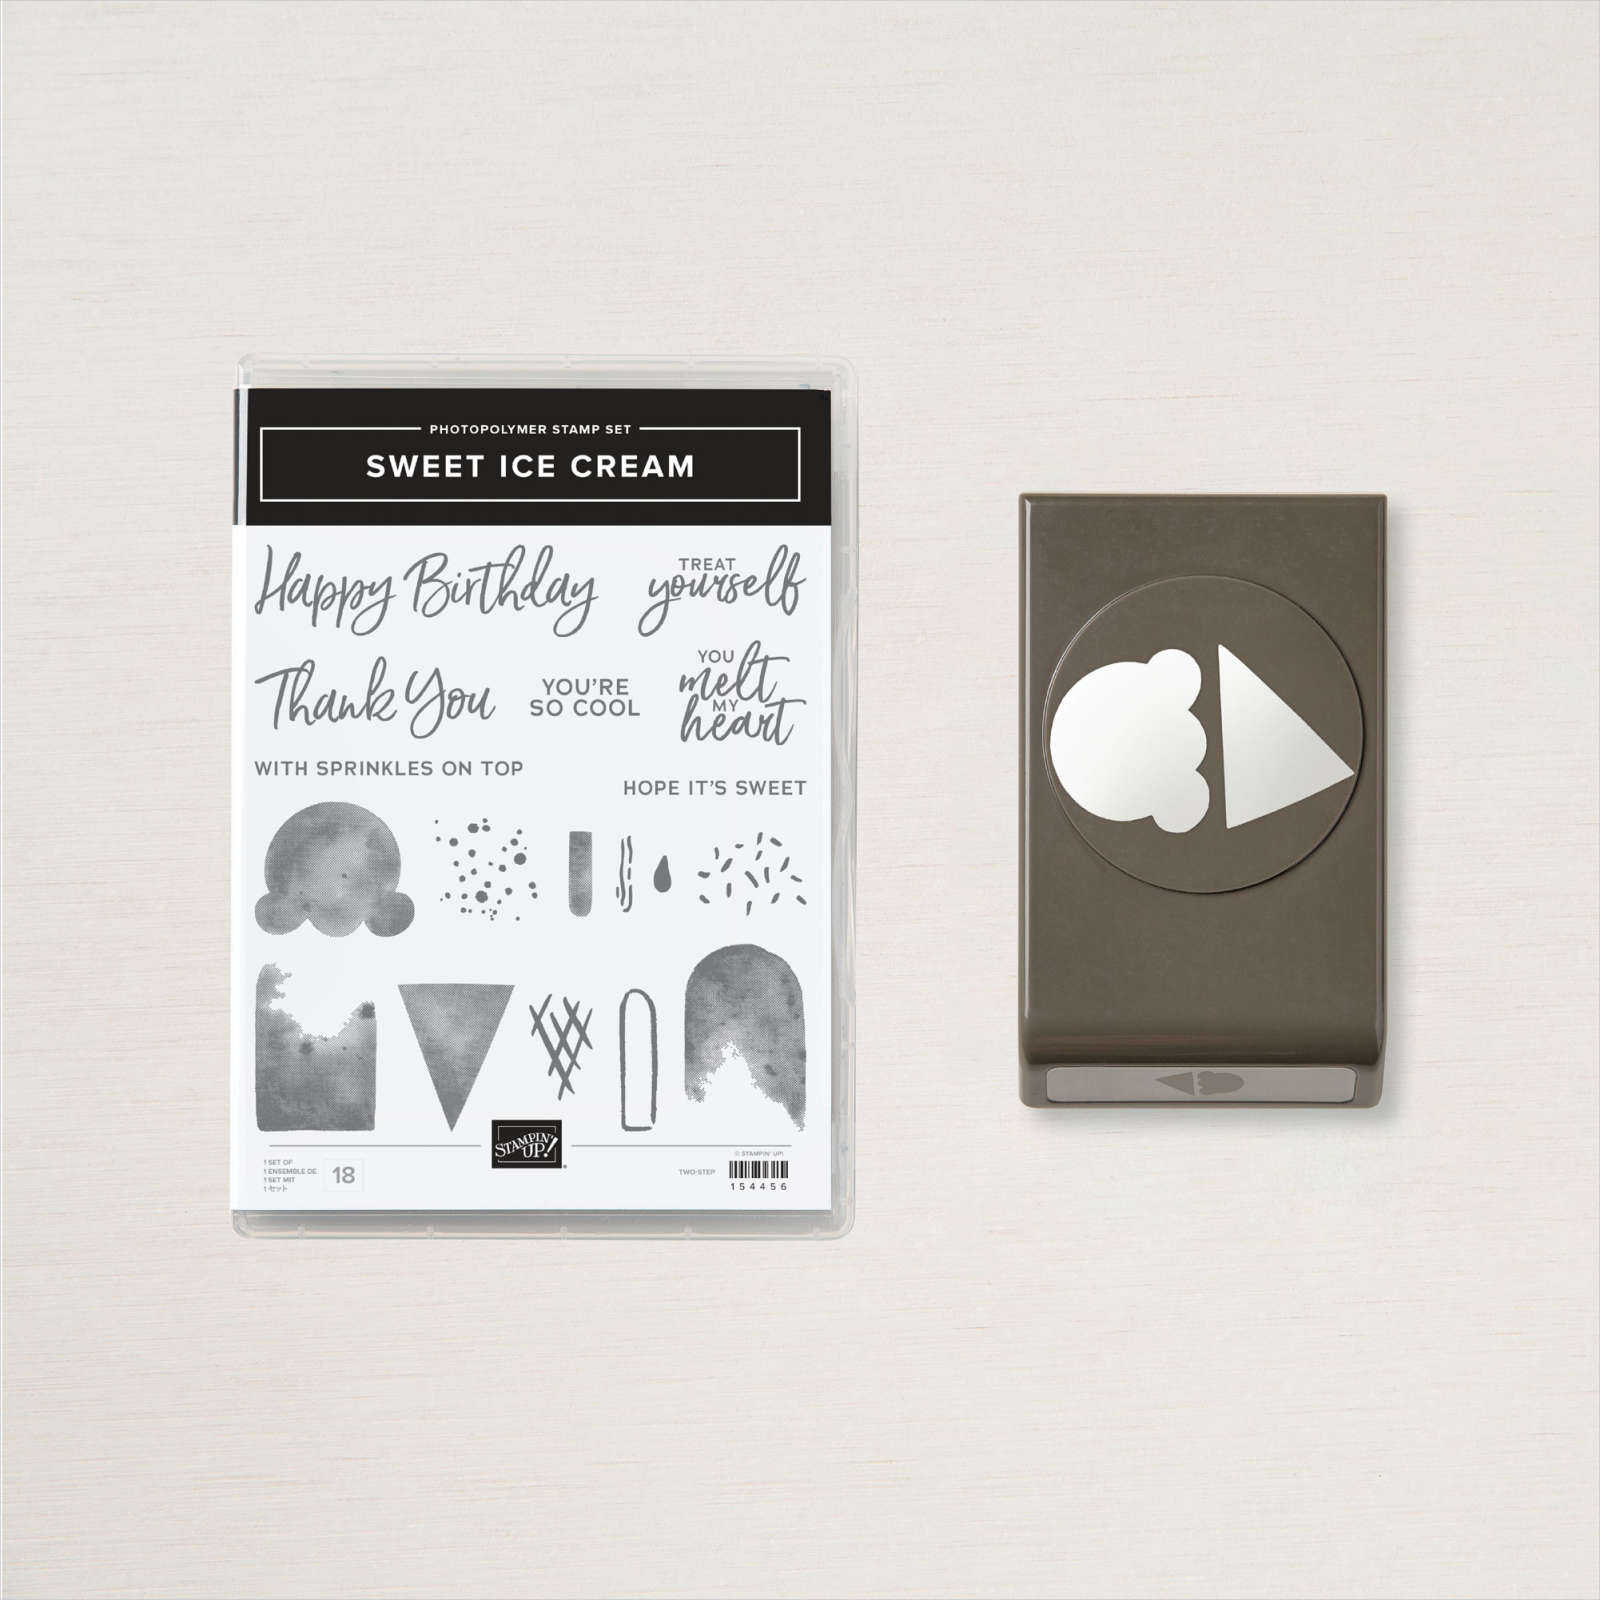
The Ice Cream Corner Suite Collection includes: * Sweet Ice Cream Photopolymer Stamp Set * Ice Cream Cone Builder Punch * Blackberry Bliss 3/8″ Sheer Ribbon * Ice Cream Corner Designer Series Paper * Ice Cream Corner Sprinkles
What about the Sweet Ice Cream Bundle which has the stamp set and the fun Ice Cream Builder Punch.
By the way can you see a bear’s head in the ice cream on the punch?? I have seen some cute cards with that by adding some fun googly eyes. Just another way to use this punch.
The Ice Cream Corner Designer Series Paper. What gorgeous colours in it. The colours are – Bermuda Bay, Blackberry Bliss, Bumblebee, Cinnamon Cider, Old Olive, Petal Pink, Pool Party, Purple Posy, So Saffron, Soft Sea Foam, Terracotta Tile.
Well we can’t show the products without showing some cute samples. These are created by Stampin’ Up! Artists. Don’t forget the Ice Cream Corner Sprinkles to make fun shaker cards.
This is available in my store now -> HERE. Shop now. Please use the Host Code:DMT9KWPQ
Or contact me directly on 0439 844574.
Now I think it is time for Ice Cream. 🙂
Jenny
Last week for Sale-A-Bration. Have you picked up your free product choice yet with your qualifying orders. Don’t miss out on them. Lots on the list?? It’s so much better value to join the Stampin’ Up! family and get great value now in your kit and then a discount on all your later purchases.
Have you seen the new Stampin’ Up! Blending Brushes?? I have had mine for a couple of weeks but have just pulled them out this week. I have been having so much fun with them. How soft and delicate are the bristles!! They are lovely.
On yesterday’s Facebook Live I used the brushes on the card and shared some tips in using them.
The edited video is now on Youtube. I will add it below too. If you are receiving this blog post via email it might not show up so head to my blog or you can go to Youtubedirectly.
I will be sharing some more cards with the Blending Brushes very soon so watch out for them.
A couple of tips with using them though. You will want to treat them differently than the sponges or the Daubers.
When picking up the ink from the inkpad you will want to “rub gently” not dab like you might with the sponges.
Dab off a little on scrap paper first. I do this with the sponges anyway.
When applying ink to your card move in a circular motion with light pressure.
Hold the brush down towards the brush head.
If you are sponging the whole card start off the edge of the card and work lightly in.
I hope these tips help. I will put together a video soon sharing some cool ways of using the brushes.
Here is the card from the video. I have used the Dragonfly Garden on the card.
On the Dragonfly I stamped the “solid” wing stamp on the wing outline in Blushing Bride and then coloured just the tip of the wings with the Soft Seafoam Stampin’ Write Marker or you can use the Stampin’ Blends.
The Blending Brushes are available in my store now -> HERE. for $21 AUD
Wednesday’s WOW! #118. You might have heard about some new White card that Stampin’ Up! has. Today let’s check it out closer to see how the Basic White compares to the previous Whisper White.
Sadly the previous Whisper White card and other products ended. So a frantic dash was made to source a new card. It was important that the new White card performed to the expectations that we as crafters need for all the stamping and techniques we do.
The new Basic White card seems to have passed the quality tests and it is now available in cardstock and envelopes and great to use for all your stamping, great for colouring with the Stampin’ Blends and for many of the Techniques you love to do.
I don’t need to say too much more about it as you can check out how it performs and with a little more explanation in the video -> HERE.
If you need some new White cardstock it is now available in my store.
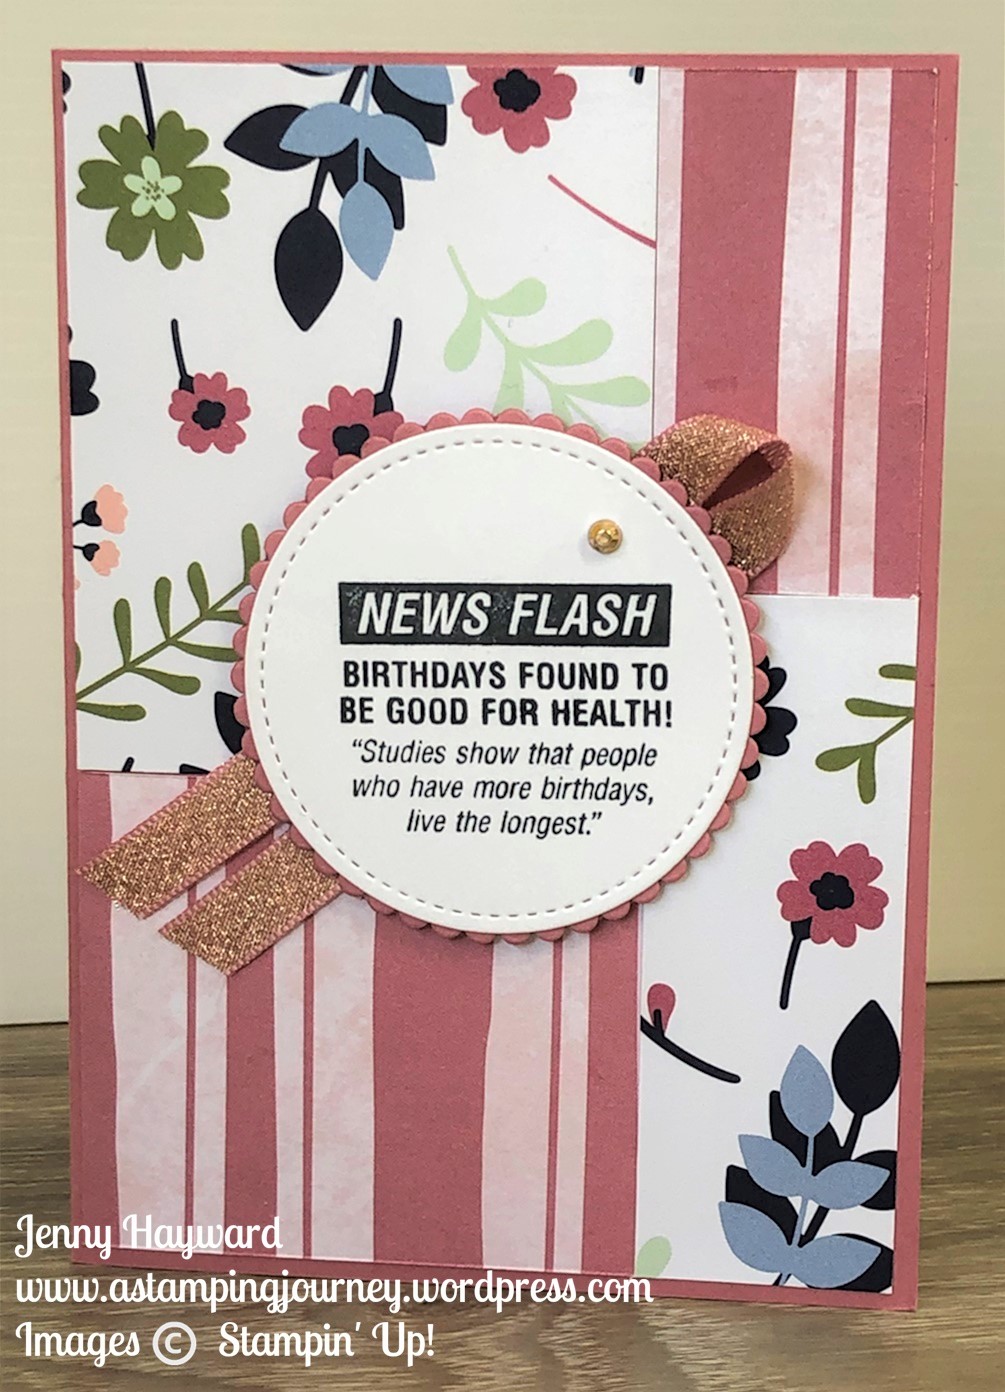
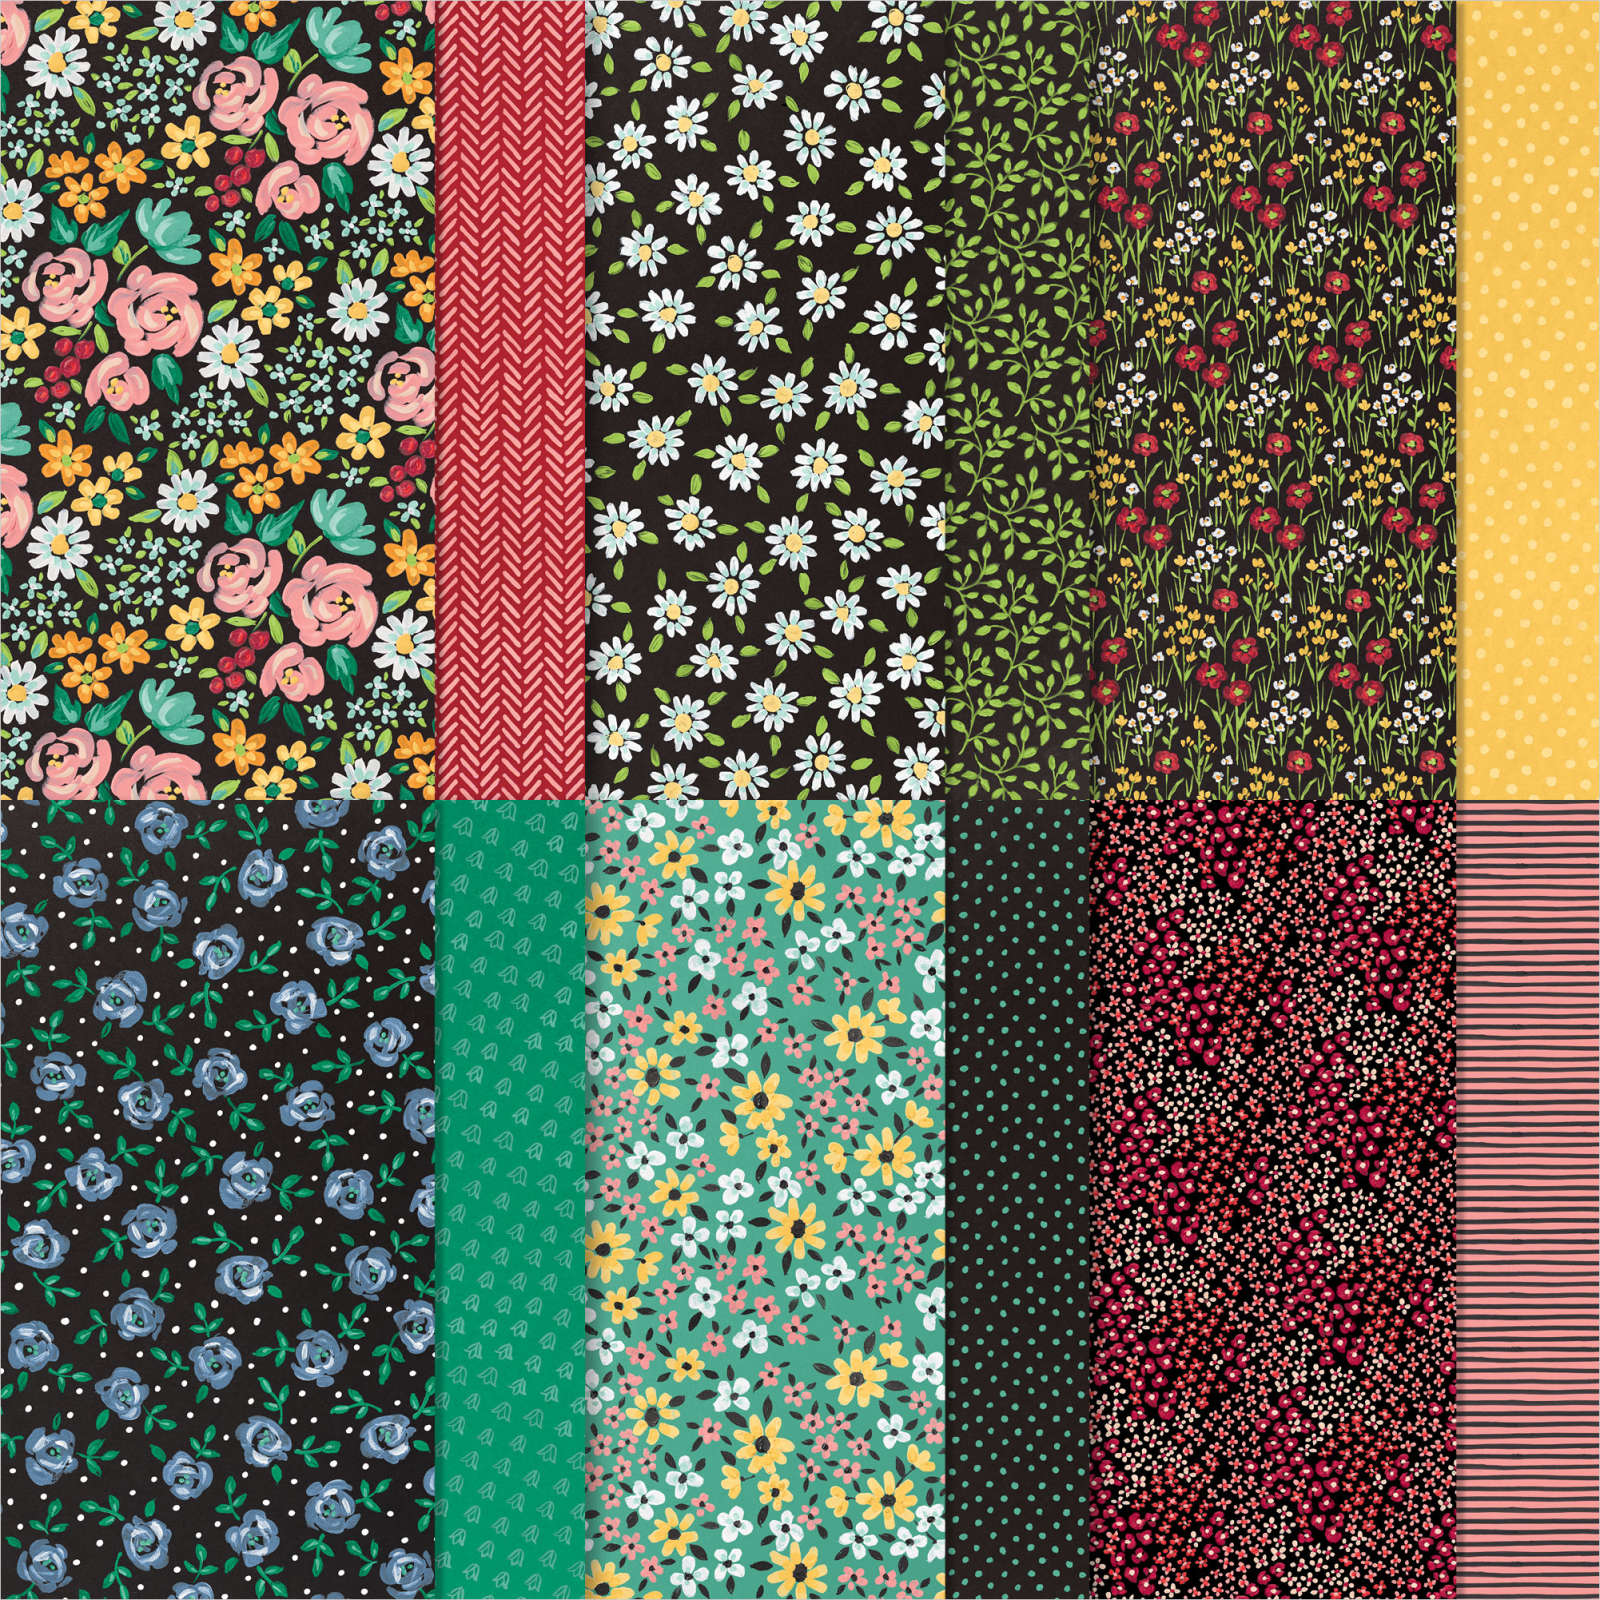
Have you seen the lovely Flower and Field Designer Series Paper?? One side has some great flower patterns and the other side has more plain prints.
For the card I am sharing today I have used 2 of the papers. I love how they work together. And, the card is oh so easy to put together!
The flowers were fussy cut from one of the prints and I love how it contrasted so well with the stripey print. I added the Vellum rectangle, cut from the Stitched So Sweetly Dies, to help highlight the flowers so they don’t get so lost among the stripes. A simple sentiment from the Many Messages stamp set and cut with the Messages Die.
You can grab this Flower and Field Designer Series Paper Free with your orders over $90 for Sale-A-Bration. Or choose any of the other sets. Less than 2 weeks left!
In Australia? You can contact me directly to order on 0439 844574 or head to my store to shop -> HERE. Please use the Host Code: DMT9KWPQ
Don’t miss out on this.
Happy Shopping,
Jenny
Have lots on your Wish List? Why don’t you save money and get a discount each time you order by joining the Stampin’ Up! Family. No pressure to “sell”
Get $235 of products and pay $169 and also during Sale-A-Bration get 200 6″x6″ papers valued at $100. Stay as long as you like but have a lot of fun along the way. Ask me for more details.
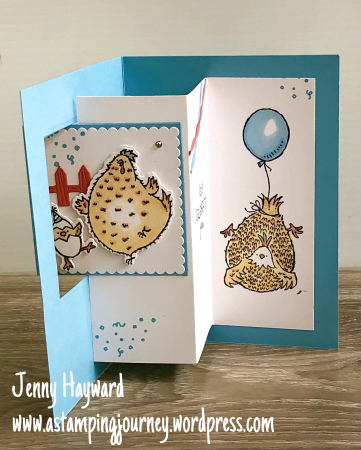
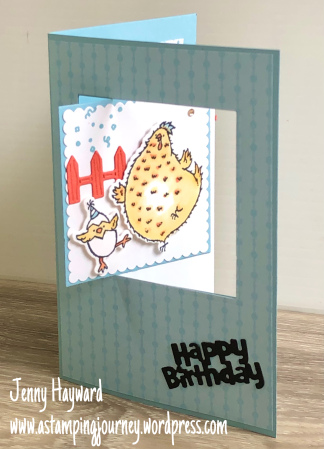
Friday Flicks.I have a fun card for you in today’s video. This video is a replay from my Facebook Live on Wednesday. I created a Pop Out Swing Card with the Hey Birthday Chick Bundle. I have made a few of these over the years and I love making them. It has been a while so thought I would pull it out again and freshen it up.
Here is the card for you first.
Check it out on the video. (If you are receiving this via email then the video may not show. Head to the blog post by clicking on the title above or head to Youtube).
It is now also uploaded to Youtube -> HERE. (Have you subscribed to my Youtube channel yet. I’m shooting for 200 subscribers by the end of the month so head on over there) 🙂
MAKE YOUR OWN POP OUT SWING CARD
The video will show you the details. I will give you general details and measurements below.
Base card is a standard size card. Designer Series paper is 4mm (1/8″) smaller. I used the Balmy Blue pattern in the Subtles pack New demonstrators receive free in Sale-A-Bration. (They will receive a pack from each Colour Collection. 200 6″x6″ in total valued at $100)
I used the Layering Squares Dies for the window cut-out. You can use a circle or rectangle also if you wish.
The inside White card measures. 15.2cm x 12.8cm (6″ x 5″). Score at 5cm and 10cm. (2″ and 4″). Adhere to the inside of the card with the white card in the folded position. ONLY place adhesive on the back of the right hand section. Centre it inside the card to the right and at the top and bottom. Close up the card and adhere the square panel in through the window to adhere to the white bi-folded card. Only place adhesive on the back on the right hand section.
—
Check out the Hey Chick or the Hey Birthday Chick Bundles. They both have the cute chicks and dies that co-ordinate with each one.
In Australia? You can now order them in my store -> HERE. Please use the Host code: DMT9KWPQ
Or contact me directly on 0439 844574 and I will help you with your order.
Hope you get to make a Pull Out Swing Card. They are fun.