cards, Stampin' Up!, swaps

SOUTH PACIFIC STAMPIN’ UP! CONVENTION IS STARTING!!!

YAY! I am a little excited.  By the time you read this I should be in Melbourne ready for the South Pacific Stampin’ Up! Convention.  There will be so many inspiring new ideas, some sneak peeks of new products and best of all meeting up with Demonstrators from Australia and New Zealand. It’s great to finally meet face to face after chatting and sharing comments online on various groups.  There are so many inspiring Demonstrators around here.

Another fun part of Convention is swapping.  It’s a great way of getting new ideas and seeing different ways of using a stamp set or other tool.  I thought I would share the swaps I made today.

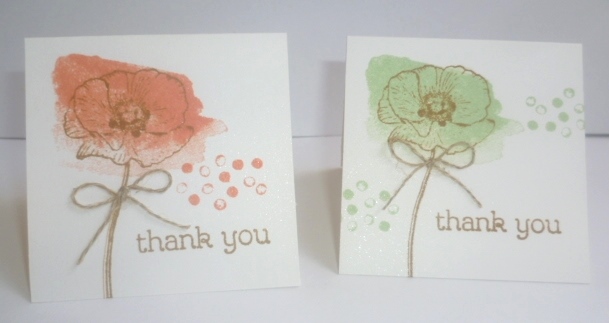
The first one is CASED from a clever Demonstrator (Michelle) on a Facebook group I am on.  I loved the idea of it.

P1110923

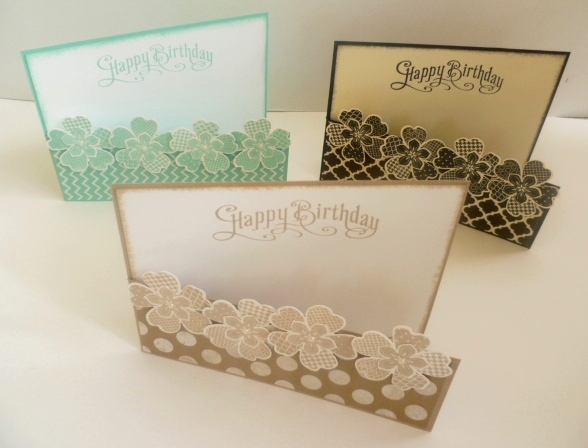
This is such a clever idea but so simple!!! Just cut the sheet of card length ways, score in half, then on one half cut it in half. Done!!  Decorate as you like.  I will show you photos of them individually.  Sorry about the lighting.  It was bad weather when I took the photos a couple of weeks ago and I have only just noticed, but it gives you an idea.

P1110924

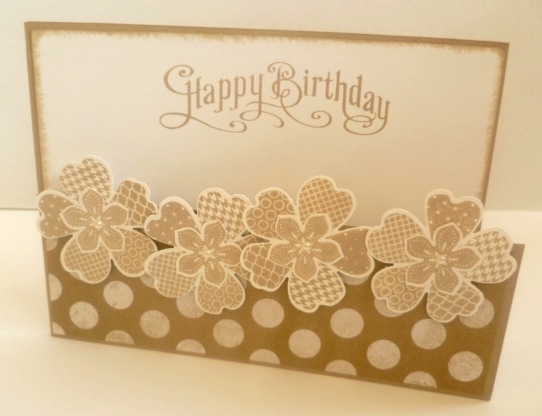
CARD: Crumb Cake with Whisper White, Fresh Prints DSP STAMPS: Flower Shop, Petite Petals, Perfectly Penned Plus Adhesive Pearls.

P1110927

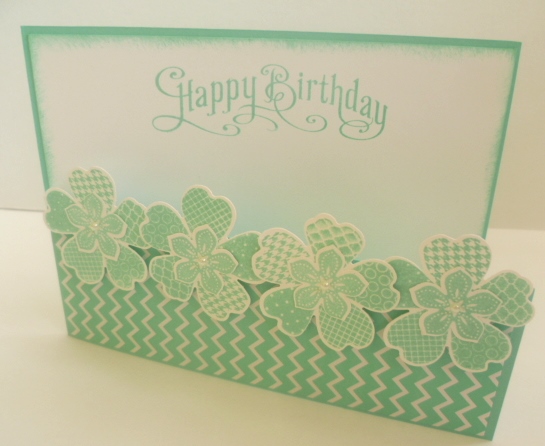
CARD: Coastal Cabana with Whisper White, Fresh Prints DSP STAMPS: Flower Shop, Petite Petals, Perfectly Penned Plus Adhesive Pearls.

P1110925

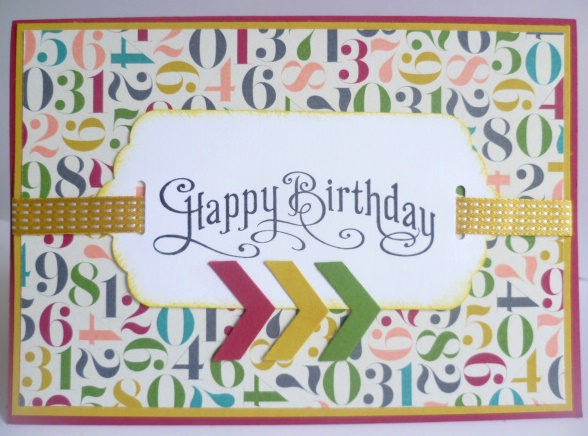
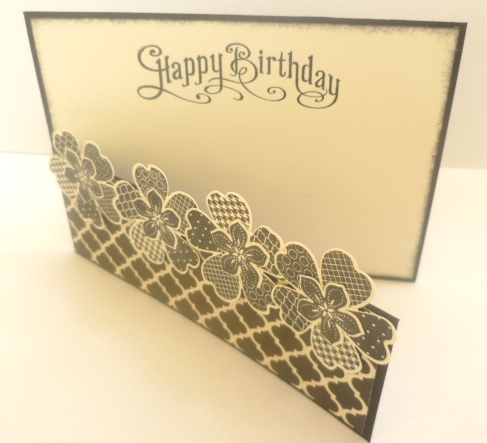
CARD: Basic Black, Very Vanilla, Modern Medley DSP STAMPS: Flower Shop, Petite Petals, Perfectly Penned. (I did add Adhesive Pearls to these ones, but  I had to grab the one that I missed to take a photo of it!!)

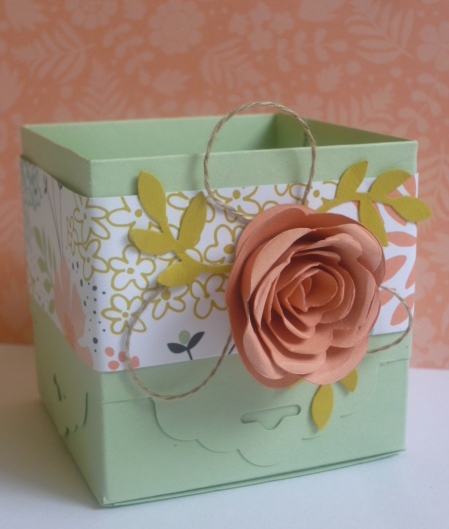
Here is a view with it open to give you an idea.

P1110926

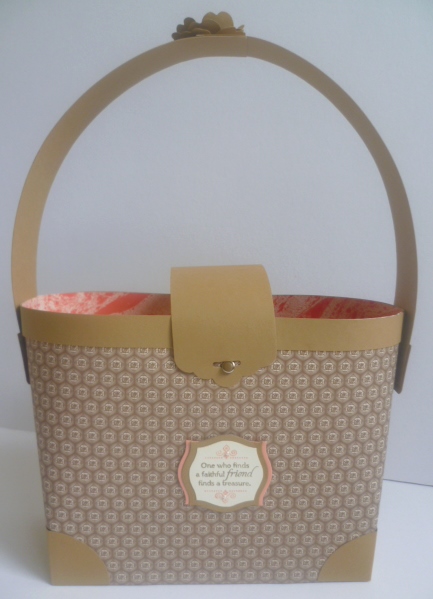
The next card was CASED from Dawn Olchefske. I can’t find the card on her blog.  I think I found it on Pinterest????  This is a clever way of using the Circles Thinlets Die.  A great retro card for the Birthday Boy???

P1120081

CARD: Smoky Slate, Basic Black, Real Red, Whisper White.  STAMPS: Music Notes Wheel, Gorgeous Grunge. PUNCHES: 1 3/4″ Circle, 1 1/4″ Circle, 2 step Owl Punch, Chevron Border Punch.

I will show you my swaps I receive back next week.  They are always great to check out.  Have a great week.  I know I will 🙂

Jenny

cards, Stampin' Up!

READY, SET, SEND FOR BREAST CANCER!

Breast Cancer has touched many of our lives, whether ourselves or with the ones we love.  Stampin’ Up! has partnered with the National Breast Cancer Foundation to help raise funds for research in Breast Cancer.

Will you help?

Simply purchase the exclusive ‘Ready, Set, Send’ kit for $19.95 (Plus shipping and handling). The kit includes 10 Ready Made cards (5 Thank You and 5 Birthday) plus envelopes. Stampin’ Up! will donate $10 from the sale of each kit to the National Breast Cancer Foundation. It’s that simple. We all need Birthday cards and I think we can all send out more Thank You’s to people.  Here are the 2 different cards you will receive.

Ready set send

SO, how do you get your kit. Email me to place your order OR order directly Online HERE.

I would love to sell 25 sets, that is $250 for the NBCF.  I know we can do this together – and more!

Contact me today.  Australian residents only 🙂

Uncategorized

WHILE THE CAT’S AWAY…

I am off to Melbourne on Wednesday for the South Pacific Stampin’ Up! Convention.  I am getting very excited but still so much to do!!  I didn’t want you to miss out on anything while I am away. So I am giving you …

DOUBLE PUNCH-OUTS ON YOUR VIS CARD PLUS GO IN THE DRAW TO WIN!!


BETWEEN MONDAY 19TH MAY AND SUNDAY 25TH RECEIVE DOUBLE VIS PUNCH OUTS.

Just to remind you what the VIS is all about if it has been some time since you have used it, or you are not my VIS member yet.  This is my ‘Very Important Stamper’ Loyalty card. For every $50 order, you receive a punch out on your VIS card. When you collect 10 you can receive Free products up to the value of $24.95.  Who doesn’t like freebies!
 
So during this week you will get double punch outs.  On your way more quickly to some Free products!!
 
HOW TO ORDER (Australian Residents only)

Email me your order or order directly online here using the Hostess Code: KGT3DN9H


PLUS GO IN THE DRAW!

 
Every order over $50 goes in the draw to win the stamp set ‘Hello Lovely’ as seen below. 
hello Lovely

I will have limited internet access while in Melbourne but I will certainly try and update when I can. So much to share!  I will be adding exciting news to my Facebook Business page too.  You can check the link on the right and make sure you ‘LIKE’ me to be sure to get all the updates.

I will show you all the swaps I receive next week too.  In the next day or 2 I will share my swaps so stay tuned.  So much excitement!

I cannot wait!!!!!!!!!!

Uncategorized

HAPPY WATERCOLOR THANKS!

Just a quick post for you today.  We are heading off for the weekend to our Church Camp.  I get back Sunday and then get ready for Convention in Melbourne.  So much excitement!  I thought though I would show you these little Thank You cards I made for my lovely customers who have placed orders recently.  I do appreciate them. 🙂

I have used the set ‘Happy Watercolor’ from the Occasions Catalogue.  I can’t believe this set is not in the upcoming catalogue.  So if you want this set you better grab it now!!

P1110979

This is just a simple, quick card.  They are 10cmx10cm cards (4″x4″).  I stamped the flower in Baked Brown Sugar and the the splodge over the flower either in Crisp Canteloupe or Pistachio Pudding.  I stamped the dots over the card and added the Thank You from the set.  A little bow with the Linen Thread finished it off.

Have a wonderful weekend.  I will stop by early next week and show you my swaps before I head to Melbourne.

Jenny

Uncategorized

HAPPY BIRTHDAY WITH CHEVRONS!

When I made this card I wanted to show a different way of using the Scallop Tag Topper Punch. This is such a versatile punch.  With a strip of Whisper White card you can punch both ends of the strip and create fancy “holes” for your ribbon to thread through.  I was really trying to come up with a fancy term for these little “holes” but there was nothing!!!  Anyway, you get the idea.

P1110646

I sponged around the tag with Summer Starfruit. The greeting is from ‘Perfectly Penned’. After threading through some Summer Starfruit Stitched Satin ribbon I layered it all on a piece of DSP from Birthday Basics and layered this on a Summer Starfruit card mat.  Then it was all adhered to a Raspberry Ripple Card base.  I punched out some chevrons with the Chevron Border punch from Raspberry Ripple, Summer Starfruit and Gumball Green.

Now these colours will be retiring very soon.  I would suggest stocking up NOW on the card, ink, ink refills and ribbon.  They go SO QUICKLY!!  Don’t wait until the retirement list is announced in a month or 2 to order them because I wouldn’t like you to miss out.

School holidays at the moment.  Although we haven’t gone away anywhere it has been a nice family time together but there has not been a lot of stamping time. I just sneak a little time here and there. I am working away at my Convention swaps which is just one month away.  YAY!! You will have to wait to see these swaps though.  Let me just say, why do I always choose involved cards to make as my swaps!!!

Have a great day/night wherever you are on this lovely planet 🙂

Jenny

cards

CANTELOUPE ‘SO VERY GRATEFUL’!

I had a little time the other day and decided to just do some playing.  I grabbed the set ‘So Very Grateful’ which I only received recently and did some colouring.

P1110888

I cut some Whisper White card with the Top Note Die and then stamped the flower images in Black Staz On and coloured with the Markers using Crisp Canteloupe, Strawberry Slush, Summer Starfruit and Pistachio Pudding. I was pretty happy with the final result.  I can’t wait to get the Blenabilities though! I stamped the greeting from’Perfectly Penned’ .  I think I stamped that too high up.  I am not happy with all that white space in the middle. I tried adding a separate flower but wasn’t sure.  What do you think???

To assemble the card I stamped the flower image in Crisp Canteloupe ink on the Crisp Canteloupe base card.  I added some white Taffeta ribbon around the card.  I add a little piece of doily that was just inked lightly with ink and I adhered that under that Top Note stamped piece.  I added a white Taffeta bow to finish it off.

It was fun playing “just because”.

Thanks for visiting.  Hope you can visit again very soon,

Jenny

Uncategorized

KID’S EASTER CARD CLASS!!

Looking for something for the Kids to do on the School Holidays.  If you are in the Wollongong area bring them along to my Kids Easter Class.  They will have lots of fun!

Tuesday 15th – KIDS EASTER CLASS. 2pm.  Come along and make this cute box and Easter card.  For Kids aged 7-13 years.

P1110852

Thanks for the inspiration to Di Barnes for the box and to Nancy Amato for the card.

 COST: $15.  RSVP: Sunday 13th. Get them to bring a friend along too for even more fun. 

Email or leave a comment you want to come but be quick as places are limited.

Can’t wait to see you.

Jenny

Stampin' Up!

WEEKLY DEALS _ WEEK 2!

More great deals have been released this week for the WEEKLY DEALS especially for the Big Shot this week.  Check them all out.

demoheader_weeklydeals_demo_4_2_2014-4_9_2014_SP_UK

The Deals (9-15 April)

 weekly deals Wk 2

I can’t remember if I had shown you this card but thought I would again if I had.  This card uses the cool Dress-up Framelits PLUS check out the edge of the dress.  This uses the Needlepoint Border Textured Embossing Folder.  Just 2 of the great bargains this week.

P1070993

Email or phone me your order.  Don’t miss out on these ones.  You can Order Online too by heading to my store here.  Why not check out the Clearance Rack items while you are there. There are some great bargains to be had!

Have yourself a stamping day 🙂

Jenny


3D projects

SCALLOP TAG TOPPER BOX!

I have had this idea in my head for a while now so I had to just do it!!  I wanted to create a little box using the Scallop Tag Topper Punch.

P1110831

I have used the Sale-A-Bration ‘Sweet Sorbet’ DSP.  I know Sale-A-Bration is done with BUT I HAD TO USE IT!!!  I used the new Spiral Flower Die that has just come in to my possession.  I am having fun with that little die 🙂  I have seen the twine loops around the blogosphere and wanted to have a go with making them.  It was a bit tricky at first as I didn’t know what I was doing but I think I worked it out in the end.  The leaves are from the 2-step Bird Punch.

I wanted to share the Tutorial with you to make your own little box (AND it is in Metric AND Imperial)

SCALLOP TAG TOPPER BOX

Metric

Card – 29.5cm x 21cm.

Along the long side score at 7cm, 14cm, 21cm and 28cm.

Along  the short side, score at 7cm and 14cm.

DSP for wrapper – 3.5cm x 29.5cm.


Imperial     (Finished size for this one will be slightly taller than the Metric box. There is a photo below showing the difference in size).

Card  – 8 ½” x 11”.

Along the long side score at 2 ½”, 5”, 7 ½” and 10”.  (Trim ½” off on the small tab section so there is not so much excess to adhere down).

Along the short side, score at 2 ½” x 6”.

DSP for wrapper – 1 ¼” x 11”.


DIRECTIONS TO ASSEMBLE THE BOX FOR BOTH METRIC AND IMPERIAL.

1. After you have cut your card to size and scored it. Cut off the small tabs, one at the top and one at the bottom leaving the middle section.

P1110821

2. Punch out each tab on the long side using the Scallop Tag Topper Punch.  To do this slide the first scored section into the Punch.  You will need to wiggle it gently in under the punch.  Centre it in the punchI line up the card section between the rectangle on the top of the punch and then punch.

P1110826


3. Gently slide the card along to the next scored section.  Line it up in the same way and punch out again.  Repeat this for the next 2 sections. Trim off the excess card between each punched section.

4. Cut up each score line at the bottom until it meets the horizontal score line.

5. Fold on each of the score lines. Fold over the top Scalloped section and adhere down with Sticky Strip.

P1110828


6. Add Sticky Strip to the small tab at the side on the right side of the card.

7. Assemble by folding the scored lines in to form a box shape and adhere together onto the side tab.

8. Add Sticky Strip to the bottom tabs and adhere down.

9. Adhere the Wrapper around the box and decorate as you would like.

I made another version using DSP (Sweet Sorbet again!).  This one was using the Imperial measurements.

P1110839

This is slightly larger than the Metric version.  You can see them in the photo together below.

P1110838

Enjoy making your own.  🙂

Jenny


3D projects, Tutorials

A NEW DESIGNER TOTE BAG!!

I have been wanting to create another Tote Bag for a long time but I haven’t had a chance – until now!  The ‘Large Tote Bag’ has been my most popular post over the last 2 years but I wanted to freshen it up.  Here is my new Tote.  Below I will share all the details for you.

P1110771

Here are a few other views. 

I have used the lovely Venetian Romance DSP and Baked Brown Sugar Cardstock.  I added the Soft Suede Candy Dots to the tabs.  They match in so well I think.  I added a flower to the top to hide the join.  I will tell you about that below.  The greeting is from ‘World Treasures’.  I coloured the words with markers (Baked Brown Sugar and Crisp Canteloupe) and cut around the inside of the border.  I cut a piece from Baked Brown Sugar with the Apothecary Framelits and layered this under the greeting and then cut another in Crisp Canteloupe and cut this one in half to layer underneath.

Let’s move on with ‘HOW TO MAKE THE TOTE BAG’ 

The original post for the Tote Bag with step-by-step instructions is HERE.  These are in metric.

** Edited to add: I have since updated that post to have Imperial measurements as well.

If you would like the tutorial emailed to you then drop me a comment.  

Let me tell you the modifications.

1. Omit the card strip for along the bottom edge.  Punch 2 circles in Baked Brown Sugar with the 2 1/2″ circle punch. Cut them in half.  You then have 4 pieces.  Fold each one in half and then adhere these to the corners of your bag.

2. For your handle, Omit the 2 card strips and the steps to prepare your handle.

Cut 2 pieces 3.5cm x 25cm (1 3/8″x10″). Join the 2 strips.  Adhere the handle to each end of the bag.  I used Sticky Strip for strength.  Cut small tabs to add to your handles.  Cut 2 pieces 4cm x 3cm (1 5/8″ x 1 3/8″).  Round the corners on the bottom edge.  Adhere these to the ends of your bag.  Add the Candy Dots or Brads for decoration. (If you are using Brads then place them on your tabs before you add the tabs to your bag).

3.  For your Bag Closure: Cut your card 5cm x 16cm ( 2″x 6 1/4″).  Punch one end out with the Scallop Tag Topper Punch.  Adhere the other end to the back of your Tote Bag.  Gently bend the closure over and mark the point on the front.  Place a Brad on the front to that will hold your closure.  I used a Candy Dot on a Brad.

4.  To cover the join in the handle I added a punch flower.  I punched out 3 flowers using the Pansy Punch and curled them a little.  Join these together by overlapping a little and adding Sticky Strip.  Add a small flower punched from the Boho Blossoms punch.  Adhere a large Adhesive Pearl to the middle.

I hope you like this version.  I hope you can go and make a Tote Bag yourself.  I hope the instructions are clear.  If you have any problems then please don’t hesitate to contact me.

Have a great day. 🙂

Jenny