Christmas, Classes, Stampin' Up!

DAISY PUNCH AND OTHER NEWS!

I am interrupting our regular inspirational postings for a commercial break.  There are some important updates that I must share with you.

FIRSTLY and most excitedly,  The Daisy Punch is now available.  This punch has exceeded Stampin’ Up!’s expectations resulting it being on back order – twice.  Now it is back!

Grab the punch as a bundle with the Daisy Delight stamp set and save 10%

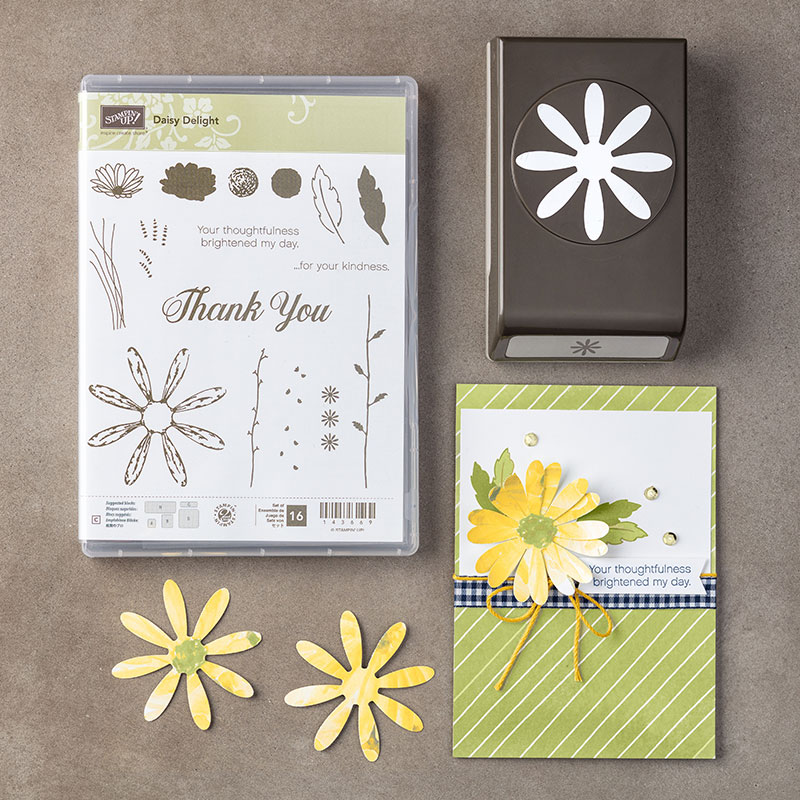
You can grab that in my store now HERE. 

——————————-


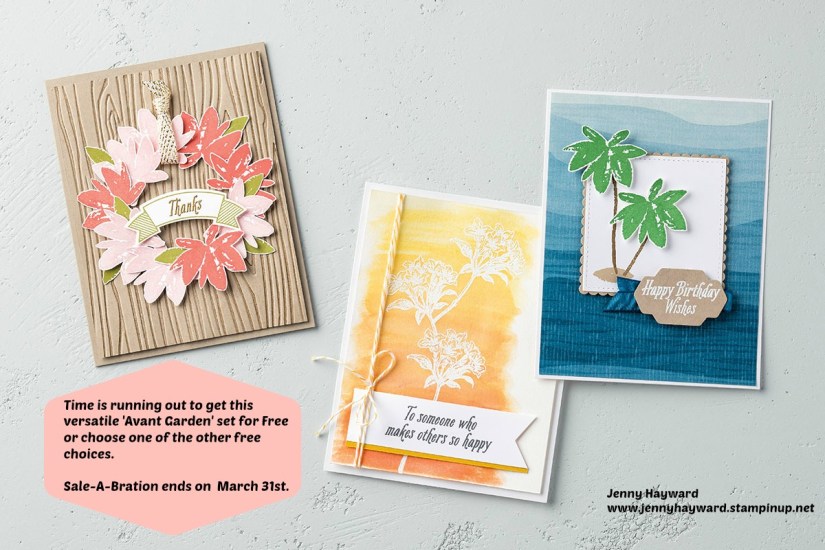
Only 2 days left to grab your coupons.  Every $90 order you receive a $9 rebate voucher to redeem in August.  That’s a great saving.  Grab your last minute orders now.  After you place your order you will receive an email from Stampin’ Up! with a code.  Don’t lose this email. This code you will add to redeem your savings next month.

————————————–


But do you want even more value? Why not $187 extra – Free!! 

It’s already great value when you join Stampin’ Up!-  but It’s Christmas in July and you get extra gifts.

If you are not convinced.  If you think you are going to sign up for something and never get out of it.  If you think you have to do parties and classes and sell big time then take a minute to read my page HERE.  10 Reasons why you need to be a part of the Stampin’ Up! family.  

You can join directly at my website now HERE and I will help you along the way.  Whether you plan to do classes – and it’s ok if you don’t or enjoy the discount.  Or enjoy the great value now and move on.  It’s all part of your exciting journey with Stampin’ Up! and I would love to share in it with you, wherever you are in Australia.  I look forward to welcoming you.

Thanks for visiting.  Have a great weekend,

Jenny


cards, Catalogues, Christmas, Classes, Stampin' Up!, Tutorials, Videos

CHRISTMAS IN JULY IS STARTING SOON!

In just a few hours Christmas in July is starting.  This is a fun time when I am bringing YOU some Christmas projects via video. We will also have some games, chatter and giveaways along the way. 

I hope you  can check in at the time.  Wear your slippers, grab a drink and be there at 7.30pm (AEST)  Link is below.  Invite a friend to the event too so we can all have fun together.

If you can’t make it you can stop by later to catch up.

Here are the details to remind you.

——————————

Christmas in July is a great time to start getting inspired for Christmas.  You can join from anywhere in the world!

Here is a sneak peek for you of one of the projects I will share with you.  I think you will love it.

WHEN IS IT?? Monday 24th July at 7.30pm – 8.30pm (AEST).  

ARE YOU IN??  Come and join HERE through Facebook.  

Don’t have Facebook?  I might share some of the projects at a later date – but you will miss the fun.

If you have trouble joining the event through the above link please let me know. I can’t wait to share everything with you.

See you soon,

HO! HO! HO!

cards, Catalogues, Stampin' Up!, swaps

RAK CARD SWAP!

I recently took part in a card swap with Demonstrators around Australia.  There were several groups.  I thought I would share the card swaps I received.  This was for the RAK card swap (Random Acts of Kindness Facebook group).

Firstly, this is the card I created.  This was a card I made several weeks ago using the Eastern Palace Suite so I thought that I would make these.  You can see the post for this card HERE. 

So these are the cards I received in return.

Aren’t they great?? 🙂 Perhaps these might inspire you in one of your creating endeavours.

Thanks for looking,

Jenny


3D projects, Catalogues, Stampin' Up!, Techniques, Tutorials

USING THE ECLECTIC LAYERS THINLITS!

I have been sharing quite a few cards lately using the Oh! So Eclectic Bundle which includes the Oh! So Eclectic Stamp Set and the Eclectic Layers Thinlits.  (You can see them in the catalogue on p 133 and p213).

One thing with the Eclectic Layers Thinlits you may not realise is that some of the dies only emboss while others cut.  Some of the dies layer together to cut the outline and a detailed inside or you can use one on their own. It can be a little confusing  so I put together a little handy guide that is just the size to keep in the packet with the Thinlits so I can see at a glance.  I thought I would share that with you.

DIECUTTING AND EMBOSSING GUIDE WITH THE ECLECTIC LAYERS THINLITS

1) On the card on the left it shows some of the detailed shapes.  There are 2 different dies to create this shape; the outline die and a matching detailed die.  I find it easier to fit the detailed die inside the outline and cut them all together.  It is so much easier.  The outline die can be used on its own to cut the stamped image from the co-ordinating stamp set.

On this card too it show the dies that will create the dry embossed effect.   These dies will not cut.

2) On the card on the right it shows the diamond pattern.  I love the effect you get with this on cards.  Now if you are really patient you can cut sections of this diecut to create some other interesting shapes that you can add to your cards.  I am sure there are so many other combinations too.

In this Thinlits set there is also 2 leaf shapes you can cut to work with your flowers.

I hope that you might find this guide helpful.  Let me know what you think.

Hope your weekend is going awesome and you have time to steal away and create.

Jenny


Catalogues, Stampin' Up!

MORE VALUE, MORE PRODUCTS, MORE CREATIVITY!

It’s the first of July which brings some exciting news from Stampin’ Up!.  Did you want more?? Check these out!

Bonus Days was HUGE last year so it’s back again.

For every $90 you spend during July. You get a Bonus Voucher of $9 to redeem in August on any of your orders that month.  How cool!  

I am sure there are a few items on your wish list to get to $90 – and the bonus is you get a discount next month! 🙂


———————————

I am always talking about the great value when you join Stampin’ Up!.  In July it is even better!

So what is it??  Pay $169 and get $235 of products, PLUS you will also receive an Essentials Gift Pack FREE which includes a stamp set from the upcoming Holiday Catalogue. This is an additional value of $121.  HOW AMAZING!!  Check it out!

ALL THIS FREE!!!

So for $169 you get $187 of FREE Products – and you don’t pay shipping on all that either!  

I would love to welcome you to my team whether you want to join for your own discount or build a business and share with others.  Ask me for more information or Head to my website HERE and join straight away.  You don’t have anything to lose but so much to gain.  If you want to know more then head to my Page HERE for ’10 Reasons why you would want to join’. 

SO imagine what you can create with all these extra Free products??  Lots more value there.  If you are still undecided then just go and do it, You can stop anytime.

Have fun,

Jenny


cards, Catalogues, Classes, Stampin' Up!

A BERRY HAPPY BIRTHDAY!

I thought I would show you one of the cards we made at Card Class last week.  I have been playing with the Happy Birthday Thinlits and Happy Birthday Gorgeous.

This card was CASED from Mary’s blog HERE.  I just didn’t add the DSP layer and kept it a little simpler.

I am loving the new Incolors.  I have used Berry Burst, Powder Pink and Lemon Lime Twist.

Thanks for visiting,

Jenny

cards, Catalogues, Stampin' Up!

LET’S MEET THE 2017 INCOLORS!

You have possibly had a chance by now to see the 2017 Incolors.  Stampin’ Up! releases 5 exclusive new colours each year usually to freshen up the Colour Collections and be on trend.

What do you think of this year’s colours??  I thought we would get to know them a little better.

We have Berry Burst, Fresh Fig, Lemon Lime Twist, Powder  Pink and Tranquil Tide.

BERRY BURST

A deeper shade of Pink to Melon Mambo and a little richer.  I think this colour complements the other pinks so well and really brightens most other colours when they are used together.

FRESH FIG

This rich purple colour is darker than Rich Razzleberry which so many people love. It is slightly lighter than Blackberry Bliss which was an Incolor a few years ago.

LEMON LIME TWIST

OK.  Hands up.  Who didn’t like this colour when it first came out?? I have to say I nearly lept out of my chair when I first saw it.  I LOVED IT!  If you have seen my craft room and my studio you would know that I have a lot of the Lime Green colour around.  I was so excited. 🙂

I think this colour is so bright and fresh and happy.  It brings life to all the other colours.  I am in Looove. ❤

POWDER PINK

This pink is a darker shade to Pink Pirouette which I am glad.  And it is a more true pink than Blushing Bride.  I do use that colour a lot for pink but I am glad that this shade of pink has joined the team.

TRANQUIL TIDE

I do love this shade of Green.  It is darker shade than Emerald Envy and certainly Bermuda Bay. Quite a rich calming green I think.

Here are all the cards together for you.

I have used the Detailed Floral Thinlits for these and used the 2 Thinlits together.  The ribbon, which is the Incolor Fine Woven Ribbon covers the small line that you get when you emboss them.  The sentiment and stamped banner are from the Happy Birthday Gorgeous set and punched out with the Classic Label Punch. I discovered that one of the Banners from the Bunch of Banners Framelits dies will fit with the Classic Label Punch when it is punched out.   I was excited about that.

I put together a Colour comparison Chart which is what I usually do each year.  It is good to compare the Incolors to other current colours.  I thought I would share that with you.  The lighting is hard to capture each colour accurately.

I would love to know what your favourite Incolor is??  Drop me a comment.

Thanks for stopping by,

Jenny

Jenny

3D projects, Blog Hops, cards, Stampin' Up!, Tutorials

ESAD 2017 ANNUAL CATALOGUE SNEAK PEEK!

Welcome to the ESAD 2017/2018 Annual Catalogue Sneak Peek Blog Hop.  Today you can hop along to 26 Demonstrators showcasing some of the exciting new products coming out VERY SOON!! I hope you have a cuppa in hand while you take your journey – and be ready for lots of inspiration!  You might have come from Kristel’s blog or just starting out here.  You can join in anywhere along the way.  So let’s get going!

Today I am sharing some projects from the Colorful Seasons bundle – the Colorful Seasons stamps and the Seasonal Layers Thinlits as well as the Color Theory Designer Series Paper Stack. I have lots of photos but I know you want to get on your way with the rest of the Bloghop so come back tomorrow and I will share a tutorial with you. for the cute little bag below.

I have two Double Z-fold cards for you and little matching bags.

These bags just use 1 square of 6″x 6″ Designer Series Paper. So cute!!

I love the new Berry Burst Incolor.  What am I saying? I love all the new Incolors!

The card folds flat to your standard size card so it is easy to put in an envelope.

You can find the Tutorial to make the Z-fold Card HERE on Amanda’s Craft Spa Blog.  This is in Metric.  If you would like the Imperial Measurements then you can find the Youtube by Dawn’s Stamping Thoughts HERE. 

Now for the bag.  This will fit 2 small chocolates inside or perhaps a Lip Balm. This would make a lovely little gift for a friend to cheer them up or to add to their birthday gift.  Check the Rhinestones! I coloured the Adhesive Rhinestones to match using Sharpie markers. (Edited: Head to the next post to see the tutorial to make these cute little bags).

This version of Z-fold card below is using the Crushed Curry paper in the stack.  This card is with a different style of bag.  I am planning on making the card and different bags with each of the colours in the stack.  I will share those with you soon.

I love the patterns in this Color Theory paper stack.  You have crackle look and a marble look, the Ombre effect and paint chip style strips.  It’s really fun!  I have used 2 different types of the paper. One for the front and back and another one inside the card.

A close up of the larger leaves.  I inked the solid leaf in the stamp set in Crushed Curry ink then sponged some Tangerine Tango ink to add a little colour variation.  Then I stamped over with the “lined” leaf stamp in Tangerine Tango before cutting it out with the co-ordinating Thinlit.

This little cute bag stands about 7.5cm tall (3″).  You can find the tutorial for this on Pootles blog HERE.  You could add a tag or a different closure?? I just kept it simple for this project and tied it up with some Thick White Baker’s Twine. 

Be sure to pop back tomorrow and I will share the tutorial for the cute Berry Burst bag.

Now you can be on your way to Carly’s blog.  Head HERE

Thanks for stopping by today,

Jenny


cards, Sale-A-Bration, Stampin' Up!

THE VERSATILE AVANT GARDEN!

The Sale-A-Bration set ‘Avant Garden’ was one of my early choices.  I loved how versatile it was and I have seen so many different ways with it over the last few months.

Here are just a few more that was shared by Stampin’ Up! this morning.  I thought I would share them with you.

Create a wreath, or clear emboss them and give the card a wash with watercolour, or what about some Palm Trees?  I have been wanting to give that a go for a few weeks but time has been a bit short.

Only 3 days left for Sale-A-Bration.  Don’t miss out on getting your free choices.  If Avant Garden is not your choice there are so many other options and even some catalogue products.

Check them all out HERE.

Order Online HERE for those last minute orders.

Jenny