3D projects, cards, Christmas

12 WEEKS OF CHRISTMAS – BONUS!!!

Latte 12 weeks Header

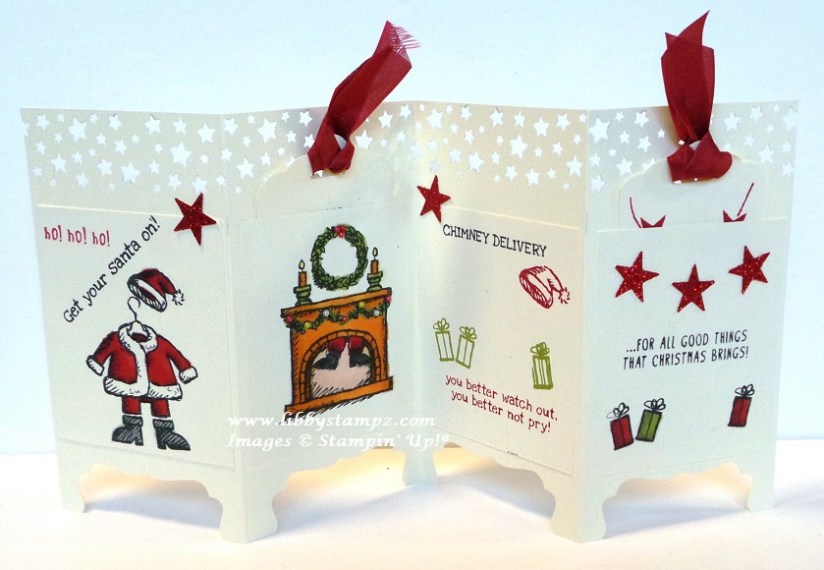
Have you been enjoying the 12 Weeks of Christmas projects the last few weeks.  Well, today I have a bonus project for you from the very clever Libby. This bonus project is a bit of fun and you could use the tags to write recipients names on them or use the back of the screen to write your personal message.

GetYourSantaOn13.jpg screen divider

HERE IS WHAT YOU NEED TO RECREATE THIS CUTE PROJECT.

  • Stamp Set – Get Your Santa On
  • Card – Very Vanilla, Red Glimmer Paper
  • Ink – Tuxedo Black Memento Black; Cherry Cobbler; Old Olive
  • Punches – Itty Bitty Accents Punch Pack; Decorative Label; Scallop Tag Topper; Confetti Stars Punch
  • Ribbon – ½” Cherry Cobbler Seam Binding
  • Adhesive – Liquid Multipurpose Glue
  • Blendabilities – Cherry Cobbler; Old Olive; Pumpkin Pie; Smoky Slate; Skin Tone; Colour Lifter; Daffodil Delight
  • Other – Basic Jewels Pearls; Stampin’ Trimmer; Simply Scored; Bone Folder; Acrylic Blocks; Stampin’ Mist; Stampin’ Scrub


GetYourSantaOn18.jpg screen divider

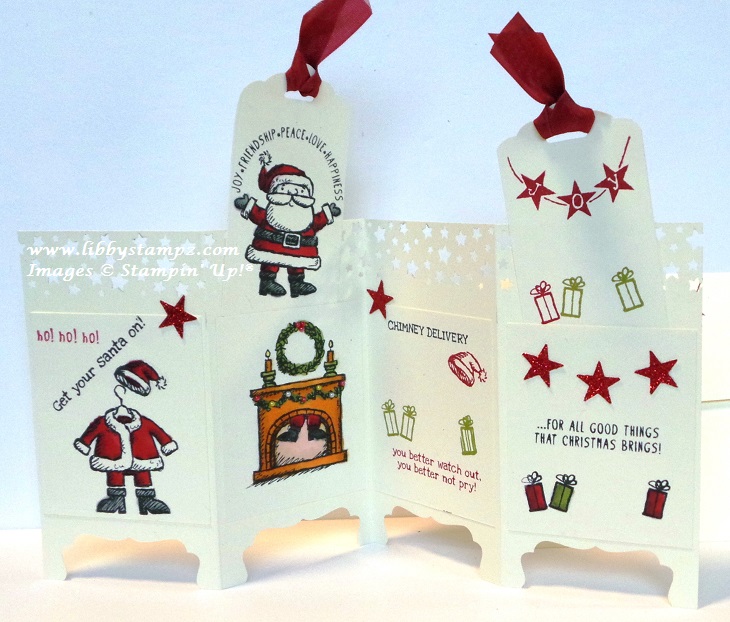
This card opens so you can create your own scene using all or most of the stamps from Get Your Santa On and it has little tags inserted so you can add some little surprise messages or images. This particular one will fold down to fit into a C6 sized envelope.  

If you would like a detailed PDF tutorial to create this card then drop me a message or email and I will get one sent your way. 

As we have done with our other 12 Weeks of Christmas project, we have a special bundle for you. Now this bundle is only available if you order through me and not through my online store.

SPECIAL BUNDLE OFFER

Get your Santa On $27.95

Confetti Stars Punch $37.95

P & P $5.95

TOTAL = $71.85 get a free Tuxedo Black Memento Ink worth $9.95

Contact me today to order this special bundle just for Australian Residents.

Thanks for stopping by today.

Have a great weekend,

Jenny

3D projects, Christmas

12 WEEKS OF CHRISTMAS – WEEK 4!

Latte 12 weeks Header

We bring you another Christmas project this week for our 12 Weeks of Christmas – and today it is my turn to share a project.  I do hope you like it.  Today I have a Tiny Treat Gift Holder for you.

P1140690This little Treat Holder will fit a variety of treats all together for you to give someone special this Christmas.  Really it is just so simple.  I have used 3 of the Tiny Treat Boxes available in the Holiday Catalogue.  These are a bargain at $11.95 (AUS) for 24 boxes.  They are so cute and there are so many different ways you can use them.  This would be a really cute gift to give someone as a little extra or for those “Hard to buy for” people.

For this I have adhered 3 of the boxes together with Sticky Strip and then decorated them using the Nordic Noel Designer Series Paper.  I have added some stars from the Bright and Beautiful stamp set and cut with the Star Framelits. Additional stars were cut from Gold Foil Sheets with the smallest Stars Framelits.  The gorgeous Red Satin Ribbon finishes the box off.  Of course, you can decorate these boxes however you like.  Fill some Cellophane bags with treats and tie them off.  I used the Gold Twine for this.

If you would like a detailed tutorial to create this project then just drop me a message or email.  If you need any products to create the project then let me know or you can order directly at my Online Store Here.

And of course, we have a special bundle for you this week to help you create this project. These are the items you will receive in your Bundle AND receive 10% off!  

Bundle Price is $44.80 plus Shipping and Handling.

I hope you like today’s project.  I would love to see your version when you create it so make sure you drop me a photo.
 
Happy Christmas creating!!
 
Jenny 
3D projects, Christmas

MANY MERRY STARS!

I have to show you this new product in the Stampin’ Up! Holiday Catalogue supplement that was just released on Monday.  Stars just typify Christmas don’t you think and why not ‘Many Merry Stars’.

These kits contain all you need to create 26 stars.  All the diecut papers and embellishments.They come in all different sizes and look fun to sit on the top of a shelf or under the tree.

138104O1

Here is a video to show you how they are put together.


But don’t just think of them as stars sitting on the shelf.  There are so many other beautiful ways to create them.  Check out this gorgeous display.

stars

Here is a video to show you how to use this kit in other different ways.

If you would like to order your own kit of Many Merry Stars then drop me a message OR head over to my store HERE.

I hope your Christmas is a Starry one. 🙂

Jenny

Uncategorized

SHAKE IT UP WITH SHAKER CARDS!

Just a reminder: Saturday Stampers is on THIS Saturday 25th October at 2pm.  

WHAT ARE WE DOING????

‘Let’s Shake it up!’ (It’s funny that I am writing this just after I have heard Taylor Swift’s Shake it up!!).  Anyway,….

Come and find out how to make Shaker Cards. These are fun, interactive cards. Check them out!

P1140684

WHERE: My studio in East Corrimal  If you are local please come along.

COST: $20 BYO: Scissors and Adhesives. PLEASE RSVP: Thursday 23rd October.

I look forward to seeing you there!

Catalogues, Christmas

STAMPIN’ UP! CHRISTMAS SUPPLEMENT!

Do you love creating for Christmas??? Do you just  create cards or like to decorate the house and send cute projects as gifts for your friends??? It really starts getting you in the Christmas mood when the creating begins – or is that just me!!!

Well, as if the Holiday Catalogue wasn’t enough for you Stampin’ Up! have released a Christmas supplement.  Starting October 20th, 2 days time!!!  Here is a sneak peek of the cover just to get your started.

20141020TH_HolidaySupplement_en-SP

There are stars and kits and Project Life.  

You will be able to check it out Online from Monday BUT if you want your very own “starry” catalogue then drop me a comment and I will get one to you ASAP.

“It’s beginning to look a lot like Christmas”    HAHA! Now I have got that song in your head I will sign off.  🙂  (sorry!)

Stop by again soon,

Jenny

3D projects, Christmas

12 WEEKS OF CHRISTMAS – WEEK 3!

Latte 12 weeks Header

We have another project in our 12 Weeks of Christmas series today. This project is brought to you by Narelle.   Check this project out for your Christmas entertaining.  This is a lovely Table Setting.

christmas setting

This table setting consists of a cutlery bag, a bonbon and a name place card.  I think these would really dress up your Christmas table and make it something special.
Here are some photos of the individual items and also some videos showing how to make the key components. For full instructions and a complete list of supplies, please email me for a detailed pdf.

CUTLERY BAG

cutlery bag

I just love this Cutlery Bag. I know you could just put the cutlery on the table next to the plates, but that would be boring, right ? Making this bag gives you a reason to create and show off a little to your guests. I am sure they will be appreciative of the effort you went to and the table will look so festive and special.

Here are a couple of videos showing you how to make the rosettes.

BON BON

bon bon

Bon Bons are a fun thing to have at Christmas time aren’t they?? The cute hat and funny jokes and the little novelty inside. But once they are pulled apart they are thrown away. With these Bon Bons not only are they a lot of fun but they will look pretty having them on the table. The bonus of these is that you can fill them with wrapped chocolates or something as an extra treat, and the guests get to keep them as a memento of a wonderful gathering with family and friends.

Here is a video how you can make them.

NAME PLACE CARD

name place card

Can you see this on your Christmas Table this year?? It would make all your guests feel pretty special.

The full materials you need for these projects are in the PDF that I can send you but here is some special products put together for the Bundle this week.

products _ table setting

We have these 4 products on offer in our Latte Girls’ 12 Week of Christmas Bundle Three(3). You can get all these products for the fantastic price of $77. That’s a saving of 10% . Gotta love that !

Contact me with  your order. This deal is not available online.

Don’t forget if you want the detailed instructions and a complete list of supplies used, please email me to get the pdf.

You can purchase everything you need to make these items and more, from my online shop.

I hope this helps you with your Christmas preparations.

Thanks for dropping by today.

cards

EVERYTHING ELEANOR FOR A WEDDING CARD!

Yesterday we went to a wedding for a work colleague of Glenn’s.  It’s always interesting when you don’t even know the bride and groom!! It was a lovely wedding though.  The wedding invitation was in a Crumb Cake colour with black swirls. I knew for the wedding card I wanted to replicate this.  The stamp set ‘Everything Eleanor’ was dusted off. I have hardly used this set but it was one I loved when it first came out.  Here is the card.

P1140587

It is hard to tell in the photo but I Heat Embossed the swirl, the flower and the greeting so it had a nice shine to it. The greeting is from ‘Petite Pairs’ and punched with the large oval punch.  I used the Crumb Cake Taffeta ribbon (retired) and some pearls to finish it off.  I thought it would be a bit heavy to have a Black card base so I matted the stamped piece in black cardstock and layered it on a crumb cake base.

I think the Bride and Groom will like it???

Have a good week this week.  I hope it is a creative week for you.  🙂

cards

BLACKBERRY BLISS SNOWFLAKE THINLETS!

I made this card a few weeks ago and realised I hadn’t shown you.  I think I shared it on my Facebook page but forgot here.  SO, here it is! This is one of the first cards I made using the Snowflake Thinlets from the Holiday Catalogue.

P1140334                      P1140335

These cards are a bit hard to photograph but I hope you get the idea.  I extended the card so it has a little fold out flap. On this flap I adhered some Gold Vellum and a strip of the Gold Foil Sheet.  I cut the snowflakes and the joy word out from Gold Foil sheet also and adhered them on the card.  I stamped the snowflakes from the set ‘Cheerful Tags’ over the Blackberry Bliss card.  I think they co-ordinate so well with this Thinlet.  I finished it off with a Gold Twine bow on the front snowflake. Hope you like???

Thanks for stopping by today.  Do say Hello.  I love to hear from you.  🙂

Stampin' Up!

GET FREE DESIGNER SERIES PAPER FOR 6 MONTHS WHEN YOU JOIN STAMPIN’ UP!

 Header_Recruiting_demo_10.1-31.2014_SP

Yes, you read that right.  When you join Stampin’ Up! during October you will receive one pack of Designer Series Paper Free (your choice) every month for 6 months.  That is on top of the already fantastic value in your starter Kit.  So order up to $234 of products and Pay only $169, then each month pick your pack of Designer Series Papers. If you are not sure what is involved when you join Stampin’ Up! then head to my JOIN MY STAMPIN’ UP! PAGE Here to read 10 reasons why you should join.

So what are you waiting for????

Stampin' Up!

STOCK UP ON YOUR STAMPING SUPPLIES THIS WEEK TO CELEBRATE WORLD CARDMAKING DAY!!!

From 1-6 October, receive 15% off select cardstock, adhesives and Inkpads.  Plus receive 20% off Select stamp sets.  Check out the details below and email or phone me the order. Or you shop directly at my store HERE  You have to be quick though!

stock up and save image


Here are the stamp set to give you a closer look. (in order as listed).

big news        playful pennants   choose happiness    petite pairs    so very happy


Great bargains to build up on your stamping supplies.  Remember only available until 6th October.