cards, Techniques

CRAZY ABOUT YOU JOY FOLD!

Just a quick post for you. Back to more projects from our Crafty Weekend. It has been some time since I have done this type of card. Here is this one for you.

P1170040

P1170041

I have used ‘Crazy About You’ stamp set and ‘Hello You’ Thinlets to make this card in Mint Macaron and Soft Suede.  This is a JOY FOLD card.  It is very easy to make.  It is a basic size card but cut your card vertically and score halfway. The front flap is cut in half.  Then a smaller folded card is adhered to the inside and they overlap when folding.  If that all makes sense??? You can find a tutorial to make your own on Splitcoaststampers HERE.  It was fun to make.  I must make another one again very soon.

Today I have been playing with some new toys from the upcoming Holiday Catalogue.  I will share them very soon.

Enjoy your day whatever you may do.

Come and visit again soon,

Jenny

cards, Stampin' Up!

HELPING RONALD McDONALD HOUSE CHARITIES – FROM ANYWHERE YOU ARE!!

Ronald McDonald House provides accommodation and support for sick children and their families during their stay in hospital.  Sometimes this can be for months on end. But, we can make a difference for their stay.  Join me in my Ronald McDonald House Charities event this Saturday. If you can’t make the day there are a number of ways you can help still so please take a minute to read on.
—————————————-
Let’s join together in a fun afternoon of games, laughs and creating while we raise money for Ronald McDonald House Charities – and wearing your silly socks!!

SILLY SOCKS FOR SICK KIDS

WHEN: Saturday August 1st at 2pm at my place, East Corrimal
We will make 3 great projects using the RMHC stamp set by Stampin’ Up! “Sprinkles of Life”.
COST: Class only $20 (I will donate $3 to RMHC)
OR
Buy the stamp set and matching punch $64 (See the stamp set below). 
Price includes $3 donated to RMHC by Stampin’ Up!, 10% off the stamp and punch price and a Free class.
RSVP: Wednesday 29th July. Places are limited so book early. (THURS. ABSOLUTE LATEST)
WHAT TO BRING:
:Scissors and adhesives.
: Small change to join in some fun games while we fundraise.
: Wear Silly Socks for some fun plus a gold coin donation.
**(Socks can be mismatched, funky, lots of pairs at once, on your hands.  Whatever you want. There will some prizes!)
: Don’t forget your smile and a sense of fun!
OPTIONAL: Bring along some blank cards to send to RMHC for them to use for the families there.  These could be Kid’s Birthdays, Thinking of You, Sympathy, Get Well. (they can be handmade or store bought.  They don’t have to be using Stampin’ Up! products). You can send your blank cards to RMHC anytime for them to use. :)Here is one of the cards we will make.
P1170061
CAN’T MAKE IT???
You can still help out if you can’t make it.  How??
  • Donate through my RMHC fundraiser page Here.
AND/OR
  • Order your stamp and punch set. (Receive 10% off the price until August 1st.  $3 is donated to RMHC.
AND/OR
  • Donate your blank cards for RMHC to give to the families that stay. Cards must be to me by August 7th.
Here is the fun ‘Sprinkles of Life’ set that you can find on p189 of the catalogue.
Sprinkles
Thanks for supporting this great cause.  Let’s bring a smile to these young sick kids and their families. I look forward to seeing you there. 
Jenny
cards, Classes

CHRISTMAS STAMP A STACK!

Another Christmas Stamp A Stack is this Friday. Have you been thinking about coming along but not sure.  Then if you are in the local area (Wollongong area) you really must join us.  We are normal – kind of! ;).  We do have a lot of fun and laughs at these classes.  Here are the details for you.

This Friday 10th October 10am or 7.30pm.

Cost: $15.  BYO: scissors and adhesives.

Please RSVP by Thursday so I can have your card cut all ready to go.

Here is what we will be making this week.

P1140594


See you there or at another class very soon. 🙂


Classes, Project LIfe

WHAT’S ALL THE FUSS ABOUT PROJECT LIFE???

Are you tired of all your photos in boxes or on the computer??

Do you want an efficient way to manage your memories??

Come and see what all the fuss is about Project Life.  The simple, time-efficient system to manage your memories.

WHEN: 20th September at 2pm in my classroom East Corrimal.

COST: $20 or free with a minimum order.  This includes 2 plastic sleeves, 6 project Life cards a selection of embellishments Plus a Black Journalling Pen.

BYO: Adhesives plus 8-10 Photos (6”x4”).

Please Book and Pay by Friday 12th September so I can order your Kit.

Project Life

Come and check it all out but don’t forget to book and pay by this Friday so I can have all your Project Life goodies.

Uncategorized

I KINDA LIKE “KINDA ECLECTIC”.

I know I said I would  post about my swaps I received and this is the second post today and still no swap photos.  I am getting there but I just had to show you this card I made yesterday.  I was really excited about it.  This is using a stamp set coming out in the new Catalogue called ‘Kinda Eclectic”. We received this at Convention last week and I just had to play with it yesterday. P1120747

I cut a window from the Whisper White card.  It would be easy with the Square Framelits but I didn’t have them with me at our stamp day yesterday.  I cut the square out using my Stampin’ Trimmer. This piece I then embossed using the Decorative Dots Embossing Folder. The starburst image in the window is stamped with Baked Brown Sugar Ink.  The butterflies are stamped with Crisp Canteloupe.  It is great that these fit the current Butterfly Punches (the Elegant Punch and the Bitty Butterfly Punch)!!! The leaf image I stamped in Pistachio Pudding and cut out freehand.  The Birthday greeting is from Apothecary Art and stamped in Baked Brown Sugar. I snipped the ends of the greeting piece into banners.  A little bling goes a long way to finish it off.

Hope you like this.  I can see lots of uses with this set.  I will play again soon. OK, I will show you my swaps next post. 🙂

Jenny

Stampin' Up!

WE SAY GOOD-BYE TO SOME FAVOURITES!

RetiredList_EUSP


The Retirement list is out and we say Good-Bye to many of our favourites from the Stampin’ Up! Catalogue.  While this is sad, you can pick up some great bargains with some being up to 40% off PLUS with these products leaving us it makes way for some VERY EXCITING new products!

Check out all the retiring products HERE!

 If you would prefer a PDF document emailed to you then drop me a message.  Be quick on your orders as many don’t stay around too long.  I can ship anywhere in Australia.

Don’t forget too:

Cards for a Cure. Purchase the ‘Ready, Set, Send’ Kit for $19 (includes 10 completed cards and envelopes).  Stampin’ Up! will donate $10 to the National Breast Cancer Foundation. See the details here.

Weekly Deals continue.  A new list is released every Wednesday.

Photopolymer Stamps special ends tomorrow 31st May.  Grab your free class with the bundle.

AND, if you are lovin’ everything Stampin’ Up! why not join the Stampin’ Up! family and get great discounts on your products.  (Psst! Demonstrators can preorder from the new catalogue from today.  Get in early as a Demonstrator).  Join now until 30th June for only $85 and receive ($90 in products).  Find out more here.

All these details can be found on my Online Store here too.  Any questions, drop me an email or a comment below.


cards

SCALLOP TAG TOPPER TRI-FOLD CARD!

When I first got my Tag Topper Punch I thought it would look cool to make a fold out card with it.  I had seen a couple around my blog travels but wasn’t sure how to go about it.  Well I made one AND I have put together a tutorial just for you so you can make one yourself.

P1110458

Here is some close-ups.

P1110459

P1110460

Now on to the Tutorial.

SCALLOP TAG TOPPER PUNCH TRI-FOLD CARD!

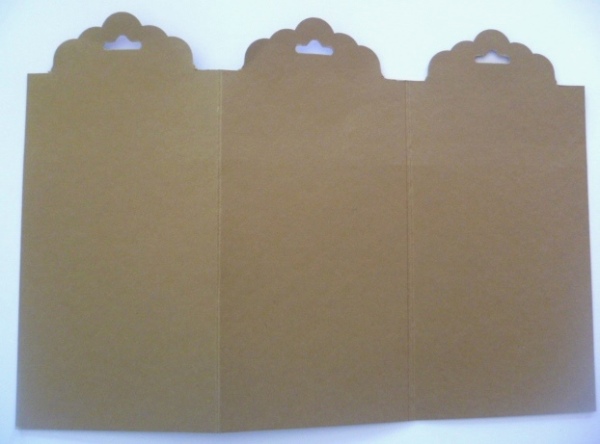
1. Cut your base card to 14.8cm x 21cm. (I used Baked Brown Sugar). On the 21cm side score the card at 7cm and 14cm.

2. Slide the edge of your card (long side) in to your Tag Topper Punch. It takes a little wiggling but you can get the card in and line it up in the first scored section in to the punch.  You can roughly line the card up between the rectangle shape on the top of the punch where the image of the punch is on.  See the photo.

P1110477

Punch the card.  Then move it along to the next scored section.  Line it up and then punch again. Repeat for the last section again.

P1110479

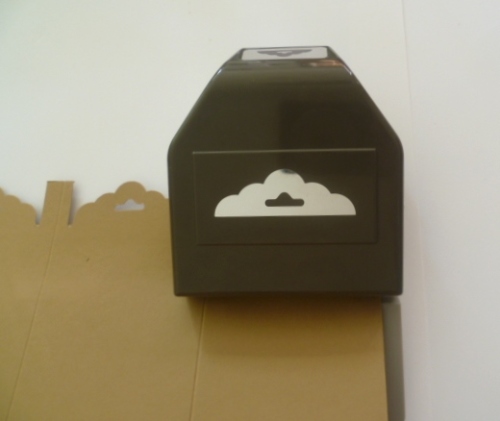
Trim off the excess tabs to level them off.

P1110442

NOTE: The card does get a little bent when you punch it out but just press over it and when you add the card to the front you don’t notice it.

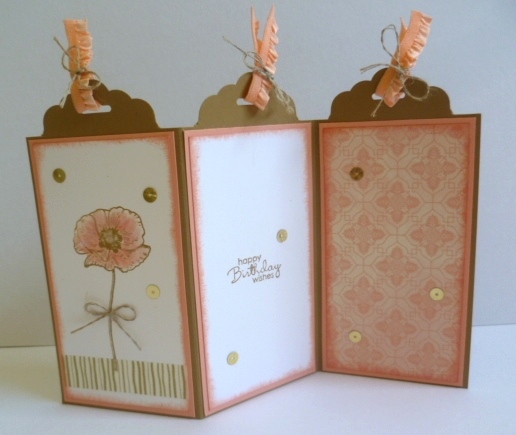
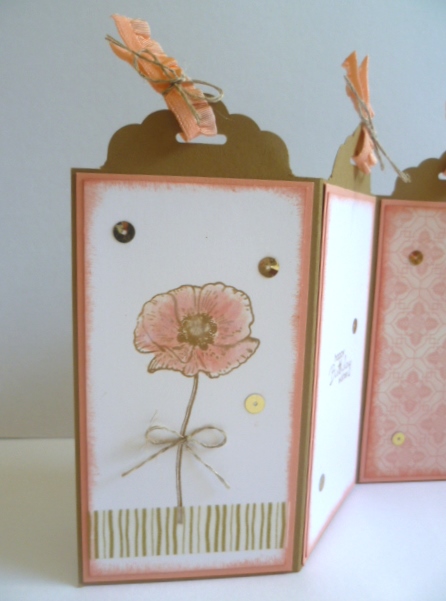
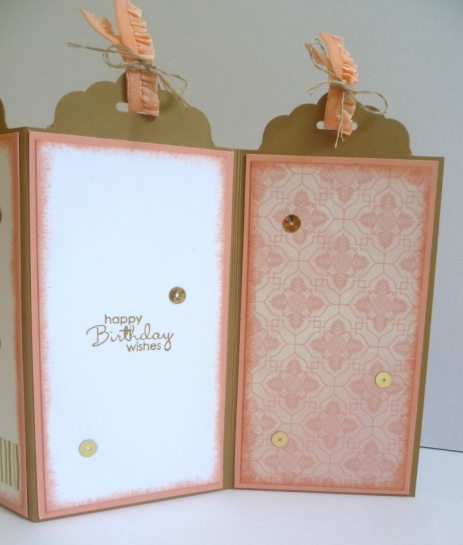
3. Cut your card mat pieces and whisper white and DSP (designer series paper).

Card mats (I used Crisp Canteloupe)  measures 6.6cm x 12.2cm  (3 in total).

Whisper White (x2) and DSP piece(x1) 6.2cm x 11.8cm.  The DSP is from Venetian Romance.

P1110441

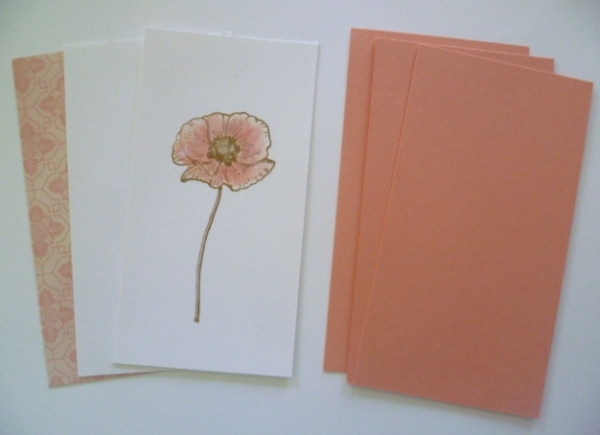
I stamped one of the Whisper White pieces with the flower from ‘Happy Watercolor’ in Baked Brown Sugar and coloured it with the Aquapainter and inkpad.

To finish the card off I sponged the white card pieces and the DSP with Crisp Canteloupe ink and adhered them to the card. I added some Gold Washi Tape and also  some gold sequins over the card (still not sure about these???). Then I tied some Crisp Canteloupe Ruffled ribbon through the holes and tied them off with Linen Thread.

Here it is again – the finished off card.

P1110458

Do you like it????? Why not go and make one for yourself.

Thanks for taking the time to visit me in your day.  I do appreciate it as I know your time is precious.  I hope you are inspired.

See you next time.

Jenny x

3D projects

SOMETHING DIFFERENT – HOW ABOUT CRAFT FAIRS!!

I have been wanting to share these projects with you for a couple of months now but with all the busyness of Christmas they were just put aside.  So, before we get right in to Sale-A-Bration and sharing any more from the new Occasions Catalogue coming out I thought I should show you these NOW!!  At the end of October last year I had a stall at the local craft fair here.  I only had 2 weeks to get organised but I made a number of different projects to sell. I know that when I do craft fairs I go searching for ideas on the internet and I am sure you do the same too if you do markets or fairs. These projects are nothing startling but I thought I might share them with you if it might help you with ideas.  I will share these ideas through a number of posts this week.

Firstly, since it was leading up to Christmas I created some little Christmas treat boxes.

P1100426

I found this idea on Pinterest.  This is using the Milk Carton Die.  I cut 3 of them – 2 in Gumball Green and one in Cherry Cobbler.  I wrapped Cherry Cobbler Grosgrain ribbon around the 3 and added some mini clothes pegs to seal them.  On the front of the boxes I added scallop circles punched from retired Christmas paper and cut ‘JOY’ from silver Glimmer paper.

P1100423

Another quick project was some Mini purses using the Petite Purse die.  I used some retired DSP and added some simple embellishments on the front.  Inside I added a few chocolate treats.

I have some more projects to share with you tomorrow so stop by again to check them out.

Jenny

cards

A DAY FOR WEDDINGS!!

What a beautiful day for weddings on Saturday.  Firstly, my nephew and his beautiful partner were married in the most gorgeous rock canyon setting surrounded by 200 family and friends.  Before I show you the card I made for them I have to show you a photo. Aren’t they beautiful????

P1110142

Now onto the card.  I used the circle Thinlets to create the card based on a similar design I made for another wedding recently.  You can see that card here.  For this card I have used the Modern Medley DSP and silver glimmer paper.  The “Mr and Mrs” from ‘Label Love’ was clear embossed after I stamped in versamark although you can’t see that too well.  I made the card base longer than the thinlet die so it could create a flap to fold over.

P1110118

Here is a photo of the side.  This card is really hard to take photos of so sorry for the odd angles.  I added some hearts punched from the silver glimmer card too.  I forgot to take a photo of the inside of the card.

P1110120

Now for the second wedding card.  This was for my lovely friend Andrea’s daughters wedding. Unfortunately we couldn’t make it but Josh and Carlie went along.  I am sure you will see more details of the wedding on Andrea’s blog here when she can catch her breath a bit! Here is the card I made for Skye and Mitch.  It is the same design.  Why change it, although you would think I would have had this done in record time but I think it took me longer than the other 2 put together!!! I just couldn’t get the colours happening together.

For this card I used the ‘Venetian Romance’ DSP and Pistachio Pudding card base.

P1110122

Another odd angle!!  I wanted to show you the other side of the circle.  I cut a scallop circle from silver glimmer paper and stamped one of the labels in Pistachio Pudding.  The greeting is from ‘Fabulous Phrases’ and punched out with the 1″ circle punch to layer over it.  Not sure that I should have stamped the greeting in Island Indigo though???

P1110125

There you go.  Hope you like???  Thanks for stopping by.  See you again soon,

Jenny x

cards

I STAMPED!!!

Yes, I stamped! Not an amazing revelation really BUT it has been 2 weeks since I had touched a stamp.  That’s a long time for me.  It has been a good break though.  I opened up one of the new Sale-A-Bration sets I received last week and created not ONE but TWO cards!! Whoo Hoo!!  Here they are.  OK, they are both the same BUT….

P1110114

This card was inspired by a card I saw on Pinterest (sorry not sure who by though).  I changed the card to a standard size card.  I think the other one was a 10cmx10cm one.  I used the stamp set ‘Perfectly Penned’ and stamped this on a small strip of Whisper White in Black StazOn.  I added a strip of Silver Glimmer Paper underneath and added the small banners.  The Banners are from the Sale-A-Bration set ‘Banner Blast’ which is one of the Free choices you can get during Sale-A-Bration starting on the 28th January.  You can get a little Banner punch to punch them out too.  No hand-cutting here!! The Whisper White strip was then adhered to a Whisper White Card base.  The colours I used for the Banners on the card on the left were Pacific Point, Soft Sky and Tempting Turquoise.  The banners on the right hand card were Real Red, Blushing Bride and Melon Mambo. I was going to make some other colour combinations but I stopped there.  I wasn’t sure whether they were a bit plain.  What do you think????  Here they are individually to get a closer look.

P1110116

P1110117

I have just received my preorder of some of the goodies coming up in the new Occasions Catalogue.  This starts on January 28th.  I can’t wait to get creating with these goodies and share the projects with you.  There is so much to love.  I am having a little trouble deciding what to start with first!!  If you would like your very own copy of the new Occasions Catalogue and the Sale-A-Bration brochure then drop me a message and I will get one to you as soon as I can.

Happy Stamping,

Jenny