cards, Techniques

A NEW TECHNIQUE PERHAPS???

I was stamping one of the ornaments from Delightful Decorations a few weeks back and found it came out really strange.  I thought at the time it was my inkpad that desperately needed re-inking.  I really liked the pattern though.  Check it out –

Isn’t it a groovy pattern???  I thought it would make a great tag or something and so I just put it aside to look at later.  I pulled it out again this week and had a closer look.   It was a scrap piece of card that I used and had previously ran some adhesive over the card to stick it down to something.  It was just the glue stick variety adhesive.  I didn’t end up using the card then.  Where I had glued was where the lighter part of the image was.  The adhesive resisted the ink slightly.

I call this my “Adhesive Resist” technique!  LOL  So, do you think it will catch on!!! Maybe I will have to try it again sometime?? I thought it would be a fun thing to show you.

I hope your Christmas preparations are going ok?  Mine are VERY slow going?  I still have presents to wrap, but we put some lights up on our house today.  That was a first!

Happy Christmas to you all,

Jenny x

cards, Classes

DASHER WITH LOVELY AS A TREE!

Just a quick post today.  I wanted to show you this card, I think it is one of my favourites from my Christmas Stamp-A-Stacks over the last few months.

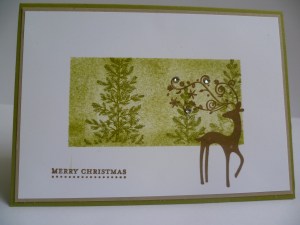
Sponging and masking – 2 of my favourite stamping techniques together!!!  I CASED this from Crafterbobbie on Splitcoaststampers.  I changed the colours and the greeting used.  Colours are Old Olive and Crumb Cake.  I also used Soft Suede instead of the Crumb Cake on some of the cards we did.  This is very easy to create.  To create your mask take a piece of copy paper the same size as your Whisper White card, cut a rectangle from the centre.  Add dotto to the back of the copy paper piece and add to your White card.

Stamp the tree from ‘Lovely As A Tree’ in Old Olive several times.  Offset the tree each time and re-ink before you stamp.  Sponge in Old Olive around the trees while you still have the mask in place.  Remove the mask and remove any adhesive residue from the white card using your trusty Adhesive Remover (something I have on my desk all the time when I stamp!).  Stamp up Dasher in the bottom right corner in Soft Suede and your greeting in the bottom left.  Adhere this to the Crumb Cake (or Soft Suede) mat and then to the Old Olive base.  Add some bling to Dasher’s Antlers with Adhesive Rhinestones.  See, easy!!

Don’t forget, you still have time to enter my blog giveaway for 20,000 hits.  I know it is a small number compared with some blogs, but I am excitied! When I started this I really didn’t think I would get many people stopping by my corner of blogland, so it is nice to see that people do stop by.  So to celebrate I wanted to say ‘Thanks’ by giving away a little prize.  See the previous post for details, or if you are subscribing you can check the details here.  You have until tomorrow night (Sunday night – Australian time).

Thanks for stopping by today. I hope things aren’t too frantic with all the Christmas preparations.  I still have wrapping to do and the cards to write.  I think I might put 2 elves here to work!!!!

Enjoy the rest of your weekend,

Jenny x

3D projects, Tutorials

SUMMER MINI CHRISTMAS TAGS!!

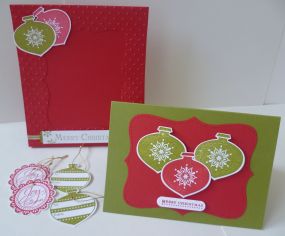
Last Friday I had my Summer Mini Catalogue Launch and it was my last class for the year.  I am a bit sad about that.  I love meeting up with my lovely ladies, although I am looking forward to a little break.  I just wanted to show you the fun project we did.  Christmas is almost upon us (17 days to go apparently I was reminded of today – and I still have to hit the shops!). I thought it would be good to create some Christmas tags as I haven’t had a chance to get any done in classes so far.  This is the little bag and tags.  (sorry it is a bit hard to catch the bag without the glare).

To create this I cut a large scallop circle with the Big Shot and then embossed with the Vintage Wallpaper Embossing Folder.  This was folded in half and 2 holes punched with the Crop-A-Dile to thread the Old Olive Satin Ribbon through.  The backing to the bag is a piece of Old Olive Card measuring 10cmx16cm and attached inside the Scallop Circle topper with Sticky Strip.  You can then attach a cellophane bag onto the card piece with sticky strip.  The ‘Joy at Christmas’ label is punched from Perfect Punches in Cherry Cobbler and Old Olive.  A rhinestone is added to the label although you can’t see that too clearly.

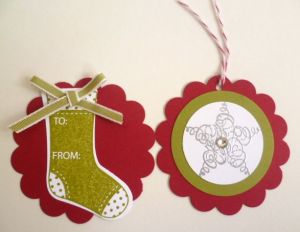
Here is a close up of the tags.  At the launch they made 4 of each.

For both of them I punched out a 6cm (2 3/8″) scallop circle in Cherry Cobbler.   On the left is the tag from Stitched Stockings set stamped in Old Olive.  A small bow from Old Olive Taffeta ribbon was added to the top (Yes, I know it was small I heard enough complaints the whole time about how hard it was to tie the bows – Sorry ladies!!!!)

On the right we used the new A la Carte stamp ‘Stylish Star’.  It was embossed in silver on Whisper White card and punched out with the 1 3/8″ circle punch.  A 1 3/4″ circle in Old Olive was punched out and they were both added to the Scallop Circle.  I added a large Rhinestone in the centre.  A hole was punched at the top and the new Cherry Cobbler Twine was tied on.  I love that new Twine it is so soft.  It comes in the Cherry Cobbler, Early Espresso and the White – so good!!!  I haven’t shown the back on this one but we also punched out a circle with the 1 3/4″ in Whisper White and “to” and “from” from the set ‘Fabulous Phrases’ was stamped in Cherry Cobbler.

Hope your not getting too frantic with the Christmas chaos.  I might even head out to the shops.  I am so bad.  I have never left it this late for Christmas shopping but life has been a little choatic lately!

Thanks for stopping by.  Come visit again soon and don’t forget to say Hi and leave a comment when you stop by 🙂

Jenny x

3D projects

“OH, CHRISTMAS TREE!!!”

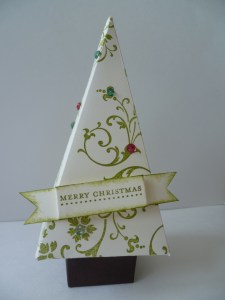
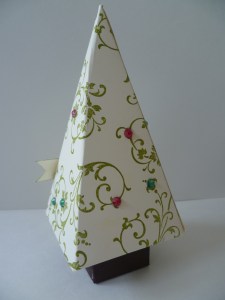
Some time ago I came across this cute Christmas tree.  I finally had time recently to create it.

Here is the back of it.

You can find the original template to create your own here at Danielle’s blog.

For this one I stamped the Elements of Style swirl on to Very Vanilla and the base is Chocolate Chip.  See those coloured Rhinestones???  These are the Stampin’ Up! Clear Adhesive Rhinestones.  You can colour them with Permanent Markers.  How cool is that! I came across that trick in my blog travels recently. I can’t remember where now.  I had put the clear ones on but I think the coloured ones just set it off like lights on the Christmas tree.

The ‘Merry Christmas’ for the banner is from “Teeny Tiny Sentiments”.  I am still debating on whether to put a star on top.  What do you think??

Now you can create your very own Christmas tree.  Have fun with them.  They are VERY easy!  Thanks for stopping by.  See you again soon,

Jenny x

cards

“50TH WEDDING ANNIVERSARY – BAROQUE MOTIFS STYLE!!”

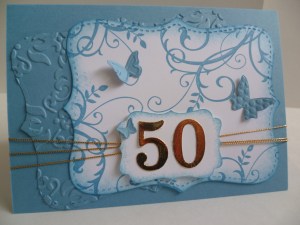
Our next door neighbours recently celebrated their 50th Wedding Anniversary.  It was such a great milestone I wanted to make a card to mark the great occasion.  It was a couple of weeks ago now but they have been away to celebrate so I have only just made them the card AND I really didn’t know what I was going to do for it.  I have been pondering on it for a while and I went searching and I still wasn’t sure.  Then I found this idea on SplitcoastStampers.  (Oh how I love that site.  It always gets you out of trouble!!!!).  I was inspired by a design I saw by sillyfilly there.  I liked the idea of using the Top Note die.  I dug out my poor neglected Baroque Motifs set.  This set always comes to the rescue too.  This is what I came up with.

CARD: Marina Mist, Whisper White, Gold card (non-SU!)

STAMPS:  Baroque Motifs.            INK: Marina Mist

OTHER: Top Note Die, Big Shot, Decorative Label Punch, Beautiful Wings Embosslits, Vintage Wallpaper Embossing Folder, Medium Sizzlits Die, Gold Cord (retired),

I even did the inside, although it is not very exciting!

Thanks for stopping by.  I hope your week is going well.  Stop by again soon.

Jenny xx

Classes

“MUM AND ME CHRISTMAS”

Ok, Mum’s (and Grandma’s) It is time to do some Christmas creating with your young one.  Come along to my “Mum and Me Christmas Class”.  Check out what we will be making.

You will make a Stand-up Photo Frame, a matching card and 4 tags.  All the hard work is done for you, all you have to do is stamp and stick.  Too easy!!!!!  It is a lot of fun working together, plus you have a great gift to give someone special at Christmas time.

WHEN IS IT:  Saturday Nov 26th at 2pm.

WHERE:         My place in East Corrimal – I will let you know the address.

COST:              $15 for the pair of you (ie Mum and daughter).

$7 for extra child.

RSVP:               Wednesday Nov 23rd.  Email me at jghayward@yahoo.com

Book in early as places are limited.  I would love to see you there!!!!

Jenny

cards, Techniques, Tutorials

“SPARKLY TREE”

This post has been a while in the making.  I can explain and you might understand!!  A couple of weeks ago I had my ‘Christmas Bling Class’ and we did some fun cards using bling in different ways.  Christmas is a great time to go overboard with the ‘bling’.  I might show you some of the cards we did later, but this particular card got some attention.  This is a card I had as a sample but everyone wanted to know how I did it.  As time is running out to fit in another class, I promised them all I would do a tutorial on my blog AND now you can all benefit too.  So, finally here it is.  Now what has taken so long is that I needed to recreate the card to get some step-by-step photos.  Well, as what normally happens, it just wasn’t coming together right.  So I have had to redo the card AGAIN.  So ladies, I hope you appreciate this 😉

This is the original card. It is hard to see the sparkle in this photo but the whole tree panel is all sparkly!  Read on to find out more.
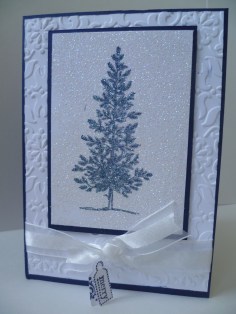
This glitter panel is created with Heat and Stick Powder and Dazzling Diamonds.  This really adds an impact – I think!  I am going to outline how to do this technique if you are not familiar with this.   Now I am a bit of a lazy stamper so I will also let you know a cheat step at the end.

Before you start here are some helpful tips:

Make sure you have a sticky versamark pad.  It really makes a difference.  That was where I went wrong when I first recreated this card.  I realised I was using an old Versamark pad and it was a bit dry.  Also, have your powder and Dazzling Diamonds ready to go so you can apply them straight away.

So, here you go:

GLITTER PANEL TUTORIAL

You will need:  Your stamped image, A versamark stamp pad, Heat and Stick Powder, Dazzling Diamonds, Heat tool.

1. Swipe your card firmly with your stamped image with the Versamark Pad.  Be careful to just touch the sides of your card with your fingers so you don’t wipe off any versamark from the card.

2. Pour over your Heat and Stick.  Yes, you want a good coverage!
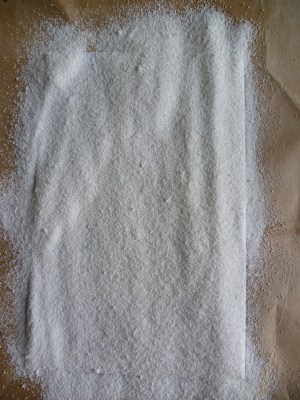
Tip off the excess and tip the extra back into your container.  Heat the Heat and Stick with the Heating Tool to melt the powder.

3. While the Heat and Stick is still hot and melted pour over your Dazzling Diamonds.
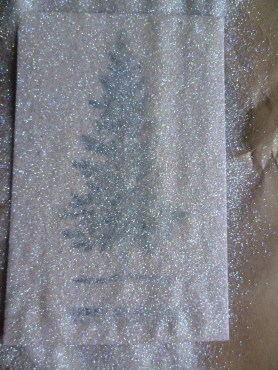
Pour off the excess back into the container and Heat set again with the Heat Tool.

4.  The glittery panel is done.
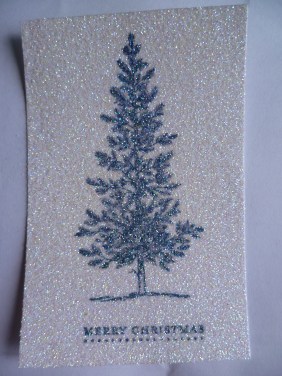
CHEAT TIME:

Sometimes I cheat a bit to save time.  You can combine the Heat and Stick and Dazzling Diamonds in a container about equal amounts.  After you swipe your card with versamark then tip the mix over your card and heat it all in one go.  It does work although it may not be as sparkly!

And so for the finished card:
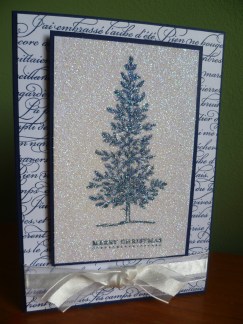
Psst! See the dark green behind the card.  That is my wall in my craft room.  It is a bit darker than in real life.  I have just taken photos of my craft room when I tidied up recently so I am going to post those soon.  We all like to spy on other stamping areas don’t we? So stay tuned for those very soon!

Anyway, here is a close up of the finished card.
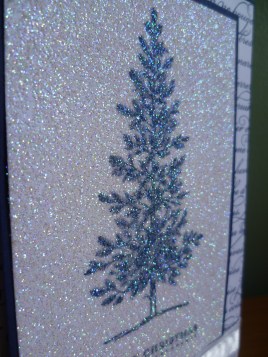
Oooh! Sparkly!!!!

Now it is your turn.  Why not have a go at this technique yourself.  Send me a photo of your card.  I might show them off here.  I look forward to seeing them.  Maybe I will have to dig up some blog candy!! 🙂

See you soon,

Jenny x

cards

CHERRY COBBLER “MERRY AND TYPE”

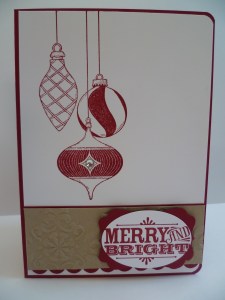
Just a quick one today.  I thought I would show you this card that I have had for a few weeks to show.  This uses the new set “Merry and Type”.  It is loosely based on a card I saw on SplitcoastStampers a while ago.  It is a very simple card.

I stamped the baubles in Cherry Cobbler onto Whisper White card.  I embossed a strip of Crumb Cake ink with the Vintage Wallpaper Embossing Folder.  Behind this strip I adhered strips of Cherry Cobbler card.  The bottom one I scalloped the edge with the Scallop Border Punch.  This was then adhered to the Whisper White card.  I rounded the corners of this piece and the Cherry Cobbler Base card.  The greeting was stamped in Cherry Cobbler and mounted on a piece punched with the Decorative Label Punch.  I added a Rhinestone to the centre of one of the baubles.  So easy!  I think this is one that you could mass produce easily.

I’m off now.  See you again soon.

Jenny x

3D projects, Classes

CHRISTMAS TREAT BOXES!!

Come and join us to create some fun Christmas Treat boxes for some special people for Christmas.

WHEN: Friday 11th November, 10am or 7.30pm.

WHERE: My studio in East Corrimal.

COST: $15     Includes all materials to make a clear chocolate box,  a Treat box and a Stocking Gift Card holder.

RSVP:  Please contact me by Wednesday 9th November.

If you live close by come along.  It is always a lot of fun!!!