cards, Stampin' Up!, Techniques

BEST BIRDS IN ROSE RED!

Yesterday was my Mother-in-Law’s birthday.  As she makes cards herself the pressure is always on when I make a card for her.  I thought for the card I would ink up the ‘Best Birds’ set that I have had for a few weeks and have not been able to use yet. I played around with watercolouring it.  I will show you the card and then share a few tips in making this.

Rose Red Birds

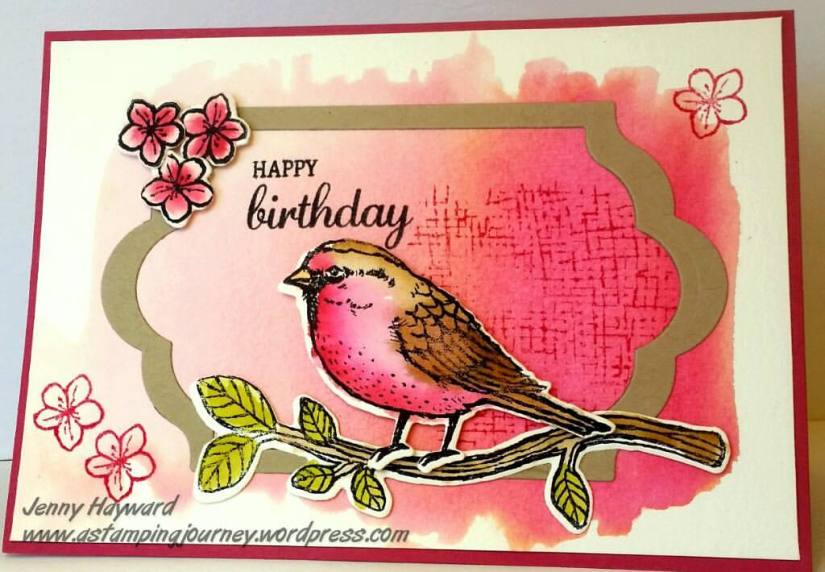
I chose Rose Red as the base card as that is my Mother-in-Law’s favourite Stampin’ Up! colour.  Well any of the reds!  (TIP#1) I used a piece of Watercolor paper and firstly washed over the card in the centre area with the aquapainter to lightly dampen the card  I have discovered recently by wetting the card it allows the ink to spread much easier creating a more washed look.  I used Blushing Bride on the left, then Rose Red in the middle section and Cherry Cobbler towards the right end.

(TIP#2) For regular watercolouring you can use the Thick Whisper White card or Shimmery White but if you are creating a washed look you MUST use the Stampin’ Up! Watercolor paper. (TIP #3) You need to be patient and let it dry.  Either you can use a Heat Tool or leave it for a few hours.

I stamped the bird, the branch and the flowers on watercolour paper too Black StazOn and watercoloured them.  (TIP #4) When colouring the bird I gave a light watercolour with the Rose Red and added highlights of Cherry Cobbler.  On the wing I washed over it with Crumb Cake and then highlighted it with Soft Suede.  The branch was coloured with Soft Suede for the branch and Old Olive for the leaves. The flowers were coloured with Rose Red and then darker highlights added in the centre with more concentrated Rose Red.

These were all then cut with the matching ‘Birds and Blooms’ Thinlits.  Too easy with that. No hand cutting necessary!! 🙂

I was going to cut the washed piece with the ‘Lots of Labels’ Framelits. I left the framelit on the card ready to cut in the morning but when I looked at it then I thought it might look OK to have a frame over it.  I cut the frame from Crumb Cake with the 2 largest ‘Lots of Labels Framelits’.  I am really pleased I went that way with it. I stamped the hatch pattern from the stamp set in Rose Red in the middle of the piece and stamped the sentiment in Memento Black.  Then it was all put together and a couple of flowers stamped around the edge to finish.  I was pleased with the finished result – and I think it received approval when I gave it to her today. 🙂

I hope you found these tips helpful when you create your next watercoloured card.  Let me know how you go.

Have a great day,

Jenny

cards, Stampin' Up!

CELEBRATING A 90TH!

Last week we discovered it was one of my neighbour’s 90th Birthdays.  This is a great occasion so of course I had to make a card.  I didn’t have a lot of time as I was in the middle of class preparation but I whipped one up quickly.  Here it is for you.

90th

I have used the Moroccan Designer Series Paper for this card 1) because it was quick but 2) because my neighbour is Estonian and while they are not near to each other the bright patterns and colours suited the occasion I thought.  Blue is one of the colours in the Estonian flag so the Dapper Denim really worked well.

The base card is Delightful Dijon. The sentiment is from ‘Guy Greetings’ set and cut with the Project life Framelits.  After I cut the star using the Star Framelits I looped behind some Silver cord (retired) and added the Silver Foil number “90” with the Large Numbers Framelits.  I think he was very touched by the card and it was lovely to give it to him and chat about his life in Estonia.  It’s a remarkable age.

Have a great weekend wherever you may be.  I hope it is a crafting one?  I am planning on a little creating myself.

See you again soon,

Jenny

cards, Classes, Stampin' Up!

SOME MORE SWIRLY BIRDS!!

I have some more Swirly Bird cards to show you today.  This is such a fun set. Have I told you that before 😉

Here they are. These first 2 cards we made at our Swirly Bird class along with others I had already shared. These cards were inspired by ones I had seen on my internet travels.

On this first one, the sentiment is from ‘Butterfly Basics’ and the clouds are from ‘Sprinkles of Life’.  The base card is Dapper Denim with the kite stamped in Dapper Denim and Real Red.

kite

This next one, the card base is Chocolate Chip.  This is a colour I haven’t used in AGES!!! I even dragged out the inkpad! This made a cute image of mummy bird and her eggs.  The sentiment is from ‘Thoughtful Banners’. The background spots are stamped in Soft Sky. This card is fairly simple looking but it did take some time to cut and to put together.

Swirly Bird _ bird

What about a Christmas Swirly card?  Yes I made a Christmas card!  I couldn’t help it.  I wanted to show the versatility of this set at my class. This card was CASED from Beth on a Facebook group I am on.  I just made it into traditional Christmas colours.  I added some dazzle with the Dazzling Diamonds in the centres of each bauble too.  The sentiment for this is from ‘Wondrous Wreath’.

Swirly Christmas

So many ideas for this set.  What have you come up with?? I would love to see them.  Send me a photo and I will share them here on my blog.

Thanks for stopping by.  Today it is FREEZING!!! Is it Summer soon???

Have a great day wherever you are,

Jenny