cards, Techniques, Tutorials

WEDNESDAY’S WOW! 171 – A QUICK, SIMPLE CARD TO IMPRESS ~

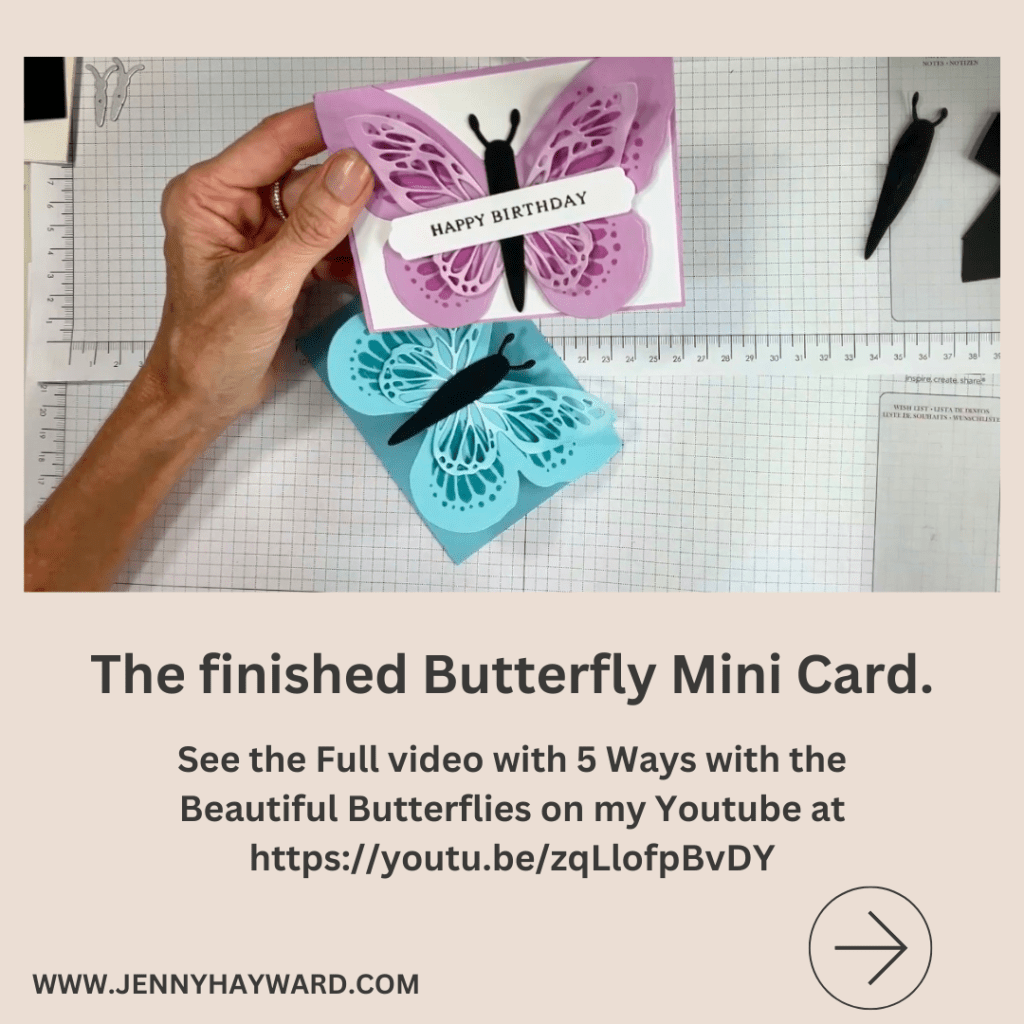
Wednesday’s WOW! #171 – Make a quick, simple card to impress your friends.

Do you want a card that’s quick to make yet still want to WOW! your receiver?? Try this idea.

Trim off 2.5cm or 1″ from the Right Hand Side of your card front. Add some gorgeous paper and elements to the front. Inside add a strip of patterned paper that co-ordinates with the front paper that is just slightly smaller than the section. Add some white card so there is a space to write on. This really doesn’t take much more time that creating a full card.

This is great timing if you still have some Christmas cards to make. You can try this for any occasion though.

On this card I used the Stampin’ Up! Modern Christmas Specialty Paper. The Black, White and Gold makes any cards elegant. I also used the Ornamental Christmas Bundle.

Hope your Christmas creating is coming along well. We are nearly at the finish line.

Happy Christmas Creating,

Jenny

Need some supplies and you are in Australia. I would love to help you get them. You can head to my store -> HERE.

Don’t forget it’s Free Shipping the next 3 days so great timing. From 10th-12th December on orders over $65 AUD.

Just a note: It is getting close to Christmas now. There is no certainty that these orders will arrive before Christmas so do keep that in mind.

cards, Catalogues, Techniques

WEDNESDAY’S WOW! 170 – ADD COLOUR ON YOUR EMBOSSED CARD

Wednesday’s WOW! #170 – Colour your Embossed Card with Ink.

If you have an embossed image on white card sometimes it can be a little plain. You can add a little colour to lift it. Of course you could swipe the Inkpad over the Embossing Folder before or after embossing, but try a little light watercolouring with your Water Painter and Ink Pads. It can really highlight the detail.

This one is with the Traditional Wreath Embossing Folder but you could try it with most folders.

Try it out.

Happy Crafting,

Jenny

If you need supplies for your crafting then I would love to help you. You can stop by my store -> HERE OR Contact me directly.

cards, Masculine, Stampin' Up!

WEDNESDAY’S WOW! 169 – FRESH NEW COLOURS FOR THOSE MALE CARDS YOU MAKE?

Wednesday’s WOW! #169. Some Fresh New Colours for creating Masculine Cards.

Do you find Masculine cards hard to make? I know I do. I resort to the blues, browns, yellows, reds.

Well, I have some fresh new colours to try.

What do you think? What colours will you try out next??

This is good timing with Father’s Day coming up soon here in Australia. But these are great for Birthdays and any other occasion for the boys. Big and Little Ones.

So maybe Pin this Image above or Save it so you can turn to it when you have some cards to make.

Happy Crafting,

Jenny

If you are in Australia and need some crafting supplies I would love to help you get them. You can head to my Store Online -> HERE OR Contact me directly.

cards, Catalogues, Stampin' Up!, Techniques

WEDNESDAY’S WOW 168 – A HAPPY ACCIDENT WITH STAZON!

I made this card recently. It resulted from a Happy Accident. I thought I would show you for our Wednesday’s WOW #168.

This is one of the flowers from the Thankful Garden Stamp Set. You could use any image though.

I was using it with Stazon and after I had stamped I wiped over the stamp with Stazon Cleaner and stamped it on scrap paper. It made the lines bleed but it looked cool. So I tried it again and this time I stamped on White card resulting in this effect giving it a washed out look.

I have tried it a few times since to replicate it. The results are different all the time. Some tips – Wipe over the stamp with the Stazon Cleaner. Stamp it off on to scrap paper very lightly first. Press firmly on to your card. Let it dry completely before finishing the card.

Be sure to clean your stamp carefully after you have stamped it.

Give it a go and see what you come up with.

If you would like other helpful tips click on the tag – Wednesday’s WOW! and find them.

Happy Crafting,

Jenny

If you need supplies and you are in Australia I would love to help you get them.

Head to my store -> HERE OR Contact me directly.

Stampin' Up!

WEDNESDAY’S WOW! 167 – TEXTURED NOTES DIES SIZES

Wednesday’s WOW! #167 – What’s the sizes of the Textured Notes Dies??

People often ask the sized of the Textured Notes Dies. And that’s a good question. You want to know how they will fit on your card.

So here you go. I put together this little chart that shows the sizes. Save it for future reference.

These dies are part of the Textured Notes Bundle but I particularly like the Dies. They have different markings on the edges that create embossed look on the edge of your card. Use them to create a frame or to add an image directly on them. They are very versatile on their own or layer them together.

The Dies and stamps have just been released as an Online Exclusives this month.

You can see the Dies more in store -> HERE.

You can see the Bundle more in store -> HERE.

I am loving these dies. They are very versatile and I think they will be a great one for your collection.

Hope that is helpful for you.

Happy Crafting,

Jenny

cards, Catalogues, Sale-A-Bration, Stampin' Up!

CORNER IN BLOOM LAVENDER CARD!

I was playing with the Corner in Bloom Stamp Set recently. I was wanting to colour the pretty lavender type flowers. I’m not exactly sure if they are lavender but we will go with that right. 🙂

I noticed in the Sale-A-Bration catalogue how the creator had coloured the sample and I thought I would try that. This is the card.

Here’s a closer look at the card. I used the Night of Navy Light Stampin’ Blends and the Light and Dark Highland Heather Stampin’ Blends.

The card mat was embossed with the Starstruck Embossing Folder.

Both the Stamp Set and the Embossing Folder are available as Sale-A-Bration choices with your $100 order (AUD).

This is the Corner in Bloom Stamp Set.

Sale-A-Bration is not around for much longer so if you want to grab these great products as your bonus gifts then you need to get your order in very soon.

If you are in Australia and need supplies I would love to help you out. You can head to my store -> HERE Or Contact me directly.

Maybe you can use this idea from this card to colour your flowers when you are creating next.

Happy Creating,

Jenny

cards, Catalogues, Sale-A-Bration, Stampin' Up!, Techniques, Tutorials

WEDNESDAY’S WOW! 166 – CREATING A BLACK BODY FOR THE BEAUTIFUL BUTTERFLIES!

I have been sharing the Beautiful Butterflies. They are gorgeous. I recently shared a video of 5 Ways with the Beautiful Butterflies. You can head back a post or 2 to see that.

But how did I create the Black centre of the Butterfly. Let me show you below. (If the images don’t show head to the blog directly to view them).

I hope you find this helpful when you create with the Beautiful Butterflies.

Happy Crafting,

Jenny

Are you in Australia and need crafting supplies yourself? I would love to help you out. Head to my store -> HERE. Please use the Host Code: 32KKQAX6

Or Contact me Directly.

Don’t miss out on the bonus Sale-A-Bration gifts you can choose from with your orders over $100 or $200 AUD.

cards, Catalogues, Christmas, Stampin' Up!, Techniques, Tutorials

WHITE HOLLY BACKGROUND WITH REINDEER FUN DIES!

Did you know you can create your own textured background with dies?

For this card I diecut lots of white Berries and Holly leaves from the Reindeer Fun Dies and adhered these together. Then I added them to a white card mat. It adds a subtle texture.

Here’s how to Create this effect:

  • Diecut lots of Holly Leaves and Berries from the dies on white card.
  • Adhere the Holly and Berries together.
  • Lay all the Holly/Berry pieces out on the white card mat to position them how you like. Have some overhanging the edges.
  • Adhere them down to the card mat. Turn over the card and trim off the overhanging pieces.

Then complete the card as you like.

I added a strip of Reindeer Days Paper and a strip of the Green Glimmer Paper along with the bells coloured with Stampin’ Blends. I finished it off with a bow from the Real Red and Gold Ribbon.

Try this idea with some dies you have. It takes a little diecutting and sticking together but it is a fun way to use them.

Hope your Christmas Creating is going along well.

Jenny

If you need some crafty supplies and you are in Australia you can stop by my store -> HERE. Or Contact me directly. I would love to help you out.

cards, Catalogues, Stampin' Up!

WEDNESDAY’S WOW #165 – WHICH WHITE CARD??

Wednesday’s WOW! #165 – White White card?

Did you know there is a new White Card available?? It has just been released. So let’s check it out and what difference it is to the other White card.

Until recently there has been the Basic White card and Basic White Thick Card.

The Basic White Card is good for your general stamping and layers on your cards and projects. This is available in 12″x12″ and A4.

The Basic White Thick Card is a little heavier weight. You can stamp on this card and it is good when colouring with the Stampin’ Blends. Being thicker though it is good for Card Bases. This is available in A4.

Now there is the White Willow Card. This is similar weight to the Basic White and is good for stamping and layers on card. It does look a little crisper white to the Basic White. This is available in 12″x12″.

Here you can see how they look all together.

You can see the White Willow card -> HERE.

Hope that was helpful for you. See how you can use that in your crafting,

Have a Happy Day,

Jenny

Need some crafting supplies and you are in Australia? Head to my store -> HERE. Please use the Host Code: JT69XW3P OR Contact me directly.

cards, Stampin' Up!, Techniques, Tutorials

WEDNESDAY’S WOW! #164 – MASK A BACKGROUND ~

Wednesday’s WOW! #164 – Creating a masked background.

Here’s a technique for you to try sometime. You can create a masked frame and add colour to the centre area.

To do this use the Masking Paper to add strips around the edge of your card leaving a rectangle or square shape in the middle. Using the Brayer or the Blending Brushes roll (or brush) over your ink. Try different colours to create a coloured background.

Once you are done gently remove the masking paper and stamp over your images. Stamping them in black ink will really highlight them against the background. Then it is a matter of adding a simple greeting.

Hope you get to try this out in your crafting soon.

Happy Crafting,

Jenny

Bonus Days are happening now. Receive a $9 voucher now to redeem in August when your orders are over $90.

Need supplies and you are in Australia? Head to my store -> HERE. Please use the Host Code: JTRANKN3

Or contact me directly and I can help you with your order.