I am married to Glenn and we have 2 adult children: Josh and Carlie. I live in the Northern Suburbs of Wollongong; just south of Sydney, NSW Australia.
I joined Stampin' Up! in August 2008. I'm having a great time playing with ink and paper and sharing my creations with you.
Thank you for visiting me in my corner of the blogosphere. I hope I inspire you along the way. I hold regular classes and workshops in my studio in East Corrimal and offer classes and tutorials by mail. I hope I can share stamping with you and your friends soon.
Take a look around. If I can help you with any of the gorgeous Stampin' Up! products please don't hesitate to ask me.
Happy creating,
Jenny
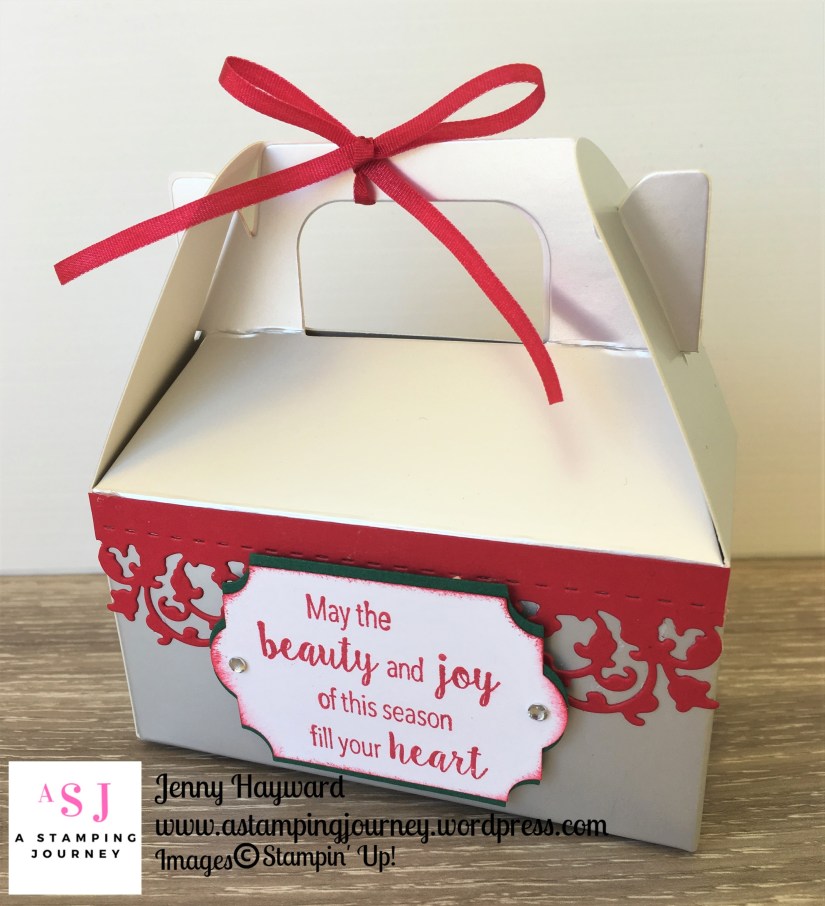
Here is a very quick treat box to make up for Christmas. This one we made at my Christmas in July Class a while ago. Yes I know that long ago and I am just sharing it now. Sorry. 🙂
I thought you might like to see it.
These are using the Silver Gable Boxes in the Annual Catalogue. You get 12 to a pack. They also come White.
I diecut the red card with the Delicate Lace Edgelits.This was adhered to the front and the back of the box. The sentiment is from the Stylish Christmasset and punch out with the Everyday Label Punch. I punched one from Shaded Spruce too to add behind. I tied around some of the Real Red Solid ribbonon the handle. Too easy and they will fit a few sweet treats.
I am excited! Today starts a special series on my blog. Every Friday I will share projects with you for 12 Weeks of Christmas. Yes, it is getting that close. Eek!
My plan for this series is to bring you reasonably quick cards and projects to help you in your Christmas creating. So stay tuned for them.
My first project is a very quick card. How much quicker can it get with the beautiful papers that Stampin’ Up! offer.
Add a piece of the lovely paper on a standard card mat. This paper is from the All is Bright Designer Series Paper from the Holiday Catalogue.
The sentiment is from the Farmhouse Christmas set. Firstly stamped on Whisper White which is cut with one of the circles from the Layering Circles Framelits and then layered on a Scalloped Circle from Gold Foil. The sentiment is stamped again on Real Red and then cut with one of the framelits from the Farmhouse Framelits. Before adhering that to the card with Dimensionals I punched out some leaves from Old Olive with the Sprig Punch.
With one sheet of Designer Series Paper you will be able to get 6 cards. They won’t take long at all to put together.
Thanks for stopping by. Remember each Friday to check in with our 12 Weeks of Christmas countdown. Of course, check in before that as I will be sharing lots of other projects too. 🙂
With a long weekend last weekend I had a little extra time. So I got to play along with this week’s Colour Inkspirations Challenge #42.
Here are the colours. How pretty!
This is the card I came up with. I have to say I took note of the colours and then went and made the card. Afterwards I realised it was Copper Foilnot just Copper. Just as well I added the Copper Foil mat at the end. Phew! This was the card I was showing in yesterday’s Wednesday’s WOW! video too with showing how to apply the Copper.
As I showed in the video I swiped some Copper Shimmer with a Sponge Dauber across the Mint Macaron card mat that I had embossed with the Tin Tile Embossing Folder. On the white card I stamped the leafy spray from Wishing You Well in Mint Macaron and added some “dots” from the Timeless Textures set. For the bow I daubered over some Copper Shimmer and then hand-cut it out. This was raised up with Dimensionals. I adhered the white card to the Copper Foil mat. (TIP:to save your foil cut a square out from the centre to use on a different project. You don’t notice it under the card piece).
For the sentiment I heat embossed that with white Embossing Powder on black card and it was cut with the small banner in the Bunch of Banners Framelits. Of course more copper with some Copper Thread loops under the banner. Lots of Copper on this card. To finish I added a Mint pearl from the Artisan Pearls.
Today for Wednesday’s WOW! #41 I have a super quick tip for you when you are using the Shimmer Paint. At this stage I am not showing you particular techniques necessarily. That will come at a later date. I just wanted to show you a quick easy way of using it. Maybe you know it already. 🙂
You will see. Here is the video below. It is only a very quick one I took as I was making the card so apologies for the quality.
Did you find that helpful??
I will show you the finished card tomorrow so be sure to stop by.
There are lots of things happening to share with you at the moment with specials and extra bits. You really want to see inspiration though don’t you?? 🙂 I have a quick card to share with you today. This card was one of the cards we made at last week’s Christmas Stamp A Stack. Everyone loved the richness of it. There was a lot of cutting and embossing to it but once that was done the card came together quickly. Especially when they had 3 of these to make!
The card base is Cherry Cobbler with the card mat embossed with the Swirls and Curls Embossing Folder. There was a bit of punching with the Sprig Punch in Old Olive and Shaded Spruce. The only stamping was the sentiment which is from the Wishing You Wellset. Of course, the beautiful leaping deer from the Detailed Deer Thinlits.
Until 31st December there is the option for the Ready, Set, Starter Kit. All ready to go with set products PLUS a $50 credit voucher to use in the first month, Plus a Stampin’ Up! apron and a collapsible bin. All this for $169.
Here is what you will receive.
NB:-There is still the customizable Starter Kit available to create your own choice but this doesn’t include the additional options.
– The Ready, Set, Starter Kit is only available in the South Pacific Market.
WHY WOULD YOU WANT THE STARTER KIT ANYWAY?
– You will get a minimum 20% off all your orders once you join. – See the products before anyone else sees them or has access to them. – Access to a quarterly Stampin’ Up! magazine full of inspiration. – Access to an exclusive Demonstrator Facebook group and website. – Opportunity to attend Demonstrator only events. – You will have me to support you whether you choose to build a business or enjoy your hobby and get the discount all the way.
—–
** I need to know more -> Email me at jghayward@yahoo.com
** I am ready to go NOW -> Head straightHERE to my Website.
I look forward to welcoming you to my JEN’s INK Team.
This is another card from our Shoebox Swap a few weeks ago. This is using the Feathers and Froststamp set from the 2018 Holiday Catalogue. I don’t have this set as yet so it was good to create with it. This was created by Roz in our Inky Fingers team.
The Real Red card is embossed with the Tufted Embossing Folder. The wreath was stamped in Shaded Spruce and then watercoloured with the Real Red and the Shaded Spruce inkpad and the Aquapainter. The Shaded Spruce square card was embossed with the Woodland Embossing Folder. On my card I stamped the bird separately on white card in Soft Suede and then coloured it with the Aquapainter. I cut that with scissors and raised it up. To finish I added some Real Red Solid RIbbon.
It’s a lovely Christmas-sy Card don’t you think? Thanks Roz. 🙂
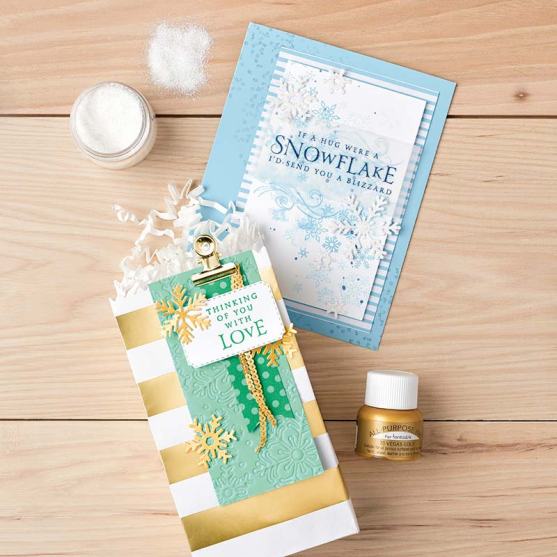
Christmas for us here is warm – well often hot, so we don’t think of snow let alone blizzards. So while the weather is a little cooler for us at the moment as Spring warms up I thought for Wednesday’s WOW! #41 we would look at the Beautiful Blizzard Bundle. I think it is a lovely one.
You can find this on page 39 of the Holiday Catalogue. It has some sweet images and I really love the Blizzard ThinlitsDie. This is a one piece die and is very versatile. With the Die you can create a background by cutting the die on a single piece of card, Or use it as a mask to sponge over. Why not use the individual snowflakes to add to a card? Here are some samples for you.
For these ones the snowflakes are diecut and adhered to the card. Check the gold ones out that have been daubered with Gold Shimmer.
Look closely at the Mint Macaron strip on the bag. The Blizzard Thinlitsdie were dry embossed on to the card using the Embossing Mat. This is a very cool effect.
Here are some more Beautiful Blizzardsamples from Stampin’ Up! artists. Very pretty ways of using the stamps and dies too.
This is the lovely Beautiful BlizzardsBundle.
If you want to see a video on working with this bundle check the Youtube video below. It shows some great ways to use it including how they have made the cards shown above.
You can order this in my store now ->HERE. Clear Mount is $80. Wood Mount is $92.50. Please use the Host Code: SGXSEFMS Thank You and be sure not to mark your online order anonymous or I can’t send you your Thank You Gift. 🙂 You can order directly from me too if you prefer by emailing me or dropping me a comment and I will contact you with the details.
I don’t want to wish you a Blizzard for Christmas. That would not be fun. I do hope it is filled with the Beautiful Blizzardthough. 🙂