cards, Catalogues, Classes, Stampin' Up!

A DIFFERENT WAY WITH FALLING PETALS!

Another project from my Catalogue Review last week.  I thought this needed it’s own post. 🙂

At my classes I show the cards and give everyone the same materials but I am happy for them to use their own creativity.  I always learn so much when they do too.  I thought I would share this idea with you.  It’s pretty clever – and a pretty card too.

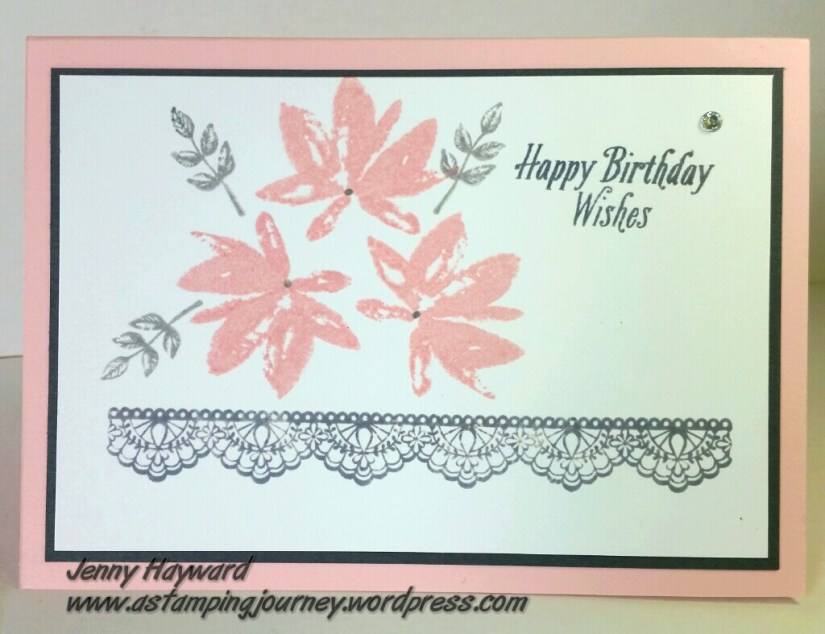
This was made by my lovely friend Harmony who is very creative.  I love watching her work.  This is what she created with some of the card she was given – and she used the Falling Petals Embossing in a totally different way.  Check it out.

2017-02-09-08-01-40_wm

Harmony embossed the white card with the Embossing Folder.  Then with the fine tip end of the Black Marker she drew lines down from some of the petals.  I think they look like hearts a lot of them.  This created little heart petals.  Then with the Aquapainter (I didn’t have the blender pen available at the time) she very lightly coloured some of the petals with the Blushing Bride ink.  It is regular Whisper White card so you don’t want to press too heavily with the colouring using the Aquapainter.  Then she sponged the edge of the card and distressed it slightly. The sentiment is from Dragonfly Dreams.

Isn’t this so pretty?  What a great idea!  I have to try this myself sometime.  I forgot to take a photo of the other card she made.  Completely different again!

Thanks for visiting.  If you want to give her some comment love I will be sure to pass it on. 🙂

Jenny

3D projects, cards, Catalogues, Classes, Stampin' Up!

OCCASIONS AND SALE-A-BRATION SAMPLER!

Last post I shared some of the creative fun from my Catalogue Reviews held last weekend. I forgot to share one more project.  So I guess this gets it’s own little post.

With all the busyness leading up to last weekend with creating I was starting to run out of time.  So I decided to use this frame I had sitting around for a while and make little samplers of some of the products.  It is only simple but was a good way of showing them. Here it is for you to see.

occasions-and-sab-2017-sampler

I included a sample of some of the papers and the dies and then embellished them. It worked well I think???  The pieces are adhered in each box with glue dots so I can easily remove them and use them on cards.  Then I can replace them with products from later catalogues.  It’s a simple way of showing off some of the products.

What do you think??

Thanks for visiting. I have lots of samples to share that I made for my launch so I will get to share those soon.

For those on the East Coast of Australia, keep cool.  The weather is heat wave conditions at the moment.  I have lost count of how many days in a row it has been now.  It’s a bit hard to be creative in this heat I will say.

Jenny


3D projects, cards, Catalogues, Classes, Sale-A-Bration, Stampin' Up!

CATALOGUE REVIEW UPDATE!

Finally I can share some of the fun from my Catalogue Review last weekend for the Occasions and Sale-A-Bration Catalogues. I had a session on Friday night and Saturday afternoon. Lots of laughs and creativity was involved I can assure you. 🙂

Firstly, I always like to make little gift bags up for my lovely guests and spoil them with some “bits” from the new catalogue.  (Also a chocolate treat is a must in the bags!). These are the little bags this time.

2017-02-04-11-07-58_wm

These are using the Kraft Tag A Bag Gift Bags in the Annual Catalogue. You know I did mean to emboss these bags BUT …. Well that slipped my mind until afterwards.  I used a strip of the gorgeous Falling In Love DSP and flagged the end of the piece. From a square of the Sweet Sugarplum cardstock I cut the larger flower from the Stylish Stems Framelits and then layered it on some Whisper White cardstock.  I thought the centre was a bit plain so I coloured it with the Early Espresso Watercolor Pencil and lightly brushed it over with the Aquapainter. This lightened the colour a little so it matched with the Kraft bags. I went over it with the Clear Wink of Stella pen for sparkle, although you can’t see that in the photo sadly.

The sentiment is from the Dragonfly Dreams set which I had coloured the “thanks” with the black marker before stamping it. Then punched it out with the Duo Banner Punch.

These are the cards we made.  The first one using Dragonfly Dreams Bundle and the Falling Petals Embossing Folder.  I had Cased this off Pinterest changing the Embossing Folder and adding the touch of the Paper Doily behind it.

img_20170204_190537

The second card was Cased off Pinterest too using the Sale-A-Bration sets Avant Garden and Delicate Details.  I LOVE both these sets!  Sadly I lost my little stamens from the Avant Garden set so we had to add a little dot in the centre of the flowers.  Some were very clever and drew stamens in with the Smoky Slate marker.

2017-02-09-08-02-38

I always forget to take a photo of the groups as it gets pretty busy. I snapped one just as we were finishing up at the Saturday session. Some people had already started to leave. (sorry!) 🙂 There was lots of creative mess happening.

20170204_161636

You might have seen the card tin in the Sale-A-Bration catalogue? I have dressed this one up. Everyone who has a party in the next month or 2 with me goes in the draw to win one.

Maybe I could just give some extras away too. Mmm? If you want a party or your own private stamping event, let me know.  I only have a few dates available so you better be quick.

2017-02-09-08-04-05_wm

There you have it. We had a product playground too for everyone to test out the pencils and a few other new products. That’s always good to test those things out.

Thanks for visiting me.  Visit again soon,

Jenny

cards, Catalogues, Stampin' Up!

COLOUR INKSPIRATIONS CHALLENGE #2 – HOW TO TAKE ON A CHALLENGE!!

I had a play this past week with the Colour challenge at Colour INKspirations.  I have been enjoying taking some time out to take part in these challenges.  This was a hard one though.  I wouldn’t normally use these colours and certainly not that many together.  Here are the colours.

colour-inkspiration-_2

So what do you make of these colours??? All colours must be used!

Well this is the card I ended up with.

mint-carousel

Just a close-up of the horse because all horses are sparkly right?? 😉

mint-carousel-_-glittery-horse

HOW THE CARD CAME TOGETHER.

I thought I would tell you about the process in making this card as it might help you when you approach a Challenge – or just in making a card. You have 3 main parts when putting a card together: The stamp set, the colours and the layout.

Stamps: I just received the Carousel Birthday set so was keen to give it a try. That was the easy part!

Layout: I don’t know about you but I find it hard to just sit there and put together a card. I need some direction.  Often when I make a card from scratch I turn to a Sketch layout.  I have a number of them saved on a Pinterest board.  I went through these and found one that I thought would work well with the stamps. 

This was the sketch I used from ilovecardsketches.com (which I couldn’t seem to find the blog now).

ilcs04

So the stamps are sorted and the sketch is chosen.  Now the colours are already chosen so just put it together. Right! Still not such an easy feat!

Colours: I usually only work with 2 colours plus a neutral for most of my cards so to HAVE to use all these was hard. That’s what a challenge is for though.  To extend your creativity.  Now how to use them.

When there are a number of colours to use I find it helps to first pick a main colour.  One that will be predominant.  So in this case the Mint Macaron. I have used that in the card base, the Carried Away DSP, and touches on the horse. Then you use the other colours in smaller quantities.  Choose one colour that will be the next main colour in smaller amounts, which would be the Soft Sky.  Then I have added some touches of the Garden Green and Wisteria Wonder in very small quantities.  This will give you balance.

Finish the card: Then with all those sorted you can finish the card with the sentiment. Which I cut with the Project Life Framelits. Then add touches of embellishments.  I used a little Paper Doily for softness and then added some bling with the Rhinestones. I went over the horse with the Clear Wink of Stella.

Card done and entered just in time. 🙂  If you want to join in on these challenges or even just to look and see the cards then you can request to join the Facebook group HERE.

Hope you found this helpful when you go to make your next card.

Jenny


cards, Catalogues, Sale-A-Bration, Stampin' Up!

DELICATE DETAILS AND A DRAGONFLY!

The last few days I have been busy getting ready for my Occasions and Sale-A-Bration Review this weekend.  Lots of creating happening – even in the heat! I will get to share some of them shortly but I really wanted to share this one first.  I was happy with the result.

I have used the Delicate Details stamp set.  A free choice for Sale-A-Bration this year when you order over $90! This was my first pick for Sale-A-Bration but I have only just managed to ink it up.

Mint Macaron_dragonfly

I used one of the stamps to create a lacy effect by stamping in Memento ink onto Whisper White card. I lined each one up by eye.  I have to say that was a little nerve racking!  You could use a Stamp-A-Ma-Jig (SAMJ) or similar tool.  I always forget to pull my Stamp-A-Ma-Jig out. (or lazy!).

Once I stamped them –  and breathed a sigh of relief – I then inked up the card.  I haven’t got the sponge rollers yet so I used the brayer which is now retired. Funny that, my brayer is in the same box as my SAMJ. 🙂  I used Mint Macaron ink to add the colour gradually going from dark to light.

TO ASSEMBLE THE CARD:

A dragonfly was cut from the Copper Foil Sheet. It looks a bit more gold in the photo. The sentiment was stamped and heat embossed with Copper Embossing Powder on to a strip of Whisper White.  I cut a banner end with scissors.  It needed a little something underneath so I cut a thinner strip from the Copper Foil and cut the end of that too.

The inked piece was added to a Mint Macaron card base.  Before I added the Dragonfly I twirled around some Copper Thread and added some Pearls to finish.  The sentiment was raised up with Dimensionals.

You can check out the Dragonfly Dreams Bundle HERE at my store.  It is $81.25 AUS. Maybe grab an inkpad or some cardstock to take you over $90 and you can grab the gorgeous Delicate Details set from Sale-A-Bration FREE (or grab one of the other great Free products).  Check out the Sale-A-Bration catalogue by clicking on the link in the right hand side bar.

Have a lovely day/night.  It is a little cooler here today and rainy which is nice so I am off to my stamp room again. 🙂

Jenny

cards, Stampin' Up!

SO DETAILED WITH FALLING IN LOVE!

Here is another card for you that we made at Onstage last year.  This one uses the very delicate ‘So Detailed’ Thinlits.  Quite pretty and very elegant to add to your cards.

so-detailed-thinlits-strip-on-falling-in-love

A few card details:

Card base is Soft Sky and the very gorgeous Designer Series Paper is the ‘Falling in Love’ DSP.  All the papers in this pack are so lovely.  This one gives a Bokeh effect without all the sponging to create your own!

When we made this card the strip created with the So Detailed Thinlits was a Belly Band around the card.  I felt that the card was a bit bare when you take it off, so I just cut it to the width of the card and made it in to a strip so the card opens as normal.

The sentiment is from ‘So In Love’ set stamped in Sahara Sand I think.  It is finished off with the gorgeous, soft Very Vanilla Satin Ribbon and the ‘Falling In Love’ Embellishments with some Copper Thread.

This would make a very elegant Wedding card.  What do you think?

Check out the Thinlits and the stamp set.

so-detailed-thinlits           so-in-love

Grab the bundle for these and save 10%.  Available for $94.50 Wood or $81.75 Clear.  See them HERE in my store. 

I hope the weather is good for you where you are? It is sweltering hot here.  Well really melting hot.  (I can say that).  It was a bit hard in my craft room today but I managed to get a few projects done to prepare for my Catalogue Review this weekend.  I can share these with you soon. 🙂

Jenny

cards, Catalogues, Onstage, Stampin' Up!

COLOURING WITH INSIDE THE LINES DSP!

Just a quick post for you today.  I have only just got back from holidays today.  I might share some of my crazy adventures with you here sometime but for now a quick card.

I realised I hadn’t shared some projects from Onstage from November.  You might have seen a few ideas around different blogs.  Today is a quick card using the ‘Inside the Lines’ DSP.  Colouring for Adults has taken the world by storm I think.  While I love a little colouring I haven’t really caught on with this phase (perhaps I would rather stamp!). Stampin’ Up! have now some Designer Series Paper to colour.  I have seen some great ideas recently where you don’t need to colour too much so I might have to try some of these ideas out sometime.

Here is a card you can make in no time and it only requires just a little colouring.  Of course with the gorgeous new Watercolor Pencils.

inside-the-lines-dsp

Using a section of the paper you can cut the piece into sections. Here I have cut it in 3 sections. Colour one piece with the pencils and assemble them together on your card front. The sentiments are from Dragonfly Dreams.  On the “Thanks” just that word is coloured with black marker and stamped on a strip of white card.  The background stamping using another sentiment is inked in the Tangerine Tango and stamped over the card.  Ink once and stamp it on the card then stamp again elsewhere to get a lighter stamping. You can stamp a third time too before inking.  Repeat this several times over the card.

Finish the card with some Black Twine and some Burlap Ribbon. 🙂 You can receive this paper as one of your Free choices for Sale-A-Bration.  There are some other wonderful choices too.  Have you checked the catalogue out yet?  You can click on the link in the right hand column.

For every $90 you can grab your Free choice. Have you made your shopping list yet?  You can then stop by my store (link in the side column) and shop up big.  Don’t forget to grab your Free Sale-A-Bration set too.

Jenny

Catalogues, Classes

OCCASIONS AND SALE-A-BRATION REVIEW!

I am sure you have seen the new catalogues by now?? Well if you are a Wollongong local why not come and play?

YOU’RE INVITED TO MY

OCCASIONS AND SALE-A-BRATION

CATALOGUE REVIEW!

2017-occasions-and-sale-a-bration-catalogue

When: Friday  3rd 7pm and Saturday 4th February, 2pm

Where:  My studio, East Corrimal

Cost: $10

includes a card to make, play with new products, giveaways and afternoon tea.

Please RSVP by Wednesday 1st.

cards, Stampin' Up!

A SPECIAL BELLA CARD!

I think it is safe to share this card with you now.  I made this card for a lovely friend who is not well.  I am not sure if she has received it yet.  It had to head across to the other side of the world.  I don’t think she stalks here though so that is all good. 🙂

I wanted a special card and I had just received Bella and Friends – and my new Watercolor Pencils.  So gave these all a whirl.

bellas-balloon

Bella was stamped on Shimmery White Paper and then cut out with the Project Life Framelits.  The image was coloured with the Watercolor Pencils and then I used the Aquapainter to blend the colours.  I tell you these colours blend so smoothly. When it dried I lightly went over the image with the pencils to add highlights.  I also went around the image with the Basic Gray pencil very lightly and blended that. This adds some depth to your image.

To Assemble the Card:

A piece of the Sale-A-Bration Designer Series Paper ‘Carried Away’ was adhered to a Mint Macaron card base.  Then the image was raised up with Dimensionals.  The clouds were punched out from the Tree Builder Punch and sponged around the edges with Mint Macaron ink.  The sentiment was then stamped on to Crumb Cake card and punched out with the Duet Banner Punch.  Then sponged around the edge with Crumb Cake ink.

Did you see the sparkly balloon?  I went over that with the Wink of Stella.

Thanks for visiting me today and seeing my special Bella card.

Jenny

cards, Sale-A-Bration, Stampin' Up!

DAPPER AVANT GARDEN!

This card is one I created for a Private Card class last week using the Sale-A-Bration set Avant Garden. This card was adapted from a couple of cards I have seen around.  You might have noticed a similar design on page 4 of the Sale-A-Bration catalogue??

dapper-denim-avante-garden

Colours used are Dapper Denim, Marina Mist and Mint Macaron.  The Smoky Slate base is at a bit more of an angle than it appears in the photo.  I added some Silver Ribbon to the card.

I have to tell you a funny story.  When I went to the class I forgot to take the Marina Mist inkpad. Minor panic! Never mind I got them stamping off the Dapper Denim to create a lighter effect.  It turned out OK. 🙂

avant-garden

The Avant Garden is such a versatile stamp set – and it is Free! Even better!  With your $90 order you can choose this set or any of the other choices for Sale-A-Bration.

You can head to my store HERE to order. Please use the Host Code for this week. SS7JW4QQ  You can then pick up your Free set of Avant Garden or choose one of the other great choices.  Check the items in store under Sale-A-Bration or look at the catalogue in the right side bar here. 

If you would like to book your own Private Card Class with me to make beautiful cards like this and you are a Wollongong local then drop me a message and we can work out a date.

Jenny