cards, Catalogues, Classes, Stampin' Up!, Techniques, Tutorials, Videos

AROUND THE BEND FOR THE 2023 MINI CATALOGUE GLOBAL LAUNCH PARTY!

It’s all happening now with the 2023 Mini Catalogue going Live. Have you checked it out yet??

I mentioned I was involved with the Global Catalogue Launch Party with Demonstrators from around the world. It’s such an exciting time to share with you.

Let me show you the the card I made.

For my project I shared a card with the Around the Bend Bundle and the gorgeous Fancy Flora Designer Series Paper.

I love the detail in these curvy dies. It creates such a cool edge. And there are some other great curvy dies as well.

Here is the inside of the card. Don’t forget that.

Want to catch the YouTube video to follow along? Check it out below.

If you haven’t joined in with the Global Launch Party you can still catch the replays.

Head to the Facebook group -> HERE.

There are lots of presentations. So many to inspire you so I hope you follow along.

Happy Crafting,

Jenny

In Australia? I would love to serve you with your crafting supplies.

Head to my store -> HERE. Please use the Host Code: RCWF4TJP

OR contact me directly by email or phone and I can help you with ordering.

cards, Catalogues, Stampin' Up!

2023 MINI CATALOGUE LAUNCH PARTY

The 2023 Stampin’ Up! Mini Catalogue is coming! All starting on January 5th.

What better way to see it than in our Global Catalogue Launch Party.  Lots of project videos to inspire you.  See how you can join in below (and maybe you can grab one of the giveaways).

Join us for a full schedule of presentations from Stampin’ Up! demonstrators around the world featuring fun ideas, great new products, and of course prizes!

There are over 60 presentations. How exciting!

You can join from the comfort of your own home and be inspired with so many projects.

HOW TO JOIN IN?

Head to the Facebook group now HERE

Be sure to click GOING and hit the ‘notifications’ so you can be updated with what’s happening and join in the games.

It’s happening January 5th 6pm – January 8th 1pm AEDT

Follow along in your own time and you can go back later and catch up too.

Catch my presentation January 7th approximately 8am Sydney Time. (January 6th at 1pm Pacific Time). Or watch the replay after.

Watch out for my Giveaway with your orders.

My presentation will be screened via the Facebook group above. (It will be listed on my Youtube channel and Facebook page later).

I hope you can join in the fun.

Jenny

In Australia? I would love to serve you with your crafting supplies.

Head to my store -> HERE. Please use the Host Code: RCWF4TJP

OR contact me directly by email or phone and I can help you with ordering.

cards, Catalogues, Stampin' Up!

2019 STAMPIN’ UP! CATALOGUE KICK-OFF!

It’s Time for the 2019 Annual Catalogue Kick-Off and you’re invited to join me if you are a Wollongong local.

Time for you to see – and play with lots of great new products in the 2019 Stampin’ Up! Catalogue. It’s always an exciting time that you won’t want to miss.

Be sure to be an early bird and book in early.

The Catalogue Kick-off is on 3 different time slots so I hope one time suits you. If not let’s make a different time.  You can get one or 2 – or more friends together and we can do it again so you don’t miss out.

WHEN: Friday 31st May 10am and 7pm
             Saturday 1st June 2pm

WHERE: My studio In East Corrimal.

COST: $10 – for early birds that book by Monday 27th May.
$15 after the 27th.

You will get to play with lots of products, see some projects, check out the new Incolors, Gifts and giveaways are included. You might even be the Mystery Host and receive the Host rewards. Imagine that getting some products for free!

RSVP: To be an early bird and save $5 book by Monday 27th. Last replies by Thursday 30th to be sure to get a seat. Replies after this there may not be room.

Comment for more information or email me at jghayward@yahoo.com

I look forward to seeing you there. I can’t wait to show you everything.

cards, Catalogues, Classes, Stampin' Up!

A DIFFERENT WAY WITH FALLING PETALS!

Another project from my Catalogue Review last week.  I thought this needed it’s own post. 🙂

At my classes I show the cards and give everyone the same materials but I am happy for them to use their own creativity.  I always learn so much when they do too.  I thought I would share this idea with you.  It’s pretty clever – and a pretty card too.

This was made by my lovely friend Harmony who is very creative.  I love watching her work.  This is what she created with some of the card she was given – and she used the Falling Petals Embossing in a totally different way.  Check it out.

2017-02-09-08-01-40_wm

Harmony embossed the white card with the Embossing Folder.  Then with the fine tip end of the Black Marker she drew lines down from some of the petals.  I think they look like hearts a lot of them.  This created little heart petals.  Then with the Aquapainter (I didn’t have the blender pen available at the time) she very lightly coloured some of the petals with the Blushing Bride ink.  It is regular Whisper White card so you don’t want to press too heavily with the colouring using the Aquapainter.  Then she sponged the edge of the card and distressed it slightly. The sentiment is from Dragonfly Dreams.

Isn’t this so pretty?  What a great idea!  I have to try this myself sometime.  I forgot to take a photo of the other card she made.  Completely different again!

Thanks for visiting.  If you want to give her some comment love I will be sure to pass it on. 🙂

Jenny

3D projects, cards, Catalogues, Classes, Stampin' Up!

OCCASIONS AND SALE-A-BRATION SAMPLER!

Last post I shared some of the creative fun from my Catalogue Reviews held last weekend. I forgot to share one more project.  So I guess this gets it’s own little post.

With all the busyness leading up to last weekend with creating I was starting to run out of time.  So I decided to use this frame I had sitting around for a while and make little samplers of some of the products.  It is only simple but was a good way of showing them. Here it is for you to see.

occasions-and-sab-2017-sampler

I included a sample of some of the papers and the dies and then embellished them. It worked well I think???  The pieces are adhered in each box with glue dots so I can easily remove them and use them on cards.  Then I can replace them with products from later catalogues.  It’s a simple way of showing off some of the products.

What do you think??

Thanks for visiting. I have lots of samples to share that I made for my launch so I will get to share those soon.

For those on the East Coast of Australia, keep cool.  The weather is heat wave conditions at the moment.  I have lost count of how many days in a row it has been now.  It’s a bit hard to be creative in this heat I will say.

Jenny


3D projects, cards, Catalogues, Classes, Sale-A-Bration, Stampin' Up!

CATALOGUE REVIEW UPDATE!

Finally I can share some of the fun from my Catalogue Review last weekend for the Occasions and Sale-A-Bration Catalogues. I had a session on Friday night and Saturday afternoon. Lots of laughs and creativity was involved I can assure you. 🙂

Firstly, I always like to make little gift bags up for my lovely guests and spoil them with some “bits” from the new catalogue.  (Also a chocolate treat is a must in the bags!). These are the little bags this time.

2017-02-04-11-07-58_wm

These are using the Kraft Tag A Bag Gift Bags in the Annual Catalogue. You know I did mean to emboss these bags BUT …. Well that slipped my mind until afterwards.  I used a strip of the gorgeous Falling In Love DSP and flagged the end of the piece. From a square of the Sweet Sugarplum cardstock I cut the larger flower from the Stylish Stems Framelits and then layered it on some Whisper White cardstock.  I thought the centre was a bit plain so I coloured it with the Early Espresso Watercolor Pencil and lightly brushed it over with the Aquapainter. This lightened the colour a little so it matched with the Kraft bags. I went over it with the Clear Wink of Stella pen for sparkle, although you can’t see that in the photo sadly.

The sentiment is from the Dragonfly Dreams set which I had coloured the “thanks” with the black marker before stamping it. Then punched it out with the Duo Banner Punch.

These are the cards we made.  The first one using Dragonfly Dreams Bundle and the Falling Petals Embossing Folder.  I had Cased this off Pinterest changing the Embossing Folder and adding the touch of the Paper Doily behind it.

img_20170204_190537

The second card was Cased off Pinterest too using the Sale-A-Bration sets Avant Garden and Delicate Details.  I LOVE both these sets!  Sadly I lost my little stamens from the Avant Garden set so we had to add a little dot in the centre of the flowers.  Some were very clever and drew stamens in with the Smoky Slate marker.

2017-02-09-08-02-38

I always forget to take a photo of the groups as it gets pretty busy. I snapped one just as we were finishing up at the Saturday session. Some people had already started to leave. (sorry!) 🙂 There was lots of creative mess happening.

20170204_161636

You might have seen the card tin in the Sale-A-Bration catalogue? I have dressed this one up. Everyone who has a party in the next month or 2 with me goes in the draw to win one.

Maybe I could just give some extras away too. Mmm? If you want a party or your own private stamping event, let me know.  I only have a few dates available so you better be quick.

2017-02-09-08-04-05_wm

There you have it. We had a product playground too for everyone to test out the pencils and a few other new products. That’s always good to test those things out.

Thanks for visiting me.  Visit again soon,

Jenny

3D projects, cards, Catalogues, Classes

HOLIDAY CATALOGUE REVIEW!

Last Saturday I had my Holiday Catalogue Review where everyone could come together and have some fun trying out these wonderful products from the new Holiday Catalogue. It was such fun and craziness.  I wanted to share some of the happenings with you.

Sorry it has taken so long to get this together.  I have had a really stressful week with our dog.  Last Sunday we woke to find he couldn’t walk and he was vomiting foamy stuff.  It was really bad.  We took him straight to the vet and I am sure he was nearly gone. We thought Monday we may have to make a tough decision for him.  It was a scary time. He had a little stay at the hospital and he was treated so well that incredibly he has made a full recovery.  We still don’t know what caused it but he has enjoyed some extra attention!!

So now as things have settled a little I can get back to creating and sharing with you.

Firstly, I will share a couple of photos beforehand.  I missed taking some photos with all the busyness but you can get a bit of an idea.

(NB: I do apologise for the  photos with different size watermarks. Funny things were happening with my editing program!)

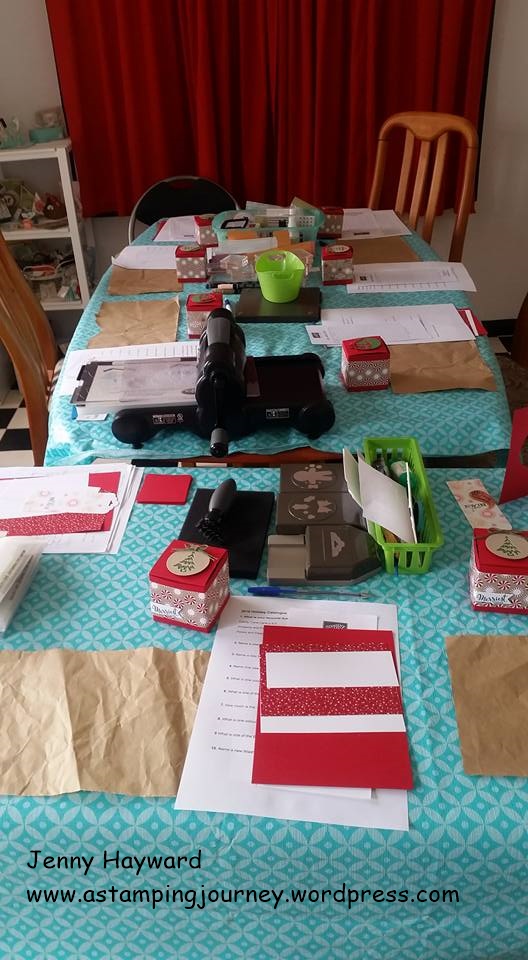
The room was set up ready for guests to arrive.

holiday-launch-ready-to-go

Apart from the usual tea/coffee and snacks I made these special treats.  I got the idea from a fellow Demonstrator on a Facebook group I am on.

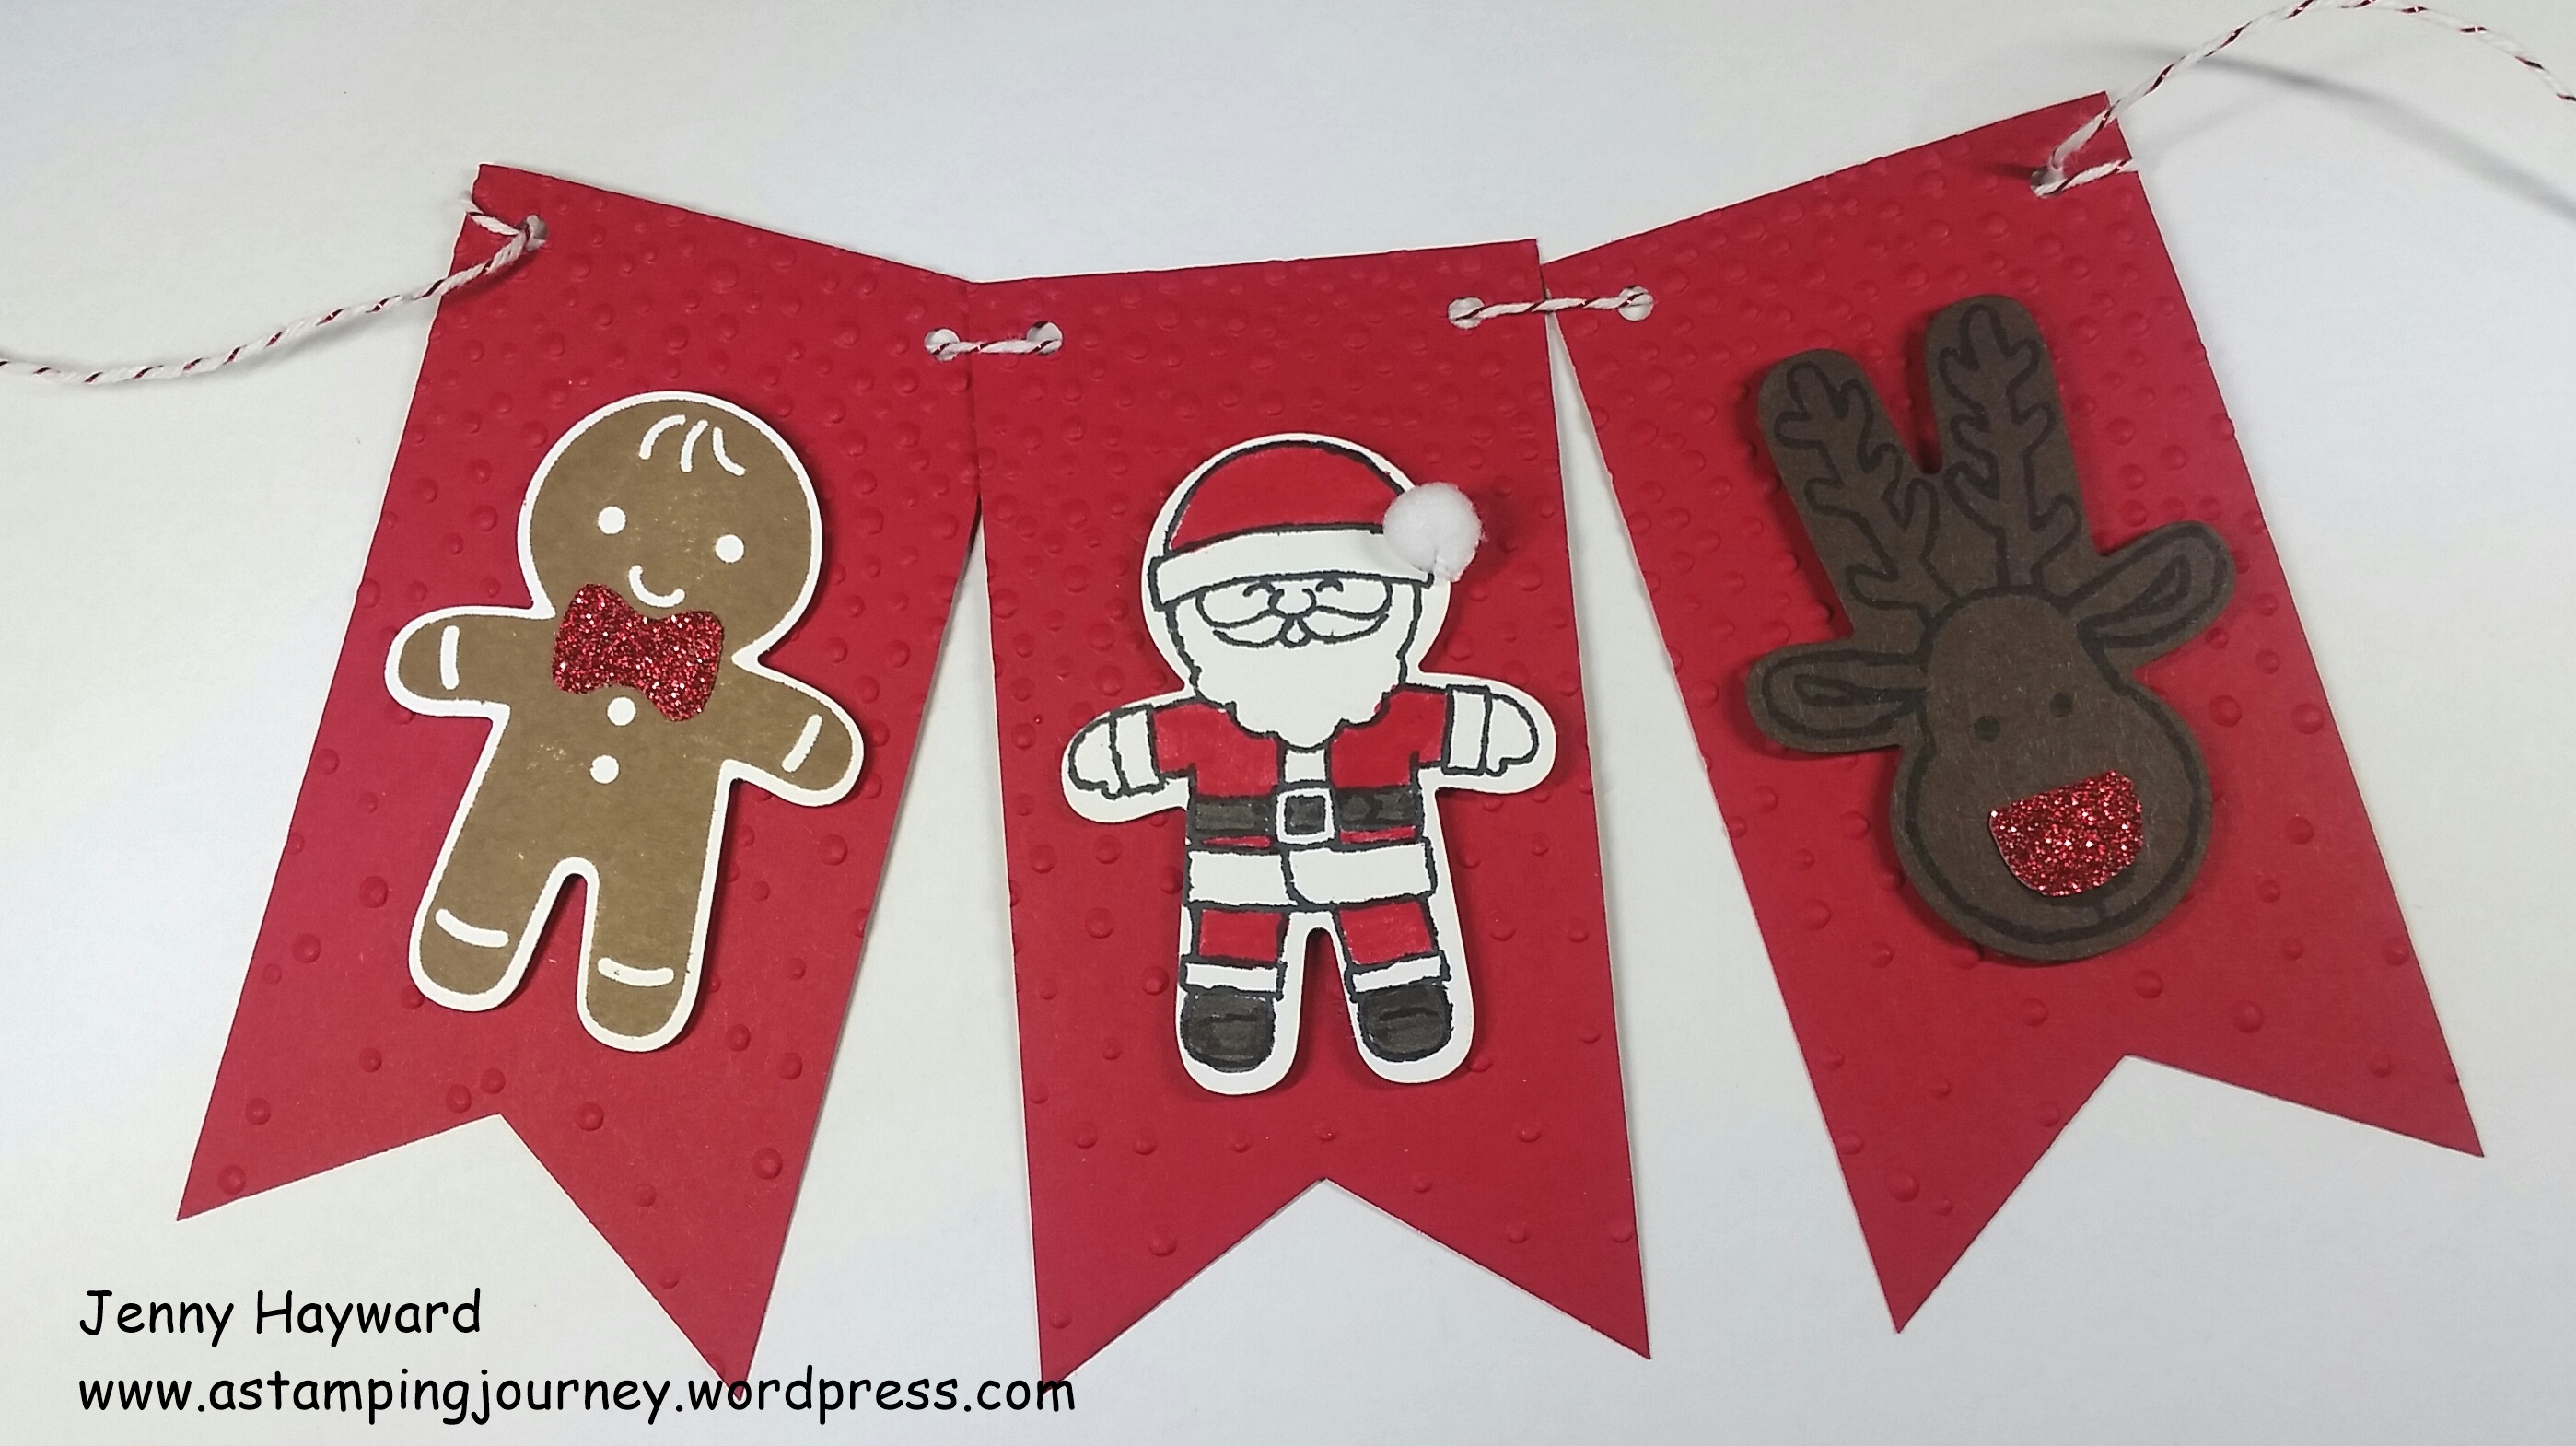
Some little Santa hats (marshmallows and strawberries on Toothpicks), Some Gingerbread men (we only had Tiny Teddies at the time), and some reindeer noses.   I punched out some Cookie Cutter characters to go with them.

holiday-nibblies

I made a little banner with the Cookie Cutter stamps and punches too. It was only small to fit where I was hanging it but silly me forgot to take a photo of that before I packed everything up.  Here is the Banner though.

I cut some strips of Real Red card.  I think they measured 5cm x 10cm (2″ x 4″)?? and cut the end with the Banner Punch.  I ran the card through the Big Shot with the Softly Falling Embossing Folder.  I punched holes in the top to thread through some Real Red/White Baker’s Twine.  Then added the characters.

cookie-cutter-banner

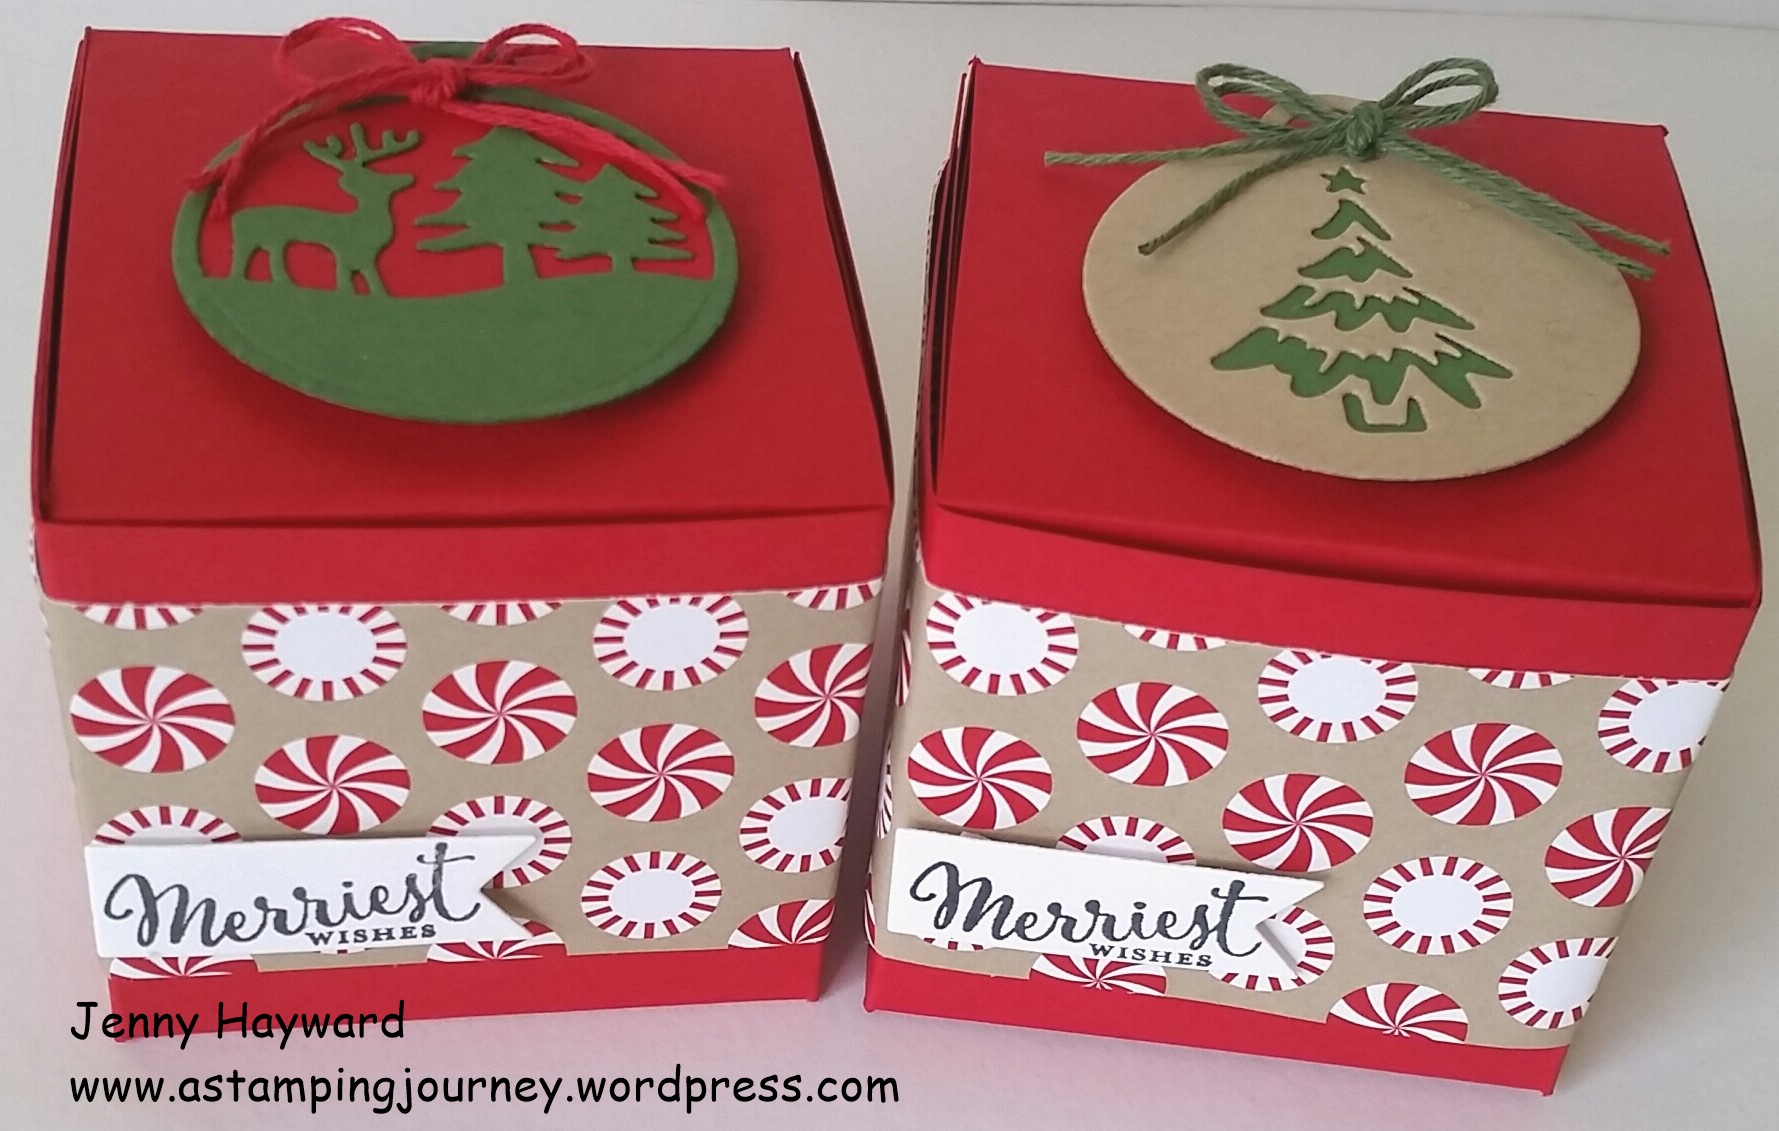
These were little treat boxes I made for everyone.  They were very simple boxes.  I will tell you how I made them in another  post.  They are decorated with some Candy Cane Lane DSP and a tag made from the ‘Merry Tags’ Framelits. The sentiment is from the ‘Merriest Wishes’ set. I filled the boxes with a little cello bag with lengths of different twine and a small pack of M&M’s.

christmas-box

Now for the projects everyone made.

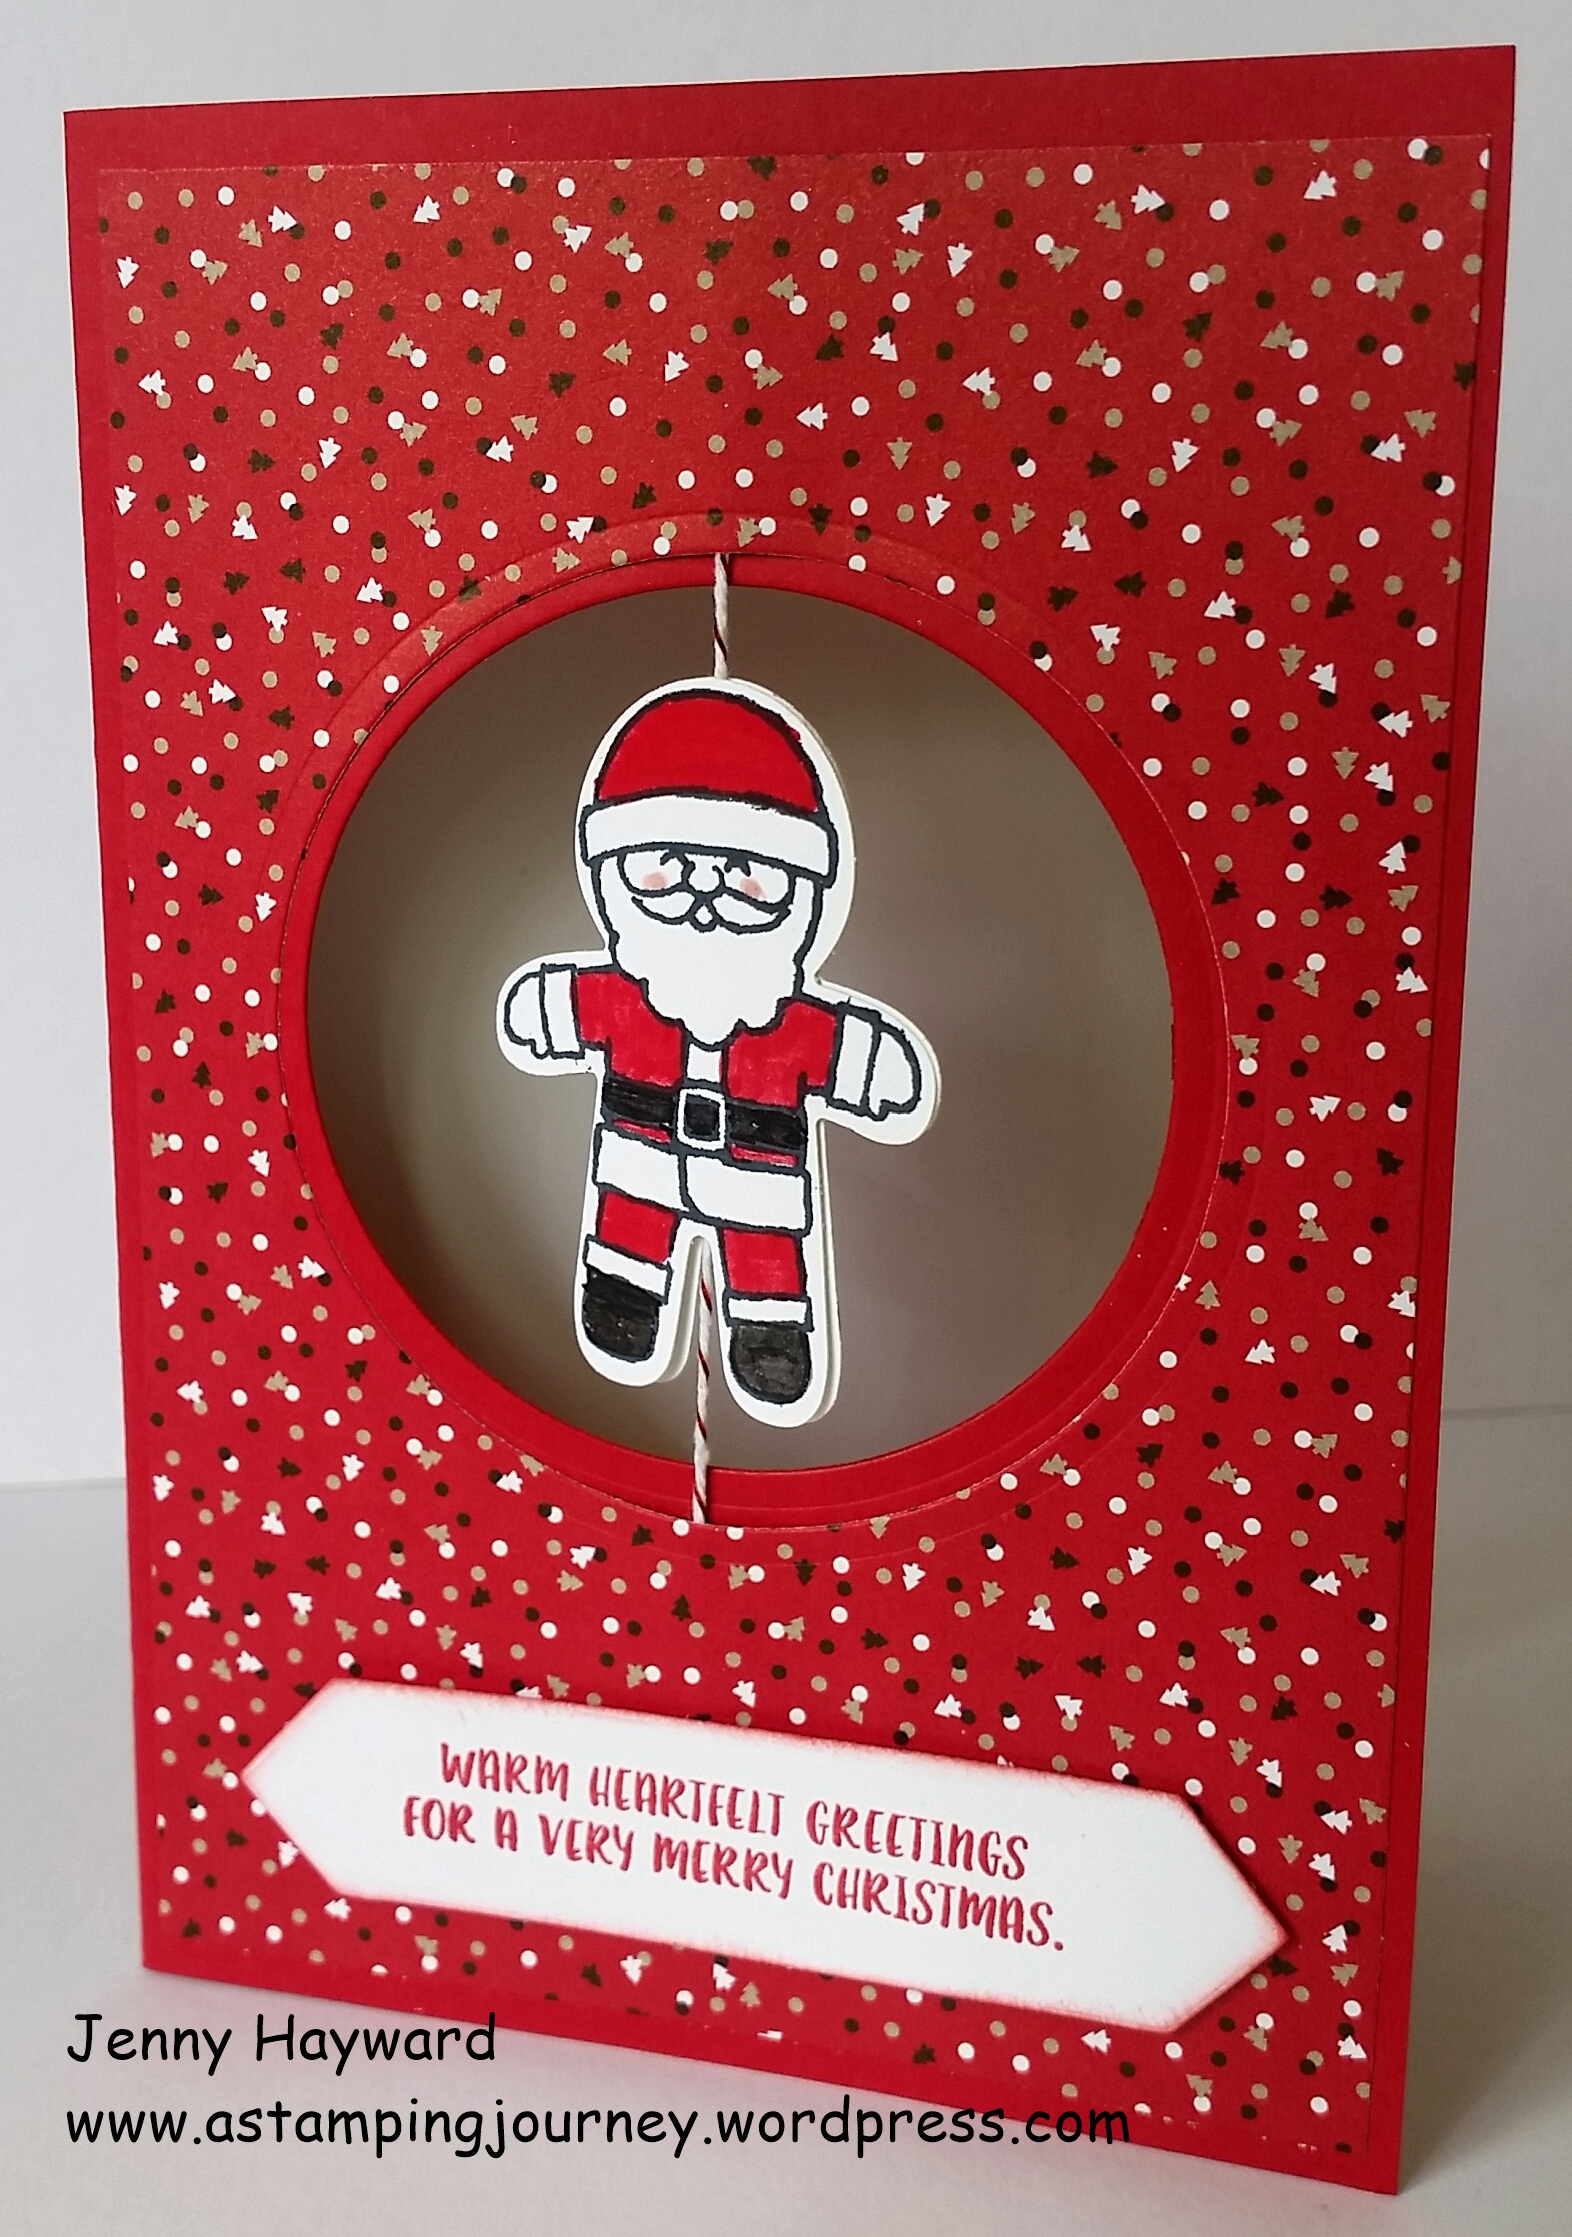
This is the first card we made.  It’s a cute Spinner card.  I didn’t show the other side but the front character is the Santa and then the other side was the Eskimo.  They could make them whatever they like.  We had Santas and Gingerbread men and Eskimos all happening.  They loved this card.  I did CASE this off a Demonstrator friend on a group.  (yes it was the same person who did the Character treats above).

window-spinner-card-with-cookie-cutter

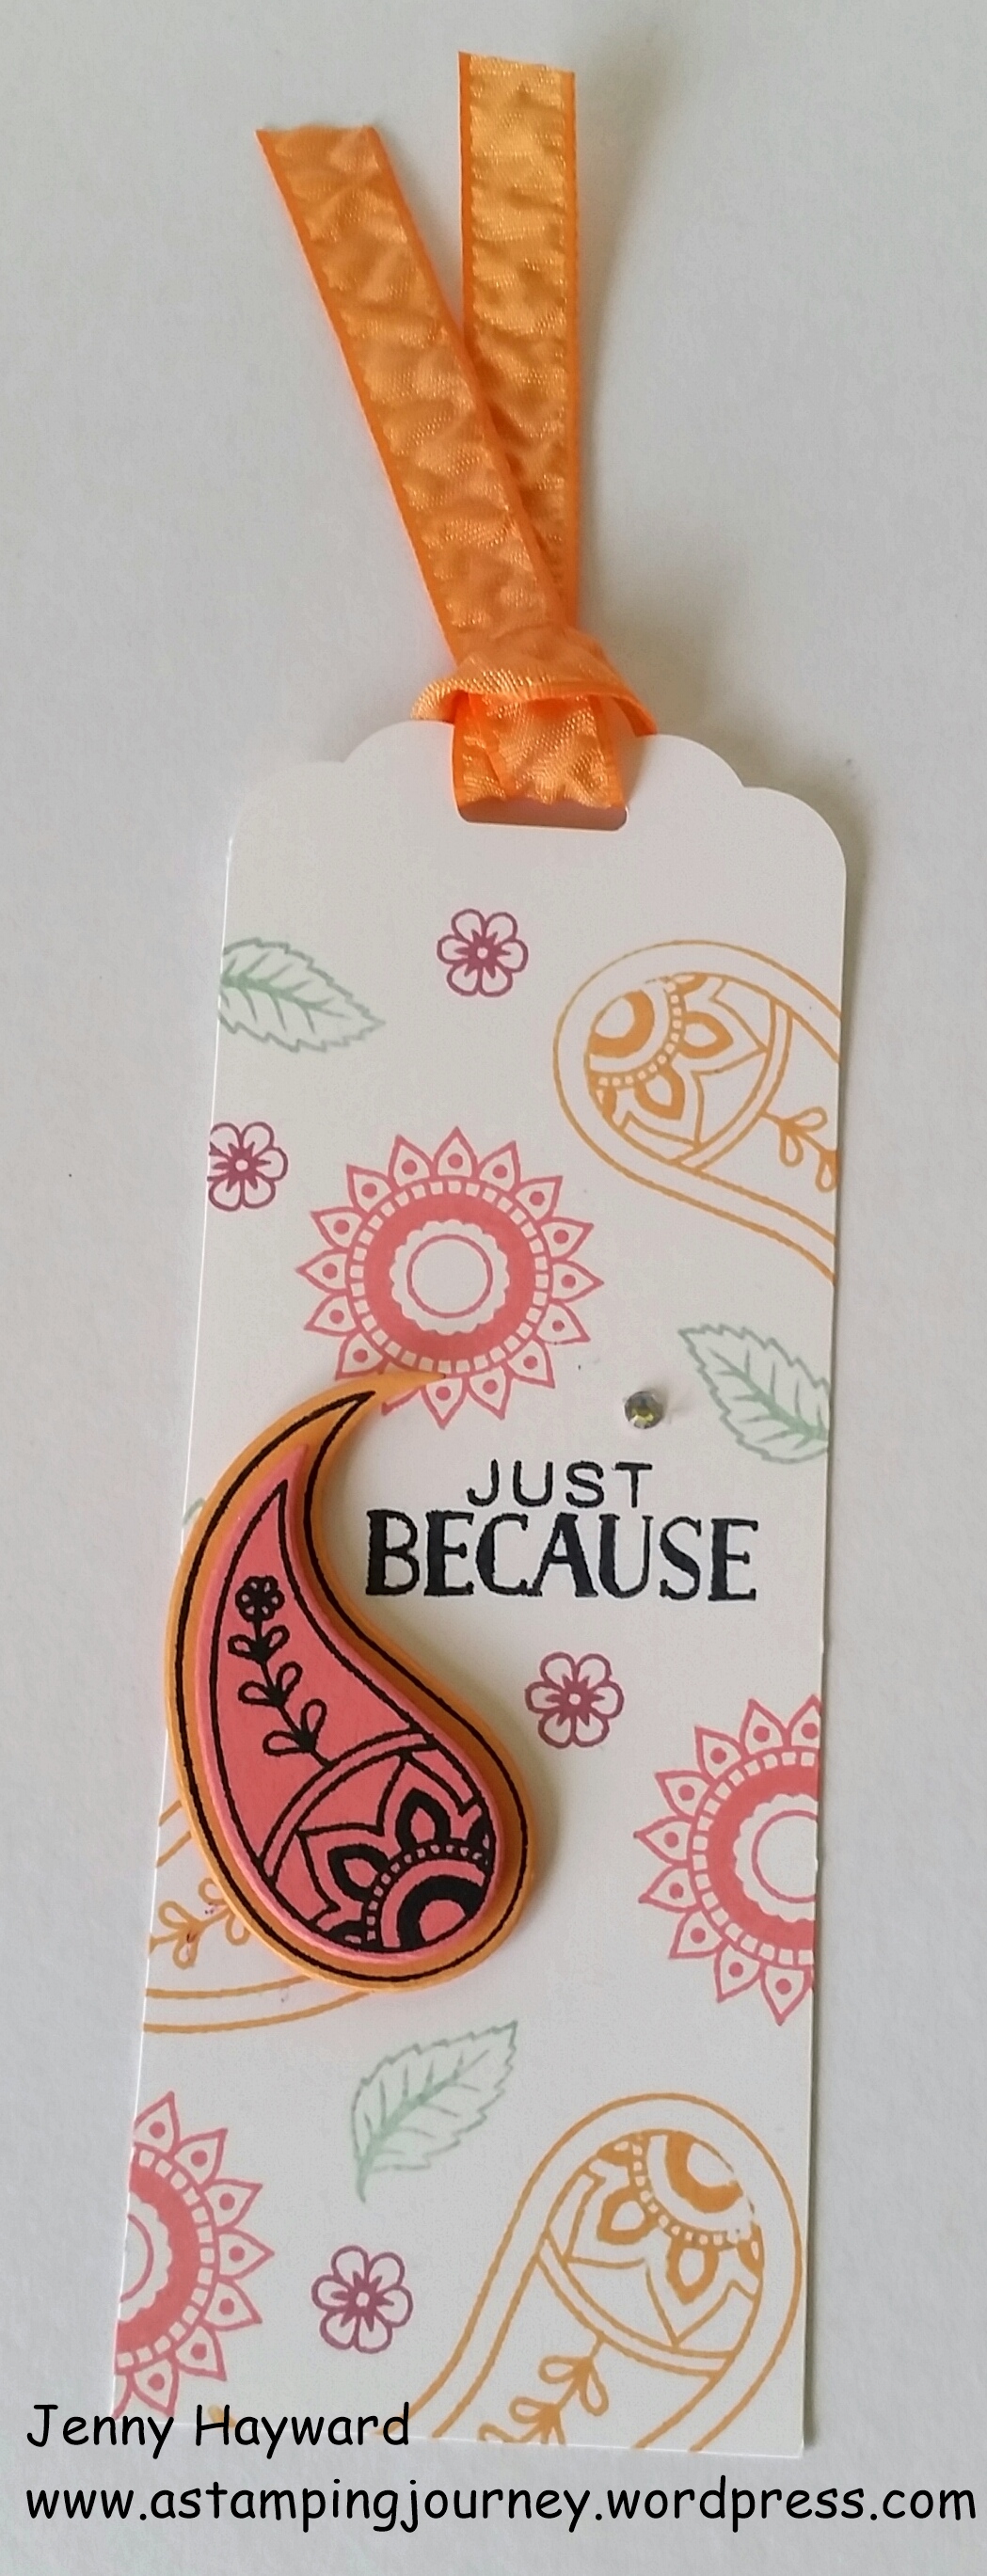
This was another of the Make and Takes.  We created a little tag using the Paisley Framelits.  The sentiment is from ‘Tin of Cards’ stamp set. The tag was finished off with some of the Ruched ribbon.

2016-09-04-16-26-16

Thanks for letting me share these pics.  Hope you have a great day,

Jenny